We have had a desire to build extensions for a long time. Each hut must have a canopy. Another option is Pomeranian or Vologda houses in which the entire residential complex is hidden under one roof. Builders have developed and are using a huge number of options for creating extensions to country houses and more. The most economical and simple option is a frame veranda for the house.
Advantages of a frame veranda
A frame veranda can be erected in the shortest possible time and has the following advantages:
- creation of additional multifunctional space;
- strengthening the walls of a frame or timber house;
- improving sound insulation of main rooms;
- maintaining heat in the house;
- ergonomic appearance.
The veranda can be used as an entrance hall, living room, summer kitchen, or greenhouse. It can be divided into several zones, for example, for relaxation and storage of garden tools, etc.
What needs to be decided before construction begins
The veranda is a simple structure, but its construction should be treated with utmost care. Firstly, you need to obtain permission for its construction, and when construction is completed, you will need to re-register the house (the rule is due to the fact that the area of the house increases). Secondly, no matter what kind of veranda you have in mind, its construction should be based on the following recommendations:
- For construction, choose the facade where the entrance door to the house is located. This is practical and convenient, especially if you plan to glaze and insulate the structure; the extension also becomes a vestibule, preserving the microclimate of the living space.
- Regardless of what material is chosen for construction, the design must match the architecture of the house and fit into the surrounding space.
- It is necessary to set the size of the veranda at the dacha in order to understand how much material will be required for construction. Structures with a length equal to the length of the facade to which it is planned to be attached look proportional. Comfortable width starts from 2.5 m. The summer veranda can be made smaller.
Corner wooden structure with two entrances Source we build with our own hands.rf
- The format of the building is immediately determined: will it be open (summer) or closed. In the latter case - will it be heated, what kind of glazing will it be (except for the standard one, possibly continuous, “French” glazing).
- Depending on the location relative to the walls of the home, the structure can be front, end, or corner. The veranda built around the perimeter of the house has an original appearance. It can be divided into open and closed areas, and there is enough space in it for a hallway, a pantry, and a summer kitchen, not to mention a spacious recreation area.
What types of frame verandas are there?
The appearance and purpose of a frame veranda make it possible to implement the most innovative design solutions. In shape they can be either classic rectangular, square, or radial, L- and U-shaped, polygonal, etc. Like verandas made of other materials, frame structures can be:
- open, in which the roof is supported by support beams, and one or more walls are missing;
- closed, which is a space completely enclosed by walls or glazing.
Sergey Yurievich
Construction of houses, extensions, terraces and verandas.
Ask a Question
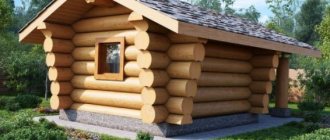
Verandas are also distinguished by the material from which they are built. The best option is a frame veranda made of timber. This structure is perfect not only for a log house, but also for a cottage made of brick, foam blocks, or silicate.
In terms of environmental friendliness and ease of construction, a wooden frame veranda has no equal. The only condition is that the wood used for construction must be treated with effective fire and bioprotection.
How to attach a veranda to a country house with your own hands: step-by-step instructions + Video
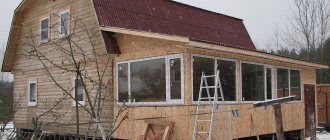
There are a huge number of options for assembling and installing veranda extensions to a country house. But a more economical and simpler option would be to assemble a frame structure. This extension will look advantageous next to a frame wooden house. We will describe below in our article what building materials and tools will be needed for independent installation and assembly of the extension and how this structure is installed.
Foundation for a frame veranda
When constructing a foundation for a veranda, it is not recommended to connect it to the foundation of the house. Buildings have different weights, and the loads from the house will be transferred to the extension, which will lead to its shrinkage.
The strip foundation is carried out using standard technology: markings are made and a trench is dug. The formwork is installed, inside which the reinforcing frame is laid. Then the structure is filled with concrete mixture. After the concrete has hardened, you can begin building the frame.
The strip foundation can be made of prefabricated FBS slabs. In this case, there is no need to wait until the concrete hardens and you can immediately build the extension.
A columnar foundation for a frame veranda involves digging in foundation pillars, which can be either ready-made or poured directly on the site. The lower crown is mounted on the installed supports.
Wall cladding and installation of windows and doors
After the frame is mounted, you can proceed to the next stage, which is sewing up the frame structure.
- Considering the fact that the veranda can be glazed along the entire perimeter, a window sill board is installed wherever windows are installed. In the veranda it is simply necessary, for example, for installing trays of flowers or seedlings.
- After this, you can sew up the openings between the vertical posts with plywood, OSB sheets or planed boards no more than 20 mm thick. This operation is carried out both outside and inside the building.
- After all, you will end up with a room in which only window and door openings remain. Subsequently, they need to install window frames and a door leaf with a frame.
- According to modern technology for installing windows and doors, they are installed, positioned as expected, fixed, and the spaces between the frames are foamed with polyurethane foam. It provides a reliable and tight, and not rigid connection.
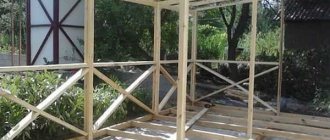
Construction of the veranda frame
The frame veranda is built from treated timber with a cross-section of 10x10 or 15x15 cm. For the lower trim, a beam of a larger cross-section can be used, which is laid in two rows and connected using the “direct lock” method. Logs are mounted on the frame - the basis of the veranda floor.
Frame structures are installed vertically on the lower frame and are united by the top frame. Additionally, at a height of 1-1.5 m from the bottom point, a number of horizontal beams are installed that connect the frame, giving it strength and stability. The height of the veranda depends on the height of the ceilings in the house. When installing the frame, it is important to position it so that the roof is sloped. The correct installation of frame supports should be checked at the building level.
The cutting of supports is usually carried out using the “direct lock in 1/2 wood” method. Making high-quality connections of horizontal and vertical elements to create a strong and safe structure is a responsible task that only a qualified specialist can do. The joints are reinforced with bolts, angles, screws and other fasteners provided for by the project. To prevent deformation and shifting of the frame, it is attached to the foundation elements using anchors or clamps.
To connect the frame veranda to the house, exhaust floor beams or parts of the rafter system are used. After assembling the frame, the walls are filled, hydro- and thermal insulation is carried out, and the finishing is applied.
Floor
The assembly of the floor begins with installing the logs on the supporting base, for which grooves are marked and cut out in the timber. The logs are installed in these recesses and fixed using mounting angles. It is convenient to use a protected terrace board for finishing the floor. It is laid on the logs and secured with wood screws.
If it is necessary to build a veranda at the dacha with a heated floor, the design is complicated as follows:
- Lay the subfloor using an unedged board.
- The timber is attached to the rough base in steps of half a meter (you can take a section of 50x50 mm).
- Insulation, for example, mineral wool, is placed between the beams. If a slab heat insulator (for example, penoplex) is selected, the gaps between it and the beams are filled with polyurethane foam.
- After laying the insulation, there should be a gap of 1 cm, which will serve as natural ventilation. The top of the insulation is covered with a water-repellent film.
- Lay the finished floor. If a solid or glued floorboard is chosen for it, it is additionally coated with two layers of varnish.
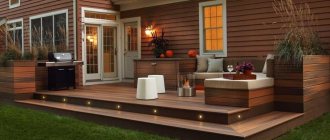
Finish floor for an open structure Source rabotai-sam.ru
Frame veranda roof
The role of the Mauerlat in a frame veranda is performed by the upper frame, on which layered or hanging rafters are installed. The roof of the veranda can be single- or double-sloped. When installing a pitched roof, it is necessary to make such a slope that will allow precipitation not to accumulate on the roof surface.
The same material is used as roofing as for the roof of the house. Also, the roof of the veranda can be covered with lightweight and durable polycarbonate. The roof is attached to a pre-installed sheathing. Elements of a drainage system should be installed on the roof of the veranda. They must be connected to the house's drain for effective water drainage.
Briefly about the main thing
A veranda in a country house is, as a rule, a lightweight wooden structure that is built simultaneously with the house or added later. For a wooden building, choose a foundation that is not designed for heavy loads (column, pile, screw). When the foundation is ready, the frame (lower and upper) is made, the frame, floor, and roof are installed. If necessary, the building is insulated, double-glazed windows and a door are installed. At the last stage, a staircase is built, cladding is performed, and light is installed.
Ratings 0
Decorative finishing of the veranda
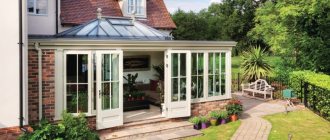
The optimal option for making the walls of a frame veranda: the bottom is covered with OSB boards or other wood materials, and the top is glazed.
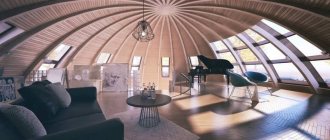
When installing high panoramic windows, a lot of sunlight will fall on the veranda. This option will allow you to equip a greenhouse or winter garden.
The frame veranda should be in harmony with the appearance of the house. Decorating the veranda depends only on the owner’s imagination! Wooden carved posts and railings coated with varnish or paint will be an excellent exclusive decoration. You can order carved balusters or make them yourself. There are a lot of options for decorating a veranda, so it is recommended to consider different styles and trends and choose what you like best.
You can also use different materials to finish the floor of a frame veranda. The most ergonomic solution is a terrace board. High-end laminate can be used from inexpensive materials.
Types of thermal insulation materials
Depending on the production, all insulation materials can be divided into two categories:
- Mineral.
- With a chemical component.
The first include basalt wool, which does not burn, glass wool and the well-known mineral wool. The main disadvantage of mineral insulation is that they require additional insulation.
As for insulation with a chemical component, these include:
- Expanded polystyrene - used for insulation of brick buildings.
- Polystyrene foam is an inexpensive and reliable insulation material that is easy to install.
- Polyurethane foam is an expensive and high-quality material.
Heated frame veranda
You can turn your veranda into a full-fledged room that can be used all year round with proper heating arrangements. As a rule, the heating system of the house does not allow placing additional radiators on the veranda. In this case, you can install a small wood or solid fuel stove, if the space allows.
Also, a heated veranda requires high-quality insulation of the walls, roof and floor. Mineral wool is used as insulation, meeting all environmental and fire safety requirements. It is better to use triple-glazed windows for such a veranda to prevent heat loss.
The cost of arranging a heated veranda is much higher than a regular one, but you will get a full-fledged room that can be used as a hall, dining room or recreation room.
You can ask your question to our author:
Final stage
To finish the walls, use lining or facade boards. If a warm veranda is being built, a layer of thermal insulation is laid under the cladding, which is protected with a waterproofing film. They also line the interior space, not forgetting about waterproofing.
To line the ceiling, use a board or lining. At the last stage (if a closed veranda is being built), the front door is hung, window blocks are inserted, and lighting is provided.
There are no special requirements for the stairs to the veranda. A competent solution would be a common frame of the veranda and stairs; this way the design will be more reliable and costs will be reduced. When designing a staircase, the following points are taken into account:
- The angle of inclination should be comfortable for safe use.
- For the lower base, supports buried in the ground or a small foundation are built.
- The design is completed with railings.
- The external staircase is made wide enough. It is beautiful and practical: the wide passage is convenient for bringing furniture and household appliances into the house. Flowerpots and containers with flowers placed along the edge of the steps will become an effective addition to the veranda.
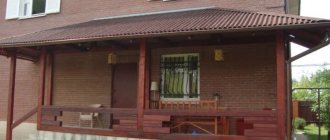
Natural wood is the best interior solution Source on-off.com
Peculiarities
The difficulty when adding additional premises is the presence of a ready-made old building, which has already undergone shrinkage and has certain defects and design features. All these points should be taken into account when designing an extension. It is necessary not only to build a room that is durable and harmoniously suited to the rest of the ensemble, but also not to harm the finished house or contribute to its deformation or destruction. Errors and miscalculations in the design and arrangement of the foundation are unacceptable; they lead to serious consequences and problems for the entire building.
There are two ways to connect bases.
- The expansion joint is simple to make, suitable for all types of foundations, and less expensive. In this case, both foundations are independent of each other under shrinkage or deformation loads. A layer of waterproofing and thermal insulation is laid between the main structure and the attached one, and an expansion joint is formed. The roof of the extension with this method must be separate.
- Rigid reinforcement is more reliable and durable; it is used for old buildings that have completely undergone shrinkage, over 15 years old, in the presence of a high-quality foundation. The connection is made using metal reinforcement. If a new and already finished building is planned to be combined under one common roof, then the connection must be made rigid. The only obstacle to using this method is heaving soils.
Video description
How to properly make a tape for an extension, watch the video:
Next, the place of the ligament is drawn up. Let's look at how to properly pour a foundation for an extension to a house with your own hands, sequentially:
- Frame assembly. The reinforcement that protrudes from the old base is connected to the new frame by welding. Next, the connection of subsequent elements is made using a knitting wire. This will prevent cracking of the monolith from stress and natural changes.
- Installation of formwork. More often the molding structure is assembled from wooden boards. Supports can be selected from available materials. You can line the inside with polyethylene. This will make it easier to ensure the walls are sealed, dismantle the formwork, and keep the boards clean.
- Pouring concrete. There are several recipes for preparing foundation mortar. For example, for the M300 composite you will need 10 kg of Portland cement, 30 kg of dry purified sand, 40 kg of gravel and the same number of liters of tap (well) water. It is recommended to fill the entire mixture in one step to avoid separating the portions. Periodic wetting of the surface will help prevent cracking during the hardening process.
Pouring a strip foundationSource filartbel.by
Dismantling of removable formwork is done 2 weeks after pouring the solution. Subsequent construction work can be carried out after at least 28 days.
Premises requirements
When planning an extension, it is worth considering in advance the purpose of the future premises and the features of its operation.
If you are planning to add a bedroom or living room, then the room should have:
warm walls;
reliable foundation;
good waterproofing.
Compliance with these requirements will make it possible to connect the room to the heating system of the house and ensure a comfortable temperature in it.
If you plan to build a kitchen or bathroom, then before building the foundation you need to take care of the connections: water and gas supply, sewerage. Insulation of walls, ceilings and floors, as well as waterproofing are no less important points.
To build a veranda or open terrace, you will not need to provide communications. A solid foundation with waterproofing will be enough to prevent moisture from penetrating into the room.
When installing a boiler room, the annex must be connected to the sewerage system, have a sufficient area (at least 15 cubic meters), as well as a reliable ventilation system
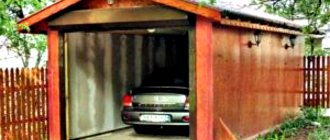
Free access to the heating unit is an important safety requirement. The boiler room cannot be attached to a wooden house in a place where there are doors or windows - only blank walls can be used. If you are planning to add a garage, you need to provide exhaust ventilation (natural or forced)
This will protect your home from exhaust gases from the garage, as well as from other unpleasant odors. In addition, the garage must be provided with a water supply and drainage system, electrical wiring, a fire alarm system and heating (if year-round living is expected)
If you are going to add a garage, you need to provide exhaust ventilation (natural or forced). This will protect your home from exhaust gases from the garage, as well as from other unpleasant odors. In addition, the garage must be provided with a water supply and drainage system, electrical wiring, a fire alarm system and heating (if year-round living is expected).
A porch is another option for an extension. May have several steps, be built from wood or blocks, and must be equipped with railings for safety.
According to the law, before constructing an extension, you must obtain permission from the appropriate authority, so that you do not have to demolish it later.
Wall “pie”: characteristics
Wall “pie”: characteristics
The ultimate goal of any construction work is the creation of a durable structure, in which living will be comfortable and cozy. The quality of the wall “pie” has the most direct and decisive influence on achieving this goal. When insulating the walls of a frame house or extension, you need to remember that properly installed vapor and wind insulation is the key to long service without loss of performance characteristics of any type of insulation. If you forget about this, the insulation will very quickly absorb moisture from the environment and become unusable.
If we consider the layers of the wall “pie” from the inside of the frame extension, then they should go in this order:
1. Internal lining,
2. Air gap (10–20 mm),
3. Vapor barrier,
4. A layer of insulation,
5. Windproofing,
6. Exterior finishing.
Traditional roofing felt or glassine can be used as wind protection.
The second option is more preferable, since it does not deform when exposed to high ambient temperatures. When installing vapor barrier membrane materials, you need to place their smooth surface towards the thermal insulation layer, and the fleecy surface towards the room. The fibers prevent condensation from forming on them, which prevents excessive wetting of the insulation.
We are drawing up an extension project
Before you start building a veranda made of wood or any other materials, you should carefully study the design documentation. This will allow you to pre-calculate all the necessary materials, decide on the shape of the future structure, and avoid possible mistakes during construction. Even if you do not have the necessary level of drawing or similar tools, we recommend making simple sketches of the future building indicating its dimensions.
Users often search for:
When drawing up a project, you should think through the entire sequence of work and the most optimal methods for its implementation. Similarly, you should decide on the equipment and tools necessary for building a terrace.
Video description
The video shows 14 mistakes that you should not make:
Installation of a columnar foundation
Before pouring a columnar foundation for an extension to a house, you need to form a seat. Wells must be deep below the groundwater flow level. Sand and gravel are compacted at the bottom in layers. The reinforcement for the reinforcing frame can be made of metal or fiberglass. The formwork is assembled and dismantled, concrete is poured by analogy with the construction of a monolithic foundation.
Installation of a pile-screw foundation
Before attaching a pile foundation to an existing foundation, to simplify the process, you can dig a seat up to 30 cm deep. Next, it is enough to find an assistant to screw the piles into the ground to the required level. In this case, the deviation from the vertical can be no more than two degrees. Concrete is poured into the cavity to ensure reliable anti-corrosion protection of the inside of the piles.
Do-it-yourself pile installationSource wp.com
Consideration of the case
In Russia, a fairly extensive judicial practice has developed regarding the recognition of ownership rights to unauthorized extensions. And it is not always possible to legitimize it in fact. This is due to various reasons. One of them is the lack of documents confirming that the owner tried to register the extension according to the law.
During the consideration of the case, the court appoints a construction examination. The plaintiff pays for the examination. It is necessary to verify compliance with building regulations. If the expert opinion indicates that the extension violates SNiPs or urban planning regulations, it will be impossible to legitimize it. A decision will be made to restore the house to its original condition.
When all the standards are met, the conclusion of an independent examination will be an important argument in your favor. After studying the case materials, the court makes a decision.
Legal nuances
The construction will be considered illegal if not agreed upon with third parties. Even a simple veranda or terrace requires registration for:
- compliance with the laws of the Russian Federation regarding urban planning;
- availability of arguments in case of controversial issues about the site with neighbors;
- obtaining new design plans, because division into shares changes when real estate is inherited or in the form of a deed of gift;
- future laying of communications, which is impossible without a registered extension to the house;
- registration of legal transactions such as sale, rental or exchange of real estate.
If an extension to a private house is not planned as a residential premises, the basis for it will be Resolution No. 271 of 03/11/1999. Before starting work, the owner of the site will have to agree on the new premises with the neighbors. They must confirm that the extension does not block the lighting and does not touch someone else's territory. If you cannot get permission from your neighbors, you can reach an agreement with the help of lawyers or send a lawsuit to court. However, you can only win if the refusal of third parties turns out to be unfounded.
What to plant along the fence at the dacha: the best ideas with photos! The use of various flowers, plants, trees and bushes allows you to beautifully decorate the areas near the fence. Before…
To register a new building with a foundation, you will have to collect the necessary documents. Such premises belong to capital construction, therefore it is illegal to start work without registration. The package of required documents includes:
- papers confirming the right to own the land;
- technical certificate;
- drawings or sketches of the extension project;
- cadastral plan of the site;
- gas, electric and sewer permits;
- a statement signed by neighbors approving future work;
- permission to change the layout of the property from the architectural department, fire service and SES.
If the construction has not been formalized before the start of work, this can be done later. When the premises actually already exist, you can only get papers for it through the court.
An extension to a home helps to increase living space or provide an additional recreation area. The veranda and terrace will be a pleasant place to spend evenings. If the cottage does not have enough space for things, the owner can build a warehouse. The cost of a new premises depends on the materials. If you insulate the walls and floor, you can relax in the room even in winter. You can make an extension to a house with a pitched roof with your own hands. Drawings and photos for this can be found on the Internet. For a frame structure you won’t have to hire professionals, but for more complex extensions you will need help.