- Build the foundation.
- While the concrete gains at least half strength, you complete site preparation. If at the bottom of the pit (the fertile layer has been removed) the soil allows water to pass through well (sandy, sandy loam), add crushed stone to the bottom. It can be compacted, or you can do without it. If there is loam or clay under the fertile layer, you will have to fill the pit either with the same soil (but not fertile) or with clean clay. It must be compacted well to avoid creating voids in which water will accumulate (it is better to lay it soaked to a paste in layers).
- A layer of waterproofing is laid on the finished foundation.
- Support posts for the roof are installed and secured.
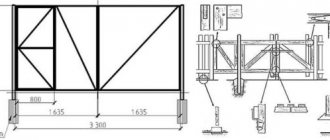
- They tie the racks: they nail a beam 100*150 mm thick around the perimeter. It can be nailed to the outside of the studs or between them. Sometimes the racks are nailed after the floor has been laid. This is not the best option: the floor will most quickly become unusable. With such a structure, in order to replace it, you will have to dismantle everything, right down to the roof. If you install the racks first and then the floor, it can be repaired without problems. This is what the assembled frame of a veranda attached to the house looks like. Intermediate racks are needed only if the width of the veranda is more than 3 meters.
- Floor beams (beam 100*150 mm) are attached to the foundation and support beam. The step of their installation corresponds to the step of installing piles or columns.
- Assemble the rafter system.
- Side railings (for open ones) or walls (for glazed ones) are installed. At this stage, the general technology ends. Further, for indoor ones it is longer; an open veranda is easier to attach to the house:
- For open ones, floor boards are nailed onto the beams.
- For glazed ones, an insulated floor is made. The subfloor is nailed to the beams. There are joists on top, insulation between them, and a finished floor on top.
These are just general steps. To have a more complete idea of how to make a veranda for a house, we will next consider the most problematic aspects of construction in more detail.
General principles for planning
A little protection of the front door from precipitation should be present, even if it is planned to equip a completely open veranda. To do this, the design is supplemented with an element called a “visor”. The veranda itself is often attached to the front side of the house. The only exceptions are situations when the house has two exits from the very beginning.
The parameters of verandas are determined by several factors:
- Exterior of the main building.
The veranda must fit organically into the existing structures so that their appearance is maintained or improved. It is unlikely that a small veranda will decorate the area if it is attached to a two-story house. Another thing is when a one-story house is connected to the structure along its entire length.
- Opportunities of owners from a financial point of view.
- Functional purpose of the veranda.
Usually the buildings are used for summer recreation, or serve as a kind of vestibule. Some owners add small closets where personal items are stored.
- The size of the area available for the extension. This will help you understand how to attach a veranda to your house.
Examples of interior decoration
The choice of materials for renovation depends on the type of building: in an open area, important attention should be paid to the floor. The flooring must withstand high humidity, rain, snow - decking boards are most often chosen.
The main purpose of roofing material is to protect from rain, but if there is a lot of snow in winter, the roof must be strong enough. The inside of the ceiling is left “bare” or lined with clapboard.
The external wall of the house will be internal to the veranda; it can be left as is if it looks neat and beautiful (for example, wooden, brick or decorated with siding). Or cover it with the same siding, panels, decorative stone, clapboard.
Important! Before installing wooden panels, treat them and the wall with a product against mold, mildew, and insects.
The arrangement of a closed extension is more difficult, but less serious requirements are imposed on the finishing itself. Suitable coatings intended for interior use.
Initial stage of construction
It must be remembered that the weight of the main house is always greater compared to the extensions. Therefore, the shrinkage of structures is different. The veranda will need a separate foundation so that during operation it will not have such an impact on what is nearby.
Most owners prefer a columnar foundation. Its depth should be the same as that of the main building. Another approach is used for buildings made of heavier materials - brick or concrete. Then choose a strip base. This choice contributes to the uniform distribution of loads over the entire area. Then the owners will have a veranda attached to the house with their own hands for a long time.
Combined designs
This option is even more popular than products made from only one building material. The most common:
- capital base (blocks, brick, monolith) with a light metal top;
- solid foundation with wooden frame;
- cantilever canopy over a permanent base.
The models presented above in the photo can rather be called canopies, although when organizing fences (except for the last photo) and constructing the foundation of the site separately from the foundation of the house, such structures can also be considered verandas.
Important: verandas with a solid foundation and a light frame can be glazed with no less success than completely brick or block structures.
Main stages
After the foundation is erected, the main stage of construction begins. First, subfloors are created. Insulation and laminate or bars are laid on top of them, only after these layers come decorative coatings on top. Step-by-step instructions will not cause problems when studying.
Even at the initial stages of construction, it is necessary to think about how the veranda will be insulated. Nowadays many materials are produced, each with its own characteristics.
Roll or tile materials are best suited for such buildings. They perfectly remove moisture and cold air. This property is especially important for a wooden floor, which will be protected from rotting for a long time. Then the open veranda itself, attached to the house, pleases the owners with its appearance for a long time.
Insulation of a wooden terrace
As for insulation products, they must be durable and reliable, and easily withstand precipitation. Recently, foam boards have become especially popular, however, whether they are needed depends on whether the terrace will be used only in the summer or in the cool autumn. As for winter, no insulation will create comfortable conditions inside the open terrace. As for the insulation, the thickness of the penoplex must be at least 4 centimeters, the joints must be treated with polyurethane foam, and the slabs must be covered with a hydrobarrier film (under the floor covering).
Frame arrangement
Insulation is then laid on the frame along with other types of materials. When installing the roof in this case, the same procedure is followed as in the case of ordinary houses. Then it will be easier to ensure that the buildings are similar to each other, they will harmoniously complement the elements.
Sloping to one side is the most common option when installing a closed veranda attached to the house.
Note!
- Do-it-yourself porch to the house - the best projects and construction ideas (125 photos of new products)
DIY brick barbecue: diagrams, drawings, photos, dimensions. Review of simple and complex structures on a summer cottage!
- House with a bay window - 150 photos of the best planning and design ideas. Overview of all features of an architectural element
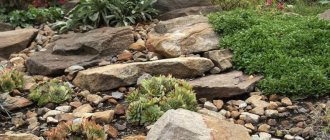
Options in landscape design
Landscape design directly resonates with the design of the house; it is especially important to choose the right combination if the veranda is open or fully glazed. After all, then it looks like part of the external environment and should be in harmony with it. The choice of style depends primarily on your preferences:
- Colonial. The main features of this direction are wicker garden furniture, dark wood trim, and a fireplace. Best used for spacious verandas.
- Provence. If the first style was English, then this one is French. It is distinguished by light and pastel colors, love for fresh flowers and floral patterns, delicate decor, textiles, forged parts: railings, furniture. The finished interior is light, suitable for small spaces.
Further work on the formation
After the initial installation, the frame is sheathed with basic materials. For internal cladding, you can choose any modern material that meets the requirements.
Insulation at this stage is the most important aspect. Waterproofing films cannot be used if metal is present. When condensation forms, such structures simply begin to rust.
The insulation must be placed between the outer cladding and the inner layer. The waterproofing film goes on both sides of the insulation. This rule is mandatory for everyone who is interested in learning how to attach a veranda to their house with their own hands.
How to attach the stand and bottom trim
Work on the construction of the veranda frame begins after the foundation concrete (if used) has gained some strength. 50% of the calculated value is enough, and this at a temperature of +20° C will happen in 4-5 days. Then, on top of the concrete, in those places where the posts or trim will be attached, two layers of waterproofing are laid. It can be roofing felt, roofing felt, folded in half. You can coat it twice with bitumen mastic or use other modern materials.
Then there are two ways:
- secure the racks and then the harness;
- first the strapping, there are stands for them.
If the first option is chosen, special holders are inserted into the foundation when pouring. These can be different devices (see photo), but the most convenient is a metal plate in the form of an inverted letter “P”, to the bottom of which a pin is welded, which is walled up in the foundation. A stand is inserted into this plate (the end must be treated with an antiseptic), its level is checked, and secured with bolts or nails.
How to attach posts to the foundation
After all the posts have been positioned and secured, the framing bars are nailed between them.
With the second option, the situation is different: the racks will have to be attached to the harness. The strapping beam is attached first. It is more convenient to do this if studs are embedded into the concrete at some intervals. Then holes are made in the beam in the right places, it is put on studs and secured with bolts. Then, using one of the methods suggested in the photo, the racks are installed.
Options for attaching racks to strapping beams
Any of these methods does not exclude the use of metal corners. They make the fastening more reliable, which is very important in this case. After all, the racks will support the roof, as well as the walls or fence.
About the final stages
Typically, in this case, windows and doors are installed.
The entrance door to the veranda cannot be located opposite the entrance door to the house. Otherwise, drafts appear. It is better to choose the option with end mounting. In a small space, this also adds free space.
There are a large number of photos in which the doors of the verandas are located in this way. This solution is considered the most convenient, regardless of how the building is arranged from the very beginning. The roof of the veranda attached to the house also benefits from this.
Note!
Do-it-yourself tandoor made of brick: ready-made drawings, dimensions, step-by-step instructions + 100 photo ideas
- How to make a gate with a wicket with your own hands: step-by-step instructions, drawings, design dimensions, design, assembly and installation
Do-it-yourself greenhouse - a review of the best ideas on how to build a good greenhouse on a summer cottage (80 photo ideas)
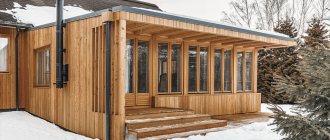
Features of the terrace and its difference from other small architectural forms (SAF)
This name refers to a platform located directly on the ground or raised above it. A distinction should be made between a terrace as a flat piece of land (for example, in terrace farming) and a terrace as a building structure. The first has a limiter that prevents the soil from “sliding” down the slope and ensures ease of planting.
The second is located on supports or a prepared site, has a floor, sometimes a fence and a roof.
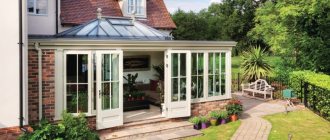
Open (without roof) veranda adjacent to the house
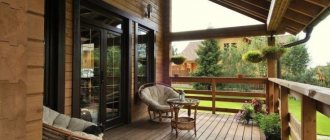
Covered pool terrace (canopy not attached to the house)
Very often a terrace is confused with a veranda. In fact, a veranda is one of the types of terraces, necessarily covered and adjacent to the house. Sometimes the presence of permanent or removable glazing is considered a mandatory accessory of a veranda.
Types of terraces are conventionally divided according to the following criteria:
- the presence of a roof (canopy). The entire surface of the site can be covered, or only part of it. There may be a complete absence of a roof or the organization of temporary shelters - umbrellas, portable canopies;
- the presence of a fence. It can be purely symbolic - a border, a decorative lattice, green spaces, sculptures, and so on. It is possible to install strong and reliable railings, solid or lattice. Such fences are considered a prerequisite when the site faces a steep slope, seashore, mountain ledge/hills. If there is a roof, the fencing is often part of the supporting structure of the canopy;
- number of levels. The simplest building options are single-level, the most complex can include dozens of levels with platforms of different sizes and shapes;
- form. The simplest ones are logically considered to be square and rectangular terraces, curved or in the form of a broken contour are much more difficult to build;
- location. The site may be adjacent to a house or other building (for example, a swimming pool), surround the structure on all sides or partially, or be located separately from all buildings of the estate.
When planning a terrace at your dacha and planning to build it yourself, it is better to choose the simplest option: a rectangular, single-level structure with railings and a light canopy.
Additional Tips
At the initial stage, it is better to take care of permits and issues from a legal point of view. Then the construction itself will take much less time. After receiving all the documents, they usually purchase materials and tools and begin implementing the project.
The veranda will have to be legalized in any case, regardless of the original dimensions of the building. It is better to do this before the actual construction, so as not to receive penalties later. In this case, a wooden veranda as an extension to the house will only please you.
Many people think that for any construction it is enough that the site is owned. But there are certain requirements, without which the work cannot be continued. It is necessary to take into account some nuances.
- The location of buildings is chosen in a certain way to preserve the rights of all interested parties, including in neighboring areas.
- The design of the general structure and its area change when using any buildings, this is also a general rule.
- Not only the legal side of the issue is taken into account, but also the safety, including that of the residents of the house itself. After all, during construction, the distribution of loads can seriously change. Additional load on the house appears even when creating light varieties of verandas.
- Without legalization, it will not be possible to officially sell or exchange the house.
A light veranda belongs to the group of non-permanent extensions. Everyone can figure out how to build this building with their own hands.