It is safer to build a permanent garage on a personal plot, but not more time-efficient. In addition, you need to set aside a significant space for construction and remember that this is a building that is subject to requirements regarding its location/distance from the main building and neighbors. The garage must be located at least 3 meters from the fence, and you will have to pay a tax for it, as for capital construction on a foundation.
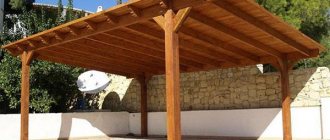
The way out is to build a canopy from timber (wood). With minimal knowledge of construction, it’s easy to do it yourself. How? A step-by-step description with photos later in this article.
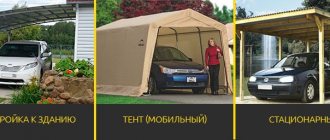
Standard solution
Small, “ladies’” cars require the construction of a simple structure, their dimensions are small, it is quite possible to set aside a “nook” next to the entrance to the yard. For jeeps and vans, the local area will have to be greatly reduced and a significant piece of land will have to be allocated for the car. And if there are two or more cars in a family, then the minimum you need to count on is a canopy size of 6 m2.
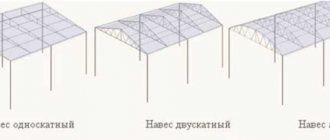
Canopies are:
- In close connection with one side of the house . In this case, the canopy is attached to the wall, and the opposite part is placed on 2-3 supports.
- Freestanding . They are located anywhere in the garden, the main thing that the gardener must remember is unhindered entry and the ability to maneuver both on the site and on the road near the house.
The easiest way is to make a pitched roof; it does not require a lot of additional elements or fasteners. In addition, it is cheaper than a gable roof.
Roofing device
The roof installation technology will depend on the selected material. Profiled sheets, for example, are mounted directly on the bars.
The corrugated sheet is laid overlapping and secured with self-tapping screws. At the junction with the wall, an aluminum pressure tape is attached with self-tapping screws, and the space between it and the wall is filled with sealant.
The space between the two profiled sheets must also be filled with sealant. To connect the polycarbonate sheets, an additional lathing is installed.
The sheathing pitch depends on the roofing material.
The roof is also installed with self-tapping screws.
Why choose wood?
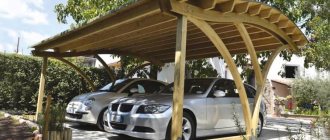
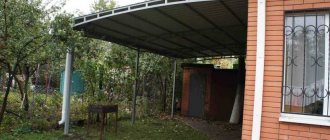
The easiest way to make a simple canopy with your own hands is from wood. The advantages of this solution lie in the relative cheapness of the material; an iron pipe is many times more expensive than timber. Well-dried wood is lightweight; installation can be carried out by one person, without assistants.
The wood fits well into the country landscape, does not look heavy, and if necessary, it can be painted in different colors, adding originality to the garden design.
Most often, beam supports are chosen 150*150 mm, but 100*150 mm is also possible, or, if the machine is small, 100*100 mm. As an option - logs with a diameter of at least 15 cm. Thinner ones (podtovarnik) will quickly become unusable or if there is too much snowfall in winter they will break under the weight. It is not always possible for a summer resident to go to the garden and clean the roofs in winter.
Provided that the wood is treated in a timely manner with special protective compounds, the design will be practical and durable.
The disadvantages include the flammability of wood and its susceptibility to rot. Although, if the owner takes good care of the building, paints it in a timely manner, and applies protection (antiseptic, fire retardant, paint or varnish, fire-retardant impregnation), these shortcomings can be leveled out.
Preparatory work
Preparation should begin with the formation of a sketch, and then a drawing based on it. Calculate a flat, lean-to wooden canopy and find out what materials are needed and in what quantities. Most often, the following lumber is used to create a roof:
- Bar for racks - section 70 by 70 mm.
- The beam attached to the wall is 40 by 60 mm.
- Front type beam – 40 by 80 mm.
- Beam for floors – 40 by 60 mm.
- Polycarbonate.
- Antiseptic.
- Hardware.
- Wood cutting device and screwdriver.
- Crushed stone.
- Geotextiles.
List of useful features
The first and most important advantage of a canopy is the protection of the car from the harmful effects of the environment. The second plus is purely for everyday use - the owner, undoubtedly, finds it much more pleasant to sit down (go out) in the rain under cover than to run quickly and climb into the cabin with wet feet and clothes.
Despite the fact that experts say that “a car rots faster in a garage,” the influence of atmospheric phenomena on the body is no less a worse option.
The canopy protects the car from:
- Rain, snow . Metal parts corrode faster, and if the seal is poor, water gets into the interior.
- Grada . Large hailstones can pierce the body and break windows.
- Dirt . Dust, bird droppings.
- Sun rays . The sun, especially in hot summers, causes the upholstery on the seats inside the cabin to fade and damages the tires.
It is also important that getting in or out of the car in rain or snow under a canopy is much more pleasant than under the open sky. In winter, the driver relieves himself of the responsibility of cleaning the car from snow and clearing snowdrifts around it after a snowfall.
Making a canopy from timber: dimensions
The size of the canopy is selected according to the dimensions of the car, the number of cars and the available free space in the local area. The height should be at least 2.5 m, the distance from the side doors of the car to the pillars should be at least 50 cm.
If the canopy is for 2 cars, then its length is determined by the length of the largest car, the height - plus at least 50 cm, and taking into account the luggage carried on the roof - 1-1.5 m. For gazelles, vans, the height is also calculated, close to the lower part It is not recommended to make a car canopy or roof. As well as too high so that slanting rain does not fall in and there is no excessive load on the supports.
When building a canopy, you should remember that in case of slanting rain or snowfall with the wind, water or snow will fall on the car, then there will be no point in the canopy. Therefore, it is recommended to make the width of the structure 1 m larger on the sides and make the overhangs longer. Gutters can be installed along the edges so that when it rains, water does not flow near the pillars and wash away the soil.
The distance between two cars under a canopy is calculated using the rear-view mirrors and side supports. There should be at least 50 cm between the mirrors, and 50-100 cm from the side doors to the support beam.
Optimal! For a standard car up to 4 m long, a canopy of 5 * 2.5 m is made. For jeeps, minivans, gazelles, at least 6.5 * 2.5 m.
How to lay out the site
The finishing touch is the floor under the canopy.
A simple gazebo for tea drinking is suitable for wooden flooring. If there is a barbecue installed inside, it is better to choose tiles or completely concrete the area. These materials will fit perfectly under a carport made of timber for a car made of timber. To save money, the parking space is covered with gravel. Rain and melting snow will not leave puddles on such a surface; they will seep down.
In the future, you can show your imagination and decorate the timber canopy with carvings, plant climbing perennial plants, and paint the roof in a bright color. In general, make sure that the timber carport becomes a decoration of the site.
How to prepare a place
The car is not simply parked on the ground; filling it with gravel is not an option either; the wheels on it slip, and over time the flat surface becomes deformed and holes form. The best option is to make a shallow screed and fill it with concrete. This will allow you to easily wash your car without worrying about water drainage.
Step by step steps:
- Mark the boundaries of the structure using pegs and rope.
- Cut the turf.
- Remove the top part of the soil, deepening it by 15-20 cm.
- Make a “pillow” of crushed stone, sand, compact everything well.
- The screed is made with a slight slope away from the house (buildings, beds, etc.), or drainage pipes are laid around the perimeter.
If the machine is heavy, then reinforced mesh and reinforcement must be used.
Afterwards, temporary formwork is made from “inch” boards, at least 25 cm wide. The first level of concrete mixture is poured, leveled, and reinforcement or reinforced mesh is laid. 2 portions of concrete mixture are poured on top.
The area for the car will be ready in 1.5 - 2.5 months, it all depends on weather conditions. To prevent the concrete from cracking, it is periodically moistened; it can be protected from precipitation and debris by covering it with film.
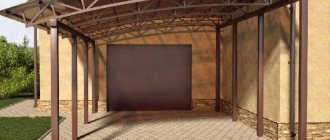
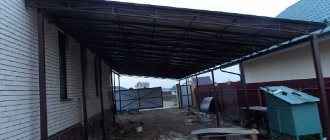
Installing a lean-to canopy extension
To build a canopy with your own hands, first make a drawing. It cannot be standard; in each specific case, the dimensions of the frame change, since the area of the site in front of the house allocated for a car is different for everyone. The main thing is to maintain the minimum required to park the car.
How to make a 6*8 canopy with your own hands? Step-by-step instructions with photos.
A canopy of this size is suitable for 2 cars plus a small utility room. The approximate budget is 50,000 rubles, depending on prices on the construction market. You don’t have to use a concrete screed if the soil is dense, but it won’t be superfluous either.
First, markings are made on the ground using ropes and pegs.
An asbestos pipe 80 cm long in the amount of 8 pieces, fittings inside and a fastening element are suitable as a foundation foundation.
According to the number of supporting elements and beams, they dig holes (70-75 cm), install an asbestos pipe, inside its fittings and a mounting angle with the “horns” facing up.
Fill everything with concrete and leave for a week. If it rains, the structures are covered with film.
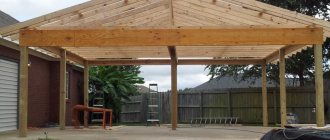
Next, pillars made of 100*150 timber are installed, the upper crossbars and screed are attached to the corners.
This is what the base for the canopy will look like. Eight support pillars, beams 50*100 cm, placed on edge, this will be the basis for the canopy roof. Each element is attached with corners. Do not forget that the frame must slope backwards, so the front support pillars will be higher than the rear ones.
The roof beams are attached “on the butt” in increments of 60 cm.
To prevent the pillars from moving, temporary jibs are installed. When the structure is assembled, permanent jibs are made for each pillar, 2 pieces each. on the pole.
The sheathing on the roof is made from “inch” boards under the profile sheet in increments of 50 cm. The walls of the canopy are also sheathed with boards in order to maximally protect the car from precipitation getting inside.
There are 18 sheets of good, profiled iron (corrugated sheeting) 3*1.1 m on the roof. They are laid with edges along the back of the canopy so that the rain flows back. You can also install a drain there so that water does not erode the soil near the structure.
Support arrangement
When marking the area for the canopy, it is necessary to take into account that the extension from the outside of the roof should be equal to 20 cm. Based on this, along the wall to which the canopy will adjoin and opposite, the installation locations of the support pillars are marked. For example, you can take a step of 3 meters between the pillars. Concrete foundations must be poured under the support pillars. The support column can be immersed in concrete, having previously treated it with anti-rotting impregnations and wrapped in thick polyethylene. You can use embedded parts - anchors. Anchors can also be dismantled and sunk directly into concrete. To create a concrete foundation, a hole 90 cm deep is enough.
Support mounting options
The easiest way to install dismountable anchors.
The supports are screwed to the anchors with anchors. First, a row is installed near the wall of the house. Then the second outer row of supports is installed. The supports must be installed strictly opposite each other, strictly vertically and aligned to the required height, taking into account the planned slope. That is, the supports near the wall should be higher than the outside ones.
The height of the supports is calculated based on the required slope.
The final stage
To make it comfortable at night in the summer, the canopy can be equipped with a lamp with a protective, waterproof housing. To connect a vacuum cleaner (to clean the interior), a socket with a cover is mounted on the pole.
The side boards can be surrounded around the perimeter with mesh or polycarbonate. Or make them with smaller gaps so that precipitation does not get inside the frame.
The final touch is the treatment of wooden structures with a protective compound. You can choose any color, from colorless to dark, walnut.
Aligning the rack
The more vertical the supports are, the more stable your structure will be. The most accurate instrument here is a plumb line, which will accurately determine the degree of vertical position of the racks.
During the process of concreting the foundation, the columns are leveled using supports (metal or wood), which are dismantled after the solution has hardened. Correction is possible only during the first hours of concreting.
To level the pillars in height, experts recommend marking in advance the level of immersion in the ground in their lower part. Such marks will become a reliable guide in further installation work.
You can ask your question to our author: