Home » Building a house
Vladimir 03/24/2020
19878 Views
In this article we will tell you how to make a brick grill with your own hands. What a delicious barbecue you make on your own grill. Soft, juicy, slightly fried, skewered kebab makes guests happy to taste this dish.
Design selection
Creating a barbecue is divided into several step-by-step actions. If you follow them exactly, then:
- the design will be strong and durable
- individuality - the barbecue grill will be one of a kind
- You can easily use this barbecue in winter
- the likelihood of error will be minimized
The first step is choosing a design . The stove should be simple and functional. At the same time, an appearance and some platform should be provided to assist in cooking the meat. This could be a small tabletop or a designated area for storing spoons, forks, and skewers. You can also allocate space for storing firewood for cooking.
Example of workspace organization
Since the grill is an individual item, the dimensions and design are also individual.
Barbecue can be of two types:
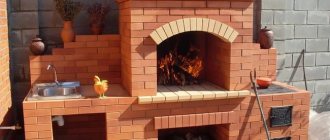
1. Open – the working surface is open. At the bottom there is a through niche for firewood. A table top can also be placed for convenience.
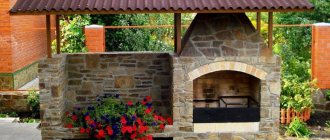
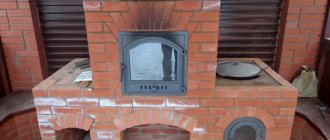
2. Closed – this is a multifunctional design. Basically, this grill is placed near the wall. The niches are all closed, there is a roof and an arch, as well as:
- Countertop for preparing food and utensils
- Place for heating the kettle or heating the first dish
- Dishes storage area
- Firewood storage area
- Place under the sink
Worth considering! This grill requires more material, as well as painstaking work associated with the stove maker.
What is the roof made of?
“Since we will be placing the roof over an unusual object, it will have to withstand unusual influences, such as high temperatures and envelopment in smoke.”
Almost every summer resident has a barbecue, as an integral attribute of a country holiday. It can be purchased on occasion or made by inspiration. In any case, all you have to do is improve the item a little by equipping it with a reliable roof, and the barbecue will take place in any weather.
The roof over the barbecue allows you to barbecue in any weather
Which roofing material should be preferred in this case? Certainly durable. Since we will be placing the roof over an unusual object, it will have to withstand unusual influences, such as high temperatures and envelopment in smoke. Heat coming from below will provoke the formation of condensation at the top, so priority should be given to materials with such qualities as:
1. Heat resistance.
2. Moisture resistance.
The roofing material must be moisture-resistant and heat-resistant
Corrugated sheeting responds most well to temperature and humidity changes. A metal sheet of this class has a specific polymer coating, which prevents it from rusting and adds visual appeal. You can find corrugated sheeting in a color that will harmonize with the overall stylistic design of the site.
Roof for barbecue made of corrugated sheets
The supporting frame for such a roof can be assembled by welding pipes or a metal profile. You'll get a good roof:
- made of slate;
- ceramic tiles;
- metal tiles.
Roof for barbecue made of metal tiles
But it’s better not to use cellular carbonate for this role. It won't just succumb to heat, it may catch fire.
You must decide for yourself what size to make the roof. In general, this indicator will depend on what tasks are planned to be assigned to it. In any case, the roof should be noticeably larger than the area of the barbecue. Only in this case will it be able to completely protect the coals and food from the effects of wind and rainwater, so collect material with some reserve.
The area of the canopy should be larger than the barbecue area
Which one can be calculated from the working drawing, if you are not too lazy to draw one. Otherwise, the money may be wasted, although, in principle, at a summer cottage there will always be a use for even the smallest scraps of modern roofing materials.
Scheme of a small roof for a barbecue
As for the shapes of the roofs over the barbecue, they can be anything:
- single-pitched;
Shed roof for barbecue
- semicircular;
Semicircular roof for barbecue
- gable;
Classic gable roof for barbecue
- arched type.
Barbecue with arched roof
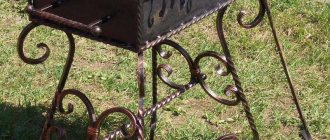
Each of the presented options is good in its own way. The roof can be made lightweight and solid, with or without a pipe. The last element is worth taking a closer look at. A pipe located directly above the fryer will ensure quality draft and protect against acrid smoke. He will not eat out the eyes of the cook standing at the grill and the guests sitting nearby. To install a pyramidal smoke collector, 2 meters of a wide pipe will be enough.
Forged barbecue under a roof with a smoke collector
When deciding what shape to make the roof for the barbecue, do not forget that it must fit into the architectural ensemble of the site. This fact is especially important for stationary structures that do not leave the yard either in winter or summer. They should please the eye and not become a pain.
The canopy over the barbecue should be in harmony with the overall style of the site
Drawing
Before you start laying a barbecue, you should draw up a drawing on paper. On it, indicate all the dimensions, taking into account the size of the brick.
The drawing will save time, materials and give you the opportunity to evaluate the picture as a whole.
Consider an example of an open barbecue:
Drawing of an open grill
I The size of the barbecue is 1 meter wide
II The size of the refractory brick is 11.4 cm. From these data the width of the niche for firewood is calculated: 11.4*4= 45.6; 100(1 meter)-45.6=54.4 cm.
III The height of the barbecue is 80cm.
IV The height of the working part of the grill is 35 cm.
V Iron tray for coals. It can be installed above a brick surface of 5 cm, or perhaps simply installed on brickwork.
VI The depth of the grill is 60cm.
Red dots indicate holders for a mesh or for installation under a skewer.
Choosing a place for a barbecue
After creating a drawing and entering all the dimensions into the sketch, you can decide on the amount of materials. But before doing this, preparatory work should be done.
They consist of:
- Choosing a location. The surface for creating a barbecue must be flat. Since the kebab oven is designed for all-season use, a foundation is required.
- It is better if the place is not heavily exposed to drafts and gusts of wind. If there is a free corner in the garden, then this is the best for a barbecue.
- In the open type, you should also consider where the smoke will be directed so that guests and relatives do not rest in the smoke.
- If it is south facing, then it will not be very pleasant to stand in the open sun and cook food. If there is no place in the shade, you should take care of a canopy.
- There should be no tree roots or tall shrubs at the proposed location. All grass and bushes should be removed with their root system.
- The future grill should be in a dry place. If it stays constantly wet, it can have a negative impact on the brickwork.
When all the plants have been removed from the surface where the grill is supposed to be, markings should be made on the ground.
Draft markup
To do this, according to the size of the barbecue, you need to drive pegs into the ground and cover them with thread. This procedure should be done using a level. So that the boundaries of the future building are perfectly smooth. Functionality and appearance depend on this.
Outdoor oven
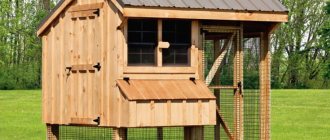
An outdoor stove complements any summer cottage or country house well. It can perform the following functions:
- Cooking.
- Drying mushrooms or fruits.
- Can be used for outdoor canning.
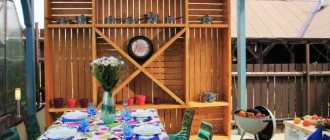
The design of the structure for this structure can be made to fit the interior of a country house. It can be done with one or several lesions. Can be done with or without doors. This is affected only by the project that was chosen for the construction of this device.
Full outdoor kitchen
When building an outdoor stove, you need to be guided by the fact that it must meet the following requirements:
- Practicality.
- Safety.
- Functionality.
- Durability.
- Low cost of construction (if your own work is expensive, then it will be more profitable to buy a ready-made option).
There are a large number of materials on the market for the construction of an outdoor stove, but you need to be guided by the fact that it must be of high quality.
For this you can use the following raw materials:
- Fire-resistant brick and aerated concrete. These materials can withstand high temperatures.
- Metal or cast iron. Most often, finished structures are produced from these raw materials. Its price will not be small.
Brick and aerated concrete are fire-resistant materials
The choice of material must be approached carefully. Aerated concrete is cheaper, but a brick oven looks much more aesthetically pleasing.
An important issue is the choice of the main location of the outdoor stove. It’s good when the construction of an outdoor product was envisaged at the beginning of construction work on the house. If, however, the decision to build this structure was made later, then you need to be guided by the same rules as the construction of a barbecue.
This rest attribute is done in the following sequence:
- Laying the foundation.
- Laying the base of the furnace.
- Chimney installation.
- Installation of the walls of the gazebo in which the stove will stand, as well as equipment of the adjacent territory.
The choice of material must be approached carefully
Outdoor stove cladding
As for the decor of an outdoor stove, there are a large number of options. The product can be finished using special decorative plaster. It can also be lined. As decoration, you can use tiles of various designs and designs.
There are the following types of simple stove finishing:
- Whitewashing and painting.
- Plaster.
Sequencing
- To reduce the roughness of the surface, you need to rub it with brick and then treat it with water.
- We treat the surface with a primer.
- We paint the building. It is better to choose it on an adhesive basis.
- In the case of whitewashing, we skip the previous stage and use lime instead of paint. You can add salt to it. This will help you achieve better results. To add a blue tint, a small amount of blue is added to the lime.
- To ensure that the whitewash is of high quality and lasts a long time, ultramarine or ocher can be added to the lime on the surface.
If the structure has metal elements, for example doors, then they can be painted black. So that it does not peel off and is heat-resistant, it is better to choose silicon, organic paint.
If plastering was chosen as a decoration, the stove is manually coated and then whitewashed. This decor option needs to be updated every year, but this is easy to do without the help of specialized services. It is enough to cover the newly formed cracks with a mixture of water, sand, clay and cement.
Tiles as a facing material
In addition, tiles can be used as a facing material for the stove . They are tiles that are made by hand. This finish is considered antique and has a fairly solid appearance.
Use tiles for decoration
The advantages of such cladding:
- The tiled surface can be easily washed and wiped.
- The tile coating has great heat transfer.
Since real and correct tiles are made by hand, they may differ from each other, for example, in shape or size. Therefore, before the furnace cladding process, you need to sort the material by shape and color.
The tiles are laid using a thick mortar. They are attached to wire pins. The seams between the facing material should be no more than 2 mm. They are rubbed with a special agent, for example, albatross.
Tiles are laid using a thick mortar
Finishing an outdoor stove with tiles
Tile is one of the options for cladding an outdoor stove, which is common among users. The following types of material are used for cladding:
- Majolica . It is a ceramic tile, the outer side of which is glazed.
- Terracotta . This is similar to the previous option. It differs only in that it does not have a glazed surface. These tiles are made from special clay.
- Clinker tiles . This type is made from several types of clay, which is selected to be of a highly plastic variety. Such tiles are pressed and fired at high temperatures.
Due to the fact that stoves heat unevenly throughout the entire area, there is a high probability that the tiles may crack in certain places.
Tile is one of the options for cladding an outdoor stove
It is better not to choose large-format tiles for cladding. Such material has a high risk of cracking. It is better to choose small tiles.
Cladding outdoor tiles with natural stone
The process of decorating a street structure with stone has no noticeable differences compared to tiling. The advantage is that the stones look more sophisticated.
The peculiarity of this cladding is that the stones need to be placed on the floor and laid out according to size, shape and color scheme.
Tip In order not to confuse the sequence of stones, you can number them on the reverse side. This action ensures that the stones do not get mixed up with each other and the process itself takes much less time.
Stone cladding
Also, you can not cover the entire surface of the product with stone, but only a separate part, for example, corners or a firebox.
Materials
- Fire brick. Regular red brick
- Cement mixture for laying fireplaces
- Cement
- Sand
- Wooden boards – 4 pcs.
- Crushed stone
- Sandstone mixed with gravel
- Reinforcement or reinforcement mesh
- Metal corner
- Cast iron barbecue accessories - barbecue grate, skewers support, charcoal tray, tongs
IMPORTANT! All necessary materials are purchased at a cost of plus 5-10%.
Foundation
To create a brick barbecue that should serve you for a long time, you will need not only high-quality material, but also the creation of a solid foundation.
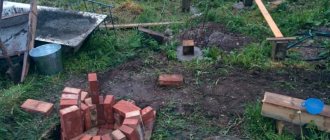
To begin with, you should dig a hole for the foundation according to the size of the barbecue. Its depth should be about 55cm.
Marking the designated area for the foundation.
- A mixture of sandstone and gravel is poured into the dug hole. This pillow is made against subsidence of the grill. Pillow height about 20cm
- Next, the fittings are installed. For greater strength, the reinforcing stakes are connected to each other by welding or knitting wire. The height of the reinforcement frame is 20cm
- Using wide wooden boards along the edges of the foundation, formwork is created
- A solution of cement, crushed stone and sand with the addition of water is poured into the finished box.
- After filling the formwork with mortar, the surface is leveled and left for a day or two until completely hardened. It all depends on the weather conditions, if the weather is damp and cloudy, the foundation can be ready after seven days
Ready-made formwork for the foundation
FAQ
Is it easy to build if you have no experience?
The process of building even a simple brick barbecue is quite complicated for an unprepared person, since a lot of rules must be followed. If there is no experience in such work, it is recommended to involve professional stove masons in performing the work. Ordinary builders are unlikely to help here, since they are not familiar with the specifics of constructing furnaces, which require the use of other technologies.
What is the correct composition of cement mortar?
The barbecue solution is made in a special way. It consists of red clay, gully sand (not river or quarry sand). It is rough and adheres better to clay particles. If in doubt, it is better to buy a ready-made mixture in a store, after consulting with the seller.
Formation of brickwork
To make high-quality barbecue masonry, you can use the following methods:
- Half brick masonry. The masonry proceeds in one row in a checkerboard pattern, that is, overlapping the joints of the bricks of the bottom row.
- Chain masonry option. It is of durable construction. Two horizontal rows are connected to each other
Nuances of masonry:
- Instead of ordinary cement mortar, a cement adhesive mixture is used. It is able to withstand sudden temperature changes. Very durable and high quality
- When laying out two or three rows, you should leave the work for a while for the solution to set.
- To ensure the evenness of the structure, be sure to use a level.
- To ensure that the brick fits tightly into place, you can lightly tap it with a hammer.
- The arch is laid out using wooden supports, which will hold the brick in place for some time until the mortar sets.
- When laying out a roasting pan in a barbecue, you need to place special hooks between the bricks to install a mesh or skewer holder over the coals. In addition to metal hooks, you can also make ledges from bricks on which the barbecue grill will be fixed
Fire bricks are used only in places where fire will burn. The rest of the grill can be laid out with ordinary bricks.
For greater functionality of the brazier, so that the coals are blown with the necessary amount of air, brick laying occurs with “windows” up to 5 cm in size. This will create the necessary draft that will maintain the heat in the coals.
Window for ventilation of the fryer
Grill finishing
The last step in shaping the barbecue is finishing. For this purpose, the construction market offers a lot of building materials:
- Wild stone
- Tile
- Varnish coatings
- Ceramic mosaic
When choosing a finishing material, you should take into account weather conditions and its resistance to sudden and frequent temperature changes.
Ceramic tiles are laid on cement-based adhesive bulk material. Wild stone should be coated on top with a special varnish coating, which is intended for street work.
If we take full individuality into account, then you can make your own gypsum tiles or individual decorative elements with the addition of drugs that prevent moisture absorption and give the gypsum the ability to withstand low temperatures. The tiles are laid on cement adhesive and coated with transparent varnish for external use.
Creation of a project and drawings with accurate calculations
Drawing up a project is an important and responsible stage of work. Many users neglect it, resulting in a lot of problems both for themselves and with the fire inspectorate and neighbors. Drawing up a project will allow you to think through the stages of work in detail, determine the position and size of the structure, and calculate the amount of materials.
It is not necessary to draw up a full-fledged project; they are often limited to a working drawing . It can be done by hand, but must be done to scale. For the construction of some departments, special order diagrams , which show the structure of a particular element.
As a rule, they are used for stoves with chimneys. With the help of ordering, even an inexperienced person can lay out the complex configuration of the firebox and other structural elements, avoiding mistakes.
In addition, it is recommended to immediately provide for the possibility of supplying water and sewerage. this will make cooking more comfortable and sanitary safe.
Backlight
To cook on the grill in the evening, you need good lighting. Therefore, it is worth considering this point from the beginning.
To do this you will need:
- Metal pipe or galvanized profile
- Wire of required length
- Wire plug
- Lamp socket
- Corrugation for wire
- Screwdriver, electrical tape
- Dowel-nails
- Self-tapping screws
Roaster with internal lighting
If there is a pipe available, then it is fixed to the back wall of the grill using a metal clamp. If there is no pipe, but there is a galvanized profile, then:
- The profile is attached with dowels to the back wall of the stove.
- A second profile is installed with edges to the attached profile. The sides are fixed with self-tapping screws
- A corrugated wire is passed through the created pipe along the entire length.
- A plug is attached to one end of the wire, and a lamp socket is attached to the other end.
- If it is raining outside, the lamp should be protected from above by a lampshade or a special cap
To prevent moths from gathering on the lamp, a small board is fixed nearby, near the beginning of the pipe, on which you can install a midge spiral.
To install an LED lamp or other lamps, the base is made in the same way, but at the top you should create a base for attaching the lamps and protection from moisture.
Some nuances for working with a barbecue
When using a brick grill, you should follow some rules:
- Firewood should not be lit using gasoline, acetone or other flammable solutions. Only special solution
- When turning food on a barbecue grill, use special tongs.
- Clean the grill only when it has completely cooled down.
- For the winter period, the open grill is covered with presentation material or thick oilcloth
- When creating a barbecue, a material such as drywall is not applicable. On the street, under the influence of natural conditions, it will quickly deform and become unusable, even if the grill is closed.
When creating a barbecue with your own hands, you need to be prudent and patient. Then the product will be durable, and the food cooked in it will be delicious.
We also recommend watching a video that focuses on some of the intricacies of this issue:
Content
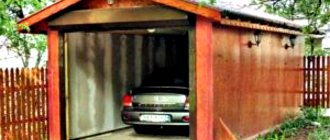
What is a canopy? This is a structure on supports, with a roof, sometimes having one or two walls. To some extent, this is a full-fledged small architectural object on a garden plot, with its own style and features:
The grill is a simple device. In it, products are exposed to heat immediately from the sides and from below. And the most convenient height of the side is 150-180 mm, because in this case the meat is placed at a height of 30-40 above the coals. In a conventional device there is no draft adjustment, except for small holes for coals, but there are also more thoughtful designs with a full-fledged chimney, sometimes even more than one. That’s why, before you build a barbecue shelter with your own hands from such expensive building materials, carefully calculate its parameters and the type of roof. After all, one canopy on top will not solve the problem, and the presence of a chimney complicates the situation significantly. We propose to consider the main types of barbecues and what is sometimes mistakenly called by this term in order to understand what you have to deal with.
So, a standard grill is made from food grade stainless steel or cast iron. But the brick options already belong more to the class of stoves, although they are also called that by the people. And sometimes, in the search for a suitable canopy for a brazier, in fact, they often mean that instead of an iron box there will be a Russian stove - so to speak, a stationary brazier.
- Today, home craftsmen have also become adept at making barbecues from the most unusual materials: a gas cylinder, a metal barrel, clay products and the like. But such designs are usually heavy and are rarely equipped with additional wheels for convenience. That’s why they are equipped in the same way as full-fledged barbecue ovens.
- Industrial folding portable barbecues today are sold in convenient packaging, folded to a minimum size. They are easy to quickly assemble on site and start working on the heat, and therefore a stationary canopy is not necessary for them - a portable one made of canvas fabric, which also folds into a small suitcase and is stored nearby, is sufficient. True, such barbecues are short-lived due to thin walls. Therefore, if you like to tinker with barbecue, bake bread and vegetables, and you plan to do this regularly, then think about a more massive structure.
- Grills in the form of a cauldron oven are suitable not only for frying meat, but also for preparing first and second courses, and therefore are made of thick-walled metal.
- The grill is a little different from all this, which has special holes for adjusting the air at the top and bottom. But still, the largest one is a brick barbecue oven, which is usually built independently, according to the chosen project.
All these barbecues look like this, although today designer projects like a hearth made of stones are in fashion:
And here is a video about why the grill still needs to be protected: