Many people have heard about two notorious Russian problems. And if it is practically useless to fight one of them, then the second, concerning the lack of roads, can be completely solved independently. This is very relevant on a relatively small scale related to one’s own suburban area and the surrounding area.
In this article we will look at ways that, with some effort, will allow us to strengthen the road and make access roads to a suburban area with our own hands.
What to make a road from
Roads are divided into roads with and without paved surfaces. The first includes roads made of asphalt, concrete or paving stones (cobblestones), the second - dirt roads. What is right for you is 95% dictated by your budget.
The most expensive and most durable are roads made of cut stone (cobblestone). The next most expensive is less durable concrete and, finally, asphalt. “Primer” is a much cheaper option, but, of course, also less durable.
Building a road in a dacha
Concrete is not much cheaper, but at least it is much more technologically advanced.
It is quite possible for two people to lay even a kilometer of concrete road during the summer season. Obviously, it’s not a highway, but it’s possible to travel in one lane. With a coating thickness of 7-10 cm (and less does not make sense) with a width of 3 m, about 0.25-0.3 m3 of concrete will be needed per linear meter. Material for a road of one hundred meters (taking into account crushed stone, sand and a minimum of reinforcement) will cost 180-250 thousand rubles. Asphalt requires road equipment, which is unlikely to be found in a dacha farm, so it hardly makes sense to consider how to make a road in a dacha with your own hands from asphalt concrete.
A dirt road with crushed stone (gravel) surface seems to be the most attractive option in terms of financial costs.
Dirt road with crushed stone surface
Table: Application of geosynthetics depending on density
| Application area | Density, g/sq.m |
| Garden paths, drainage systems, green areas | Geotextile 100 and Geotextile 150 |
| Artificial ponds, pedestrian zone (sidewalks) | Geotextile 200 and Geotextile 250 |
| Roads for cars, parking lots | Geotextile 400 |
| Roads for heavy vehicles | Geotextile 450 and Geotextile 500 |
| Highways, railways and local airline runways | Geotextile 550 and Geotextile 600 |
Do you have questions about choosing geotextiles, calculating quantities or purchasing? Call now on the number
+7
How to make a road with your own hands
Whatever option you choose, the following is still the main tool for road construction.
Tools needed for road construction
Construction of a paving stone road
•
Shovel, crowbar, pickaxe.
These are the tools that will be needed to level the subgrade and develop the soil. •
To mark the direction and elevation marks, you will need even stakes (you can hammer them in with the butt of the same ax that was used for planing): a pair of long ones - for setting the direction; a dozen short ones, half a meter each. One hundred meters of strong cord.
I recommend: What work follows the application of plaster
•
A tape measure, preferably thirty meters.
•
If you plan to make a concrete floor, you will need tools similar to those used to level the floor.
That is, the rule and a grater for leveling and smoothing. Of course, the quality requirements here are not as strict as for floors, but the smoother and more even the surface is, the longer the canvas will last. •
Wheelbarrow (stretcher) for transporting (carrying) bulk materials.
•
Manual tamper for compacting soil and tamping paving stones.
Layout and marking
Before starting excavation work, it is necessary to mark the route, which, given the calm terrain of most holiday villages, will not be a problem. As a rule, you can make a road in a country house with your own hands only in a specific place, in the only possible direction. Usually there is already a path or dirt road there, so serious survey work involving drawing up a relief map is not needed. It is enough to hammer in pegs every ten to fifteen meters, marking the edges of the road, and as work progresses, pull a cord between them, marking the area of work.
Excavation
The depth of the trough depends on the soil on which you are building your highway: the weaker the soil, the deeper the trough. But in any case, you need to remove at least the top layer of vegetation to a depth of at least 10-15 cm. The excavated soil is removed or used for landscaping. The bottom of the trough is lined with “geotextile”, protecting it from damage during subsequent work with a layer of fine crushed stone (screenings) or sand.
You can learn more about the construction of the trough in the materials about the construction of paths and paths in dachas: the difference is only in the volume of work.
Now let's look at the design features of each coating after the excavation work for constructing the trough is completed.
Types of roads in which crushed stone is used
Different types of road surfaces are filled with crushed stone:
- Ground;
- Country roads;
- Field;
- Automotive.
All these types of canvases must meet certain requirements.
Ground
Dirt road
- this is any road surface suitable for the movement of wheeled vehicles, but does not have a hard top surface. The roadway can be improved by introducing skeletal additives - slag, gravel, local binders - ash and slag mixtures, industrial waste.
Since they are laid on natural soil, during heavy rainfall and melting snow they often become unusable. Safety of movement along them is guaranteed only in dry weather, after the onset of frost.
When building a dirt road, it is necessary to take into account that two cars must pass on it without difficulty. The width is assumed to be at least 4 m. For a dacha canvas, two meters wide is enough.
Country
Country road
- This is a type of soil canvas. Most often it is not strengthened by anything; sometimes it can be leveled with a grader. On maps they are indicated by one continuous stripe.
Field
Field or forest - the result of natural rolling of soil by vehicles. It looks like two parallel tracks. Such a surface is often overgrown with grass. It is marked on maps as a broken line.
Highways belong to the category of engineering structures. They have two or multi-lane, oncoming and passing traffic directions.
The main elements of roads are:
- Roadbed is a strip of land that is intended for the movement of vehicles. Provides favorable driving conditions for vehicles of a certain weight, safe movement at a given speed limit, which does not depend on the time of day, weather conditions, or seasonality.
- Right-of-way is a part of the area along the road surface where road elements and structures are located.
- Subgrade is a specially prepared soil mass. The roadway is located on it, the drainage system is being constructed, side ditches and shoulders are placed.
- Road pavement – special reinforcement of the roadway. Designed to ensure the movement of vehicles of a certain weight at the permitted speed. It is resistant to the adverse effects of climatic factors.
- Curbs – two lanes along the edges of the roadway. Adjacent directly to the roadway. Designed for support on the sides of road surfaces and for short-term parking.
- Side ditches are ditches on both sides of an earthen embankment. They serve to remove moisture and dry the roadway.
- Brovka - the border at the intersection of the roadside and the earthen slope.
- Edges are sections of the right-of-way that are located outside the subgrade. In total they are used for green spaces and linear buildings.
Highways are classified according to their significance - federal, regional, local, private.
Paving stones, paving stone road
To create a covering made of natural stones, you will need tools for splitting and processing stone: a small sledgehammer, chisels, wedges. When it comes to power tools, an angle grinder (“grinder”) or a powerful hammer drill with a set of stone attachments are indispensable. For artificial stones that do not require additional processing, you can only get by with a grinder, although, of course, a stationary machine for cutting stone tiles is more preferable.
Scheme of a road with paving stones
The stones are placed on a sand cushion close to each other, hemming if necessary. They are pressed down with a massive rubber or wooden hammer (tamper) until the shrinkage completely stops. The seams between the stones are filled with a cement-sand mixture in a ratio of 1:5.
If weak soils dictate a significant depth of the trough, the canvas is brought to the desired level by adding ballast. In this case, stones of large fractions are first laid, which are then wedged into smaller ones and spilled with sand (Fig. 1).
I recommend: How to draw up an agreement with a private owner during repairs
Who should organize all this work?
A large number of construction companies offer for rent the necessary special equipment for strengthening roads. But the downtime of renting special equipment is often not enough for full-fledged work. There is a need for proper organization of work. It is necessary to select the correct number of units of each special equipment so that all equipment works with maximum efficiency and does not stand idle.
Our company not only rents out the necessary special equipment, we take upon ourselves the complete organization of all work. In addition, we cooperate with large construction and road organizations, from whom we can obtain the necessary large waste for road filling.
Concrete pavement, concrete road
Now let’s figure out how to make a road for your summer cottage with your own hands from concrete.
Crushed stone of fraction 20-40 is used as ballast for roads with concrete pavement; a leveling sand layer is not used. If heavy vehicles can travel along the road, it is advisable to reinforce the fabric with a knitted mesh with a mesh side of 250-300 mm made of AI reinforcement with a diameter of 6 mm. Or welded wire mesh with a mesh side of 150-200 mm and a wire diameter of 3-4 mm.
Scheme of road construction in a country house with concrete and asphalt surface
Inventory beacons made of galvanized steel are not used for the road surface, since over time the concrete around them deteriorates, and the beacons themselves, when worn out and broken, create a danger for the wheels. The concrete is laid on beacon slats, which are removed after the composition has set (usually the next day or a day later). The remaining grooves are sealed with concrete of the same grade using fine aggregate.
For the canvas, concrete of a grade of at least 200 is used with a layer thickness of at least 100 mm.
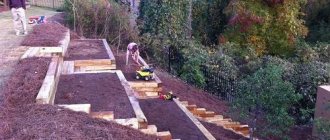
Dirt bed, DIY dirt road
Do not assume that it is enough to level a strip of land and the dirt road is ready. Such a design solution can lead to the fact that after a couple of autumn rains, from a structure that makes movement more convenient, the road will turn into an effective fortification structure, and to overcome it (and across it) you will need a tractor.
First you need to remove the plant layer, and then lay the geofabric. Then the canvas is covered with loam, which is compacted with a tamper or carefully rolled. The final stage of the dirt road will be compaction of the roadbed with crushed stone. To do this, crushed stone of fraction 20-40 is scattered in a thin layer and driven into the ground with a tamper.
Construction of a simple dirt road
Such a road can serve without repairs for many years, even with fairly busy traffic.
It remains to say about two more mandatory events for the road:
•
for all types of roads, be sure to make a slight (about 3%) slope for water drainage, from the middle to the edges;
•
If possible, we make drainage ditches (ditches) along the road (Fig. 2).
Road slabs
Manufacturers offer ready-to-install road slabs made of reinforced concrete. Such products are available in a wide variety of sizes, which determine the cost of the slabs. This is a rather expensive pleasure, but it has undeniable advantages:
- the road made of slabs is designed for serious loads - even heavy trucks can move;
- this coating does not erode;
- no risk of damage (subject to installation technology).
If you need a road of minimal length, this solution will be the most appropriate. Before installing reinforced concrete road slabs, appropriate preparation is carried out. First of all, the top layer of soil is removed, after which it is compacted. Then a sand cushion is installed and a construction mesh or geotextile is laid. At the next stage, crushed stone is applied. Due to the fact that the base consists of several layers, the load on the slabs will be distributed as evenly as possible, which will preserve their original characteristics over a long service life.