Any estate, be it a country house or a private house, must be provided with water. Without life-giving moisture, no cultivated plants can grow, delight the eye with lush flowering, or fully bear fruit. Do-it-yourself water well, despite the seeming enormity of the process, is a very real possibility of extracting water, which can be done independently without the use of heavy drilling equipment. There are several drilling methods that are quite simple to implement and do not require the use of expensive equipment or significant effort.
- 2 Drilling a well manually
- 3 Impact-rope drilling technology
- 4 Nuances of installing casing pipes
Types of water wells
Depending on the depth of the aquifer to which the well is drilled and the features of its design, there are three main types of structures:
- Abyssinian well (the easiest way to make it yourself is due to its relatively shallow depth);
- sandy;
- artesian
The choice of type of structure depends on:
- terrain features, including the explored depth of groundwater, the nature of the soil;
- relief and built-up area - with dense buildings or small dimensions of the estate, the use of heavy drilling equipment is impossible or very difficult;
- construction budget.
The main characteristics of a well are considered (and are indicated in its technical passport when equipped by special organizations):
- aquifer level;
- the immediate depth of the well (does not necessarily coincide with the drilling depth);
- nominal diameter of the structure (determined by casing pipes);
- geological section data;
- aquifer levels (static and dynamic);
- well flow rate.
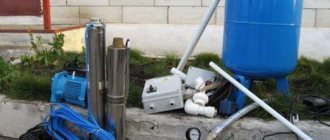
Additionally, it is advisable to know the required characteristics of pumping equipment.
A geological section in this case is a cross-section (relative to the surface of the earth) of the surface layers of sedimentary rocks indicating the depth of permeable and impervious layers and groundwater horizons. Based on the geological section data, the levels of occurrence of aquifers are indicated.
The static and dynamic levels of the aquifer are determined based on the drilling results. The first - before pumping water, the second - during active use.
For normal operation of pumping equipment, the pump is buried below the dynamic level by 5...10 m. This ensures its constant immersion even when the aquifer is depleted and water resources are being used intensively by consumers.
The flow rate (productivity) of a well is understood as the amount of water supplied to it per unit of time. Most often, flow rate is measured in cubic meters per hour (less often per minute), liters per hour, liters per minute. Performance calculations are carried out by specialists, but approximate calculations for a vertical or inclined well can be made by an amateur.
When drilling a well with your own hands, a technical passport is usually not drawn up, although this is incorrect. Records of what the aquifer level, productivity and number of inclusions in the water were at the time of commencement of operation will help determine the cause and nature of problems during further use.
Creating a construction project
If you know at what level the aquifer is located , then you can immediately begin to carry out the work. But when such information is not available, it is necessary to find out at what level the aquifer is located in a certain area.
Therefore, each well has its own individual project , which is influenced by the following parameters:
- soil type and geology;
- the drilling method that will be used;
- obtaining the desired result in the field of quantity and quality of produced water;
- the depth of the aquifer, but not the first one that the drill encountered, but the one that will be responsible for the amount of water over a certain time.
Abyssinian well (well)
This type of drainage device uses the upper groundwater, while cutting off dust, dirt, and typical “overwater” contaminants that pollute the liquid. Thanks to this, the device provides cleaner water than a well.
Important: you can “pierce” a narrow well only on relatively soft soils, without rocky inclusions.
The size of the hole for installing equipment is minimal, the drilling depth is 8...12 m, the diameter is 4...6 cm. In some cases, with an aquifer of coarse-grained or medium-grained sand, a depth of 4...6 m is sufficient. The liquid enters through a filter under pressure, for better To filter groundwater and prevent clogging of the well, you can fill it with marble chips when drilling a hole.
The flow rate is 0.5...3 cubic meters per hour. For small private houses this is enough, for collection points more than 3...5 - too little. A do-it-yourself Abyssinian well is very economical, but it cannot be built on rocky soils. The reason is the insufficient penetration ability of manual drilling or low-power drilling equipment.
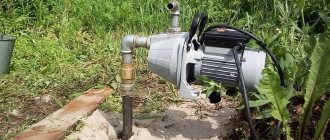
When installing a hand pump on the surface of the earth, this type of well is only suitable for use in the warm season. For year-round operation, installation of an automatic pump in a concreted and heat-insulated pit is required.
To drill water wells with your own hands to a shallow depth, you can do without drilling equipment, using a primitive installation for driving a casing pipe. However, in this case there is a risk of damaging the spear-shaped tip. The optimal construction option is to use a drilling rig with a manual or mechanized drive.
Features of different types
It’s worth starting with the Abyssinian well. Since the depth here is not very great (3-12 m), it is necessary to take into account the location. Care must be taken to place the well as far as possible from potential places where dirt accumulates. That is, there should be no garbage pits or compost nearby, which can pollute the water and make it unusable. There are cases when there are no hard rocks or pebbles in a given area, then there is only one way out - to drill a source directly in the basement of the house. But a number of problems may arise here, since you will have to equip the well with manual columns and a pump in order to be able to extract liquid without unnecessary energy costs.
As noted above, a sand well can be cut to a depth of no more than 50 meters. Before you start drilling, you need to draw up a plan, that is, choose a suitable location. The well should be as far as possible from various sources of pollution. Even a bathhouse or a poultry farm falls under this concept. It is also necessary to take into account future buildings, since it will be almost impossible to move the source.
Sand well for water
A deeper and more efficient design - a sand well - is designed for the use of special equipment and ensures the rise of water from a depth of 14...40 m. The diameter of the hole is 12...16 cm (diameter of the casing pipe), while the size of the casing pipes is the same along the entire length. The structure is “placed” on waterproof (waterproof) soil and guarantees supply due to the infiltration of water under pressure through the lower, perforated part of the product. Additional filtration is carried out by a fine-mesh filter, and the pressure is provided by a submersible vibration pump.
The flow rate of such a device is approximately 1.5 cubic meters per hour, and the quality of the water may suffer due to the seepage of harmful runoff into the sandy layer. Often a filter is installed along with pumping equipment. With constant use, a well can “work” for up to 15 years (in coarse sands); with periodic use, it quickly silts up.
Important: during dry periods, water often leaves sand layers or the level of the aquifer drops significantly.
The most common mistakes during drilling
It may be interesting: How to drill a well correctly?
To non-specialists, it may seem that drilling a well is easy. A similar impression can be formed after reading manuals and watching videos on the topic. In fact, when working, there is a possibility of making a mistake. We will look at the most common mistakes that the authors of videos and instructions are silent about.
Wrong choice of horizon
Professional drillers know the geological sections of the area where the work is being carried out. Beginners often make mistakes when determining the type of horizon.
For example, during drilling, water begins to accumulate in a mine. A beginner may think that he has reached water-bearing sand. He carries out casing and arrangement of the well. But the water stops flowing after a few days or a few months.
The reason for this situation is the incorrect determination of the type and flow rate of the horizon. This means that the beginner has discovered groundwater or slightly watered sand. A specialist in such a situation would recognize a bad water carrier and continue the dive.
Excessive depth
A less common situation is when a beginner gets carried away by the process and dives deeper than necessary. This situation does not threaten the shallowing of the source, but leads to increased costs for development. For a deep well, a more powerful pump and a larger supply of pipes will be required.
No casing
The walls of the mine must be reinforced with casing. You can't skimp on this. If you don't build a column, the mine will collapse and be closed in 1-2 weeks.
Lack of aquifer isolation
It is not enough to recognize the intermediate aquifer in time. It needs to be cut off correctly. Otherwise, contaminated water from the surface will mix with clean drinking water. Isolation of the upper aquifers is carried out using an additional pipe. The space between the walls is filled with cement mortar.
Incorrect sealing of the column
Depressurization often occurs when the welding of a metal column is performed poorly. Particles of earth and water from the upper layers penetrate into the gaps. The quality of drinking water is declining. In case of serious damage, the column becomes clogged and becomes unusable.
Incorrect filter selection
There are no universal filters. When selecting filters, one should take into account the geological section, flow rate of the source, and distance to the bottom. When the filter is not selected correctly, sand will get into the barrel. This leads to silting of the trunk and breakdown of pumping equipment. Only a specialist can choose the right filter.
Artesian wells
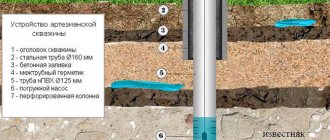
The difference between such a device and a “sandy” well is that drilling is carried out to calcareous layers (depth 40...200 m), and not sand ones. Groundwater does not seep into such layers, and as a result, the water is cleaner. In addition, in limestone the liquid pressure is higher, which ensures its rapid rise to the desired height (up to the creation of a natural fountain).
The construction of an artesian-type well is carried out in stages, since the casing pipe is required only on loose soil layers and cannot be too long. The diameter of the hole is reduced twice: after the end of the casing pipe and in the middle (at a certain depression) of the lime layer. This is due to drilling technology.
Attention: the use of artesian waters is regulated and controlled by the state, so the construction of such a structure on private territory is a rare occurrence. The cost of obtaining permits, drilling, and setting up a “sanitary zone” is 8...12 thousand dollars.
In addition, drilling requires a 12x9 m site without nearby power lines, as well as heavy, large equipment. Therefore, the installation of such wells on private property is very limited.
How to drill a water well with your own hands
When talking about how to drill a well, they usually mean the Abyssinian or sandy variety, since artesian versions of structures are carried out only professionally.
For work you need:
- prepare the drilling site. Tree roots in the area are uprooted (cut down if necessary; for deep work it is better to use an ax with an extended ax handle), any vegetation is removed;
- dig a hole 1...1.5 m deep, with a cross-section of at least 1x1 m. It is necessary to remove the top loose layers of soil, make it easier to carry out further work and arrange a pit or caisson;
- install the drilling rig.
The drill for the well can be homemade. For this, several pipes with a diameter of 120 mm are prepared (they will later serve as casing). The lower end of the lower pipe is equipped with teeth or a drill, the opposite and both ends of subsequent pipes are equipped with threads for connection.
When using an industrial drill, the soil is first “punctured”, then casing pipes are lowered into it.
For small-depth “punctures”, the coordinated work of two performers is sufficient. The auger drill is removed after passing every 10...15 cm of soil, otherwise the excess weight of the adhering earth can lead to breakage of the drill. As you go deeper, you can hang the load on the gate handles, in which case workers will have to put in less effort.
This method of work is considered the answer to the question: how can one drill a shallow well without equipment? This is indeed possible, but it is still better to work with an assistant.
Hydro drilling
If pipes are used for drilling, you will additionally need a water container (barrel) with a volume of at least 200 liters and a pump. After the pipe is initially buried in the ground, a pump is connected to it and water is supplied under pressure. The liquid gradually erodes the soil near the lower end of the pipe, allowing it to be gradually deepened by rotation.
In this case, the destroyed soil is washed out with a stream of water, which is pumped out of the pit by a pump (manual or mechanized). Therefore, the method is called hydrodrilling water wells. Making a breakthrough of the required depth with your own hands is easier and faster than using other methods. If the column depth is small, it is possible to exclude pipe splicing using the threaded method.
The above diagram applies to professional drilling equipment. When carrying out the work yourself, it is enough to ensure the supply of water to the future well and its natural outflow to the outside.
Important: when figuring out whether it is possible to drill a well under water in winter, you should take into account the air temperature. In frosty conditions, working with wet soil and water is impossible. Even supplying hot liquid does not always solve the problem. Work is permissible in the absence of soil freezing.
Drilling using the percussion-rope method
To do this, you need to use a special tower.
It can be made of a metal profile or logs (beams) of a suitable cross-section. It is necessary to install a winch or counterweight to remove the casing; the tower is positioned so that its top is exactly above the drilling site.
First, a casing pipe is installed into the dug hole. Its wall thickness must be at least 5 mm; a seamless pipe is used. After that, a bailer (glass) is lowered into the resulting guide structure, which, with the help of a winch (gate), is raised and lowered (free fall) to a height of about a meter. Thus, the soil breaks down and fills the internal space of the casing pipe. After it is filled 2/3 or more with soil, the pipe is removed and released onto the soil that fills it. The process is repeated until the required depth is reached - that is, the aquiferous sand layer.
Important: when drilling any well, its upper part is significantly wider than the diameter of the casing pipe. To strengthen and stabilize the structure, the gap between the casing pipe and the walls of the pit is filled with crushed stone.
To understand the issue in more detail, we suggest watching several videos on the topic:
Percussion-rope drilling
Manual hydro drilling
Choosing a location and installing a pit
First you need to choose a place to install the well . And if we are talking about human consumption of this water, then it is necessary to look for the source. A hired specialist will help determine such a place, but if the budget is not designed for this, then you can do it yourself using alternative methods, for example, by the amount of dew in the area, dowsing or test drilling.
When the location is determined, you need to dig a hole. This hole is basically one and a half meters wide, deep and long, but there are other sizes, it all depends on how deep the hole should be. Such a structure will greatly simplify further work on installing the pipe and drilling a hole in the ground.
Mandatory preliminary arrangement of the pit is important for two reasons:
- The drilling length is reduced.
- The possibility of a collapse of the earth is excluded.
As a rule, to avoid soil spillage, the pit is reinforced with boards or plywood around the perimeter.
Do-it-yourself caisson for a well
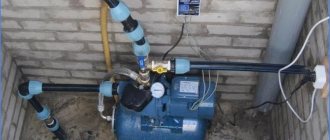
As already mentioned, it is better to place pumping equipment for wells in a special pit rather than on the surface of the earth. To do this, the pit is concreted and insulated, or a caisson is installed in it.
This name refers to a special container made of metal or plastic in which the upper part of the well and the pipe that drains water to buildings are connected. At the same time, pumping equipment, a pressure tank (not always), electrical equipment and control devices are also located there.
Access to the caisson is provided by a hatch. Insulation of the structure is not necessary, but to prevent freezing in winter, the upper part (lid and “ceiling”) is provided with a layer of thermal insulation 50...100 mm thick. Additionally, the walls of the caisson can be insulated.
You can independently build a structure from concrete, brick, blocks (with careful waterproofing), or weld it from sheet metal. Plastic products are produced industrially.
Advice from an experienced summer resident
When calculating pump power, two quantities must be taken into account:
- Height of the water column. This is the distance from the water surface to the surface of the earth.
- Horizontal water transmission range. The calculation includes the distance from the well to the distant consumer.
The height of the water column is an indicator that must correspond to the power of the pump. It is generally accepted that every kilowatt allows you to raise water by 10 meters. The power of the pump is designed to create the required pressure in the pipeline so that each consumer can function in normal mode.
When calculating the required amount of water, you need to take into account the consumption rate in the region when it comes to irrigation. But for domestic use, you need to add up the entire flow rate, as if all the points were turned on. In this case, the pump productivity cannot be greater than the well flow rate. Therefore, when the well is ready, they measure how much liquid flows into it in one hour.


