Mittlider method beds are an effective and less labor-intensive method of vegetable growing than traditional tillage, allowing you to grow high-quality crops in large quantities even on poor soils and in climatic conditions that are far from ideal.
The classic process of growing in vegetable gardens consists of autumn plowing, spring harrowing, 3-5 weedings and loosening per season, and fire cleaning. It has been proven that this method of cultivation disrupts the structure of the soil, making it poorer, leveling hygroscopicity and killing microorganisms. Dr. Jacob R. Mittlider, a world-renowned international agricultural consultant, developed this method of gardening more than 50 years ago to show the public how to grow food in small spaces, in harsh climates and poor soil conditions. The American doctor experimentally proved the effectiveness of his approach, which is much less labor-intensive and cost-effective. It is already used in dozens of countries around the world. Let's get acquainted with this method.
Mitlider beds - description and characteristics of the technology
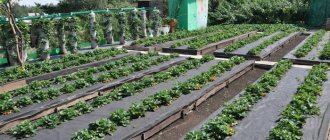
This technology is based on balanced nutrition coupled with the organization of optimal and convenient conditions for various plants. They are planted in narrow, uniform beds with wider passages between them. Standard sizes for most popular garden crops, including potatoes, carrots, tomatoes and eggplants, are 10 cm wide, 45 cm high and 105 cm deep.
In greenhouse growing conditions, it is possible to narrow these indicators to 30 cm in width and 90 cm in aisles. Vegetables are planted in pairs, in a row, maintaining distances from the edge of the bed (10–15 cm) and between rows (15–20 cm). Other features depend on the behavior of specific crops, their root system, the degree of spreading of the bushes, the height of the stem, etc. Large crops, such as tomatoes, zucchini, squash or pumpkin, are planted in one row, planting them along the edge of the bed so that they had space for proper growth and development.
Experts consider the main feature and advantage of the Mittleider method to be uniform distribution of light and improved absorption of moisture after watering. In addition, such narrow mini-vegetable gardens accumulate more nutrients in the soil, which has a beneficial effect on all plants without exception.
Other features include:
- Pure chemical composition of the fruit. Due to a special irrigation system, precipitation does not accumulate on the beds, but immediately flows into organized wide passages, and some harmful substances, including strontium, lead or aluminum, are not deposited in the fruits.
- Easy to care for vegetables. Thanks to this system, all plant care comes down to timely watering, fertilizing and periodic loosening of the soil. The compact shape of the beds allows fertilizers to be better absorbed and distributed evenly throughout the mini-plot, which promotes rapid development and improves the taste of ripe fruits.
But this technology is not suitable for all types of plots and garden crops, so Professor Mittleider also identified some limitations that do not allow obtaining the desired effect.
User tips
Many people know that mulching is good for the soil. Thanks to it, the soil becomes lighter, looser, and weeds do not receive growth activation. Therefore, some craftsmen cover the area with mulch after constructing beds or harvesting in the fall. This also attracts natural rippers - worms, which improve the soil structure.
But otherwise, it is not advisable to change the technological map of the methodology in order to achieve maximum efficiency.
An improved vegetable garden will delight you with reduced labor costs, a beautiful appearance of the plot and a much larger harvest. The advantage of the method is that plants are less susceptible to pest attacks and diseases. But, if there is a Colorado potato beetle or other problems, it is permissible to use special substances.
It is not possible to call this method fully satisfying the principles of “clean” farming due to the active use of mineral rather than inorganic fertilizers. However, the indisputable fact is that it allows you to get the maximum yield in poor soils and unfavorable climates, without spending much physical effort and without requiring significant material investments.
Restrictions on using the method in the garden
Constructing narrow beds and growing vegetables in this alternative way is not practical in lowlands or in areas with groundwater close to the surface. Due to precipitation and spring floods, large amounts of liquid often stagnate on them, which negatively affects narrow row spacing and leads to rotting of plant roots.
The location of the beds must be strictly horizontal, so areas that are located on a slope and other terrain are not suitable for using this method, since in one part there will be a greater accumulation of water and nutrients, while the other will suffer from a lack of them, which will lead to partial or serious loss of yield.
The method is not used in heavily shaded gardens with uneven light distribution, as well as on peat and clay soils. The best option is light loamy or sandy loam soil with a nearby water source. It is not recommended to organize such beds near highways or highways; the plants will absorb harmful substances from polluted air with redoubled force. The minimum distance from such objects is 100–150 meters.
How to arrange a Mittleider vegetable garden in the Russian version
Each technology manifests itself impeccably only where it originated and was improved. When trying to transfer it to another environment, nuances appear that require knowledge of local specifics and a fair amount of ingenuity.
Russian private vegetable growers are faced with two questions regarding Dr. Mittleider's method.
- Modest plots - the classic 6 acres - and low incomes force us to reconsider the size of row spacing. For tomatoes, cucumbers, grapes, the width of the passages is left no more than 90 cm, and for low-growing radishes, beets, strawberries - even 65 cm. At the same time, the width of the beds themselves must remain unchanged: 35 cm inside the sides, otherwise the very idea of such a vegetable garden disappears - a continuous flow light on each sheet.
- A negative attitude towards mineral fertilizers leads to their replacement with compost, manure, potassium humate and wood ash. Quite often the soil is dug up with green manure: peas, clover, mustard. Green manure can be sown between apple trees or mowed in floodplain meadows and used to prepare liquid fertilizer. To do this, two-thirds of the grass is placed in a barrel and filled with water. The infusion obtained after a week and a half is diluted ten times with water and used for irrigation.
The experience of owners of summer cottages shows that Dr. Mitlaider’s method is quite applicable in Russian conditions and can easily be adapted to the climate characteristics of either Kaliningrad or Siberia. Narrow ridges are easy to cultivate while sitting on a folding chair; the condition of the plants on them can be easily monitored on a daily basis. The Russian version of the method allows you to combine moderate labor intensity and the commendable commitment of summer residents to organic matter, which is especially important for older people.
Options for building beds according to Mitlider
Implementing American technology in your garden plot is possible in two ways. Either they install special box beds with sides, or they organize planting directly on the soil. In the first option, compact boxes are constructed from wood, polycarbonate or other suitable material, which are filled with fertile substrate (the lower layer is natural soil, the upper layer is a nutritious soil mixture) and installed in open areas or in greenhouses.
The advantages of using this method of planting include:
- No need to level the soil. “Wooden” beds can be placed on sandy, clayey and heavily eroded soils; the main thing is to properly prepare the garden substrate and choose a place to install the beds.
- Improving the winter hardiness of plants planted in small areas. The presence of walls additionally insulates garden crops during winter cold and autumn frosts. They also serve as a barrier against the penetration of certain weeds and garden pests.
Open beds are placed exclusively on flat surfaces, in spacious, well-lit and ventilated areas with fertile soil. In this case, the sides are made from soil, and the vegetables should grow at the same level.
The principle of care according to the Mittleider method does not depend on the chosen option. The first method is preferable for greenhouses and small vegetable gardens; in fields or large areas, the “earthen” version is used.
We create the right conditions for a good harvest
In order to grow a good harvest, you must adhere to the following rules:
- study the planting dates of the selected crop, compare them with the planting rules in your region, especially paying attention to frost dates. If the crop is not resistant to frost, it should be planted a couple of weeks after they end; if it is resistant, it should be planted a couple of weeks earlier;
- do not place beds in lowlands, on the northern slope of a hill and in other places where the temperature will be several degrees lower than usual;
- You also need to know when frost occurs in the fall in your region so you can harvest your crops and prepare your garden beds for the next season.
We present to your attention a video on this topic:
Arrangement of beds with your own hands
Before using the method of growing in beds from Professor Mittleider, 4 main factors are taken into account:
- selection of a suitable and optimal site;
- determining a specific method for planting vegetables;
- development of plant placement schemes;
- proper soil preparation.
The first stage has already been mentioned above; the best place for planting various vegetable crops is a well-lit and ventilated area with a flat surface. The most important thing is to minimize the risk of flooding or stagnation of water.
The choice of arrangement method also depends on the conditions of a particular area. If there is no need to level the area, and the soil meets all the fertility requirements, then make natural ridges 40–45 centimeters wide and an optimal length of 7–9 meters.
It is easier to achieve a horizontal surface using boxes; they are also most preferable when constructing beds on depleted soil, since it is easy to add the required amount of nutrient substrate to them. The direction of the beds plays an important role; the recommendations state that it is best to form them from east to west, but in more severe climatic conditions it is permissible to organize plantings from north to south.
When choosing a direction, take into account the characteristics of the plants that are planned to be planted. Tall species are sown from north to south, the distance between large-fruited crops (cabbage, eggplant, etc.) should be 30-35 cm. Between small root crops (onions, garlic, beets, carrots) - 5-10 cm, staggered.
When constructing a wooden or plastic box, the last layer of soil should be a pre-prepared nutrient mixture, the components of which depend on the characteristics of the plants being grown, but universal options are prepared from sand with peat and turf soil in equal proportions, and pine sawdust, perlite or fine-grained sand are also added to them . When using a completely artificial substrate, it is necessary to qualitatively and correctly prepare complex starting fertilizers.
Territory marking
A properly planned plot is the key to a good harvest! Long beds are more rational; according to Mitlider, the length should be 9 meters and the width 45 centimeters. The ground for future beds is carefully leveled. For proper distribution of moisture, differences should not exceed three centimeters. The presence of holes in the beds is unacceptable. The territory is marked in the usual way (pegs, ropes).
The uniqueness of the method is the large distance between the beds, which is equal to 105 centimeters; as an exception, it is possible to reduce the distance to 75 centimeters. This arrangement provides ideal illumination for plants, significantly increasing their productivity. To prevent tall plants from creating shade, they are planted in the northern part, and low-growing ones in the southern part.
Construction of boxes using do-it-yourself technology
To make boxes of suitable size yourself, you will need the following materials:
- short boards (45 cm) for cross sides;
- long options for organizing the main walls of the box;
- bars for supports with a section of 5x5 cm;
- agrofibre and marking rope;
- level, tape measure, fasteners and equipment (screws, nails, screwdriver);
- antiseptic agent for wood protection.
The first step is to mark the area using a rope that is pulled between the wedges. The latter are installed in the corners, having previously measured the required distances with a tape measure (45 cm wide and 1 m per passage) and aligned them to the same height.
Now all the wooden boards and support beams are joined and secured to the sides with self-tapping screws or other fasteners. Then they are leveled to the building level; there should be no transverse or longitudinal slopes. At the final stage, a layer of fertile soil is poured into the boxes, and a mixed nutrient substrate is placed on top, or the container is completely filled with an “artificial” soil mixture if the soil on the site does not meet the requirements.
The resulting beds are fertilized with mineral pre-sowing complexes, but organic substances in the form of compost, mullein or bird droppings are not used. Layer options may vary, the main thing is to combine fertile soil, geotextile and useful substrate.
Preparing a narrow version of the bed according to Mitlider
To build an ordinary garden bed with your own hands, you will need all the same materials except boards, plus garden tools - a pitchfork, a shovel and a rake. Work begins with cleaning and preparing the area. All weeds are removed, the root remains of previous garden crops are uprooted with a pitchfork, and the entire area is carefully dug up.
Then the soil is leveled with a rake, making its surface as smooth as possible. Now, using a tape measure, take measurements and drive in pegs in the corners. Saving space by narrowing aisles is not recommended. The established 95–105 cm are observed to ensure that the plants receive enough sunlight and do not shade each other as they grow.
To control the uniform height, a tight rope is pulled, then bulk sides are made and the inner area is leveled with a rake.
Visually check the level; there should be no differences in heights, otherwise water will accumulate in them and the effectiveness of the method will significantly decrease.
In addition, they also make a frame for winter shelter; for this purpose, plastic arches are installed on both sides, onto which it is then easy to stretch and secure suitable material. If all points of the instructions are followed, begin preparing the seeds and the corresponding starting fertilizers.
Interesting article! How to make beds from boards.
Features of irrigation when using the method
Vegetable growing in narrow beds and small areas proceeds normally only with constant and comprehensive watering of the plants planted in them. The features of the Mitlider technology lie in compliance with the conditions discussed below.
Root hydration. Watering is carried out only in this way, since additional irrigation of the green part of the plant and sprinkling of the soil contribute to the formation of a favorable environment for various diseases and pests.
Water should only fall on narrow beds, while the passages should be left dry; for this purpose, side wooden or earthen sides are constructed.
Daily summer watering. In the warm season, the soil is moistened frequently and abundantly. If it is not possible to do this constantly, then install a high-quality automatic drip irrigation system. The liquid should be clean, warm, with a minimum content of calcium salts and magnesium.
Water the beds in the morning, afternoon or evening, but with the onset of August, evening approaches are stopped so as not to provoke the appearance of powdery mildew, especially in some vegetable crops.
Recommendations for applying fertilizers and fertilizing
The entire process of feeding garden crops in Mittleider’s beds comes down to a combination of two nutrient mixtures. They are created taking into account the balance of nutrients and trace elements necessary for plants, including phosphorus, potassium, nitrogen and iron. These arrangements have been time-tested in various climatic conditions and are used in all countries where this planting method is used.
The first option is designed to level out acidity and improve the calcium composition of the soil. It includes dolomite flour, boric acid or sodium borate, chalk or slaked lime, which are added during the pre-sowing preparation period. Before using these fertilizers, the acidity factor of the soil is determined as accurately as possible, for which a special device or folk remedies are used.
During the active growing season of plants, mineral complexes and mixtures are used, for which superphosphate (100–110 g), urea (200 g), nitrophoska (420 g), potassium magnesia (270 g), boric or molybdic acid, 2 and 3 g, respectively, are combined. .
Plant feeding is carried out in three mandatory stages. Before planting, add 2 parts of the first mixture and 1 part of the second mixture to the soil. The soil is watered abundantly at the roots and the beds are dug up. Next, surface fertilization is carried out once a week while adding liquid. 60–70 grams of a mixture of the mineral complex is enough for one standard bed.
If necessary, additional nutrients are added to a particular crop, especially if its appearance indicates a deficiency of one of the important elements. This can be copper or zinc sulfate, manganese sulfate, etc. As practice shows, for normal yields of popular vegetables (potatoes, beets, onions, tomatoes), it is enough to follow the above rules and composition, as well as timely and proper watering.
The Mittleider method is a whole system of principles for working with soil, lighting, watering and fertilizing. When using this alternative and largely non-standard technology, every little detail should be calculated. It’s better to start with one small bed in order to evaluate the effectiveness of the method and the feasibility of its use in your garden plot or vegetable garden.
Growing tomatoes in protected soil
Tomato seedlings are planted on ridges in May.
Tomatoes are a very capricious vegetable; growing them has its own characteristics. Tomatoes are poorly adapted to growing in wet weather and are susceptible to late blight. When planted according to Mittleider, tomatoes produce high yields. Modern vegetable growing allows the use of hybrids and varieties to produce crops.
Tomatoes of early varieties are grown in the beds. Growing seedlings begins in early April. Tomato seedlings are planted on ridges in May. Produce film cover. Without shelter, seeds are sown from April 15. For mid-season varieties, seeds are sown in March. Tomatoes of different varieties are planted at different distances from each other. This depends on the presence of stems in the bush (one, two or three) and the number of stepsons.
The tomato harvest depends on the light. The less light, the smaller the number of fruits. The tomato bush is formed into one, two or three stems. One stem for varieties Malyshok and Yarilo. Single-stem tomatoes are pruned during the growing season. All stepsons are removed weekly. After the fruits are formed, remove all the leaves that cover them. The apical shoot is removed on August 1.
Vegetables are subjected to standard agrotechnical care: fertilizing and watering. Additionally, fertilizers are applied during budding (wood ash 50 g) and fruit formation (magnesium sulfate 25 g/m). When budding, it is necessary to treat the tomatoes with the preparation “Epin” (10 drops dissolved in 1 liter of water). To relieve stress in plants, additional treatment is carried out with the same drug every other week.
