28.12.2020
Groundwater
Editorial staff of the “New Place” website
Share
From this article you will learn
:
- Types of groundwater
- 3 methods for determining groundwater levels
- Danger of high groundwater level in the area
- Open drainage system equipment
- Installation of a closed drainage system
- Use of wellpoint units
- Other ways to solve the problem
- Getting rid of groundwater in the basement of a private house
- How to get rid of groundwater in a cesspool
- Protection against groundwater entering the well
- Raising the site as the most radical method of solving the problem
- Choosing a site drainage method
How to get rid of groundwater is a common question among private home owners. It is most difficult for those whose plots are located in low-lying areas. Groundwater can rise, especially during the rainy season or periods of snow melt, and flood everything around.
Fortunately, there are ways to solve the problem. Some of them are more labor-intensive, some less. You can do everything yourself, or you can with the help of specialists. The main thing is to understand in which direction to work. And only after that choose one or another solution to the problem.
Types of groundwater
When buying a plot of land on which you will build a cottage, you should take into account not only its size, but also its location. Experts advise studying the soil characteristics, as well as determining the level of groundwater. These parameters affect the complexity of construction work and arrangement of the garden. But often the owner of the land who sells it cannot answer this question. This parameter may differ, as well as their origin of groundwater.
The high water is located closest to the surface, its level is high and amounts to 50–300 cm. This water is located in the depressions between the earthen layers. High water is formed from rain, snow and condensation in the ground. If a drought occurs, the liquid evaporates. But as soon as precipitation appears, perched water forms again.
The depth of free-flowing groundwater is slightly greater. Another name for them is “pound water.” They are found at a distance of 100 to 500 cm from the surface and never disappear, even if there is a dry spell. It is free-flow water that replenishes rivers and lakes. They can have a negative impact on buildings because they erode the foundation of the house. They have one peculiarity: the location of pound waters can change, as well as their depth.
At the maximum depth there are artesian pressure waters. It is not possible to determine their location on your own. A drilling rig is used for this; it is used during the construction of wells. Artesian waters are formed from underground sources. This liquid can be used for drinking.
How deep the groundwater is located is influenced by the topography of the site. You should also consider whether there are lakes or rivers near your area. If the area is swampy or the area is low, groundwater will be located close to the surface, at a distance of 100–200 cm or even less.
Islets
The floating island is one of the fashion trends. The ancient civilizations of America even grew gardens this way. The design is based on reeds, branches, moss, on which aquatic plants were planted. The roots entwined this structure, and the flowers felt great.
To create such a structure, any porous base that can float is suitable. For example, foam packaging from household appliances. Fix reeds and branches on its surface and add peat or humus. Plant plants in this substrate, and the floating island is ready.
Danger of high groundwater level in the area
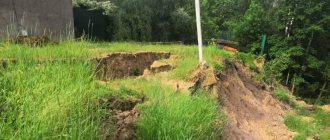
What troubles can await the owner of a site where the depth of groundwater is shallow? First of all, be prepared for the fact that because of the rains, the groundwater level will rise even higher, as a result of which the street toilet, septic tank, and sewer system will be flooded. What this can lead to:
- If water accumulates in an outdoor toilet, the foundation of the building will collapse and an unpleasant odor will appear in the area. In addition, there is a high risk of spreading dangerous microorganisms.
- When sewer pipes located in the ground without protection become flooded, rust forms on them. Because of this, the sewage system will quickly fail, and you will have to spend a large sum on replacing the pipes.
- If water accumulates around the septic tank, it will not be possible to clean it, the containers will be overfilled, and the discharge of the filtered liquid into the soil will be slow. The same applies to a cesspool, the entry of groundwater into which will cause a lot of trouble.
You will have to deal with flooding if you have a cellar or inspection hole. When the groundwater is high on the site, and the owner of the house equips a cellar, a basement like a thermos greenhouse, or a thermos greenhouse itself, as well as a garage pit, he will encounter serious difficulties. The fact is that during rain or spring floods, liquid will accumulate in these places:
- It will not be possible to store homemade products, vegetables and fruits in the cellar and basement, because they will rot. In addition, the buildings themselves will begin to collapse.
- If the garage pit is wet, the tools that are usually stored there will rust. You will not be able to repair your car in the inspection pit; in addition, the foundation of the garage will collapse.
- As for the thermos greenhouse, it will be too damp in the spring months, when it is necessary to plant. This problem will also have to be dealt with.
Due to the close location of groundwater to the surface, the foundation of the house will quickly become unusable. To protect the foundation from high humidity, waterproofing material should be used.
What happens if the ground is not just wet, but the foundation of the house is actually in water? Concrete may burst, the level of the foundation will change, it will pull the walls with it, which will also crack. A large sum will have to be spent on restoring the cottage’s foundation, walls and basement. The work of tightening the walls with metal structures, as well as pouring glass and other materials under the foundation will require a lot of labor and time.
Troubles will also arise with the well. Groundwater is found throughout the area, so because of it, the liquid level in the well will increase.
If there is a well on your territory, next to which there is a cesspool or an outdoor toilet, and the groundwater lies high, it will not be possible to use well water for drinking.
It is also necessary to take into account the type of soil water and its composition. Most likely, you shouldn't drink from a well at all. Because the liquid contains too high a percentage of salts. It is prohibited to use even on farm animals. Washing with such water will also not work, since it does not remove household chemicals from the fabric well.
As for garden plantings, not everything is so simple here. Some believe that groundwater does not harm plants, but its stagnation is harmful. When the depth of groundwater is constantly changing, nothing bad will happen.
Fruit trees, shrubs and other plantings will not be able to grow normally if the GWL is high in spring and autumn. Due to increased humidity, the root system of plants will rot.
In addition, much depends on the composition of groundwater. Perhaps this liquid is from a car wash station or car service station or contains harmful emissions from a chemical plant. Such liquid will cause irreparable damage to garden plantings.
If there is groundwater on the site, how to get rid of it? In this case, you will have to equip a drainage system. It eliminates waterlogging of the area and prevents soil washout. As a result, the house will last longer and the basement will be dry. The maximum efficiency was shown by open type drainage systems: surface, trench, as well as pipe systems: closed, deep, or systems using wellpoint systems. Next, let's look at the features of each of them.
Inexpensive do-it-yourself storm drain
The first thing that comes to mind in order to equip a budget option for storm drainage on a site is to lay special trays.
Trays can be made of concrete or plastic, but they are expensive. This forces users of our portal to look for cheaper options for installing storm drainage and drainage systems from the site.
Denis1235FORUMHOUSE Member
I need to make an inexpensive storm drain, about 48 m long, along the edge of the fence, to drain the melt water that comes from the neighbor. The water must be drained into a ditch. I was wondering how to drain the water. At first it occurred to me to buy and install special trays, but then they would be left with “extra” grates, and I don’t need any special aesthetics for the storm drain. I decided to buy asbestos-cement pipes and saw them lengthwise with a grinder, thereby getting a homemade tray.
Despite the budgetary nature of this idea, the user was not attracted to the need to cut asbestos-cement pipes on his own. The second option is the opportunity to buy gutters (plastic or metal) and lay them on a prepared base in a concrete layer of about 100 mm.
Users of the portal dissuaded Denis1235 from this idea in favor of the first option, which is more durable.
Having latched on to the idea of an inexpensive storm drain, but not wanting to deal with cutting pipes on his own, Denis1235 found a factory that produces asbestos-cement pipes, where they will immediately be sawed into pieces 2 m long (so that the 4-meter one does not crack during transportation) and ready-made trays will be delivered to the site . All that remains is to develop a scheme for laying the trays.
The result is the following “pie”:
- Soil base in the form of a bed.
- A layer of sand or ASG about 5 cm thick.
- Concrete about 7 cm.
- Tray made of asbestos-cement pipe.
When installing such a storm drain, do not forget to lay a metal mesh (for reinforcement) at the joints and leave a deformation gap (3-5 mm) between the trays.
Denis1235
As a result, I made a budget rain shower at the dacha. It took 2 days to dig the trench, another two days to pour concreting and install the route. I spent 10 thousand rubles on trays.
If we calculate at 2016 prices, then for 1 linear meter of a tray cut from an asbestos-cement pipe it cost about 200 rubles.
Practice has shown that the route “overwintered” well, did not crack and intercepts water from its neighbor, leaving the area dry. Also interesting is the option of a rainwater drainage system for a portal user with the nickname yury_by.
yury_byFORUMHOUSE Member
Because The crisis doesn’t seem to be ending, then I started thinking about how to install a storm drain to drain rainwater away from the house. I want to solve the problem, save money, and do everything efficiently.
After some thought, the user decided to make a storm drain for water drainage based on flexible double-walled corrugated pipes (they cost 2 times less than “red” sewer pipes), which are used for laying power cables underground. But, because The depth of the drainage route is planned to be only 200-300 mm with a pipe diameter of 110 mm, yury_by was afraid that the corrugated pipe might break in the winter if water gets between the two layers.
As a result, yury_by decided to take a budget “gray” pipe, which is used when installing internal sewerage. Although he had concerns that the pipes, which were not as rigid as the “red” ones, would break in the ground, practice has shown that nothing happened to them.
yury_by
If you step on the “gray” pipe, it turns into an oval, but there are no significant loads in the place where I buried it. The lawn has just been laid and there is foot traffic. Having laid the pipe in the trench and sprinkled it with soil, I made sure that they kept their shape and the storm drain was working.
The user liked the option of installing an inexpensive storm drain based on “gray” sewer pipes so much that he decided to repeat it. All the nuances of the process are clearly demonstrated by the following photographs.
We dig a hole for a drainage well to collect water.
Level the base.
We install a concrete ring.
The next stage is to fill the bottom of the well with gravel of fraction 5-20.
We cast a homemade well cover from concrete.
We paint the manhole cover.
We insert a drainage plastic “gray” sewer pipe into the well, maintaining a slope of 1 cm per 1 linear meter.
We spill the pipe with a mixture of sand and water so that there are no voids left between the walls of the trench and the pipe.
To prevent the pipe from floating, it can be pressed down with a brick or board.
We put the lid on, install the hatch and fill everything with soil.
This completes the production of the budget rain shower.
Open drainage system equipment
An open drainage system is the best solution if you are looking for a way to get rid of groundwater. With its help, it will be possible to drain melt and rain water where it accumulates. An open drainage system is divided into two types: point and linear. In the first case, the system is installed under drains, watering taps, and also where it is necessary to quickly remove accumulated liquid. Drainage systems of the second type are made in the form of channels with a container for collecting moisture. Many homeowners combine these two types of drainage.
To equip an open drainage system, you will need:
- concrete, crushed stone or PVC to make channels;
- protective and decorative grilles;
- storm water inlets with holes for drainage of liquid. These tanks are used for point drainage; they are located under drainpipes. Storm water inlets are made of polypropylene or polymer concrete;
- storm flaps. Necessary to prevent water from returning from the container to the pipe if it rains.
Algorithm of actions:
- We will install ditches around the perimeter of the house, the depth of which is 50–60 cm and the width of 0.5 m.
- We place rainwater inlets under the gutters. It is important that the ditches are dug with a slope of 5-10 degrees to allow water to drain better. Their shape should be V-shaped or U-shaped.
- Crushed stone or polypropylene, polymer concrete or PVC channels are laid in the trenches.
- We bring the trenches to a water collection tank, a ditch or an artificial reservoir.
We hide the channels under a grate made of cast iron. Its weight and thickness depend on the load experienced.
Pumps
Drainage pumps are needed when the water in the system needs to be raised above its natural level. For example, the drainage is at a depth of 80 cm, and the drainage ditch is at a depth of 50 cm.
When choosing a pump, it is assumed that the volume of pumped wastewater is from 40 to 200 liters per hour per 100 m² of area. But these are minimal figures that do not take into account inevitable “force majeure” events, for example, heavy rains that will oversaturate the soil with moisture. So it would be wise to purchase a pump that is two or even three times more powerful than required.
As for the pressure, it is determined based on the distance from the water surface to the top point of its supply. Using a simplified formula, pressure loss can be calculated as follows: every 10 m of pipe means minus 1 m of pressure.
Installation of a closed drainage system
To get rid of groundwater, you can also install a closed drainage system. However, before starting work, you should create a diagram that will indicate trenches for drainage pipes, as well as storage tanks and outlets. After this, you need to determine the depth of the pipes.
This work should be approached responsibly, since the drainage system should be located below the level of soil freezing in winter. Otherwise, the liquid in the pipes will turn to ice, they will burst, and as a result, the drainage will not function effectively. The depth of soil freezing depends on the climate of the area where you live.
Also study the composition of the soil in which the pipes will be located. If the soil is clayey, the freezing depth will be small. In the middle zone of our country, this parameter is 130–200 cm.
Sequencing:
1. Calculate the number of wells in the territory
. They should be around the perimeter of the building. In the case where the drainage area is straight, they are located at a distance of 15 m from each other. But when the system is branched, we place the wells at the junctions of the side branches and the main drain channel.
2. We purchase building materials and tools
. What you will need:
- Sand and crushed stone for equipping a cushion at the bottom of the trench, as well as for arranging a protective layer over the pipes. You can fill the pipes with crushed stone after laying them so that the liquid flows into the pipe faster and the soil pressure on it is reduced.
- Drainage corrugated pipes made of polyvinyl chloride or HDPE. This material is best suited for creating a closed drainage system. The service life of HDPE and PVC is quite long and amounts to 50 years. Perforated pipes, flexible and inexpensive.
- Geotextiles. To protect the pipes from contamination and gravel, we also cover the trench.
- Containers (wells). Corrugated polyvinyl chloride pipes of sufficient diameter or factory-made tanks with holes for pipes are also suitable.
- Fittings for connecting pipes: plugs, tees, adapter couplings, crosses, rotary tees. They should be selected taking into account the drainage scheme.
- Tools: earth drill, shovel, bayonet-shovel, hacksaw, construction level.
This is interesting!
Water purification for a private home: we create a universal system Read more
3. We dig trenches of the required depth, focusing on the diagram
. They must be made with a slope; it is 20–30 mm per 1 meter of trench. We carry out the central main with a slope towards the water intake. Since the volume of liquid is large, we make the slope stronger than that on the branches, namely 40–50 mm per 1 m.
4. Place geotextiles on the bottom of the trench
. It is important that the ends of the fabric remain outside the trench. We pour crushed stone on top, the layer thickness is 10–20 cm. Then we check that the slope angle meets the requirements.
5. We install pipes to the points of their connection with wells
.
6. We install wells, connect them to pipes using insulating couplings
. Apply adhesive sealant to the joint areas.
7. Fill the pipes with crushed stone, then wrap it in the edges of geotextile
. Pour sand or earth on top.
Drainage without crushed stone
There are ready-to-install drainage systems that significantly simplify the work of draining the site. Thus, SoftRock modules consist of a perforated flexible pipe, which is immersed in polystyrene foam backfill. According to manufacturers, it is 30–50% more effective than traditional crushed stone. To protect against silting, the pipe is wrapped in geotextile.
The length of the modules is 3 m, and the internal diameter can be 110, 160 or 200 mm. The system is designed for installation in the ground to a depth of up to 2.5 m. Its predicted service life is about 100 years.
Use of wellpoint units
Don't know how to get rid of groundwater in a garage, well or cesspool? The use of wellpoint units will solve your problem. This system is used for water reduction when laying the foundation of a house, as well as for arranging utilities underground.
The wellpoint is made in the form of a pipe made of polymer material into which the filter is built. The installation also consists of the following elements:
- collector pipes;
- dewatering pumping station;
- sand trap;
- drainage and discharge;
- drainage well.
To install the wellpoint unit, proceed as follows:
- Drill wells at a small distance from each other. Place wellpoints in them up to the groundwater level. Install a collector pipe above the ground, which will be connected to the wellpoints.
- The pumping station will pump out water, which will flow into the collector pipe, and then through the sand trap into the drain pipe, from there into the drainage well.
Setting up such a system with your own hands is quite difficult. Special equipment will be required, as well as geological and hydraulic studies of the site.
Moisture-loving plants
Before you drain an area of water with your own hands, it is worth knowing that there is a way without installing engineering structures on the site. This is planting moisture-loving plants that will “work like natural sponges.” Their root system will actively absorb a large amount of liquid, and the vegetative part will evaporate it. However, this method will be effective in low swamp conditions. By using perennials and shrubs that need a lot of water, you can speed up the drying of the soil after rainfall or flooding. You can plant:
- maple;
- poplar;
- birch;
- dell;
- viburnum;
- swimsuit;
- day-lily;
- iris;
- aquilegia;
- Volzhanka;
- blueberries
The advantage of this method is that you can get rid of excess moisture from the area and create a carpet of beautifully flowering plants. However, using the method, the acidity of the soil increases. Therefore, to restore normal PH, you need to systematically add alkali to the soil.
Other ways to solve the problem
- We are setting up an artificial pond.
When the area of the territory is large enough and the site has geological features to drain it, a pond is installed. It will be possible to create an artificial reservoir only if the low area of the site with marshy soil is located on the periphery. This technology is called drainless dehumidification. However, surface drains can be made in the form of ditches. They can be decorated and turned into dry streams.The main advantage of creating an artificial pond is that you will be able to diversify your landscape design. However, you will have to constantly clean the lake or pond and pump out the water. The fact is that it will accumulate, bloom and contribute to waterlogging of the area.
- We plant moisture-loving shrubs and trees.
Using this method, you can drain the area without creating a drainage system. Such plants will naturally take up excess water using a developed root system. Evaporation will occur due to the abundant leaf crown.The effectiveness of this method is not high enough. However, if you also equip a standard drainage system, you will be able to drain the area.
But if you use only moisture-loving garden plantings to combat groundwater, this will only help in the case of a not very wet area or as a preventive measure. For example, if you have a dacha where you live only in the summer season, then you will not have to urgently deal with melt or rain water.
If you plant shrubs, trees and grasses that love moist soil, you will be able to reduce flooding of the area due to high water. The top layer of soil will dry out faster after spring floods, as well as heavy rainfalls in the fall.
What plants are best suited for these purposes? First of all, those that grow in natural conditions near bodies of water and in wetlands: willow, alder, birch. Shrubs, such as rosehip, hawthorn, and viburnum, should be planted along the border of the site. They will act as a hedge.
Spillways
The water level in the drainage pond changes over time, especially if there has been heavy rain. In cases where there is a hole nearby for draining into a storm sewer, it is necessary to organize the drainage of water into it or into a natural reservoir located nearby . But more often, water from such a pond is used to water vegetable beds and garden trees. They organize any of the drainage systems using a pipe system.
The parameters of the pipes are selected based on the volume of water that they have to pump. And whatever is planned - organizing a system for watering gardens and gardens or draining excess water into a natural reservoir, this should be included in the work carried out simultaneously with the construction of the pond itself.
Creating an artificial reservoir requires effort. But it is quite possible to calculate and assemble the drainage system on your own. It is important to remember that the work does not end there. In the future, maintenance of the pond and drainage ditches will be required. Excess or dead vegetation must be removed, and the surface must be periodically cleaned of leaves and pathogenic microorganisms. Then the system will function smoothly and efficiently.
Sources:
https://artflora.com.ua/main/vodoemy/proektirovanie_vodoema/drenazh_vodoema/ https://www.baurum.ru/go/osushenie-uchastka-i-drenazh/ https://fermer.blog/bok/blagoustroystvo/ iskusstvennye-vodoemy/prudy/vidy-prudov/15838-drenazhnyj-prud-svoimi-rukami.html
Getting rid of groundwater in the basement of a private house
Don't know how to get rid of groundwater in a cellar or basement? In this case, to drain the room, an automatic system is installed that will remove accumulated water. How to equip it:
- We make a pit in the basement. To do this, we dig a recess 0.5 by 0.5 by 0.5 meters. Next, we concrete the walls or strengthen them with brickwork so that they do not collapse. Fill the pit with gravel, layer thickness 10 cm.
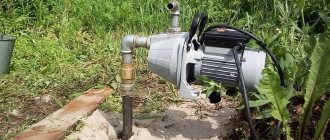
- We buy a pump, it will automatically turn on if the recess is filled with water to a certain level.
We install a pump in the pit, connect hoses to it, then take them as far as possible from the basement. If the groundwater level rises, the pit will fill first. The pump will start working and pump out the water. This method is suitable for draining basements during rising groundwater levels.
The cost of setting up this system is small; you can do it yourself, and the work and setup will not take much time. However, this method has disadvantages. Firstly, the pump will function normally until its resource is exhausted. Then you will be forced to buy a new one. Secondly, the water pumping system fights only the effect, not the cause, and eliminates flooding temporarily.
How to get rid of groundwater in a cesspool
If you have started building a cesspool and noticed that dense clay soil has appeared after a layer of sandy soil or loam, you should think about it. You have stumbled upon an impermeable layer, under which there is a large volume of groundwater formed after precipitation.
How to prevent subsoil water from flooding a cesspool? First of all, a drainage system should be installed. It is a 15-centimeter trench of sufficient depth, which is located below the cesspool.
Large crushed stone is placed in the trench and a perforated pipeline or gutter is installed. Then the system is covered with geotextile, on top of which it is covered with earth.
The drainage system must be located on a slope so that groundwater flows, collects and is discharged.
If you want to get rid of groundwater in a cesspool, follow the following procedure:
- Install an insulating layer under the cesspool, and also waterproof the walls of the structure.
- Install an internal drainage circuit.
- Install a pump to pump water out of the drainage system.
When groundwater is located high enough, the above actions cannot be avoided. Otherwise, the liquid will stagnate in the cesspool, silt will form at the bottom, and the wastewater will not be able to drain. In addition to the appearance of an unpleasant odor, the contents will begin to flow out of the cesspool. It will be necessary to repair it and call the vacuum cleaners.
Please take note of some important tips. If groundwater gets into the cesspool, you may decide to build the system in another place, then you should dig a new hole only in the dry season, when there is no rain and the groundwater level is as low as possible.
Is water accumulating in the septic tank? Then it should be pumped out, leaving a little liquid. This is necessary in order to then beat the sediment under high pressure of water. By doing this you will stir up silt. Next, pump out the water from the cesspool again.
It is necessary to pour gravel onto the bottom of the structure, the layer thickness is 20 cm. This will protect the bottom from the formation of silt, which does not allow liquid to escape. It is important to periodically add special biological products with microorganisms that process organic waste.
In fact, cesspools are becoming a thing of the past. The labor and time costs for their arrangement are large, and the design will still not comply with the requirements of SanPiN. Therefore, it is recommended to install modern septic tanks instead of cesspools.
Interior decoration
Considering that this is a storm pond, it is advisable to periodically clean it, so a water pump is installed in it . Any model with a desired capacity of 350–500 l/h is suitable. Purchasing a filter for water purification is also advisable for landscaping work. It is needed to eliminate unpleasant odors, fungal formations and mold. Mechanical filters are designed to purify water from large debris, while biological filters reduce the concentration of pathogenic bacteria, mold and fungi.
You can also decorate a pond by placing statues on the shore or lighting fixtures. The figurines of fairy-tale creatures are made from materials that are resistant to weather conditions. They are available in a wide range at many garden decor stores.
Learn about the features of a fountain in landscape design.
Protection against groundwater entering the well
Many summer residents install a well with drinking water on their property. If you do not make mistakes during work, the well will last for many years.
How to get rid of groundwater in a well in the spring? Indeed, in this case, you will not be able to drink from it from the beginning of spring until summer. The fact is that groundwater contains hazardous substances, salts, pesticides and herbicides that are used to treat agricultural plants.
A pump is used to pump out groundwater. However, this measure is temporary. How to make well water clean and increase the life of equipment:
- Protect the well with caissons and conductors . Install them at a depth where the boundary of the impermeable layer is located to prevent the penetration of groundwater.
- Also waterproof the outside of the well, restore the concrete rings, and seal the joints . Such waterproofing will prevent contaminants from getting into drinking water, in addition, the rings will not collapse.
- Install a security lock around the well. If you fill the dome with clay, the perched water and groundwater will not flow into the well.
- If necessary, install a storage well next to the well into which groundwater will be pumped . This way you can drain the area next to the well, and the collected water is used to water the plants.
Raising the site as the most radical method of solving the problem
Sometimes, even if the drainage system is properly arranged, groundwater will still flood the area. If the methods described above do not solve the problem, you should plan the area and fill it. The cost of the necessary work is quite high, but the effectiveness of this method is high. How to raise the site?
It is necessary to make a plan of the territory, indicate on it the level of heights, as well as how the surface aquifer is located. In addition, the thickness of the fertile layer is noted. This information is necessary to understand how to make bedding. To carry out this work, you should contact a professional, especially if the site has geological features.
This is interesting!
Equipment of a well in a private house: stages, types, secrets Read more
After this, it is necessary to demolish the old structures, remove vegetation from the territory, garden and household waste, stumps. Next, a drainage system is laid.
Then backfilling is done again. A foundation is installed along the site, which will protect the backfill soil and sand from the harmful effects of precipitation.
It is important that the filling is carried out in layers; the soil must be covered by 10–15 cm. Using a vibrating rammer, the filling must be compacted. The lower layers should be kept for 14–21 days to allow them to shrink. Next, you can fill the area with fertile soil.
How to prevent layers from mixing? Geotextiles are used for this. To secure the fill, it is necessary to plant cereal crops with a branched root system. To increase the efficiency of such a system, moisture-loving shrubs and trees are planted, as well as grasses that will absorb excess water. For example, birch, willow, rose hip, hawthorn, game, spirea are suitable.
Choosing a site drainage method
Often, the owner of a site learns that the groundwater level is high after he has already purchased the land. In such a situation, it is necessary to quickly take measures to combat high humidity in order to avoid damage to the foundation of the house, as well as garden plantings.
Draining the area is quite simple; the main thing is to act correctly, taking into account the following features:
- soil composition;
- groundwater level, direction of their movement;
- the presence of lakes and rivers nearby the site;
- area of flooded territory;
- presence of buildings, garden plantings.
You should choose one or another method of combating groundwater, taking into account the characteristics of a particular site. For example, if it is swampy, it is worth raising it and installing an open drainage system. When groundwater is located close to the surface, a closed drainage system should be installed, a well with a pump should be made to pump out the water. This method is suitable for areas located in lowlands.
;
Groundwater
Did you find this article helpful? Share it with your friends: