Gravel paths allow you to delimit the site and improve the landscape. The material with which they are created can be purchased at a low price, which makes it more attractive compared to its analogue. Considering that gravel fractions are scattered over the surface of the soil, it is important to prepare the soil for arranging paths. The key factor here is the formation of a reliable foundation along with laying the borders. The need to comply with such rules is due to the fact that you can easily get stuck in gravel.
Feasibility of creating gravel paths
The design of the road and path network on the site begins immediately after determining the location for the construction of a house and auxiliary premises. After studying the relief features of the territory, they proceed to drawing up a plan on paper, where they mark the main and auxiliary paths and passages. At this stage, a decision is made on the width and type of paving of the road network.
Main paths (from the gate to the central entrance, from the house to the utility room, summer kitchen), which will be subject to heavy loads, are best made of slabs, paved with natural or artificial stone. These materials are durable, resistant to stress, easier to clean in winter, and comfortable to walk on. A gravel path can be adjacent to the main road, be the main one in a recreation area or in a garden, or duplicate it. If the path is made of loose gravel, it is more difficult to move along due to the viscosity of the material, and it is impractical in winter.
Designer recommendations
Gravel paths are ideal for landscape style gardens. They are made tortuous with thin, barely noticeable borders made of polymer materials. To emphasize the closeness to nature, the width of the passage can be slightly varied.
Highways made of large pebbles would be appropriate in a vegetable garden with a regular arrangement of beds. If the base is made correctly, the stones help drain excess moisture. Plants will be less affected by diseases.
Pebbles look natural around artificial reservoirs; they can fill the space around an alpine slide. Combined paths are aesthetically pleasing; their central part is made of slabs or natural stone, and the space around is covered with pebbles.
Designers are increasingly using pebbles painted in different colors to create flower beds. If there is a dry stream planned in the garden, then a gravel path should not be led to it. These landscape elements will merge and will not be expressive.
Large sea pebbles with straight edges and a smooth surface can be used for paving paths, and the gaps between the pebbles can be filled with fine gravel or crushed stone. Individual stones can be painted in different colors, creating a composition of flower petals or any other.
The use of decorative crushed stone in landscape design
Stone chips are used not only for decorating flower beds. Decorative crushed stone in landscape design is often used to create demarcation zones between plantings, decorate fountains or artificial ponds.
It can also be found in various landscape designs, such as Japanese or Scandinavian style. In this case, free areas between large stones are filled with crushed stone.
Shady areas of the garden, unsuitable for placing a flower bed, are ideally suited for creating rocky compositions. It can be a rocky or alpine hill, rock garden, rocky or mountain slope.
Ideas for combining different colors and fractions
Flowerbeds decorated with decorative crushed stone can be monochromatic or combine bright colors, adding color and beauty to the landscape. These can be rainbow stripes or multi-colored islands that harmoniously echo each other. In this case, the color must be selected so that it contrasts with the plants planted in the flowerbed.
In order for the composition to look harmonious, you need to know the rules for combining shades with each other:
- white and black are considered universal and can be combined with the entire color palette;
- gray is basic, but looks better with pink and purple;
- red – with green, yellow, black, brown;
- brown - with pink, beige, green, purple;
Use as mulch
Decorative crushed stone is often used as mulch to protect the root system of fruit trees, conifers and perennial flowers. This allows you to give the site a more original and natural look.
Decorative crushed stone as mulch
Stone chips protect the soil well from weathering and corrosion, prevent its compaction and inhibit the growth of weeds. The advantage of inorganic mulch is its durability and high aesthetics. Whereas organic mulch needs to be changed once a year.
Advantages and disadvantages of paths made of crushed stone or gravel
The advantages of rocky paths include:
- aesthetics, the ability to choose a material that matches the style and color of the home’s decoration;
- durability of the coating;
- relatively low cost;
- a garden with a gravel path requires less labor for weeding;
- good drainage capacity in conditions of excess rain.
Disadvantages of loose paving with low binding properties:
- if stones with sharp edges hit, there is a possibility of injury, not suitable for families with small children;
- if the material is incoherent, it is difficult to move on it, it is impossible to transport carts, baby strollers and wheelchairs;
- it is difficult to clear leaves; sprouting weeds must be removed only by hand;
- not suitable for winter use, it is impossible to clear snow and chip ice on them;
- the pebble path can be damaged by moles;
- the complexity of preparing the bed.
Which rock material to choose
Materials of natural origin are chosen, usually clastic or sedimentary rocks. The stones may be finished in size when extracted from the quarry, or they may be further crushed. Here are the main rocky materials:
- Pebble is a rock of sedimentary origin in its pure form or with admixtures of clastic rocks. Fractions: coarse – 55…100 mm; average – 20…55 mm; small – 10…25 mm. The species varies from smooth beach pebbles to proluvial (located at the foot of the mountains) and pointed alluvial (formed in river floodplains).
- Gravel is a rock formed as coarse rock due to the action of water and wind on exposed rock. The edges are uneven, the natural color is gray. Fractions: coarse – 40…70 mm; average – 2.5…10 mm; fine gravel – 1.0…2.5 mm.
- Crushed stone is extracted from granite, mining waste, limestone, slag by crushing or recycling construction waste. The material varies in strength. To understand the properties of crushed stone, you should study its markings. Minimum fraction 3…5 mm.
- Slate is a collection of layered rocks that have good cohesion, are beautifully colored, and shine. In terms of cost, this is the most expensive material.
What is better for paths - gravel or crushed stone?
Crushed stone is the cheapest and most versatile building material. Depending on its origin, crushed stone varies in color from reddish (crushed granite) to cream, white and gray (crushed limestone) and strength. It is added to concrete and mortars, it is used to strengthen bridge structures, to fill “cushions” for asphalt roads, tram and railway tracks, and to decorate buildings. Many factories have established the production of crushed gravel from natural sea, river or water-glacial stone. The most durable is granite crushed stone.
What fraction of crushed stone is needed for garden paths?
Expanded clay factories for creating garden walkways offer fractions 0-5 and 0-10. This material is suitable for creating a durable coating with a polymer binder. Such paths are called “stone carpet”. They are highly durable, you can carry strollers on them, and in winter you can clear snow with a shovel.
Based on their origin, the following types of gravel for paths are distinguished:
- sea (coastal) - smooth stones with the least cohesion; you cannot use a layer over 7 cm, which will seriously complicate movement along such a path. The optimal fraction is 2 cm;
- gully – stones with pointed edges provide good cohesion of the material;
- river - processed natural material of good quality;
- lake – its properties are similar to river gravel;
- glacial - individual stones have sharp edges.
The main advantage of gravel is that it is 1.5-2 times stronger than crushed stone. Bulk paths are made from gravel without the use of binding components.
The amount of material for backfilling is calculated in cubic meters, but it can be sold in tons or kilograms. In this case, you need to consult with specialists, since the volume of required material can vary greatly depending on the fractional composition and installation technology. After completing the work on creating gravel paths, a reserve of at least 15% of the base material should be left for repairing the passages in subsequent years.
Peculiarities
Filling with crushed stone makes it possible to improve your territory in a simple, practical and inexpensive way.
It allows you to level the terrain, protect the area from flooding, disguise construction debris and create an effective drainage system. Filling with crushed stone has many advantages.
- Crushed stone is a high-strength material, so it can be used for filling parking lots, parking areas, passageways for heavy vehicles and other areas that face high operational loads.
- Crushed stone coatings are resistant to moisture, temperature fluctuations and other adverse external factors.
- You can fill the area with crushed stone with your own hands, without any construction skills.
- Manufacturers offer a wide selection of crushed stone at a variety of prices, so everyone can always find an option that suits them.
- Crushed stone has the property of allowing water to pass through, which is why it is often used in wetlands. Of course, it is not enough as a permanent, full-fledged drainage, but backfilling will avoid constant puddles.
- Crushed stone has a decorative appearance, which is why it is widely used in landscape design.
- The platform, made of crushed stone, requires almost no maintenance.
- Crushed stone is of natural origin, so its use near residential buildings does not pose a threat to the health of people living in them.
However, there were some downsides:
- the coating is formed uneven and hard, walking on it can be uncomfortable;
- the use of large stones with sharp edges for backfilling leads to damage to tires in the parking lot;
- crushed stone is not the most suitable material for arranging playgrounds due to the increased risk of injury.
Other materials and tools for construction
For good drainage, crushed stone will be needed at the base of the coating. The size of crushed stone for the base is 5-20 or 20-40 mm. Crushed stone of these fractions can be replaced with broken bricks and crushed construction waste. To compact the layers - river or quarry sand. The second type is usually cheaper if there is no difference in transportation distance. Geotextiles provide structural strength and increased drainage properties. It can be taken in densities of 60, 80 and 100 g/m2 in dark gray or white.
Passages with curbs have a neat appearance. The latter include factory-made curb stones, concrete curbs poured into molds, and brick curbs. The border for a gravel path bordering a lawn can be made of polymer material; for a “stone carpet” - a wooden frame is made.
As experts recommend, a good frame material for the construction of gravel paths is gravel mesh. There are several types of mesh; they are made in the form of flat or three-dimensional polymer gratings, have high binding properties of soil and material, and add strength to the road surface. Such paths can be used for the passage of vehicles.
Tools needed to build a gravel or crushed stone walkway:
- stakes and twine for marking, on turns - flexible hoses and wire staples;
- bayonet shovel;
- device for compacting stones and sand;
- rake or professional leveler - “trowel”, scraper;
- To create a “stone carpet” you will need a mixer or concrete mixer.
If you plan to build a durable compacted driveway, you will need a bonding agent such as epoxy resin. During the construction of the path, it will need to be watered several times, so access to irrigation water is necessary. Let's look at how to make a garden path from gravel.
Performing markup
To arrange paths of various shapes, the soil is marked in different ways:
- rope and stakes for straight paths;
- flexible hose - for winding paths.
If desired, you can use rope and stakes to delimit the area for laying paths of complex shapes, but this process will take a lot of time, since you will need to drive in many more pegs to determine the radius of the rounding. During the marking process, you should take into account the gap that is left for installing curb stones on both sides of the path.
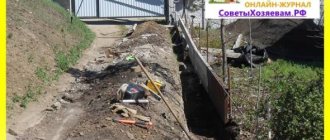
Pit preparation
At the first stage of pit preparation, markings are made along the entire length of the future passage. For an even coating, it is recommended to pull the twine strictly at the same height, checking it according to the level. The ground surface may be uneven, so after the pit is ready, the height is checked again by measuring from the base to the tension level of the twine.
There are two types of gravel path construction:
- with laying geotextiles on the ground base;
- with laying geotextiles on a sand “cushion”.
In the first case, the depth of the pit is greater. It is dug to a depth of 35-40 cm. In the second case, the depth of the trench under the base of the path can be 25 cm.
The base for the path must be dug using a spade blade if the soil is light or to any depth if the soil is heavy. This is done to ensure that the settlement depth is the same over the entire area. Roots, stones and other inclusions encountered during digging must be removed. The dug up layer of earth is carefully compacted.
The edges of the pit must be made strictly vertical, otherwise the crumbling gravel will disrupt the vertical position of the curb and the appearance of such a path will be ruined.
Areas of application: for landscape design, for the garden and more
Decorative crushed stone is a universal material used to solve a number of problems in landscape design and more:
Crushed stone is a popular decorative material. Photos of Soil Trucks
- creation of multi-colored volumetric and flat compositions in areas for various purposes: administrative, public (parks, squares, playgrounds), private;
- arrangement of paths and platforms;
- pouring mosaic areas and floors;
- mulching the soil;
- production of decorative plaster, paving slabs, decorative elements;
- design of sports grounds, fields, courts, flower beds, flower beds;
- arrangement of blind areas around houses, country houses and other outbuildings;
- creation of alpine slides and dry streams;
- construction of fences and gabions;
- framing monuments, steles, obelisks, tombstones;
- laying out the bottom of artificial and natural reservoirs and their banks;
- decoration of aquariums, pots with plants, etc.;
- finishing of various buildings both inside and outside.
Laying technology
An important advantage of colored crushed stone is its ease of use. Not only professionals, but also people without special construction and design skills can work with it. The technology for laying crushed stone (regardless of the tasks being performed: be it filling the territory, creating drawings, arranging paths, etc.) includes several stages:
- marking the area where the work will be carried out is carried out using pegs and a rope, which is pulled tight, connecting the pegs into the desired shape;
- in the marked area, the top layer of soil approximately 10 cm thick and plant rhizomes are removed, a shovel and rake are used;
- limiters are installed along the external boundaries, which are used as curbs, large stones, boards, planks, tape, etc.;
Reference. The installation of the limiter, depending on its type, is carried out either directly on the ground or on a previously prepared cement-sand cushion.
a layer of sand 3-5 cm thick is poured onto the surface inside the figure, which is compacted and spilled with water to prevent shrinkage;
Reference. An alternative and more thorough, but at the same time more labor-intensive option is to install a concrete screed on a sand bed.
- waterproofing material is laid on a layer of sand;
- another layer of sand 3 cm thick is poured onto the waterproofing;
- The final stage is filling the figure with crushed stone and leveling it.
Backfilling layers
Technology for laying geotextiles on the ground
The substrate for the gravel path is spread in an even layer on the compacted soil. A border of the selected type is installed along the edges. A large fraction of crushed stone or other drainage material with a layer of 15 cm is poured on top of the geotextile. It is compacted.
Sand is poured on top of the coarse crushed stone in a layer of 15 cm. The next step is watering the sand “cushion”. This measure allows you to achieve even shrinkage of the first layers. Once the moisture dries, the sand may end up in an uneven layer. If as a result of watering a lot of sand has settled, you should add it and repeat watering.
Gravel or crushed gravel of the selected fraction is poured on top of the sand in a layer of 12-15 cm. The filling level of the main coating should be 4-5 cm above the level of the surrounding surface, since rocky material will settle within a few months. After filling the top layer, it is also subjected to compaction and watering.
Technique for making a path with laying geotextiles on a sandy base
It also provides for digging and compacting the bottom of the pit. With this technology, it is preferable to use curb stones. They will ensure good drainage of the edges of the path. If bricks are used as a border, then it is advisable to fasten them together with cement mortar, otherwise the rocky mass may disrupt the evenness of the bricks.
After the curb is ready and the cement mortar has set securely, they begin to fill the drainage layer with large stones. The height of this layer is 15 cm. The stones are compacted. Then sand is poured in a layer of 5 cm to fill the voids between individual stones, pressed using a log or a special metal device with a welded horizontal base of 15 x 15 cm. Irrigation is carried out. After the excess moisture has drained and some of it has evaporated, the sand layer is trimmed and geofabric is spread. The edges of the fabric on both sides may extend 3-4 cm onto the borders.
The main fraction of crushed stone is poured over the fabric backing, leveled with a rake, compacted, and watered. The upper level of the main fraction should be 1-2 cm below the curb or flush with it. After settling the stones, the border will be slightly higher than the base, which will create the necessary decorative appearance.
Bed base structure
Geotextiles are laid on the compacted bottom of the trench. This material is quite dense. It will hinder plant growth. As a result, there will be no weeds on the surface of the path. The width of paths is often determined taking into account the dimensions of the geotextile sheet. This avoids the formation of seam joints, since weeds grow more intensively in these areas. A layer of coarse gravel is poured on top. Clay is used to strengthen the material. It will hold fractions of the material. The clay is mixed with coarse gravel, then laid in an even layer. It is necessary to compact this and each subsequent layer. Sand can be used to compact coarse gravel. This option has the advantage: sand allows water to pass through better than clay, which will avoid the formation of puddles on the surface of the path. To prevent mixing of this layer and the covering material (fine gravel), another layer of geotextile is laid.
Is a binder required?
When building the main highways on the site, roads along the house, it is better to build a path of crushed stone and epoxy resin - the so-called “stone carpet”, which was already mentioned above. Granite crushed stone is most suitable for this purpose. It is beautiful in color, repeating granite with splashes of red and black, and is wear-resistant.
Glue for crushed stone can be purchased in specialized stores. The base for such passages is additionally reinforced with concrete pouring. The foundation pit for the road is dug to a depth of 25-30 cm. The soil is dug up and compacted. The edges are aligned strictly vertically, and a wooden frame (formwork) made of slats with transverse ties is mounted on them. The latter hold the edges of the highway in a vertical position. It is advisable to install them every 70-80 cm.
A 15 cm drainage layer of crushed stone is poured onto the bottom of the trench, pressed, and compacted with a 5 cm layer of sand. The base is compacted, watered, and allowed to settle. Then the layer of sand is leveled, and a geofabric is laid on top of it. To ensure the strength of the base, a concrete solution with the addition of crushed stone of fraction 5-10 or 5-20 is poured over the geofabric. Concrete layer 8-10 cm.
When the concrete base is dry and can be walked on, begin pouring the stone resin. The finest fraction of crushed stone is poured into the mixer, a binding component is added - epoxy resin and glue (hardener). The packaging contains instructions for making the composition. All components continue to be mixed for 20-30 minutes until the greatest uniformity of glue distribution is achieved. Here is the approximate ratio of components:
- crushed stone fraction 10-20 – 80 kg;
- epoxy resin – 1.3 kg;
- glue – 10 g.
Furfuryl alcohol may be needed to thin hardened resin.
A mixture of crushed stone and adhesive is poured onto the concrete base in a layer of 1-5 cm and actively leveled and compacted using a trowel. You can only use a scraper if the mixture is dense and only needs to level the layer in height. They try to work quickly, as the mixture is actively hardening. The time during which the track is ready for use is 1-2 hours. After setting, the coating is watered. The mixture of crushed stone and glue allows water to pass through well, precipitation does not accumulate on it, and less ice forms in winter.
How to make colored crushed stone with your own hands - step-by-step diagram
Step 1: Preparing the Material
Manufacturers of crushed stone for construction work do not specially prepare granite crushed stone for painting, so you may end up with stones of very different sizes in the general pile. Manufacturers of colored crushed stone use a special device called a “screen” to separate larger pieces of stone. With its help, bulk materials are sorted into small and large fractions using the screening method. It’s unlikely that you have a “rumble” lying around in the barn, but you probably have a metal mesh. Before you paint the crushed stone with your own hands, pull it at an angle of at least 60° and pour crushed stone with a shovel to the very top to ensure a larger sifting scale. Larger pieces will roll down the mesh, while smaller pieces will fall to the ground underneath the mesh. For painting, it is best to use pebbles about 10 mm long - such crushed stone is most convenient for filling garden paths. Smaller ones will also be useful for decorating flower beds and flower beds, and you can always use large pieces for construction purposes.
Step 2: Painting the crushed stone
The sorted material must be poured into a concrete mixer. By the way, you can make a concrete mixer yourself if you have an unnecessary metal barrel. Paint of the color we need is poured over the crushed stone - you can use both polymer and acrylic paints. To achieve the best color, the volume of paint should be at least a third of the volume of crushed stone loaded into the concrete mixer. Having started the unit, you can calmly rest for the next 40-60 minutes - this is exactly how much time is needed for uniform coloring.
Step 3: Drying the Stones
While your DIY decorative crushed stone is taking on a new color, you can prepare a receiving container if you haven't already. The container is a large box with a mesh stretched around its perimeter. If it is a metal mesh, then it can be stretched a short distance from the bottom of the box; if you are using a regular mesh, stretch it to the very top of the container. Thanks to this device, excess paint will flow freely to the bottom of the box, and the painted material will remain on the mesh.
Crushed stone fill
Paths and passages with paving made of slabs, natural stone, clinker can be filled with crushed stone, that is, the gaps can be filled. This technique creates a smooth transition from the main covering to the ground or grass, flower beds. In this case, rocky material can either be located within the curbs or be on the outside of the road surface.
What crushed stone is best to use for backfilling?
The so-called “screening” is used to fill the gaps - crushed stone fractions 0-5 and 0-10. Crushed limestone is suitable for external filling. In acidic soils, it can help raise the pH and create better conditions for plant growth.
How to fill paths with crushed stone?
The base for filling inside the curbs is prepared in the same way as for a gravel path. After the base paving material has been laid, it is given time to shrink. Backfilling begins in 7-10 days. The gaps between the tiles and facing stones are filled with rocky substrate, compacted together with the main covering, and watered.
For filling outside the borders, there is no need to prepare the base, since it is for decoration and will not be used for walking. The backfill layer can be 1 - 4 cm. Geofabric is laid under the crushed stone, its edges are 2-3 cm short of the extreme point of the backfill.
An interesting design solution is to fill the path with a straight stone border, beyond which an additional border made of plastic bottles in a zigzag shape was laid. The space between the main and additional curbs was filled with screenings.
Crushed stone filling with an adhesive component can be a good solution for strengthening slopes that are close to vertical along passages and paths, wells, and hatches. On light sandy soils, this solid mixture helps secure the edges of flower beds and tree trunks. This type of filling is easy to do. You need to lightly clear the slopes or edges of tree trunk circles from excess soil, prepare a mixture of glue and crushed stone and pour it in a layer of 5-6 cm onto the prepared area. The service life of such filling is more than 5 years.
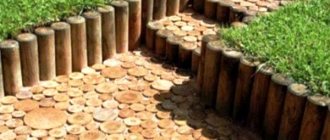
Manufacturing stages
Path made of crushed stone and fenced with wooden posts
All work consists of several sequential processes:
- marking;
- trench preparation;
- installation of curbs, if necessary;
- making a “pillow”;
- backfilling of crushed stone.
Scheme for laying a crushed stone path
Necessary materials and tools for work
To carry out all work you will need to prepare the following:
- Rake.
- Shovel.
- Tamping.
- Clay, sand and coarse crushed stone to create a “pillow”.
- Container for mixing components.
- Geotextiles.
- Small crushed stone for the path.
- Curbs.
- Nylon thread.
- Pegs.
Territory marking
Marking the future path using rope and pegs
First, it might be a good idea to draw a small project on a piece of paper. After this, everything is transferred on an enlarged scale to the site. Pegs and nylon thread are used for marking. The distance between pegs should be no more than 1 meter. This will allow you to more accurately convey the shape of the future track.
Digging a trench
After marking, you should dig a trench for laying crushed stone. There's no need to dig too deep. Here it is enough to remove the top fertile layer or turf - the depth of the pit will be up to 20 cm. The easiest way to do this is to dig along the contours of the path with a bayonet shovel, and select the middle with a pointed shovel. This method is relevant if the soil on the site is free of solid impurities.
The pit should be cleared of all kinds of debris, roots and weeds. The bottom is carefully compacted and a layer of sand of 5–10 cm is added, which is also tamped.
Features of laying geotextiles
Laying geotextiles under the path, it is important to avoid folds and wrinkles
Lay geotextiles on top of the sand. At the edges it should protrude up to 10 cm above the ground level, after completion of the work it will simply need to be cut off with scissors or a sharp knife. This fabric does not have a front side, so it can be laid on either side.
The choice of fabric for the track and its role
Geotextiles for paths should not be organic based
The main function of geotextiles is drainage, separation of building materials and protection of gravel from mixing with soil, preventing the germination of weed and shrub roots. Given the low loads, for a gravel path it will be enough to use geofabric with a density of 150–200 g/m2. The material used is predominantly polyester or polypropylene.
If we talk about the role of geotextiles in the construction of paths, here we can highlight the following:
- the service life of the trail increases;
- eliminates the possibility of weed germination;
- the track surface is protected from the ground;
- geofabric in combination with crushed stone also serves as excellent drainage.
Installation of curbs
Installing curbs for a walkway on a cement pad
To prevent the gravel from extending beyond the edges of the path, a curb must be installed that will serve as a limiter. Can be used:
- concrete curb;
- brick;
- a natural stone;
- wooden posts or boards;
- plastic, etc.
The curb should rise up to 7 cm above the ground level. If you plan to use brick or stone, it is recommended to prepare a cement-sand cushion. If wooden pegs or boards are chosen, they must be treated with a special antiseptic against rotting.
Making a “pillow”
Making a cushion for the path; for this, gravel is mixed with clay or sand.
Under laying the face layer, you should definitely put a “cushion”, which will consist of clay and coarse crushed stone. After pouring the mixture over the geotextile, it should be watered. After this, compaction is carried out. You can also not mix these materials, first fill the trench with crushed stone, and then with clay, while each layer is filled with water and compacted.
Instead of clay, you can use sand, this will increase the drainage properties of the gravel path. In this case, the work looks like this: geotextiles are laid, then coarse crushed stone, then, again, fabric and finally sand. The simplest option is to fill the trench with crushed stone, compact it and cover it with geotextile so that the coarse fraction does not mix with the fine fraction.
The final stage is backfilling the trench with the prepared “cushion” of gravel. On average, per 1 m2 the consumption will be up to 50 kg, this is provided that the layer thickness is up to 3 cm. Accordingly, as the layer increases, the material consumption also increases. When you have completely filled the crushed stone, it must be leveled with a rake and compacted.
Covering with geogrid
The use of volumetric and single-plane polymer meshes is advisable on roads with slopes, where the main soil of a light mechanical composition with a low clay content slides from the main place, or the roads are planned to be operated under high mechanical loads. In areas with uneven terrain, it may be necessary to strengthen paths against landslides from above or crumbling of the road surface downwards. In this case, you can build vertical retaining walls, and if the slopes are gentle, also strengthen them with geogrids, which are covered with crushed stone mixed with a binder component (epoxy resin and glue).
To lay the geogrid, it is enough to remove the turf layer, dig up the soil and compact it. Geofabric is placed on the base and a grating is laid out. To fix the geogrid to the ground, thick wire staples are used. They are inserted into each link on light soil and after 1-2 links on loamy soil. The grid cells are covered with crushed stone or gravel of fraction 5-10 so that the grid is covered with a rocky layer of more than 5 cm, otherwise after the stones shrink, the grid will be felt under your feet and it will be uncomfortable to walk on.
Can grates be filled with stone resin?
Volumetric and single-plane polymer gratings can be filled with a mixture of crushed stone and adhesive components. In this case, the coating will be durable and you can drive a car or bicycle on it. At the dacha, this way you can pave the area for a summer kitchen or a parking space.
Caring for gravel and crushed stone paths
The most labor-intensive paths to maintain are those with pebble and crushed stone surfaces, where the stones have the least adhesion to each other. Level and smooth stones tend to shift after each pass over them. Such paths require frequent leveling with a wooden batten.
Autumn falling leaves should be removed in a timely manner, preventing their accumulation on the road surface during the wintering period. Decaying leaves leave behind clinging dirt and change the color of the pebbles. Emerging weeds should be carefully trimmed with pruning shears as low and early as possible; if they develop a deep root system, this will inevitably lead to deformation of the gravel surface.
After snowy winters and rapid snow melt, the path may look sagging in many places. This phenomenon occurs if there is a redistribution of the load on the coating. In this case, the material is added. If the problem repeats from year to year, you should remove the top base layer and further strengthen the base by adding a polymer mesh.
Thus, it cannot be said that building and maintaining gravel paths on your own is a simple and easy matter. It requires experience and dexterity, physical strength, patience and endurance, mathematical calculations and free funds for the purchase and delivery of materials, and a lot of space for storing them. It is especially difficult to dig a long pit with a depth of more than 30 cm, as well as to lay large areas under geogrids.