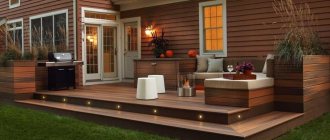
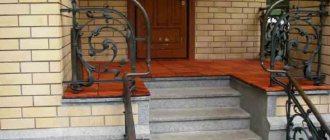
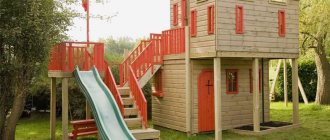
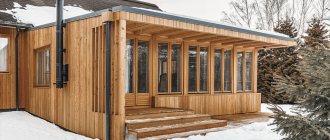
Adding a terrace to a private house not only increases the area of the room, but also serves as an additional decoration for the entire building. It is here that you can arrange a comfortable recreation area, make a workshop, dining room or summer kitchen.
There are many different materials for building a terrace for your home yourself. In this article we will look at how to build a frame veranda for a house with your own hands, what advantages and disadvantages such an extension will have, how to correctly draw its drawing, choose materials, pour the foundation, assemble the frame and much more.
What are there
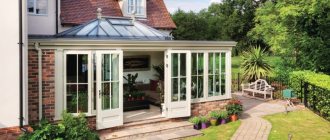
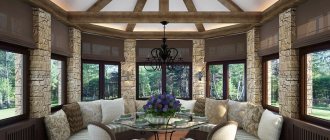
Depending on the method of construction, a veranda attached to a house can be closed - with glazing - or open. Open ones are used mainly in the warm season, closed ones can serve as a place to relax all year round. A veranda attached to a house can be of two types at once: part can be glazed (closed), part can be open.
You can relax on the covered veranda all year round. It also reduces heat loss through this wall
There are also walk-through doors - this is when in order to get into the house you pass through it. Such extensions are located on the front side of the house, sometimes on the yard side if there are two exits from the house. Entrance to impassable buildings is only from the house. It is impossible to get outside from such a veranda.
An extension can cover one, two or more sides of the house. If it covers two adjacent parts of the house, it is called a corner. Some of them occupy only part of the wall.
The forms are different. More often it is a rectangle, less often - a hexagon, a semicircle, or other non-standard shapes (these are more difficult to build). In short, these are all types of verandas attached to the house, but without taking into account the materials.
The perimeter extension gives the house an extravagant look
What materials are they made from?
Most often, wooden verandas are made in our area. It is easier to work with wood, and it is not as expensive as in other countries. In areas where wood is very expensive, structural elements are made of metal, and the cladding is selected to suit your taste. It can be glass (double-glazed windows), polycarbonate.
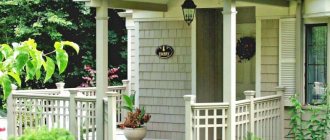
The walls of the veranda are built from brick, shell rock, rubble stone, and building blocks. Just like a house, they are then finished or not, depending on the design of the main building. They can simply make a fence, as in the photo above.
Veranda made of a metal frame and special window blocks
If wood is expensive, or you are reluctant to work with it on a regular basis, the veranda frame is assembled from metal. For this purpose, a profile pipe, corners or channels are most often used - it depends on the material and size of the extension. It is easier to attach double-glazed windows to metal; instead of glazing, you can use polycarbonate. This material can be of different colors and varying degrees of transparency. Despite its apparent fragility, there is a fairly strong material that is used for the construction of greenhouses. And if so, then in the veranda, if it is closed, it will keep the heat well.
Polycarbonate veranda attached to a brick house. The entire frame is assembled from a profile pipe
Read how to decorate a veranda here.
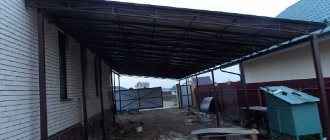
Assembling the rafter system
According to the diagram, profile pipes of small cross-section - 40-20 mm - are welded onto the frame from corners. They will serve as a sheathing. However, the large size of the site, and, consequently, the roof, must receive proper reinforcement.
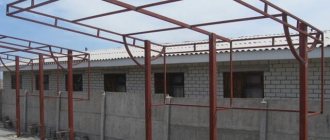
Prefabricated trusses will serve this purpose. What it is? These are two metal belts connected to each other in a zigzag manner. Several designs will protect the metal frame canopy from sagging. How to do:
- First, the frame is welded from corners or profile pipes.
- Pipes are installed between the belts. The angle between them should not be more than right.
- A sheathing is welded across the trusses using tack welds, the pitch of which is also subject to the design.
Veranda attached to the house: stages of construction
First of all, you need to decide on the type - open/closed, what material it is made of, and choose the type of foundation. It is also necessary to decide what size it will have, where and how it will be located. It is advisable to draw all this on the plan. Even better - order a project. Construction according to a project is rather an exception for us, but at least there is a plan with dimensions and an indication of the location, reference to paths, etc. you must have.
The construction of a veranda for the house with your own hands proceeds according to the following plan (we build it from wood):
- Use pegs and twine to mark the outlines.
- Remove the turf and fertile layer. If this is not done, the vegetation under the flooring will rot, spreading aromas.
- Mark out the foundation. At this stage, questions may arise: what height should it be. If the foundation is made incoherent and “floating”, the level of the veranda flooring should be 5-10 cm below the floor level. This is necessary so that even when raised, the extension does not block the front door. If you don’t want the floor to be lower, you will have to make a high threshold in the front door: to guarantee the freedom of opening the door. The height of the support beam depends on the height of the extension floor. It is nailed to the wall of the house, and floor beams are attached to it. The height of the foundation is marked along its lower edge (these are the next two steps).
- Nail a support beam to the wall, along the lower edge of which the height of the foundation is measured.
How to mark an extension: nail the support beam at the required level, and mark the height of the foundation along its lower edge - Build the foundation.
- While the concrete gains at least half strength, you complete site preparation. If at the bottom of the pit (the fertile layer has been removed) the soil allows water to pass through well (sandy, sandy loam), add crushed stone to the bottom. It can be compacted, or you can do without it. If there is loam or clay under the fertile layer, you will have to fill the pit either with the same soil (but not fertile) or with clean clay. It must be compacted well to avoid creating voids in which water will accumulate (it is better to lay it soaked to a paste in layers).
- A layer of waterproofing is laid on the finished foundation.
- Support posts for the roof are installed and secured.
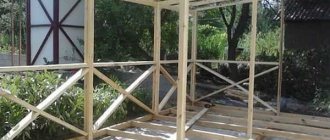
- They tie the racks: they nail a beam 100*150 mm thick around the perimeter. It can be nailed to the outside of the studs or between them. Sometimes the racks are nailed after the floor has been laid. This is not the best option: the floor will most quickly become unusable. With such a structure, in order to replace it, you will have to dismantle everything, right down to the roof. If you install the racks first and then the floor, it can be repaired without problems.
This is what the assembled frame of a veranda attached to the house looks like. Intermediate racks are needed only if the width of the veranda is more than 3 meters. - Floor beams (beam 100*150 mm) are attached to the foundation and support beam. The step of their installation corresponds to the step of installing piles or columns.
- Assemble the rafter system.
- Side railings (for open ones) or walls (for glazed ones) are installed. At this stage, the general technology ends. Further, for indoor ones it is longer; an open veranda is easier to attach to the house:
- For open ones, floor boards are nailed onto the beams.
- For glazed ones, an insulated floor is made. The subfloor is nailed to the beams. There are joists on top, insulation between them, and a finished floor on top.
- Roofing.
- Wall decoration inside and outside.
These are just general steps. To have a more complete idea of how to make a veranda for a house, we will next consider the most problematic aspects of construction in more detail.
Perhaps you are interested in building a gazebo? You can read how to build a wooden gazebo here.
Metal painting and care
Steel is susceptible to corrosion - that's a fact. You can avoid damage if you make a galvanized metal frame in advance. However, such products will be more expensive. Therefore, protection is carried out by painting the frame with special red lead - paints containing anti-corrosion compounds.
The coating must be done before the roof is laid to avoid unpainted areas. If pockets of rust occur periodically, then in order to avoid damage and, as a result, destruction, the affected areas are cleaned and painted again.
It should also be taken into account that when laying the roof, the eaves overhangs should protrude beyond the frame by 30-40 cm, this will protect the metal structure from constant contact with moisture - rain and snow.
There are many options for constructing a metal terrace - arches, open wooden platforms, areas with fences, etc. Steel structures will serve their owners for a long time if all the features of the project - loads, interfaces - were taken into account during assembly.
Foundation
If a veranda is attached to a house, the foundations are very rarely made coherent. Firstly, the house has already settled, the shrinkage has passed. If a “fresh” building is rigidly attached to it, problems will inevitably arise. If it is possible to tie them, then only on stable, reliable soils, on which no movement occurs. Secondly, heavy foundations are rarely made for extensions of this type. The building itself turns out to be light - especially an open one made of wood or frame - and the load-bearing capacity of a pile or columnar foundation is sufficient.
In general, verandas are placed on the same foundations as houses. Another thing is that most of them are on columnar foundations: the costs are small and the time required is short. And although all architects and designers claim that it is much more difficult to install a correct columnar foundation than a strip foundation (though a strip foundation is much more expensive), people install exactly the pillars.
Column and pile foundation
If you decide to attach a veranda to a wooden house, you can install a columnar foundation. To make it yourself, you need to find out at what depth and at what distance the supports are placed. The distance between the columns depends on the material from which the extension will be built. If these are lightweight materials - wood or a light frame structure - you can place them in increments of 1.5 meters. For heavier ones, the distance should be from 1 meter.
Columnar foundation for the veranda - the columns are made of brick. This open veranda is attached to a wooden house. The house stands on a strip foundation. The foundations of the extension and the house are not connected
When choosing the depth of columns, there are two approaches:
- Bury below the freezing depth of the soil. This is done on water-saturated soils that are prone to heaving. In this case, the veranda will stand at the same level without changing its position, regardless of the heaving forces. For a columnar foundation, this only makes sense if the freezing depth is no more than 1.2 meters. At greater depths it is easier to make a pile foundation (preferably TISE piles). Holes for piles are not very difficult to make even if you need to drill 2 meters. To install posts for each of them, digging a pit of the same depth is difficult and time-consuming.
- Make a shallow foundation: 20-30 cm below the fertile layer. In this case, get a floating veranda that will float and lower during frost heaving. It is much easier to build such a structure, but every spring you will have to deal with the consequences of heaving. Different pillars will “walk” differently and the situation will have to be corrected somehow. But this is on heaving soils (clays, loams). On stable soils that are not prone to heaving there will be no such problems.
What is good about this option for the foundation for the veranda of the house? It is quickly built, the cost of work and building materials is low.
The veranda is attached to a brick house on a strip foundation. They placed it on a pile foundation. It differs from columnar in that the piles are either screwed in/driven ready-made, or poured into the formwork and are monolithic.
Disadvantages: difficult to predict his behavior. Moreover, both deep and shallow. With a shallow foundation, everything depends on winter and the degree of soil saturation with water, which is impossible to predict and calculate. When buried deep, there is also a problem: it is not known what is under each of the piles. After all, geological surveys cannot be done at all points. And in those areas where the soil has a complex layered structure, it is quite possible to get into some kind of pocket, due to which the pile will not behave as expected. Also in the case of piles or deeply buried columns, it is necessary to remember about lateral heaving forces. They may well break long and thin piles or pillars. Therefore, on problematic soils, strong formwork (metal, asbestos) is used for piles and they are also reinforced: when making pillars, a steel pipe coated with a primer is inserted inside, around which the masonry is laid. It is also possible to lay reinforcing belts. When making bored piles, three or four reinforcement rods must be inserted inside, which add strength to them. Building a veranda with your own hands on a pile foundation can be done quickly and inexpensively, but the risks on heaving soils are great.
Monolithic: strip and slab
If you are going to build a veranda from brick, rubble or other similar heavy materials, and even with heavy cladding, you need a monolithic foundation. You will have to either cast a tape or make a slab. They are made according to all the rules without any exceptions: with formwork, reinforcement, vibration, etc. Completely based on technology.
Read about how to build a strip foundation here.
When building such a foundation, it can already be connected to the main one: you will have to build it to the same depth and, most likely, it will behave stably.
Advantages: high reliability and stability. Disadvantages: significant cost and lengthy construction process.
Bedding
If the house is located on dry soils or in a region where frost heaving is just a horror story, if it does not have a base, a veranda attached to the house can do without a foundation. In this case, the fertile layer is removed along with the vegetation, the bottom of the pit is compacted, then crushed stone is filled in, compacted, then sand, which is also compacted. On this base you can already lay a flooring: wooden, paving slabs or slabs.
A veranda attached to a house can be without a foundation
One “but”: the racks on which the roof will rest still need to be strengthened in some way. Small piles are made for them or columns are laid (from approximately the same depth where they began laying crushed stone under the flooring).
How thick should I make the bedding? It depends, firstly, on the thickness of the fertile layer, and secondly, on the choice of floor covering. If these are wooden panels (as in the photo), you need to choose the layers so that they lie flush with the ground. If you are planning to lay paving slabs, you will have to consider their thickness. Although, it can be raised slightly above ground level to separate it from the yard. But then they put a border along the edge.
In this photo, the open veranda is attached to the house without a foundation - it’s more like a summer shed with a polycarbonate roof and an open wooden fence
You can read about the construction of a summer kitchen here.
Advantages of corrugated sheets in the manufacture of canopies
The decision to make a metal shelter is a very profitable and practical solution:
- the metal is not afraid of temperature changes, is not subject to cracking in the cold, and does not change shape from the action of the scorching rays of the sun;
- corrugated sheeting has sufficient strength to withstand household loads and certain technical efforts.
Disadvantages include:
- high thermal conductivity, heating from high temperatures, which does not affect the metal itself, but can damage adjacent materials;
- if it is intended to rest on metal railings, then it is better to cover them with a less thermally conductive material , for example, wood;
- corrugated sheeting suffers from moisture, which manifests itself as rust on the surface; this disadvantage is eliminated with the help of anti-corrosion impregnations.
Metal profiles for canopies
The sheathing is made from a wooden beam or from a metal profile, corner, square or channel. The connection of metal parts is made by welding using overhead metal gussets. Sometimes the parts are connected with bolts and nuts.
How to attach the stand and bottom trim
Work on the construction of the veranda frame begins after the foundation concrete (if used) has gained some strength. 50% of the calculated value is enough, and this at a temperature of +20° C will happen in 4-5 days. Then, on top of the concrete, in those places where the posts or trim will be attached, two layers of waterproofing are laid. It can be roofing felt, roofing felt, folded in half. You can coat it twice with bitumen mastic or use other modern materials.
Then there are two ways:
- secure the racks and then the harness;
- first the strapping, there are stands for them.
If the first option is chosen, special holders are inserted into the foundation when pouring. These can be different devices (see photo), but the most convenient is a metal plate in the form of an inverted letter “P”, to the bottom of which a pin is welded, which is walled up in the foundation. A stand is inserted into this plate (the end must be treated with an antiseptic), its level is checked, and secured with bolts or nails.
How to attach posts to the foundation
After all the posts have been positioned and secured, the framing bars are nailed between them.
With the second option, the situation is different: the racks will have to be attached to the harness. The strapping beam is attached first. It is more convenient to do this if studs are embedded into the concrete at some intervals. Then holes are made in the beam in the right places, it is put on studs and secured with bolts. Then, using one of the methods suggested in the photo, the racks are installed.
Options for attaching racks to strapping beams
Any of these methods does not exclude the use of metal corners. They make the fastening more reliable, which is very important in this case. After all, the racks will support the roof, as well as the walls or fence.
Do-it-yourself awnings from a profile pipe: photos and videos
Canopies are cost-effective and very easy to make from a metal profile or pipe with your own hands. In this case, a profile pipe is used to construct the supporting frame, and the canopy and walls of the structure are made from metal profiles. Various types of metal are used for canopies: galvanized, copper, aluminum, ferrous metal.
Awnings are widely used to cover the area of a private yard, as well as in commercial settings. They are used to cover parking lots, bus stops, canopies over entrances, transition galleries, summer and winter utility buildings.
Attaching the joist to the harness
They can be mounted on top of the harness, or at the same level with its top edge. You need to decide exactly how you will do this at the very beginning of the work: this will determine at what level it will be necessary to attach the support beam to the wall of the house (the height of the joists is taken into account or not). Methods for attaching floor joists are shown in the photo below.
How to attach floor joists to the frame
Read how to make beautiful and inexpensive paths on your site here.
Possible mistakes
Non-professional builders often make mistakes when constructing the base of the veranda.
An obvious defect of the columnar base is the unevenness of its subsidence. This can occur if the foundation depth calculations are carried out incorrectly.
The base also sags when the load on the platform supports is unequal.
Experts do not recommend making a foundation different from the foundation of the common object. The foundation supports must have the same depth of depth.
Beginners in construction may not take into account the terrain features when working, however, the depth of freezing and the height of groundwater are very important. The monolith must be waterproofed and insulated, and before shrinkage, the height of each column must be carefully measured.
It would be a miscalculation to miss the grillage, because it is this that ensures the stability of the extension. If you immediately make a wooden frame from timber, the supporting beams may break, especially in the case of log options.
Attention ! A columnar foundation is not intended for heavy buildings. If this rule is neglected, the foundation will require repairs or even replacement.
Attaching the roof of the veranda
The porch attached to the house is usually covered with the same type of roofing as the crowbar. There may be several options, and the organization of the roof connection depends on how and to which wall you attach it. If the roof is a continuation of the roof slope of the house, you need to join two rafter systems. In this case, they say that the roof of the veranda is adjacent to the roof of the house.
Then the procedure is as follows:
- The top trims are attached to the veranda posts.
- Transverse ceiling beams are nailed to the frame. The ceiling is then sewn to them.
- The long rafter legs of the house are shortened. They should not protrude beyond the wall.
- Veranda rafters are made from planed boards, which are cut at an angle from the roof side so that they adjoin the existing ones (see photo below). To make it easier to work, you can make a template, according to which you can then prepare the rafters on the ground. The rafter legs are attached to the house system through nails; metal reinforcing pads can be placed on the sides.
- To increase the rigidity of the structure, spacers (anti-snow supports) are installed between the rafters of the house and the extension. They are shown in the photo explaining the design.
Connecting the veranda roof truss system to the roof of the house
If the veranda width is more than 2 meters or heavy roofing material will be used, spacers are installed to prevent the support beam from sagging. It is better not to nail them on the side, but rather to insert them between the ceiling beam and the rafter leg.
In order to prevent the roof from sagging, spacers are installed between the ceiling beams and rafters
More often it turns out that the roof of the veranda attached to the house is adjacent to the wall. In this case, a groove is made in the wall, a special wall profile is placed in it, the other side of which is laid on the roof covering. The place where it joins the wall is sealed with sealant.
How to attach a veranda roof to the wall of a house
The second option differs only in the shape of the wall profile: it can be made independently from a sheet of roofing iron. This design is distinguished by the presence of a beam, which allows you to move the bend away from the wall of the house and cover possible errors when laying roofing material at the junction. Also, in this option, the apron is not attached directly to the wall material, but to a beam with a beveled edge, mounted in the groove.
The second option for connecting the roof of the extension to the wall of the house
Some questions may arise about how to attach the rafters to the outer top frame, because its dimensions do not allow making cuts, as on the mauerlat. The solution is the usual: using corners (see photo). Instead of corners, you can use small cross-section bars.
Method of attaching veranda rafters to the top frame
Maybe not the most elegant solution, but reliable. After everything is covered with roofing on top, clapboards will be added underneath, they will not be visible.
Selection of building materials
Construction stores offer a huge selection of metal pipes that you will need to create a veranda. To build a truly strong and reliable metal structure, you need to buy:
- profile pipes . Their shape can be square, oval or rectangular. The wall thickness is 3 mm, and the profile width is 30 - 40 cm. This material is light in weight, which greatly facilitates the construction process. In addition, such material is easy to process, since it is cut and drilled with any available tools. It is worth adding to the main advantages of purchasing a profile pipe: affordable cost, resistance to deformation (even in the presence of large mechanical loads), the ability to build an extension yourself and without helpers. Due to the light weight of the material, there is no particular need to make a strong and solid foundation for the extension;
- metal channels. They can be made of steel or aluminum. Their length varies up to 12 m. This material is ideal for arranging a grillage when installing screw piles;
- metal corners. Their thickness and length can be any. This material is used when installing the rafter system, for laying the foundation and for strengthening the racks of the structure;
- galvanized lightweight profiles. They are made of thin steel and come in a wide range of standard sizes. The length of the material is 12 m, the thickness ranges from 0.5 to 4 mm. It is not recommended to use them as the main material. But they can be a good choice when installing fences and rafter systems.
Types of fittings for aluminum windows and doors from Roto
The world leader in the production of fittings for windows and doors, Roto offers fittings for aluminum windows of any type:
- Roto AL300: Tilt-and-turn sashes, pivot sashes and transoms weighing up to 80 kg and heights up to 2400 mm. The best price-quality ratio for the most common windows.
- Roto AL: for large sashes up to 3000 mm high and weighing up to 300 kg. An ideal mechanism for panoramic windows.
- Roto AL Designo: hidden fittings and fashionable handles for stylish windows. The trend for hidden fittings is widely used in modern homes. Hidden hinges are located inside the structure and do not spoil the appearance of the window. When using a hidden hinge, the tightness of the window increases.
- Burglar-resistant design is available for any version of Roto AL with the ability to automate opening using the hidden Roto E-Tec Drive .
However, any sash is an extra jumper and a reduction in the light opening. Ventilation through the doors will allow you to combine two in one.
Photo: for aluminum verandas, any type of door opening can be used. Roto fittings are designed for all types of door opening:
- The parallel sliding door Patio Alversa PS is equipped with the option of slot ventilation while maintaining burglary resistance. The dimensions of the sashes reach 2000x2700 mm, weight 200 kg.
- The Patio Alversa KS tilt-and-slide door is equipped with a tilt-up ventilation option. Anti-burglary design is possible. The dimensions of the doors reach 1680x2380 mm, weight 160 kg.
- Folding accordion doors Roto Patio Fold allow you to fully open the opening up to 6 meters - all doors slide to one side and the glass wall is replaced by open space.
- The Roto Safe Eneo lock with electric drive for swing doors presses the sash tightly, preventing drafts. Has increased resistance to burglary. The smart lock can operate in night mode with automatic door locking or in day mode without blocking.
Special attention! If the blind parts of the veranda are static and nothing can happen to them, then special attention should be paid to the selection of opening elements for windows and doors. For a long service life, you need to choose only high-quality fittings.
Buy Roto fittings for aluminum windows* |
Preparing the base
Any of the described rolled metal products does not have much weight, which means that the platform for the terrace can be made of a lightweight type: piles, pillars. How to prepare such a foundation:
- The area is cleared and leveled. All subsequent root growth should be stopped in advance, so the area is spilled with chemical solutions. Level the soil by removing the turf and top layer.
- The holes for the supports must be of sufficient depth. The freezing of the soil + shock-absorbing layers - sand and crushed stone - are taken into account. The height of each of them must be at least 15 cm.
- If the work is not carried out with factory-made reinforced concrete pillars or piles, then reinforcement will also be required for self-pouring. The rods can simply be stuck into the ground - the reinforcement cannot be welded, since the metal is destroyed under the influence of temperature.
- The ends of reinforced concrete pillars should be waterproofed by wrapping them with roofing felt or covering them with mastic. Thus, the foundation will gain durability - aggressive wastewater and constant soil moisture can destroy the foundation.
- The cavities between the pillars are backfilled - that is, construction waste is placed inside and filled with concrete, leaving for three weeks to harden.
The marking is done using wooden pegs and a mooring cord. Markers must be set according to the number of holes for supports specified in the project. It is impossible to do less, or only for load-bearing elements - the terrace is fraught with unreliability, fractures, and deformations of the metal frame.
Correct installation of a metal terrace frame is accompanied by constant monitoring using a level - all ends of the pillars must be in the same plane, otherwise there is a risk of the entire object skewing.
Walls made of corrugated sheets
Veranda wall cladding
You can install a metal profile on the walls only from the outside if it is assumed that the extension will be used only in the warm season. For a winter veranda, it will be necessary to cover it with insulation, and in this case the corrugated sheet can also be secured on the inside. It will bear a decorative load and provide protection for the insulating material from external influences.
When installing walls made of corrugated sheets, it is necessary to take into account the height of the corrugation
. It will determine the wall or roofing type of corrugated sheeting. For wall installation, it is possible to use sheets with a lower wave crest: from eight to twenty millimeters. Inexpensive metal profiles are suitable for cladding.
When covering, continuous sheathing is required around the entire perimeter. Mortgages made of a special profile pipe are installed along the bottom of the building. The corrugated sheet is fastened using self-tapping screws, which have a special rubber gasket to protect against external weather factors and is done through a wave to provide greater strength to the building. An extensive palette in the manufacture of material makes it possible to use a color that matches the main building, as well as a contrasting one, it will add individuality to the veranda.
To complete the image of the building, you can use corners; window frames can be made using corners and ebbs made of galvanized steel and painted to match or in a contrasting color.