Review author: Terrari School of Design
Any home is always marked with its own unique address, to which various correspondence is received. So that the addressee can receive it in a timely and convenient manner, there are special devices - mailboxes, where letters, receipts and newspapers are neatly folded.
If in apartment buildings these products are made in a single standard style and are part of the overall system in the entrance, then in private homes the postal devices are absolutely individual and exclusive.
Features of a mailbox for home
Most often, a mailbox in a country house is located on the street near the entrance to the territory. Therefore, it is subject to some requirements that are not always relevant for access products:
- fasteners must be especially reliable and resistant to corrosion;
- the mail opening must have a protective canopy against precipitation and road dust;
- the door for removing correspondence should be located at the bottom of the product and have a hinged design so that small letters, receipts and postcards do not fall out when opened;
- It is advisable to equip the box with a locking mechanism to protect it from outsiders;
- In order not to interfere with mail and advertising brochures, you can install a small table or shelf next to the box.
A street mailbox, as a rule, is one of the elements on the front side of the estate, so it is advisable to combine its design with the design of the facade and fence.
You can purchase a standard design at a hardware store, but it will be much more interesting to try to make the thing yourself.
Exclusive products can enliven and decorate the local area - this is proven by colorful photos of hand-made mailboxes.
Modern tool box
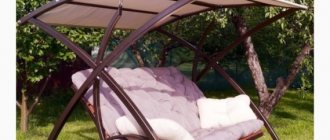
How to make garden furniture with your own hands?
If we use an organizer to store business papers and documents in everyday life, then the tool needs its own case - a special tool box. You can divide tool boxes into professional and universal, which are most often used in the household.
Our grandfathers generally made a toolbox with their own hands, but today there is no need for this - you can always find what you need on sale at a very reasonable price. Naturally, those who like to do everything with their own hands still have the right to express themselves here and assemble an original case that meets all individual requirements.
Professional boxes are generally made for specific sets of tools, which depend on the type of activity.
All tool boxes are divided into two types:
Cases. Such tool boxes are a flat suitcase with an opening design and compartments of a certain shape for specific tools: drills, keys, screwdrivers, etc. There are designs with customizable partitions that allow you to change the internal arrangement.
Container type box. This design usually has an opening top. Inside there are several compartments separated by a partition. The design includes separate lockable drawers.
Simple and small designs have a handle for transportation. More complex designs can be mounted on carts, have drawers, multiple compartments and individual boxes assembled into a single structure.
Container designs are more versatile, spacious and easy to use, but they are inferior in ease of access to case-type boxes.
Variety of models
Before you start making a mailbox, you need to think about its dimensions and design, decide on materials and location. If this is not just a design element, but an active device, it should be positioned so as to provide convenient access for both the postman and the owners.
Products can be presented in different images and forms, but three main types can be distinguished: traditional, American and English.
Let's sum it up
As you can see, there are many different plywood box designs available. Not all of them are presented in this material, however, you can find the drawing you need or get an idea on the Internet. However, many of you are able to make a drawing yourself, simply using the materials presented in the article you are reading now as a guide, while determining your own dimensions for the products.
The box can be assembled without drawings, by eye, however, such aerobatics is a sign of the highest skill in the field of furniture assembly. If you can do it, then go for it, and everything will definitely turn out the way it was intended.
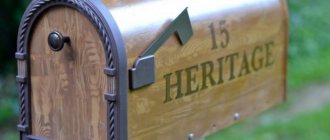
American mailbox
This type of device for receiving mail has the same design, but a different design. The American model looks like a trailer with an opening end. The space inside is quite narrow, so large correspondence has to be rolled up.
The main feature of the design is a special flag, which, when raised, indicates that there are letters in the box that require sending. American mail carriers are responsible for collecting letters and mailing them.
American-style mailboxes are installed on a separate wooden or metal post.
Varieties
It is very important that the mailbox is combined with the overall style of the house, as well as the landscape design of the site, and a harmonious picture is obtained. No less important is such a parameter as capacity and choosing the right place for placement. Experts advise first deciding on this question: the future letter box will be used exclusively for its intended purpose or will additionally be a separate decorative element. In the latter case, with its appearance it will attract the attention of passers-by and friends.
With a door at the bottom
Now let's look at the main types of mailboxes, which are divided by style.
- Traditional mailboxes are purchased exclusively for receiving all types of correspondence. These types are common in post-Soviet countries and can be made from a variety of materials. In the modern world, to make them more attractive, they are additionally decorated with a variety of objects. They are mounted both on the fence and on the gate. It should be noted that this particular type is universal and popular, as it is simple and convenient.
American
American boxes are the same in design, but different in design. This allows everyone to choose the best option. All mail is left horizontal, so bulky magazines and newspapers will have to be rolled up. A special difference from other models of boxes is the presence of a special flag. If it is raised, it means there are letters to be sent. Unlike our rules, in America postmen retrieve letters and send them through the mail themselves. An American mailbox should be installed on a separate support made of wood or metal, or a decorative figure.- The design of English-type drawers is a stationary cabinet-table, which is laid out of brick or welded durable metal. Install it directly on the ground, a couple of meters before the entrance to the site. Skilled builders make a replica of the house in miniature, which will harmoniously complement the main building of the estate. These boxes are quite spacious and also very durable, so they will last for many years.
English mailbox
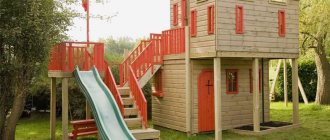
At the entrance to country houses in Great Britain, stationary structures are installed in the form of a massive brightly colored cabinet with a table. The material used to make this stylish and beautiful mailbox is brick or metal.
The product is made in the form of a poster stand, a miniature telephone booth or a house model, harmoniously combined with the architecture.
How to make an open box: step-by-step instructions with drawings, dimensions and photos
How to make a mezzanine in the corridor with your own hands in Khrushchev
The simplest tool organizer is a box-shaped design with a handle. You can arrange several compartments inside, and attach “pockets” of various capacities to the outside.
For a medium sized box you will need:
- plywood, board, MDF or other wood sheet material that can be easily fastened with self-tapping screws;
- fasteners;
- electric jigsaw;
- screwdriver;
- pencil, ruler;
- linseed oil for wood processing.
Mark the details:
- A - bottom of the box 35x20 cm;
- B - 2 side parts 22x22 cm;
- C - 2 long side elements 35x10 cm.
A handle 35 cm long is prepared from the block with a small margin. Then you can adjust the dimensions accordingly. You can use steel or aluminum tubes, scraps of smooth fittings.
Cut out the marked parts with a jigsaw. The bottom and sides are alternately connected using self-tapping screws, which are screwed through the part into the end of the other element. The approximate step for installing hardware is 7-10 cm. You can additionally glue all joints with wood glue.
To avoid misalignment during fastening or hardware breakage, self-tapping screws must be installed correctly:
- do not screw into places with knots and other wood defects;
- install fasteners perpendicular to the surface;
- the axes of the screwdriver and the self-tapping screw must strictly coincide;
- increase the twisting speed smoothly, without jerking.
Some craftsmen recommend pre-rubbing the screws with soap. After this they enter the wood very easily.
The handle block is sanded until smooth. When attaching it to the sidewalls, you first need to drill a hole through the part, and then screw in the self-tapping screw.
The handle can be made folding - cut holes in the sides, thread a strong cord and tie a block to it. The box is carried in the usual way, then the handle is placed to the side. In this form, it does not interfere with access to tools.
For small parts, side pockets are made of plywood or fiberboard. The plates are cut out to appropriate sizes and screwed to the sidewalls through narrow linings.
Partitions are cut out for internal compartments. They are secured using overlays or inserted into pre-cut grooves.
Under the containers to be removed, stops made of bars or scraps of plywood are installed inside the box. You can make removable containers yourself from sheet plastic, tin, wood, or take ready-made ones of a suitable size.
After assembly, the organizer is coated with linseed oil. You can paint the wood with acrylic varnish for external work or treat it with stain or antiseptic impregnation.
Design options
This type of product includes original mailboxes, made with your own hands from improvised materials and common household items: plastic bottles, boxes or containers.
Any durable and waterproof material can serve as the basis for an exclusive item, and step-by-step instructions will tell you how to make a mailbox with your own hands.
Photo
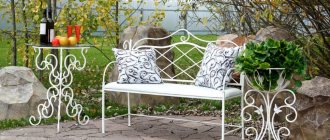
In the form of a house With forged parts
With an image
Wooden mailbox covered with stain
Decoupage box
Decoration House
Wood
American Mailbox
Did this article help you?
Self-production
Having decided on the installation location, shape and dimensions of the structure, you need to decide what material the mailbox will be made from. Factory products sold in stores are most often made of metal.
However, not all home craftsmen have welding skills and have the necessary equipment, so the best option for creating a device for correspondence is wood.
To make a mailbox you will need:
- wooden blocks and thin board;
- fasteners;
- hand power tool.
The following steps should be followed:
- Find a suitable drawing or make it yourself.
- In accordance with the drawing, prepare box parts of the required sizes from boards and bars.
- A hole for mail must be made in advance either on the lid or in the upper part of the front wall, equipping it with a protective visor.
- The hinged door is also prepared in advance. It is attached to the product using hinges and is equipped with a lock.
- Next, the box is assembled using bars and fasteners.
The finished design is the basis for an exclusive item. To turn a simple object into a work of art, you need to decorate it.
You can use anything you like to decorate your mailbox: natural material, toys, Christmas tree garlands and much more.
The final stage of work is installation of the product. Usually it is mounted on the fence from the outside or inside. The main thing is that the item is clearly visible and accessible.
A beautiful and original hand-made mailbox can decorate the entrance area of any country house, delighting the owners and lifting the spirits of passers-by.
Useful tips
The most frequently asked questions arise about attaching the mailbox to the fence. There are several options:
- On the back wall, 2 holes are made in the middle or on the sides and through them the box is secured to the fence with clamps. The disadvantage is that water flows in during rain or snow. Mail becomes damp.
- Additionally, a beam is prepared, the length of which is equal to the width of the mail box. The rail is attached to the fence using angles or bolts. Then, using self-tapping screws from the inside of the box, they are attached to a reinforced beam.
- The product is secured to the wall using bolts and nuts. To do this, make 2 holes on the sides in the back wall. Transfer the marks to the wall and drill a hole.
Designers advise that when sawing elements, strictly adhere to the dimensions indicated in the drawing. Carpenters recommend additionally strengthening the gluing and joint areas with moisture-resistant sealant or epoxy glue.
DIY photo of a mailbox
Master class #1: designer cardboard box
A chic mailbox, decorated with elegant lace and looking like a dollhouse, can act as a bright accent in the exterior of a country house.
To make such a cute “house” we will need:
We will decorate the box using decoupage napkins, as well as acrylic paints in white, black and silver.
We apply the template to a sheet of cardboard, transfer the dimensions of all the design details, and then cut them out with a knife
When making a window, it is important not to cut the cardboard to the end, this will prevent tears. It is advisable to secure the bend points with paper tape.
We glue all the parts of the box using hot glue or construction PVA, leave the box until completely dry
The box is ready, let's start decorating.
To create a visual effect of antiquity, we cover the outer surface of the box with napkins, and then cover it with black and white paint, finishing the corners with a silver tint.
All that remains is to install a miniature lock on the door, stick the selected napkins for decoupage and decorate the roof with lace ribbon
An original designer box, made by yourself, will become a memorable calling card of any suburban area.
Practical advice from folk craftsmen
To prevent the wooden structure from falling apart, individual parts are fastened with corners, then the product will be more durable, and when you need to repair it, you just need to unscrew the nuts and screws.
When the correspondence slot is placed at the top, it needs to be protected from precipitation by installing a small visor. It is better to make the door for removing mail items at the bottom; the best option is when the bottom of the box is completely tilted.
When a door for removing correspondence is placed on the front of the box, it is important not to make a mistake with the dimensions so that the parts do not have to be adjusted or even changed. To protect your correspondence, lock the door when you leave your country house.
If you don’t want your mailbox to quickly fill up due to advertising information, place a wooden cabinet nearby where the postman will place advertisements.
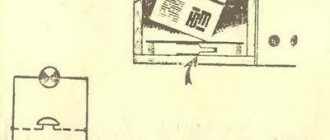
If you want to receive notifications when new mail arrives, install an alarm inside your mailbox. To do this, you will need to make another bottom from a plywood sheet or plastic; the contact plates are placed between the springs on which the false bottom rests.
The design works as follows: the postman places a letter in the mailbox, the contacts close, and as a result, the light bulb in the house connected to the alarm lights up.
You can make any model with your own hands if you want to save money on the family budget. The wooden product is made from pine beams and plywood, the lid is placed on epoxy glue. To make the homemade product convenient to use, attach a handle to the door, cut out a small keyhole and insert a lock. Decorative coatings are made using paints and varnishes for exterior work.
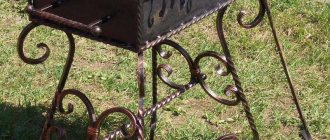
To make an American mailbox, you will need skills in working with a welding machine to connect the structure together. It is most difficult to make metal models yourself, so before choosing a model, really evaluate your strengths.
Source
Plot
0 votes
+
Vote for!
—
Vote against!
Owners of their own houses or summer cottages still receive letters, subscribe to newspapers and magazines, and there is also a need to deliver bills or parcels. And in order for all this correspondence to be delivered to the addressee, he needs to have a special cell at his place of residence. Of course, the modern market offers a wide variety of models and variations of this product, but it’s so nice to make a mailbox with your own hands, put a little of yourself into it, and even thanks to the unusual design, decorate a residential building or summer cottage. This article will talk about how to make a mailbox.
There are plenty of options for creating a mailbox with your own hands. They may differ from each other in shape, size, color, design and material of manufacture, as well as in design style. What types of mailboxes are there?
Types of mailboxes for a private home
Most of the models discussed are quite easy to do yourself, and you do not need to purchase expensive materials or equipment. So, what kind of mailboxes can you find today? First of all, it should be said that the style of the post determines the overall appearance of the site or the exterior of the house.
- It is also important when creating a mailbox to take into account the amount of correspondence sent. That is, if the owner receives a lot of letters, magazines, newspapers or advertising booklets every day, then a more capacious product will be needed, but if there is a minimum number of letters, then you can build a small box with an original decoration. Very often, a mailbox is used not for its intended purpose, but as a decorative element. The product is installed in a visible place and perfectly complements the overall appearance of a private house or garden area.
- There are several style solutions for designing a mailbox. The most famous American and English designs for receiving correspondence. The traditions of Europe and America are somewhat different from domestic ones. For example, in American cities, postal boxes are needed not only for receiving letters, but also for sending. If there is correspondence in the box, the postman takes it and takes it to the post office. But how can you determine that a message needs to be sent? It was for this purpose that special flags were invented on every mailbox in the states. If the flag is raised, it means the postman needs to look inside; if it is lowered, it means the box is empty.
- Another feature of such structures is that they are installed not like the usual structures on walls or a fence, but on lawns or areas near paths leading to the house, and are fixed on vertical supports (metal, wood and even stone). In shape, such products resemble a small container or house, which has a semicircular hinged lid at the end.
- This is a standard look, but in many states there are often competitions for the most original letter box. That is why near some houses you can find unusual structures in the form of fairy-tale characters, animals or any abstractions, as well as mounted on various stands. In addition, very often purchased products are simply decorated in a special way and thus stand out from the crowd of others.
- A slightly different tradition exists in UK cities. Here, mailboxes are installed directly on the ground near the front door or near the path with the entrance to the property. In appearance, this design resembles a small cabinet, which may have brick or stone walls. Of course, other materials are also used - wood, metal and even plastic.
- Such a structure should be compatible in style with the house and the site, that is, if the walls of the building are made of brick or have it in the design, then the mailbox will be made of this material, or a stone gate, usually complemented by stone structures for receiving letters and press . To make it easy for the postman to put the correspondence, and for the owner to easily retrieve it, the boxes are installed as if on a stand, which is an inseparable continuation of the structure. That is, this product is stationary and does not involve moving from place to place.
- Still, the most common type of mailboxes in our country are traditional ones, or otherwise called standard mailboxes. Their main feature is that they are rectangular in shape, and correspondence enters through a small slot. In order to remove letters or newspapers, you need to open the door or move one of the walls. Such structures are very often installed on apartment doors. These products are slightly larger than American mailboxes and more mobile than English ones. They can be made from a wide variety of materials, and also have different shapes.
- Of course, modern mailboxes are no longer just a rectangular box; there are decorative elements and an original appearance. It is these products that are the easiest to manufacture, convenient to use, and at the same time can perfectly decorate any building, be it a multi-level cottage or a small country house. They are installed on fences, walls of homes, and even on a free-standing stand.
How to make a mailbox with your own hands
So, if standard, commercially available products are not the ultimate dream and you really want to create something of your own, original, then it’s time to get creative. First of all, you need to decide on a specific idea, the appearance of the future mailbox. Then, you should decide what materials will be needed to implement the plan. Let's look at how to create your own wooden mailbox. This is the simplest option, and at the same time it is possible to create a real masterpiece from which it will be so pleasant to take letters out.
- Assembling the structure is somewhat reminiscent of creating a birdhouse; many people were probably involved in this type of activity in childhood. To build a mailbox, you will need a simple set of tools: a hammer, a saw, a ruler, a pencil, a screwdriver, hardware or glue. The materials you will need are wooden boards, boards or sheets of plywood, chipboard, MDF, etc.
- Next, determine the size of the mailbox. Specific parameters are selected based on what you plan to receive. If these are only letters and small advertising booklets, then a small product will be enough, but if the box is designed to receive large-sized magazines, then its dimensions should be appropriate. In any case, it is always better to make it a little larger than the standard one, then you won’t have to worry that not all printed materials will fit inside.
- The next step is to define the design. This concerns not only the features of the form, but also what elements will be needed for decoration. After all, the box for the press and letters must be combined with the exterior of the house, which means that some details must have something in common. This stage also involves the selection of a specific material and future color scheme.
When the choice of shape, materials, colors and decorative elements has been made, you can begin to manufacture the parts.
Step-by-step instructions for creating a mailbox
- For work you will need blocks of wood, plywood, preferably moisture-resistant (or use special impregnations that will help make the parts sufficiently resistant to precipitation and other weather conditions), metal corners, wood glue, a screwdriver, self-tapping screws and a hand or automatic saw or jigsaw will also be useful . In addition, depending on the design of the lid, it is necessary to prepare a hinge device, as well as a lock with which the door will be locked.
- Since our box has a more complex shape than just a rectangle, it is recommended to first create a frame from beams. For this purpose, it is enough to use slats with a cross section of 20-10 mm. The length will depend on the specific model, but approximately 20-40 cm is sufficient. The resulting base for the product will be shaped like a cube, but will have a small triangular roof.
- The next step is to secure the walls. Durable plywood is perfect for this purpose, but ordinary boards of small thickness can also be used. You will need two pieces for the side walls, two for the front and back panels and two for the top and bottom, as well as two pieces for the roof. Of course, we should not forget that all parts should be treated with impregnations, which will protect the finished structure from natural factors and extend the service life for a longer time.
- The plywood is screwed to the frame using corners and self-tapping screws; for greater reliability, the bottom of the mailbox can be additionally glued with adhesives, and all joints of the finished structure can be coated with moisture-resistant sealant. Don’t forget to make a cut on the front or top panel. Through this gap the postman will place letters and press inside. It is also necessary to make an opening door. It is possible that the roof of the house will serve as the opening part. To do this, attach this element using hinges.
- In cases where it is difficult to make a gap in plywood, for example, with insufficient experience, you can use a little trick. Use not a whole piece of plywood, but two halves that will not reach each other at a certain distance. Usually, a 1-2 cm slot is enough for these purposes, but when you plan to receive larger correspondence, you can leave more.
- Having completed all of the above procedures, we can assume that the box is almost ready. All that remains is to paint it or decorate it in any other way and install it in a permanent place, and also take care of protecting letters, magazines and newspapers from rain. Indeed, in cases where the slot for incoming correspondence is located at the top, moisture can easily penetrate inside. This is why you should install a special canopy over the box. It is best if it is made of metal.
The described method involves creating the simplest version of a mailbox, which you can do yourself even without special skills. Of course, in cases where it is possible to make more complex shapes and designs, you should not deny yourself such pleasure. After all, a mailbox is not just a box for receiving letters, it is also a wonderful decorative element.
Mailbox decoration options
- There are several fairly common ways to decorate a mailbox. First of all, you can use paints and apply any patterns, ornaments, and sometimes entire paintings to all structural elements. Even without artistic skills, you can accomplish this task yourself. Stencils made of paper, cardboard or plastic can help with this.
- Acrylic paints are best suited for painting on materials such as wood or metal. In order for the image to last for more than one season, it is first recommended to cover the entire surface with a layer of white primer, and apply a moisture-resistant varnish on top of the image, which will also protect the structure from damage caused by rain or snow.
- The next decoration option assumes that the mailbox will be decorated with a type of creativity such as decoupage. This is also a fairly simple method that does not require special skills. It is enough to select the required design depicted on a napkin or decoupage card. Next, the surface of the structure is painted white (this is one of the standard solutions), and then small fragments or the entire design are glued to the walls of the mailbox using PVA glue. When the glue is completely dry, apply several layers of varnish on top.
- Another solution that will help make the mail original is to attach several decorative tassels, beads, shells and other elements to the box. In order for such decoration to hold securely and last for many years, you should choose good glue.
- Even an unusual coloring will make the mailbox an original decoration for the entire summer cottage or private house. And if you turn on your imagination, use available materials and various artistic techniques, you can get real works of art. With the right approach, you can even decorate the box with fresh flowers, which will grow in small containers on the sides of the structure.
Original solutions for creating mailboxes
- Not only can decorations add originality to a mailbox, but it is also possible to use unusual items to create the design itself. Old interior items or unnecessary things are suitable for these purposes. For example, a product made from a plastic bottle or large-diameter PVC pipe will look very unusual. This option is perfect for people who do not subscribe to a lot of newspapers and receive correspondence in small quantities. It is enough to attach a round door to the tube, which will serve both for delivering letters and for removing them.
- A similar option would be a box made from a round log or thick log. Here you should remove the core and place a suitable container inside; it can be a metal pipe, sealed on one side and with a welded door on the other. At the same time, this lid can be decorated with tree bark so that the feeling of naturalness is complete.
- If a more spacious design is required, then an empty system unit would be an excellent option. This product can be installed on any support and can even be screwed to a fence. All that remains is to build a door and decorate the box accordingly, so that the postman immediately understands that this is a box for letters and newspapers.
- In general, making a mailbox that you won’t be ashamed to install in your own home is not that difficult. You can use plexiglass, metal, wood and even cardboard using gluing, welding or assembly technologies. In addition to choosing the material and shape, it is equally important to properly secure the finished box or install it in a permanent place.
- The installation location can be a fence, a gate, a house wall, or even a separately placed support. It is important not to forget when designing a product to think in advance about the method of fastening. For example, in cases where mail is placed on a gate (wooden or metal), it is necessary to make small holes in the back wall and secure it with nuts and bolts. If you plan to install the structure on a stand, then the fasteners should be in the bottom panel.
To summarize, we can say that despite the fact that technological progress in the world has reached unprecedented heights, paper letters and the press have not gone out of fashion to this day. This means that products such as mailboxes are still needed. And not always things bought in a store can perfectly complement the style of a private home or summer cottage. That is, if you really want an original decorated and designed place for receiving correspondence, then the best solution would be to do this element yourself.
Preparation
A mailbox can be very diverse - everything is limited only by your own imagination. But no matter how the box is conceived, it is important to take into account the design style of the house and garden. Let this step be included in the preliminary preparation: you need to determine the general concept of the suburban area, think about where it will look best and, of course, we must not forget about capacity. Will the box accommodate newspapers, letters, or is it being built only as a decoration? It’s worth looking into these questions.
To assemble a wooden box, additionally buy metal corners - thanks to them, the strength of the box increases and the working moments are simplified. A wooden beam should be inspected before purchasing (or before directly creating a box): it should not have knots, in addition, wood is a material that needs processing. It is advisable to transform it by painting it in the desired color, or varnish it - otherwise rotting will begin.
Tip: the most popular antiseptic agents for treating wood. The compositions Tikkurila, Snezhok, Prosept and others have proven themselves well.
You can additionally purchase a clamp in the store - you will need it to secure the box to the pole. It is fixed on the back wall when placed in a permanent place. Before assembling the wooden box, the drawings are transferred to a thin sheet of paper or printed on a printer. This will make it easier to navigate the details. You can use ready-made diagrams, but some people prefer to make sketches themselves.