Review author: Terrari School of Design
Outdoor games occupy almost all the free time of children in the country. And if the kids remember the old fun at city playgrounds, you can please them with the usual slide.
Today, ready-made children's slides for the garden are sold. Most often they are inflatable and plastic. The ease of purchase is overshadowed by fragility over time. And with your own hands you can make a good design that will serve not only your children, but also your grandchildren.
A reinforced children's slide made of natural wood will delight both children and mothers and grandmothers. It is reliable, durable, safe.
Where does the work begin?
Any changes to a summer cottage begin with design. It is important to correctly calculate the parameters of the future structure in order to:
- the height of the children's slide (steps, railings, ceilings) corresponded to the height and age of the child;
- building materials were in sufficient quantity;
- manufacturing of parts was simple and straightforward;
- the building fit organically into the site and did not interfere with wires or irrigation equipment.
The general rule is that the length of the slide should be twice its height. The angle of inclination of the sliding surface is so important that it is even described in detail in GOST standards. They are in the public domain, it will be useful to familiarize yourself with them. Drawings can be made by hand or in special programs. 3D projects allow you to look at the layout from all sides. Understand whether children having fun will be visible from a window or gazebo. Will violent games touch the pipes and cables laid in the ground?
Advantages and disadvantages of different types of slides
In order to choose the material from which the children's slide will be made, you need to carefully read each of them, weighing all the pros and cons. The most popular are:
- tree;
- metal.
Even though they have a similar design, the manufacturing process is still different. The reason for this is the characteristics of the materials.
Children's slides made of wood
Such designs have proven themselves well several centuries ago. Since wood slides are considered the simplest to make, they can often be found on personal plots and in private courtyards.
Each of these slides for children is built according to a standard layout, which includes:
- stairs;
- descent;
- base;
- upper platform;
- mandatory protective component.
In addition, the classic design is often supplemented with all sorts of internal labyrinths, sandboxes, additional descents - here everything depends only on your imagination.
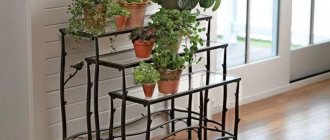
Wooden slides are often combined with houses, swings and other details
Advantages:
- Low financial costs. Since wood is relatively inexpensive, and specialized tools are not needed to process it.
- Ease of manufacture. Building a slide from wooden planks and blocks does not require you to have any special construction abilities or skills. Often it is enough to adhere to the scheme according to which the structure is made.
- Minimum tools. To construct a slide you do not need a large number of different devices.
- Environmental Safety. Wood, as a rule, not only does not cause allergies, but also does not emit toxic substances when heated.
- Any place to install the slide. Unlike a metal structure, a wooden attraction can be placed in any convenient place on the site, since in the scorching sun the wood will not heat up and will not burn little fidgets.
Flaws:
- Susceptibility to rotting. Wood is a material that requires treatment with special protective agents and varnish. If this is not done, then the slide begins to rot and dry out under the influence of external factors.
- Descent deformation. This happens due to exposure to rain and sunlight.
When installing a wooden structure, special attention should be paid to the slope. To cover it, it is best to purchase factory-made material, for example, linoleum or plastic. The latter is more expensive, but more reliable and safer.
If desired, it is very easy to remake a wooden slide, for example, turn it into a pirate ship.
Metal constructions
Just a few years ago, such slides decorated almost every yard. With proper care, they can last a very long time.
There are practically no significant differences between a wooden and a metal slide, except that an iron structure will require pouring a foundation. This design consists of:
- small sites;
- descent;
- ladders made of pipes.
It is recommended to cover metal structures with an awning or build a canopy over them
Advantages:
- Structural strength. The advantage of a metal structure is that it does not require special care; it can withstand temperature changes, rain and high humidity, as well as heavy loads.
- Reliability. It rarely happens that any part of such a design becomes loose or comes off.
Flaws:
- Difficult to install. To install a metal slide you will need a welding machine and the ability to use it. Moreover, you will need knowledge of metal working technology.
- Heats up quickly in the sun. Iron is subject to rapid rise and fall in surface temperature depending on the time of year. If you install the slide in a place where the sun shines brightly, your child can easily get burned while playing. To avoid this, it is recommended to install the structure in a shaded place or hide it under a special canopy. It is possible to combine a metal base with a plastic slope.
- Loss of interest in the child. It is almost impossible to decorate a metal slide with anything, which means that such an attraction can bore your child.
After familiarizing yourself with the advantages and disadvantages of each manufacturing material, you can confidently make a choice. It is not necessary to use only metal or wood; you have the right to combine them, resulting in an original, interesting and durable structure.
Photo gallery: different slide designs
Slides can be part of an entire entertainment complex
The slides can be supplemented with various elements. Children will definitely like the bright wooden slide
A high-quality and reliable slide will bring a lot of fun to children and their parents
For children of any age, fun on the slide will be happiness
A reliable slide is the key to safe games
Wood is the best option for non-professional welders
Metal slides are considered the most durable structures
What materials are used
A slide for a children's playground is built from the following materials:
- wooden boards;
- beam;
- stainless steel fasteners;
- a mixture of crushed stone and sand;
- concrete.
Pre-treatment of wooden blanks with water-repellent, antifungal impregnations will increase their service life. There are also coatings for the finished structure.
Which slide to choose - metal or wooden?
The manufacture of slides mainly uses wood and metal. The selected material influences the manufacturing technology, because any construction raw material has its own characteristics.
Wooden slides in the classic version are built with an upper platform in the form of a house and comfortable steps. All parts of such slides are connected using fasteners. Every detail must be polished so that the child does not get hurt. It is important that all boards used in construction are smooth and dry.
Metal slides usually look simpler: a small platform, a ladder made of pipes and a ramp. The supports for these elements of the structure are usually poured with concrete. Metal slides are most often painted.
Only those who know how to use a welding machine can undertake the creation of a metal slide. It is impossible to fuse metal parts without welding skills - in inexperienced hands, the material heated by welding will bend and become unsuitable for construction.
A table will help you make a choice in favor of one material or another, indicating the pros and cons of using metal and wood when building a slide:
| Wooden slide | Metal slide |
| Advantages | |
| Wood is a traditional material that is easy to process and cut | The metal slope of the slide will not deteriorate during operation |
| Wood products are environmentally friendly | The structure will stand securely - no element will move away or become loose |
| The slope of the wooden slide is always warm, despite the cold weather | The slide will remain in its original form, even when the child grows up |
| Flaws | |
| Wood is susceptible to rotting and drying out | The metal is subject to strong heating in summer and cooling in winter. |
| Mold may appear on wood | It is better for school-age children to ride on an iron slide, since small children can accidentally get injured by hitting the sharp corner of the structure |
| The wooden slope gets wet and therefore becomes deformed. | A metal slide, the design of which has limited possibilities, can quickly get boring for a child. |
The listed disadvantages of wooden slides can be combated if you periodically coat the wooden parts of the slide with special protective agents and varnish.
The choice is yours. But manufacturers offer to purchase slides, some parts of which are made of metal, and others of wood. Thanks to the combination of different materials, the play structure seems more interesting.
Sliding surface
The slide slope can be left boarded. When applied with a special wax polish or bathtub acrylic, it will glide quite well. Or you can lay a coating on top:
- linoleum;
- galvanized steel sheet (at least 0.5 mm thick);
- plastic sheet.
Plastic will provide the best glide, but it may not withstand the frosty winter and may crack. Steel sheets must be handled responsibly to avoid cuts from sharp edges. The metal surface glides well, but gets very hot in the sun. It is advisable to place such stingrays in the shade so as not to get burned.
It is not recommended to lay laminate flooring. The very first autumn rain will distort the surface of the slide irreversibly. Plywood will not stand the test either.
Video: how to make a slide for a child out of wood
The key to a successful and fun time is a high-quality and reliable slide. It is a way to keep your child busy with an exciting activity and develop his physical skills. And as the baby grows up, it will be possible to complete the design and improve it, which can encourage your fidget to a healthy lifestyle.
- Author: Veronica Volgina
Hello! My name is Veronica. I'm 20 years old now. I am a 3rd year student at the Vologda Institute (VoGU) majoring in business informatics (programmer). Rate this article:
- 5
- 4
- 3
- 2
- 1
(4 votes, average: 3 out of 5)
Share with your friends!
Main stages of work
- Cleaning and marking the area. Preparation of supports (need to be cut, grooves made).
- Installation of supports. For each of them, a hole 50-60 cm deep is drilled, into which a crushed stone-sand mixture is poured. The installed beam is filled with concrete. Additionally, the support beams are “tied together” with boards secured into grooves.
- Installation of the upper platform - “floor”. It is advisable to make small gaps between the boards so that rainwater does not stagnate.
- Installation of descent. If a plastic descent is planned, then the purchased blank is simply secured. If there is a wooden slope, it is assembled by hand. It is necessary to provide enclosing sides.
- Careful sanding of the wooden slope.
- Installation of stairs and railings.
Design examples
Good owners never have too much space in their dacha or garden, and this is where a corner slide comes in handy. But don’t squeeze it into the corner of the fence: the distance from the slide to any obstacle must be at least 1.3 m!
Drawings of the corner children's slide and its upper platform are given on the following. rice. Of course, it is better to make the slope profiled. In the same way, as a platform, you can build a sandbox for landing; then the length of the boards for it needs to be 1800 mm. The slide platform is supported by 4 pillars 150x150 at its inner corners.
Drawings of a corner children's slide
The pillars do not need to be concreted. It is enough to scald their lower ends with hot bitumen to a height of 750-800 mm, sprinkle them with sand while still hot, wrap them in roofing felt and dig them in to a depth of 60 cm or more. In the pits you need cushions made of 15 cm of sand + the same amount of crushed stone, i.e. pit depth from 900 mm.
For scalding, the ends of the beams are immersed in almost boiling bitumen. Slowly, otherwise hot splashes will fly! Then they wait until the bitumen around the tree stops hissing and bubbling. This means that air and moisture are forced out of the wood. After this, the beams are kept in bitumen for at least 10-15 minutes so that it saturates all the pores. After installing the pillars in the pits, they are covered 3/4 of the depth with crushed stone in layers, 15 cm each, with a tamper and topped up with excavated soil with a height of 15-20 cm. Wooden non-foundation buildings on such supports last for 40-70 years or more.
In Canada, whose climate is similar to Russia’s, only even wetter, top platforms for children’s slides are common, which do not require excavation for installation, see fig. below. For proper rigidity and reliability of the entire structure, it is necessary, firstly, that the upper platform itself be of a box-shaped structure. That is, there may not be a roof, but balusters and reinforcement connections from the rear (stringer) are required. Secondly, the ladder legs must be attached to the strapping bars with rigid, one-piece units (leg brace), consisting of persistent jibs and attached earrings on the outside.
The upper platform of the children's slide, which does not require excavation for installation
It is better to fix the entire structure on the ground, of course, not with pegs, but with L-shaped anchors made of reinforcing bars. The anchors are driven to a depth of 60 cm. In order for the ladder support brace, exposed to both soil and atmospheric destructive factors, to last for a long time, they must be protected from rotting especially carefully. For example, the same as the heels of a fence for a front garden, which is also installed directly on the ground.
The development of the idea of a slide for children to ride, installed on the ground without excavation, are the samples shown in the following. rice. They use the rigidity of not only the triangle and the box, but also the so-called. biplane box. This gives a large supporting area, so such slides do not need to be attached to the ground at all, and the entire material is a 150x24 board. The second interesting feature is the sides of the slopes, which decrease in height along the slope. You won’t fall off the top, but you’ll roll around - wave your arms and scream from your heart. Ready-made factory products of this type are available for sale; they are brought and simply placed where the owners indicate.
Drawings of children's slides installed directly on the ground
Nuances of operation
- The new slide is treated with acrylic paints or varnishes. The coating should be applied in several layers, giving each layer sufficient time to dry.
- Any paint will have to be updated. It is recommended to thoroughly sand the surfaces before reconstructing them and inspect them for damage. Fill cracks, chips, and uneven areas with putty.
- Flexible polymers can significantly diversify the shape of a children's slide created with their own hands for household members. But they will require additional strengthening. The sides of a curved slope should be higher than those of a straight one.
- On the upper platform you can organize a “summer house”, under the steps of the stairs there are boxes for storing toys and “sand” equipment. Sometimes there is also a sandbox under the hill. Numerous photos of children's slides will help you find a suitable solution.
- In winter, the wooden structure easily turns into an ice fortress.
How to decorate beautifully, design ideas
Self-manufacturing of the structure opens up a lot of scope for imagination in the final design:
- Multi-colored bright paints are chosen for painting parts. The main thing is that they are suitable for outdoor use and have a hypoallergenic composition that is safe for children.
- Wooden elements with carved shapes are suitable for decorating railings and protective edges.
- The edges on the slope, cut in an unusual shape, will add zest to the finished product.
- Many craftsmen stylize the elements of the gaming complex to resemble their kids’ favorite cartoon characters.
Advice! When showing imagination in design, we must not forget that all parts must be completely safe for the child. The use of sharp corners and protruding elements is not permitted. The wood must be carefully processed to protect children's hands from splinters.
Designing and building a slide for your baby is an interesting and exciting process that will allow you to turn any ideas into reality with your own hands. The finished result will bring great joy to the child, save the family budget and free up time for household chores.
Security questions
- The landing site should be as soft as possible. Clean sand or a well-cushioned mat works best.
- Electrical appliances, chemicals, and sharp garden tools should never be allowed near the slide.
- There should be enough open space around the playing area (no fences, thorny bushes or trees).
The structure must be regularly inspected for cracks and damage, reliability of joints and stability of the railings.
Ideas for creating slides
Creative design of a wooden slide
Wooden slide under the roof
Wooden slide with metal slope
Wooden slide with a large platform and stairs on both sides Metal slide under a roof
Low metal slide for young children
Simple metal slide This structure has a simple wooden slope
Thanks to the curved bars, this slide looks unusual
The slide turns into a play complex
The first homemade slide in your life can take a lot of time. But as soon as the work is finished, you immediately want to do something else. Supplement or improve your own work.
The easiest way to do this is to install crossbars between the supports - these will be small horizontal bars. Sturdy ropes or rings are also easy to hang. A swing of the simplest design can be hung in one evening. If the upper platform is at a sufficient height, you can supplement the slide with a rope ladder or net.
Construction rules
Before you figure out how to make a slide for children with your own hands, you should study the rules for its construction and installation. You need to remember the following:
- the design should be comfortable for the child;
- there must be a “brake pad” on the descent. This is the area where the slope should be parallel to the surface of the earth. If the descent speed is not reduced, there is a risk of injury;
- The length of the homemade slide should be twice the height of the structure. For example, with a ramp length of 5 m, the height of the launch pad should not exceed 2.5 m;
- there should be no other structures a meter from the descent so that the child does not hit himself during acceleration;
- in the descent area there is a special covering (for example, a rubber mat);
- a swamp should not form under the structure;
- For the construction of the structure, use only safe and environmentally friendly materials. No matter what you choose, they should not contain harmful ingredients. This also applies to the paints and varnishes with which you will cover the slide;
- if the slide is made of wood or plastic, it must be resistant to fire;
- When constructing, be sure to use fences and railings. Thanks to these elements, the child will not only maintain balance when climbing up, but will also not fall during active movement. These structures must be present on the slide no matter how old the child is;
- the structure should not have cracks or openings so that the child does not get injured or get stuck during play.
The slide must certainly be stable, functional, durable and have an attractive appearance. Its base can be concreted or metal supports can be used . All structural elements should be sanded and varnished.
Be sure to take into account the age of the child; if we are talking about preschoolers or primary schoolchildren, then the height of the slide should be a maximum of 3.5 m.
Photo of a children's slide
Step-by-step production of a wooden slide
Preparation: drawings and tools
Any construction begins with the execution of drawings. They will tell you what materials, in what quantities, will be needed, and most importantly, they will give a clear idea of the scale of the work. These drawings should reflect the dimensions of the base, descent and stairs of the structure.
A simple wooden slide with a long slope
The height of this structure is 3 meters, the length of the slope is 6 meters. The site is located at a distance of 2 meters from the ground. The length of the handrails, which are attached to the structure on the sides of the descent, depends on these numbers.
But if a wooden slide is being built for a child under 4 years old, then you need to sketch out on paper a drawing of a small structure with a short slope and a ladder of a couple of steps.
Among the tools you will need to arm yourself with a drill, saw, screwdriver and shovel. At the very beginning of the work you will need sandpaper, and upon completion - stain and color emulsion. Instead of paint, you can use wood varnish.
Necessary materials
To build a wooden slide, you need to purchase the following materials:
- 8 boards;
- 4 thick beams 0.6 meters long and one 2 times thinner 0.8 m long;
- Several sheets of plywood;
- 2 round wooden profiles.
The recommended dimensions of the boards are 5x14x60 cm. The plywood sheets must also have certain parameters - 150x150x12 cm. It is important that the size of the round profiles is 30x120 cm.
Instructions
- The process of building a slide should begin by cutting all the wooden elements, while being guided by the drawing. The beams and boards need to be sanded with sandpaper, and then the sharp corners must be rounded off;
- Now it’s time to make markings on the ground and drill holes in the ground to install the bases of the beams in them. The bars will not move from their place during the operation of the slide if their base is filled with concrete;
- Taking a saw, you need to create recesses at the top of the posts. They are needed for fixing planed boards. The supports must be attached to each other using self-tapping screws. The structure will become reliable after cross bars or, in other words, sides are attached to it, preventing the child from falling off the slide;
- To an almost finished structure, you can screw two bars onto self-tapping screws, to which a ladder and a ramp are attached. After this, you can lay floorboards on a small slide area and fix them with self-tapping screws. It is advisable to lay floorboards at a short distance from each other. Thanks to gaps of only a few mm, the wooden floor will dry out well if it gets wet by rain or snow;
- Then you can make the sides for the stairs. To do this, the edges of two boards must be cut down, positioning the saw at an angle of 45 degrees. These boards are attached to the racks, and then smaller boards are fixed to them - steps;
- The gap between steps must be calculated in advance. If the distance is too large or too small, it will be difficult for children to climb up. A comfortable step for climbing stairs is 35 cm +/- 5 cm;
- At first, the slope is created in the same way as a staircase, but instead of boards, sheets of plywood tightly pushed together are placed on the sides. On the reverse side they are fixed with wooden slats using screws;
- Lastly, the structure is coated with varnish or color emulsion. Wood and plywood must be treated, otherwise they will deteriorate under the influence of moisture, thereby reducing the service life of the slide.
Video: tips for making structures from metal and wood
DIY children's sports corner
Anyone who has held a saw, hammer and drill in their hands at least a couple of times can make a sports corner in their apartment on their own. The work is very simple and does not require filigree precision. What you need to pay attention to is the reliability of the fastening. In this regard, it is better to play it safe and do it with a large margin of safety.
If you plan to make a sports corner from wood, use dry wood (with a moisture content of no more than 16%). Also pay attention to the grade: there should be no through knots on the racks and supports. Given the loads that may arise, they are dangerous. These are, perhaps, all the basic requirements.
Based on the Swedish wall
If desired, you can make a children's sports corner with your own hands. No special tools are needed. You definitely need a saw or jigsaw, a drill with bit-type attachments, it’s very nice to have a hand router and a grinder. If they are not there, you will have to do a lot manually. You also need a level, a laser level is more convenient, but you can get by with a construction level, preferably paired with a plumb line to check the verticality of the racks.
In addition to 150*45 mm boards, you will need handles for brooms (they are thinner than for shovels, and more convenient for children). You will also need ropes, a piece of rope, self-tapping screws, bolts, studs, angles, in general, everything that is necessary to attach the structure to the wall and ceiling.
What is needed to make a children's sports corner
The board was cut to size (taking the distance from floor to ceiling and subtracting 10 cm) and sanded. We fasten the two resulting racks with clamps and apply marks under the steps. In these places, we use a crown to drill holes of the required depth (half the thickness of the board). To be able to control the depth of the hole, a strip of electrical tape or colored tape is glued to the crown. Oriented along the bottom edge of the strip.
Start of production of the Swedish staircase for the sports corner
The two short parts with holes in the photo are a mini-handle bar with several bars, which can also be used as a horizontal bar. In the long racks on the side facing the wall, in the lower part we saw off a piece for the baseboard.
At the bottom of the racks we cut off a piece - there is a plinth there
Now we connect the racks and the upper part. The quality of this connection determines whether the children's sports corner will be strong. We use powerful studs, place wide washers under the heads of the screws and nuts; instead of a bunch of washers, you can make metal plates. We pre-drill a hole for the studs; it must be strictly perpendicular to the plane so that the fastening does not break.
At the bottom of the racks we cut off a piece - there is a plinth there. You can also use four studs
We install rungs and steps into the finished sidewalls using glue. For reliability, we fasten them with confirmations (furniture ties). We drill holes in the end, install the confirmat, sinking the head into the wood. The holes can then be closed either with wood putty or with furniture plugs in the color of the wood.
Confirmations installed (one of the corners fixing the staircase to the wall is visible)
Having placed it against the wall, we mark the places where fasteners need to be installed, drill holes there and install dowels.
Attached to the wall the base of a home sports corner for children (and not only)
As tests have shown, such fastening is not enough for reliable fixation: if you hang on the outer crossbar and pull yourself up, over time the fastenings will be pulled out of the wall due to vibration. Therefore, it was decided to make additional fasteners to the ceiling. Collets (anchors) were installed into it, into which long metal rods with rings at the end were screwed.
Ceiling mount
As a temporary option, a rope is threaded into the installed fastener; then the fastening will be upgraded. To avoid any difficulties, it is necessary to install the anchors in the ceiling so that the rings are closely adjacent to the boards. Then they can be secured with bolts and washers. You will get a rigid mount. In this case, the load will be distributed between the fasteners in the wall and the ceiling, which greatly increases the reliability of the entire structure.
The basis of the children's sports corner is ready. Let's start assembling additional shells. Let's start with the rope ladder. Crossbars 300 mm long are cut from a 35*25 mm block. The edges are cut with a router to a rounded shape (do not leave sharp corners) and well sanded. Holes are drilled in them at a distance of 50 mm from the edge, the diameter of which is slightly larger than the cord. The holes must be drilled at the same distance: the more precisely, the easier it is to assemble the ladder.
Drill holes in the planks
We take the cord and make markings on it every 30 cm. This will be the distance between the steps. We mark the two cords identically - with a millimeter to millimeter coincidence. We put on the first step and tie a knot at the bottom. At the marking site we tie a second one, thread the next step and so on.
Marking on the cord and knot
This is what the beginning of a rope ladder looks like
We hang additional shells on screwed hooks by making loops from the same rope, or by attaching carabiners to the ends, and clinging the carabiners to hooks or slats - this seems more convenient and reliable to some.
DIY children's sports corner
This is what a homemade corner for children's sports activities looks like. It takes up very little space in the apartment.
From what age
Pediatricians advise purchasing a sports corner for children by the end of the second year of life. But those families in which equipment was purchased for the elders often note that the younger ones learn to climb stairs earlier than to walk. So it's a matter of preference.
An example is in the video. The sports corner was installed when the girl was only 1.2 years old. The photo was taken a month later. The mother notes that the child has become more coordinated and dexterous. For a month there was not a single serious fall (we were successfully caught several times, but this does not count). There are many approaches during the day - every time after sleep, and in intervals when it becomes boring. Conclusion - a sports corner for children in an apartment is not mandatory, but desirable.
If you are really worried that the child will hit himself hard if he falls, you can lay a sports mat or a soft floor for children of great thickness (at least 10 mm) under the sports corner and next to it. A soft floor is preferable - it is designed specifically for children and, with a relatively small thickness, has good shock-absorbing abilities.