The first samples were somewhat reminiscent of plant patterns. Geometric shapes were especially popular. Modern masters practice a wide variety of styles. Carved elements combine especially well with decorative grilles.
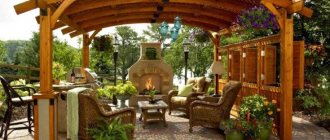
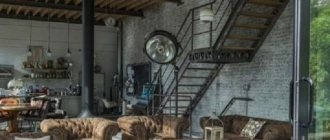
Thanks to this unique decor, the design looks “elegant” and bright, and most importantly, hospitable. Having seen a photo of carved gazebos, every person has a desire to hold their gaze and take a closer look. And when you meet for the first time in person, you immediately want to come closer and relax inside.
In this case, the carved gazebo fully lives up to its name. It sets up guests and loved ones for a good, pleasant conversation. You can also feel extraordinary comfort if you build a carved structure at your dacha.
Types of gazebos
Gazebos are divided according to many criteria depending on the size, type of material, and purpose.
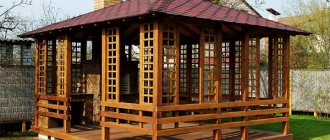
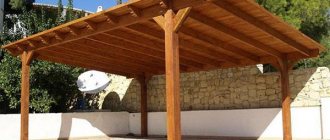
Pergola made of wood
But all of them can be divided into two main types:
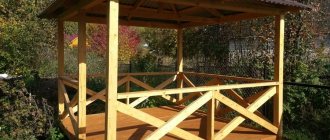
- A pergola is an open structure, arch, roof or canopy over a table or bench. It can be made of different materials and often consists of a frame covered with curtains on the sides. This design can be wooden, plastic, metal. It fits perfectly into any yard or garden interior. The disadvantages include the impossibility of spending time in the gazebo during the cold season or in bad weather.
- The pavilion is a semi-closed or completely closed structure. It can be made in the form of a separate building. Where, when chewing, you can install a barbecue, stove, furniture, so that you can relax there all year round, regardless of the weather and air temperature outside.
You can come up with a design and drawing of a gazebo yourself or seek help from specialists who will help you draw up a project, carry out calculations and purchase materials. Building with your own hands or hiring workers is everyone’s business, but first I would like to note that installing a gazebo is not a difficult task.
You can also purchase a ready-made carved gazebo and install it on your site. The cost may vary and depends on the complexity of the thread and the dimensions of the structure itself. Prices range from 30 thousand rubles to several million. That is why many people strive to build a recreation area on their own in order to save money.
How to make artificial aging of wood
To ensure that the materials used correspond to the ancient style of the gazebo, you can use artificial aging of the wooden elements. The result will be a material with an individual surface that will highlight the design of the building. Moreover, this treatment additionally increases the strength and service life of the wood, since paints and varnishes with protective properties are used in the work. Most often, beams and floors and the surface of furniture (tables, benches, etc.) are treated.
You can use one of three techniques:
- firing, in which exposure to high temperature changes the color and pattern of the surface of the wood. Firing is performed with special burners and lamps (gas, soldering);
- brushing, in which a mechanical tool (usually a brush) is used to adjust the relief;
- treatment with special chemicals (alkali and acids), which unevenly destroy the structure of the wood, forming a new relief.
Important! Pine, oak, walnut, ash and larch are suitable for aging, but this technique is not used for fruit trees, beech, teak, alder and maple.
After obtaining the desired surface, the wood is treated with protective impregnation, paint or stain, or varnish. The above methods physically change the structure of the tree. There is also a patina technique, which creates only the illusion of a new surface using special paints, stains and wax.
Video: do-it-yourself artificial aging of wood
Advantages of carved gazebos
Carving has long been considered a sign of wealth and prosperity. Previously, this type of art decorated palaces and chambers. Today everyone has the opportunity to install a wooden carved gazebo at home or in their country house. Carvings are usually used to decorate the sides, support pillars or window openings. More often, through threads are found on cornices or struts.
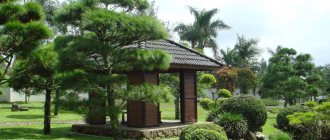
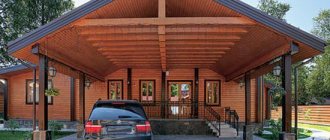
Wooden gazebo-pavilion
Carved gazebos are not only beautiful, but also reliable. They have a number of advantages:
- wood is a natural material, so it does not cause an allergic reaction and does not emit toxic substances
- Most carved gazebos are quite light in weight, which makes it possible not to have to worry about the foundation first
- small wooden gazebos can be removed for the winter so as not to expose the wood to rot and mold
- special impregnations and protective materials for wood will help preserve the quality and appearance of the structure for many years, and protect the gazebo from aggressive environmental influences.
Design
The construction of a terrace or veranda allows you to connect the enclosed space of your home and nature into a single whole and opens up wide possibilities for the design of these buildings.
Fencing. They can be made protective or decorative, for example, in the form of a low, elegant fence or pergolas - canopies of several arches, decorated with vines or potted compositions of bright hanging plants. It is good to decorate the perimeter with ornamental shrubs and flowers.
- Instead of a standard roof, you can use a removable awning, retractable awnings, or a portable umbrella.
- When a terrace or veranda is not attached to the house, but is located separately in the yard, then a path is used as a connecting link between the buildings. To decorate the path, spotlights built into niches on the ground cover or LED lighting plus one or more openwork arches to create the effect of a luminous tunnel are suitable.
For a summer veranda or open terrace, it is advisable to choose plastic in muted dark colors - smoky, tobacco shade, bottle glass color with a grayish or bluish undertone. Being in red, blue or bright green on your porch can be irritating.
c36ac8488e67a8800292fa292c6acd5e.jpe
When the frame is made of wood, then after antiseptic treatment and varnishing the wood acquires a reddish color. In this case, brownish or orange polycarbonate is selected for the roof. Such tones help create a relaxing atmosphere and increase the color temperature of the veranda interior.
Pattern samples
The choice of pattern is probably one of the difficult decisions that an owner will have to make when he decides to install a carved gazebo on his property. The drawing, or rather the ornament itself, can be seen in magazines or invented by yourself. When the element is ready, you can begin making the future ornament.
Modern technologies make it possible to do everything automatically. That is, print it on a computer with all the markings and dimensions. If this is not possible, then the element of the drawing must be drawn and divided into squares of equal size.
The pattern must be made in several versions - natural size and scaling up and down. These sketches will allow you to make a perfectly even carving with identical elements. Next, the finished samples are transferred to wood so that carving can begin. It is not difficult to do, since you can use modern technology.
The outline of the pattern is drilled out with a drill, and then the ends are cleaned with a saw, file, jigsaw or chisels of different sizes.
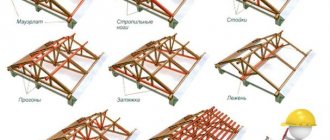
How the top chord and frame jumpers are made
For the manufacture of the upper belt, a beam is used, 150 x 150 millimeters, fastened with 50% notches and self-tapping screws.
As on the lower belt:
- First, a pair of elements is mounted, which has a lower part of the notch.
- The supports and bars of the upper chord are fastened together with metal corners.
- The remaining parts of the strapping are laid and fixed with self-tapping screws with a large diameter.
- Smaller angles are used to secure lintels made of the same timber between wooden supports, which have a dual purpose:
- like stiffeners;
- as frames for installing carved wooden elements.
Carving materials
The quality of a future carved gazebo depends on many factors - correctly selected materials, evenness of the pattern, complexity of the pattern, the skills of the craftsman, the availability of additional tools and materials. As for wood, to build a carved gazebo you need wood no more than 2.5 centimeters thick. Each board must be completely dried, otherwise cracks and deformation may occur.
Carved gazebo
For carving, it is better to choose pine needles, linden or poplar. It is highly not recommended to use apple or chestnut wood, because they are difficult to carve and file.
You need to choose boards of high quality, without burrs and knots, because they can ruin the ornament when cutting out the pattern.
Select an option
To roughly understand how to make a decorative lattice for a gazebo yourself, you need to decide on a specific model that will be discussed in the article.
Decorative lattice for a 3 by 3 gazebo
As an example, let's take a simple square gazebo measuring 3 by 3 meters and cover it with a lattice, leaving only a doorway. The height of the walls will be 2.5 meters. The doorway will measure 2 by 1 meter.
The option used will be a square single-level lattice with grooves. This method results in a more attractive structure that will delight the owners of their personal plot.
This is what the finished model will look like
The cell will be located at an angle of 90 degrees relative to the walls and floor, i.e. will be square. The size of all cells will be 300 mm. This option will allow you to avoid high costs for the purchase of lumber, and will also reduce the amount of time spent on its manufacture.
Installation of a gazebo
Before installing the gazebo, you need to draw up a plan, a drawing, and calculate the amount of materials. This depends on the size of the gazebo itself. You need to start from the area of the space where the gazebo is planned. In order for it to comply with the rules and regulations, some dimensions must be observed.
For example, the height must be at least two meters, from the lowest part. The roof must be made with a slope so that debris and residual water do not accumulate on the roof, due to which the coating will quickly deteriorate and repairs will be required. You first need to consider the availability of lighting and install it.
Foundation
The foundation is the key to a high-quality and durable structure. Strengthening the foundation will guarantee a strong gazebo. The foundation can be of several types:
- Strip foundations are laid for massive, large and heavy structures. This type is mainly used for covered stone or brick pavilions. They themselves weigh a lot, and if there is also a fireplace, barbecue, or massive table inside, then the weight becomes greater and additional reinforcement is necessary.
- Pillar foundations are most often used for small wooden structures. Its essence lies in the fact that small round or square pillars are driven into the ground at a certain distance opposite each other. Next, wood is laid on them, which will serve as a frame for the future floor.
- A monolithic foundation is considered the strongest and is poured under large and massive structures. The monolithic type can be recessed or shallow. For a small building, the second option is ideal. Its essence lies in the construction of formwork and pouring concrete.
Which type of foundation to choose is a personal matter for everyone, but a carved small gazebo will fit perfectly on a columnar structure.
Roof for gazebo
The roof for a carved gazebo plays a very important role because it protects the wood from the negative effects of the environment. The first step is to create a sheathing on which the roofing material is attached.
Octagonal roof for gazebo
The most commonly used materials are ondulin, roofing felt, slate or tiles. Each of the materials has its own advantages and disadvantages, so you need to heat it solely according to your desires, budget and the desired appearance of the gazebo.
How to install the foundation and bottom chord
Having a drawing in front of you:
- A work site is marked for the placement of the structure.
- Places are determined for digging foundation holes to a depth of 50 centimeters, and a width and length of 15 centimeters greater than the dimensions of the concrete blocks that make up part of the foundation.
- A layer of sand 20 centimeters thick is poured into each hole.
- Reinforcing mesh is laid on top of the sand.
- A layer of sand-concrete mortar is poured in a ratio of 3:1, 10 centimeters thick.
- Concrete blocks are laid out and leveled to one level.
- The foundation is covered with a film and left until the concrete hardens completely.
- Before installing the lower chord, each pillar is covered with waterproofing.
A belt of timber with a cross section of 150 x 150 millimeters is being installed. The elements are laid out in pairs in the following order:
- The two bottom ones.
- Two top beams.
After that:
- The beams are attached to the foundation with anchors, and joined together with a 50% notch and large-diameter self-tapping screws or special construction staples.
- All wooden parts are treated with an antiseptic.
- Inside the harness, stiffening ribs are installed from boards 150 x 50 millimeters, and are fixed with wooden blocks on the lower belt and metal corners with each other. The step between the jumpers is taken on average to 50 centimeters.
Assembling the lower frame chord
- The wooden frame posts are exposed. For this:
- Metal corners are attached to the lower part of the beam on both sides;
- racks are installed on the harness, screwed with self-tapping screws, which should not be tightened to the end;
- the verticality of the beam is checked by level, if necessary, adjusting washers are placed;
- The screws are completely tightened.
- Each of the bars is reinforced with boards - temporary structures. They will be in place before the roof installation begins.
DIY polycarbonate veranda: a modern solution
Polycarbonate is a modern material that successfully competes with traditional materials.
Polycarbonate - a modern material
Polycarbonate is a very durable material and, therefore, its manufacturers rightly claim that it is safe to use. The material has good flexibility, and its deformation does not require special thermal preparation or devices; it can be worked with at any temperature. The cost of the material is relatively low. If we compare it with glass, the price difference between these materials is significant.
Due to a significant increase in the deformation coefficient, temperature changes have a negative impact. For specialists, this factor is nothing more than a certain inconvenience when glazing. The linear expansion of the material can be leveled by increasing the gaps between the frame and the glazing material.
Sketch of a polycarbonate veranda
Polycarbonate scratches easily, which can lead to rapid clouding. In addition, with prolonged exposure to ultraviolet radiation, the material may take on a yellowish tint. In order to prevent this phenomenon from occurring, a protective film is used, which, in addition to its main function, additionally strengthens the polycarbonate.
What is a stencil for?
First, let's try to figure out what stencils for woodworking are.
These are special drawings and templates with which elements of patterns are applied to the surface of wood. They make repeating identical symbols much easier and allow you to speed up your work. For example, the most popular stencils for carving wood are samples for platbands.
With their help, quite complex interior and facade design work is performed.
Stencils are divided according to their purpose for creating interior elements:
- ribbon carved ornament;
- carved platbands;
- pilasters;
- towels;
- brackets;
- carved balusters and more.
All varieties are considered professional templates. Using them, you can create several ornaments for wood carving of a three-dimensional nature and significantly facilitate the task assigned to the master. There is no need to create them yourself. On the Internet you can find and download the option you like.