Reliable gardening equipment is necessary to maintain order and bring beauty to the estate and the areas adjacent to buildings. Professional equipment is used by companies serving parks and squares, and utility companies. Without compact trimmers it is difficult to imagine complete lawn care. Even if you have a large lawn mower, you will need a mobile tool to mow grass near trees, bushes, fences and other objects on the site. The Technodid company repairs lawn mowers and electric trimmers with a one-year warranty. An experienced technician will restore a compact lawn mower even if it is seriously damaged. Manufacturers supply separately components for preventive maintenance, as well as assembled units for troubleshooting major problems. It is important to choose a service that provides a guarantee.
Principle of operation
At the moment, there are a huge number of trimmer models on the market, however, they are made according to the same principle.
The petrol mower consists of the main parts:
- gasoline engine;
- fuel tank;
- starter;
- rods;
- control module;
- cable;
- gearbox;
- cutting tool.
The operating principle of the device involves transmitting torque from a gasoline power drive to the cutting tool via a shaft (its role is played by a steel cable located in the rod).
Rotation from the engine crankshaft is transmitted to the gearbox using a clutch mechanism; the cutting elements are given rotation, depending on the speed of rotation, they cut grass and shrubs.
Accordingly, various problems that arise during the operation of a lawn mower are associated with the failure of certain parts of the device.
Need for renovation
Like any gardening equipment, the trimmer tends to break down and fail. The reasons for this may vary. This is a violation of operating rules, a formal approach to equipment maintenance, natural wear and tear of elements, manufacturing defects and other problems. In each of these cases, you need to seek help from specialists who can repair the trimmer. Moreover, the repair of garden equipment should be entrusted to professionals who have proven themselves in this field. You need professionals who know how to work with gasoline trimmers. Each equipment has its own characteristics, so you should not turn to inexperienced people to repair it.
Our company's employees are highly qualified specialists. They are well versed in the design of gas trimmers and are familiar with various models of such equipment, so they will be able to identify the causes of gas tool malfunctions and eliminate them. Our specialists are able to repair trimmers of various levels of complexity.
Repair of Husqvarna trimmers and brushcutter
Husqvarna is a Swedish company founded in 1689 and is one of the oldest companies in the world. Now the Husqvarna company occupies a leading position in the world in the production of garden equipment.
We repair and service products of this brand.
Repair of trimmers and brush cutters AL-KO
AL-KO is a German company founded in 1931. Assortment: brush cutters, chainsaws, lawn mowers, walk-behind tractors and other gardening equipment.
We repair and service products of this brand.
Repair of trimmers and brush cutters Stihl
Stihl was founded in 1926 in Germany. Today, Stihl tools are equipped with lightweight, advanced engines, ergonomic designs, and low vibration, allowing them to lead the gasoline tool market. Repair of Stihl chainsaws will be carried out by our company in the shortest possible time; we have a large range of spare parts, both original and analogues.
We repair and service these equipment products.
Repair of trimmers and brush cutters IKRA
IKRA Mogatec was founded in Germany in 1977. In 1978, the company merged with AEG to develop and manufacture lawn care equipment. In 1982, production of the first IKRA chainsaws began. In 2008, a new elite line of gardening equipment was created together with the Italian company Tonino lamborghini.
We repair and service products of this brand.
Repair of trimmers and brushcutter Patriot Garden
The Patriot Garden company was formed in the USA in 2000 to produce gas-powered saws and garden trimmers. In 2003, production was located at one of the best factories in China. Today, the Patriot Garden company's assortment is quite large: chainsaws, brush cutters, gasoline snow blowers, lawn mowers and other garden equipment
We repair and service products of this brand.
Repair of trimmers and brush cutters Rebir
Rebir company was founded in Latvia in 1944. Rebir is now a successful manufacturer of high quality hand tools.
We successfully repair and service instruments of this brand.
Repair of trimmers and brush cutters Alpina
Alpina is an Italian manufacturer of chainsaws, trimmers, cultivators, snow removal equipment and other garden equipment, founded in 1960. Motto.
We repair and service these equipment products. Delivery of some spare parts of this brand may increase the repair time.
Repair of trimmers and brush cutters Dolmar
Dolmar is a felling saw company founded in 1927 in Germany. In January 1991, the world famous company Makita acquired the German Dolmar chainsaw factory.
Our company has extensive experience in repairing products of this brand.
Repair of trimmers and lawn mowers Partner
Partner - the brand's history begins in 1949 with the release of the first chainsaw in Sweden. In 1990, Partner introduced a full range of semi-professional and amateur gardening equipment. Partner is now owned by Husqvarna.
We repair Partner brand products as quickly as possible. The entire range of spare parts is available on the market, both original and analogues.
Repair of trimmers and brush cutters Oleo-Mac
Oleo-Mac is the largest Italian manufacturer of chainsaws, brush cutters and other garden equipment. The company was founded in 1972. In 1992, Oleo-Mac merged with Efco, and the corporation was named EMAK.
We repair and service products of this brand. Spare parts for this equipment belong to a high price range.
Repair of trimmers and MTD brush cutters
MTD was founded in 1932 in the USA. It has several brands: MTD – gardening equipment at an affordable price; MTD pro – equipment for professionals; Yard-man – equipment primarily for European consumers; Cub Cadet is a premium product of the MTD concern.
We repair and service these equipment products.
Repair of trimmers and brush cutters Efco
Efco is a company founded in 1978 in northern Italy. In 1992, EFCO merged with Oleo-Mac to form EMAK Corporation.
We repair and service products of this brand. This brand has a high cost of spare parts
Repair of trimmers and brush cutters Makita
Makita is a Japanese company founded in 1915. In 1991, Makita acquired the German chainsaw manufacturer Dolmar. In terms of gardening equipment, Makita currently produces chainsaws, brush cutters and lawn mowers.
You can repair and service products of this brand in our company. High cost of spare parts
Repair of trimmers and brush cutters Shindaiwa
Shindaiwa is a Japanese company founded in 1952. Since 1975, it has been producing chainsaws and brush cutters. The cost of spare parts for these products and components does not belong to the low price segment.
We repair and service products of this brand.
Repair of trimmers and brush cutters Echo
The Echo brand was founded in 1963 by the Japanese company Kyoritsu Noki Company Limited. To produce chainsaws, cultivators, and brush cutters for foreign markets.
We repair and service products of this brand.
Repair of trimmers and brush cutters Hitachi
Hitachi is a company founded in Japan in 1910. In terms of gardening equipment, Hitachi LTD now produces chainsaws, brush cutters and gas drills.
Our company successfully repairs and services products of this brand.
Repair of trimmers and brushcutter Mcculloch
Mcculloch is a company founded in 1943 in the USA. Since 2008, Mcculloch has been the official brand of the Husqvarna group. This brand has a full range of garden equipment: chainsaws, trimmers, lawn mowers.
Our company successfully repairs and services products of this brand.
Repair of trimmers and brushcutter Craftsman
The American company Craftsman was founded in 1927. Currently, the Craftsman company produces trimmers, chainsaws, walk-behind tractors, cultivators, blowers and other equipment.
We are familiar with the products of this brand and offer repair and maintenance of your tools in our service center.
Repair of trimmers and lawn mowers Homelite
The Homelite company was founded in the USA in the early twenties of the last century. In 1963, the company released the first household chainsaw. Today, Homelite, headquartered in Hong Kong, is a subsidiary of Techtronic Industry Group. Our company successfully repairs and services products of this brand.
Repair of trimmers and brushcutter Champion
Champion is a fast-growing brand of gardening and power equipment. The history of the company's development began in 2005 in the USA. The company's main production facilities are concentrated in China.
We have extensive experience working with the products of this company and will repair your equipment in the shortest possible time.
Repair of Ryobi trimmers and brushcutter
Ryobi was founded in 1943 in Japan. In 1999, Ryobi acquired the Tech tronic industries (TTI) concern. From this moment on, the company's interest in the production of gardening equipment grew. All products under the Ryobi brand are manufactured in factories in China. In 2010, TTI made changes to the corporate identity of the Ryobi brand - now the instrument has a bright light green color.
Our company is well acquainted with the products of this brand; we repair and service them.
Repair of trimmers and brush cutters Stiga
The history of the famous Swedish company Stiga begins in 1934. In 2000, the Swedish group included Castelgarden Spa and Alpina Professional. Stiga also acquires the English manufacturer of garden equipment Mountfield. Stiga is now an example of reliable Swedish quality.
We successfully repair and service these products.
Repair of trimmers and brush cutters Elmos
Elmos was founded in 1984 in Germany. The basis of its assortment consists of: power tools, chainsaws, and lawn mowers.
Our company is well acquainted with the products of this brand; we repair and service this equipment.
Repair of trimmers and brush cutters Sungarden
Sungarden is a German-made gardening equipment that is developing very quickly. The company's headquarters are located in Germany, and its production facilities are located in factories in China.
We repair the entire range of products of this brand.
Repair of trimmers and brush cutters Solo
Solo is a German company founded in 1948. It produces chainsaws, brush cutters, lawn mowers, and motor cultivators. This brand is not widely represented on the Russian market, which may cause difficulties with the supply of some spare parts.
Our company successfully repairs and services products of this brand.
Repair of trimmers and brush cutters Greenline
The Greenline brand is owned by VagoGmbh, founded in 1995 in Germany. It specializes in the production of household hand tools and garden equipment. The equipment is produced at enterprises located in the eastern part of China. Products under the Greenline brand have proven themselves to be reliable and durable in use.
We successfully repair and service instruments of this brand.
Types of lawn mower malfunctions
There are types of gas trimmers with two-stroke and four-stroke engines: the first type is more maneuverable and, accordingly, its repair is cheaper and easier, the second type has professional models of gas trimmers, they have a lower vibration level, and repairs are more expensive.
Among the main types of malfunctions associated with the operation of lawn mowers, the following can be distinguished:
- problems when starting the engine;
- excessive heating of the gearbox;
- extraneous noise and excessive vibration of the trimmer rod;
- after starting the engine immediately stalls;
- The cutting mechanism cannot gain momentum.
Lawn mower malfunctions are also divided into problems with the engine (overheating, failure of spare parts) and mechanical (damage to the shaft, belts, cutting tools).
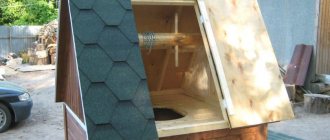
DIY tool box according to drawings: instructions with step-by-step guide- Form for paths - a large selection of forms and a simple method for creating a beautiful and comfortable garden (photo + video)
Do-it-yourself snow blower - we remove snow easily, an overview of designs and types for a suburban area
Malfunctions that are associated with contamination of certain engine elements can be eliminated independently.
Problems with the engine - the most difficult part of the device - are best left to a specialist. Let's take a closer look at the most common gas trimmer problems.
The structure of a lawn mower and common malfunctions
The easiest way is to have your lawn mower repaired by allocating a certain amount of money from the family budget; prompt and high-quality repairs with your own hands are no less simple and convenient if you want to understand the design of the lawn mower and fix all the problems.
Mass and piece production of trimmers is based on the use of generally accepted technology; a typical design diagram consists of certain elements and parts, it is important to know them when carrying out independent repair work:
- top part. The basis of the entire structure, where all the important elements are assembled, such as the starter, carburetor and lawnmower engine;
- middle part. A hollow rod, inside it there is a cable connecting the motor and the gearbox, which drives the cutting line. This part contains fastenings for distributing the weight of the entire structure and a belt for fixing the trimmer on the belt of the person using the trimmer for its intended purpose;
- Bottom part. It houses the gearbox and cutting elements, which are hidden under a practical cover that protects the user. The casing provides an increased level of safety, preventing large fractions of debris, stones and glass from entering a person while working with a lawn mower.
Knowing exactly the internal structure and operating principle of the trimmer, you can independently carry out repairs to the structure or replace individual components that have become unusable, using the repair instructions.
The most common and common unit breakdowns that can be self-corrected include the following problems:
- engine malfunction, due to which the lawn mower does not start and does not work;
- increased vibration of the mower bar, which complicates its intended use;
- increased overheating of the gearbox, its accelerated heating during operation;
- slow and weak functioning of the cutting line at insufficient speed;
- clogging of the starter grill, causing the engine to overheat and fail to operate;
- rapid and frequent carburetor clogging due to the use of low-quality fuel;
- clogging of the air filter due to failure to take care of the device.
All these problems can lead to the device losing its functionality; before ordering the necessary spare parts for the mowing machine, a visual inspection and diagnostics of the device should be carried out.
Individual spare parts and assemblies of the device require special attention; to check them, you do not have to contact a professional technician; a set of diagnostic measures will help you to identify the consequences of loss of performance with your own hands.
Replacing the spark plug
In some cases, there may be problems with the spark plug; it may not produce a spark when it comes into contact with the body.
In case of this malfunction, the spark plug channel must be dried for at least half an hour, the part must be cleaned, and the wire must be checked to see if the contact has come loose.
The most common malfunction associated with the spark plug in a lawn mower is contamination or mechanical damage (for example, a crack in the housing).
If the problem is a faulty ignition unit, it is better to contact a specialist.
If you decide to fix the problem yourself, you need to let the engine cool down, carefully disconnect the high-voltage cable, unscrew the spark plug and inspect for damage (deposits on the spark plug indicate the use of low-quality fuel).
If the spark plug does not require replacement, it should be thoroughly cleaned with brake fluid or solvent.
In some cases, the air filter may need to be cleaned and sometimes replaced.
The filter cleaning procedure should be carried out regularly for normal operation of the device, and replacing the part is one of the most common malfunctions of a lawn mower.
The filter should be washed with gasoline or water with the addition of special detergents, dried and installed in place. Before installation, moisten with fuel mixture.
Electrical circuit of the trimmer: what to look for when a malfunction occurs
Electricians have long reduced all their malfunctions to two reasons and talk about them in a humorous manner when electrical contact:
- accidentally occurs where it should not exist (insulation breakdown and short circuit or overload);
- breaks off in any unexpected place.
It is from these two fundamentally different positions that we will deal with defects in the electrical circuit.
Moreover, in the first case, I strongly recommend using a circuit breaker or differential circuit breaker for protection, which will protect the outlet that powers the electric trimmer.
When it is correctly selected and configured, saving a person from electric shock is guaranteed. This is very important to always observe.
But I’ll tell you further about all the other features of the circuit’s operation related to unauthorized breaking of the circuit. Fundamentally simplified, it looks like this.
The current from a stationary 220-volt socket passes through the extension cord to the plug contact of the trimmer output cable, and then flows through the switched-on switch button to the brushes and rotor winding, stator winding, thermal relay and returns back.
All these elements are connected by conductors. When a break occurs accidentally anywhere, there will be no current and the motor will stop. The power button works on this principle: breaking it stops the rotation of the armature.
I'll look at how these parts work in more detail.
How to check an extension cord: 3 ways
The situation is not trivial, but in my practice there have already been cases when people’s extension cord frayed and they were unable to mow. After that, we immediately took the screwdriver in our hands and disassembled the working trimmer.
There is no rush in this case. You must immediately make sure that the supply voltage reaches the electric trimmer motor.
This can be done by measuring it at the output of the extension cord using a simple multimeter, switching to AC voltmeter mode. You can use an old pointer tester or voltmeter.
If you don’t have a multimeter at hand, a simple indicator screwdriver will help out. It must be measured twice in both sockets of the extension cord. Moreover, the second time you should go to the power stationary outlet and turn the plug over.
In this way, both extension cords will be tested.
When there is neither a multimeter nor a voltage indicator, then we proceed in the third way. We go to a stationary outlet with an electric trimmer, make sure there is electricity (turn on the light with the switch) and check the operation of the engine without an extension cord.
If it does not work, then you need to look for internal damage.
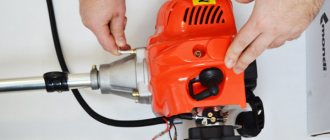
Trimmer housing: how to open and get to the electrical circuit
I will take all the photos using my trimmer from China, which has already worked for 6 seasons. Other models may have differences, but they are not significant for understanding the principles of operation.
Do not forget to first unplug the cord from the socket before disassembling.
The top plastic cover around the perimeter is secured with Phillips-head self-tapping screws. All of them are located and twisted only on one side of the body.
Unscrew them one by one until the end. After this, between both halves of the case it is necessary to disengage (disconnect) the plastic latches - locks. They can be opened with a thin blade of a screwdriver or knife.
Then the lid is removed upwards, and we have access to all the insides. We carry out an inspection.
Take a camera and take photographs of each part and their location among themselves. They will significantly speed up your future assembly and will be useful in future repairs, especially if you have to look for and buy something.
Everything that is shown in this photo (there may be differences on your specific trimmer model) must be carefully inspected and checked with electrical measurements, and the integrity of each wiring and component must be checked.
Pay attention to the cleanliness of the interior, especially the condition of the ventilation holes and the operation of the cooling fan. If the air does not blow over the electric motor, the latter will overheat during operation.
How to test a switch: the most reliable method
As a trimmer switch, a mic with normally open contacts is usually used, which can burn or oxidize during long-term operation.
Their serviceability allows you to analyze resistance measurements with a multimeter in ohmmeter mode, or the so-called circuit continuity in electrician parlance.
When you press the button, the contacts close and their resistance becomes small, as in the photo above. If the switch is turned off, the ohmmeter will show an infinite value.
On my electric trimmer the switch works like this.
Circuit break
Circuit closure
All other readings will indicate a malfunction. Quite often, the microphone itself can be carefully disassembled by removing the cover, and the dirty contacts can be cleaned with blued or washed with alcohol. After this, the microphone is assembled in the reverse order.
When replacing a switch with a new one, pay attention to the switching capacity of the contacts. They must have a reserve of power, because they will break the electric arc and may burn out.
How to check the operation of the switch without disassembling the trimmer body in 5 steps:
- We connect the multimeter in ohmmeter or continuity mode to the contacts of the power cable plug.
- We record the instrument readings.
- We trip the switch.
- We observe the change in the count.
- Release the button while controlling the resistance.
We analyze the performance of the circuit. Our engine runs on alternating current, and the ohmmeter runs on direct current. But this does not prevent one from judging the switching of the contact by the change in the active resistance of the circuit.
This value is different for electric motors of different power. In my case, these indicators are visible in the photo below.
A serviceable disconnected switch: the circuit is broken - the reading is infinity.
Switch is off
The switch is on: the circuit is closed - resistance is 12 Ohms. This value may vary slightly for you.
Switch is on
When talking about the switch, I would like to draw your attention to the button for fixing its operating position. It has a purely mechanical spring shift design. In my trimmer I removed it and left a free hole.
I believe that safety issues should prevail over convenience. The latch is redundant. When mowing, you can trip, slip, or fall.
An electric trimmer that falls out of your hands should turn off immediately.
If the trimmer continues to work, then big troubles are possible. A similar locking button is located on an electric drill. But this tool can be rack-mounted and controlled by additional circuitry. In this case, work occurs safely.
However, rely on your own strengths and capabilities, and I consider the preventative part of the information mandatory.
Thermal relay for the trimmer motor: how to check and replace
Inside a small white plastic box there is an electrical contact with a bimetallic strip. The thermal relay lies on the copper stator winding and is pressed against it with a tie.
The thermal relay has the same temperature as the winding. In normal mode, its contact is closed, and during overheating it opens, automatically breaking the current circuit: the engine stops.
The condition of the contacts is checked by dialing, as well as the switch. The technique is similar - I don’t describe it.
In all my time, I only once came across a thermal relay with an internal break. I haven't tried to take it apart. I just shunted his contact for two weeks. During this time, friends found an analogue on the donor engine of an already completely broken trimmer.
Replaced it and everything still works today. There is another option to look for a thermostat in online stores.
The presence of a thermal relay is a significant priority of electric trimmers over analogues with conventional gasoline engines. I don't recommend blocking his contact.
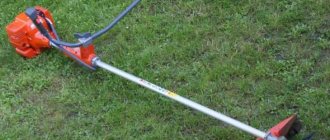
I make this statement based on my own experience. I also have a petrol mower (the same ECO brand) for mowing grass and a simple hand-assembled Lithuanian for small jobs in the garden. They are shown in the photo below.
The manufacturer of the gasoline device clearly states in its instructions that operating this trimmer at air temperatures above 30 degrees Celsius is not recommended. It may overheat and fail: complex repairs will be required.
Other braids are less susceptible to heat and are easier to maintain.
All this is described in a separate article about starting a lawn mower.
In general, I still prefer an electric scythe in my work rather than a gasoline trimmer:
- there is no need to prepare the exact proportion of the fuel mixture, measure gasoline and oil;
- you will not come across low-quality fuel contaminated with various impurities;
- problems with the spark plug, carburetor, starter are eliminated;
- a device of similar power is lighter in weight, which means it is easier to mow the grass in the garden areas;
- after winter it starts without problems;
- For me personally, it’s easier to do the repairs yourself;
- ease of launch.
Commutator motor malfunctions: how to identify and repair
During operation, the commutator motor of an electric trimmer can most often be damaged by:
- carbon brushes;
- rotor collector plates;
- stator and armature windings;
- bearings.
Let's look at these defects and how to repair them in more detail.
Carbon brushes: faults and repairs
Graphite brushes serve to pass current between the stationary stator winding and the rotating armature winding. This is a consumable item and will wear out over time.
A spark begins to jump through the weakened contact: the graphite is destroyed and the copper of the contact plates burns out.
In this case, the brushes need to be replaced. They can be found on sale with two types of contact areas shown in the photo.
The paradox is that the left brush, which has a smooth surface, takes longer to rub against the plates and is cheaper. On the right side, the brushes are of high quality: they have a clearly defined relief - this ensures faster break-in (the price is more expensive).
In some cases, it makes sense to purchase larger brushes and file them down to the dimensions of the brush holder. Graphite is easy to process.
The force of pressing graphite to the contact pads depends on the spring. Check it when replacing brushes and adjust if necessary.
Manifold repair: what to look for
The burnt armature commutator is immediately visible. Pay attention not only to the circular depression of burnt grooves, but also to the presence of ellipse. A caliper will help determine it.
The situation can be corrected by a turner by grinding off the plates until a smooth side plane of the cylinder is formed and polishing them.
The main mistake of many craftsmen is that they sharpen the commutator at home on homemade machines.
However, the quality of such work is low. The collector will still serve, but not for very long - the unresolved beats will have an effect. The damage has not been completely repaired. Operating time is reduced and the device fails earlier.
Pay attention to the condition of the gaps between the collector plates. Conductive carbon dust from brushes and small metal filings can accumulate in them. They need to be removed. They create problems for the normal flow of electrical current.
It is necessary to clean the air gap of the collector with a metal scraper until the conductive chains between the contact plates are completely removed.
How to check the stator winding: 2 ways
Damage to the winding can occur in three cases:
- breakage of the current-carrying wire;
- breakdown of the insulation layer on the engine housing;
- interturn short circuit (violation of the dielectric layer between the turns).
Broken wire
The malfunction is detected by checking the continuity of the winding with a multimeter, which will show its active resistance in ohmmeter mode.
Insulation breakdown on the motor housing and trimmer
Here you need a special device - a megohmmeter, which produces a voltage of 500 or better than 1000 volts between sections of the circuit. It is capable of measuring leakage current in fractions of milliamps and converting them into megaohms.
Not every electrician has it at home. This simple scheme can help out. It is limited by operating voltage.
220 volt power is supplied from a household outlet through an incandescent light bulb and a multimeter ammeter.
This measurement applies to live work. Only electricians with electrical safety group III or higher are allowed to perform it. It’s better not to try without special training: trust the specialists.
Interturn winding short circuit
This malfunction can only be detected in a specialized electrical laboratory with specific equipment. There is simply no way to perform diagnostics at home.
If anyone is interested in such a check in order to study it more thoroughly, then write in the comments. I'll help you with advice. I had to look for interturn short circuits both directly under load and on the bench by taking the current-voltage characteristics.
How to check the armature winding: a review of 3 techniques
The faults in the rotor winding are the same as in the stator winding, but the design is different and so are the testing methods.
On the stator of the trimmer commutator motor, the winding is wound with a certain number of turns, but with one long wire with two ends brought out to terminals.
The collector has a clear number of pairs of contact pads. Absolutely identical windings with equal wire lengths are mounted between them according to a specific connection diagram.
Due to the same lengths and cross-sections of the conductors between the contact pads, they create equal active resistance. If a break appears at some point in the circuit, then the balance is disrupted and the resistances are different.
Based on this principle, there are three methods for checking the integrity of armature windings.
Before taking measurements, do not forget to remove the brushes from the brush holders. Their presence in the circuit will affect the reading of the device and distort the final result.
Method No. 1. Measuring resistance between adjacent plates
Using a multimeter in ohmmeter mode, we measure the ohm fractions between each pair of contact pads.
We remember or write down the result. We rearrange one probe and repeat the measurement of all chains, sequentially moving in a circle. We check all the readings. We ensure a tight fit of the measuring ends to the contact plates.
The results of all measurements of serviceable windings will be equal, but in the event of a break, they will differ.
Method No. 2. Measuring resistance between diametrically located plates
The measurement technology is similar to the previous one, but the ohmmeter probes are placed on pads located at opposite ends of the shaft diameter. To do this, you will need to remove the armature from the engine or use the brush holes in the brush holder.
There is an opinion that this method is more accurate. Test this hypothesis.
Method No. 3. Measuring resistance using the indirect method
The essence of electrical measurements is the same, but the tools are different. A charged high-capacity battery is suitable as a power source. It is not necessary to remove it from the tank or combine. You can get by with a car or a motorcycle.
Simply, the increased capacitance provides a more stable source voltage during short-term measurements. This is important to understand and take into account.
The voltage is supplied to the collector plates through a resistor, the resistance of which does not change, and at the same time its drop is measured using a voltmeter.
Contact pads can be used adjacent or at opposite ends of the diameter. Whichever is more convenient for you.
The measurement is performed in a circle. All readings are compared. Equal result - whole windings without breakage.
How to check trimmer bearings: an easy way
For an electric motor, professional repairmen assess the condition of the bearings on special stands. But we do not have a service center. We perform this operation with our own hands, assessing the result with tactile sensations.
We proceed as follows:
- We place the electric motor on a hard surface, preferably a table or workbench;
- with one hand we press the body to the support;
- with the second hand we rotate the shaft;
- We evaluate the uniformity of its rotation by the absence or presence of its beating and jamming, noise.
If defects are detected, worn bearings must be replaced with new ones.
Don't forget that friction is reduced by lubrication. When disassembling the engine, it should be updated or at least added inside each bearing.
Starter malfunctions
The main problems associated with the starter in a lawn mower include the destruction of the coil. This occurs when the device is started too sharply; accordingly, strong tension in the cable leads to the impact of the flywheel pawls and destruction of the starter coil teeth.
In this case, repairs on your own are excluded; the part must be simply replaced.
The modules are sold in stores specializing in garden equipment, and they can also be purchased at service centers of leading manufacturers of lawn mowers.
Advantages of repairing a gas trimmer with us
Petrol trimmers are widely used for mowing lawns. This equipment is equipped with a powerful motor. To operate such equipment, a special fuel consisting of gasoline and oil is required. Moreover, it is important to maintain certain proportions.
Gasoline trimmers are highly productive. This is a mobile technique that can move in any direction. Gasoline models are capable of cutting thick roots and branches. The combination of power, convenience and practicality makes such a gas-powered tool indispensable in the garden.
Trimmers of this type are more expensive than their electric and battery-powered counterparts. However, the advantages of this technology make such an acquisition justified.
Gearbox Troubleshooting
If you use unsuitable and low-quality lubricant, or its absence, problems with the gearbox may occur in the gas trimmer.
Also, destruction or wear of the bearings often occurs, leading to the shaft seizing during rotation, which, in turn, leads to knocking and backlash.
Repairing a lawn mower gearbox can be done by replacing the failed bearing with a new one; removal is best done using a special removable device, without heating the device in any case.
After which, to break in the parts, you should work for some time without loading the device.
The lawnmower gearbox should be lubricated at least once every 2-3 months; if the work is at maximum intensity or if extraneous noise is detected, it should be lubricated even more often.
For lubrication, use the manufacturer’s own compositions or special “Litol”, “Azmol”. You can pour the lubricant with a special syringe or by squeezing it directly from the tube onto the body.
Lubricant should be applied carefully - a lack or a large amount can cause additional heating of the gearbox, which can lead to bearing destruction.