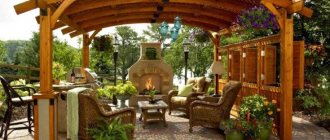
Types of gazebos
All gazebos are divided into groups:
- Open (summer);
- Closed (glazed garden house)
- Semi-closed;
- Awnings made of polyethylene film, which, if desired, are pulled over the frame of the gazebo.
They can also be with or without a floor.
Install a gazebo without a floor in any convenient place. This can be a green lawn, or a specially prepared place filled with concrete or paved with paving stones. With this option, the wooden frame must be treated with protective agents against rotting and fungal damage.
Wooden gazebos with a floor require a foundation. These can be columns, bricks, foundation blocks, concrete pouring. The floors themselves can be wooden, lined with frost-resistant tiles or bricks.
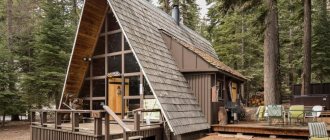
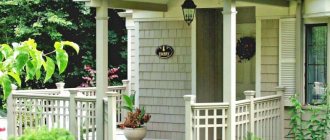
Gazebos are made of wood and vary in shape. They can be round, rectangular, square and polygonal (5-6-8 angular). The most common shapes are square and rectangular.
How to select a sample and perform the work?
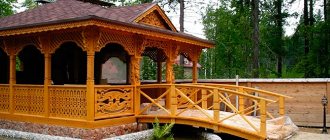
We found out that modern carved wooden gazebos can be decorated with a wide variety of patterns. You can draw them yourself or take a photo from a magazine for a sample. Don't have a life-size sample at hand? No worries – you can easily enlarge absolutely any image.
Ornament for carving elements of the gazebo
More ornament options
To do this, take a drawing that shows a beautiful ornament. Line it with a grid that has square cells. Then draw a grid with squares, but larger. The increase in the squares of the new grid is directly proportional to the pattern. The larger they are, the larger the image will be. Then from each square the elements are transferred to the grid squares. At this point, the creation of an enlarged copy can be considered complete.
Patterns of platbands for windows, can also be used to decorate a gazebo
Carving is easy.
- Secure the workpiece.
- Drill holes along the outline.
- Insert the saw blade and file along the contour.
- It is very convenient to perform work with a jigsaw.
When the carving is ready, the surface is well cleaned. A chisel will help remove unnecessary chamfer. Treat decorative elements with a special protective agent based on varnish or oil. And here is an excellent series of video lessons for those who want to master such a wonderful craft as wood carving:
Gazebo styles
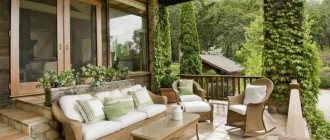
The interior of a wooden gazebo is purely individual. The following styles can be used to design it:
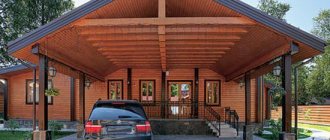
- chalet is a romantic alpine house, for the construction of which wood and stone are used. The roofs of this style are two- and four-slope. A fireplace, chairs or benches, and a table for the gazebo made of wood, which is considered its most used part, can be installed. To make it pleasant to sit at, the table must be level, strong and not devoid of beauty;
- high-tech, distinguished by its minimalism;
- German half-timbered timber, the peculiarity of which is that the structure of the building (beams, joists, partitions) is visible from the outside. They are the advantages of the structure;
- English country, creating the comfort of rural life. Armchairs, chairs with forged backs, a table, a fireplace, and benches made of dense wood are perfect for such a gazebo;
- French Provence. When finishing, the gazebo is painted white, pink, lilac, milky, beige or light green. The floor is covered with boards.
Which form is better?
The choice of form depends on the personal preferences of the owner, the availability of free space for construction, the number of family members and friends. There are four main types of construction:
- square;
- round;
- rectangular;
- hexagonal
Construction materials
It is worth thinking in advance what materials you plan to use.
Tree
Of course, the most common are wooden gazebos for summer cottages.
Wood is easy and convenient to work with, and this material is also quite economical. However, wooden parts will require additional treatment with antiseptic agents, as they are susceptible to rotting and can deteriorate under the influence of the environment.
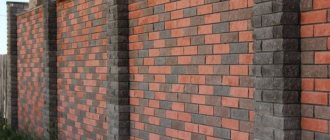
Brick
This material assumes a more capital structure. A brick building can be insulated for use in the cold season. If you want to build a gazebo for your summer house with a barbecue, brazier or fireplace, then this option will be the best choice. In order for the structure to look neat, the material must be of high quality, without chips or cracks.
The seams should also have a decent appearance. Creating a gazebo made of brick will be possible for someone who has already had experience working with this material and understands this issue.
Metal
Gazebos with forged parts look very beautiful and elegant. However, only professionals can make such materials themselves. And such parts are not very cheap. Of course, there are simpler options: corrugated sheets and pipes, metal tiles. But working with metal is not so easy. You will need special cutting tools, a welding machine and more. The appearance of a gazebo made of corrugated sheets is also inferior, for example, to a wooden one. In addition, the metal gets very hot.
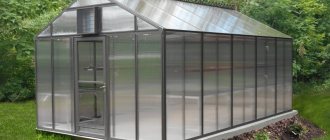
Polycarbonate
A gazebo for a summer house made of polycarbonate is a rather controversial option. Still, it is better to use this material for the construction of greenhouses.
Roof for gazebo
Depending on the shape, there are several types of roofs:
- A shed roof is the simplest type of roof, consisting of just one part with a slight slope.
- Gable is the most common type. A triangular roof is most suitable for a classic rectangular gazebo.
- Multi-pitched - roofs with a complex shape for unusual gazebos.
- A hipped roof is a complex roof that consists of two paired slopes with the shapes of triangles and trapezoids.
- A tent is an ideal option for a square gazebo. It has the shape of a pyramid.
- Dome - continues the shape of a round gazebo. It has a structure in the form of a cone or helmet.
The roof is a continuation of the gazebo, with which it forms a single whole. Therefore, the choice of structure, its shape and design features should be approached comprehensively.
Design Features
Gazebos are divided into two main types:
Requirements for a wooden gazebo
In order for the gazebo in the garden to please the eye for a long time and remain a cozy place to relax, all wood must be treated with protective impregnation at least twice.
Experts consider Snezhen and Usadba to be the most economical and reliable impregnations. And if you choose a tinting option for the composition, you can give the wood the desired shade.
When starting to build a gazebo with your own hands from wood, you should remember what it should be like according to the basic requirements:
- safe;
- aesthetic;
- resistant to fire, moisture, fungal infection;
- with a solid base.
The size of the gazebo should be selected taking into account the size of the family and additional structures - fireplace, grill, barbecue, grill.
When installing such structures, you need to consult with specialists or familiarize yourself with the sanitary rules that determine the desired type, size and place for the barbecue.
Grate collection
First, you need to prepare the slats for installation, make the appropriate grooves in them, so that later you can assemble a single structure without problems. First you need to make the calculations correctly. All bars must be evenly distributed over the entire area of the frame.
At the joints of the grille slats, you need to make notes for future grooves.
How to assemble a grill
The depth of the grooves should be at least 5 mm for both the longitudinal and transverse rows to ensure a uniform plane of the future product.
The grooves at the joints must match perfectly to create a beautiful structure. Therefore, taking measurements is of particular importance. To avoid mistakes, it is best to check your calculations several times.
Cuts for grooves of the correct depth can be made using a hacksaw or milling machine.
The essence of the work, instructions
If you fill it carefully, you may not even notice the difference. Next, the grooves must be cleared of excess wood; for this it is best to use a chisel and a hammer.
Using smooth blows, you need to knock out the excess that will interfere with joining the slats. After this, the grooves are ground for tighter contact with each other.
Stages of doing the work yourself:
After preparing the bars, you can begin installing a single structure:
- Prepared slats for the grill are placed in pre-marked positions.
- To begin with, lay the first row and attach it to the frame using self-tapping screws 16 mm long. They are best suited for this situation, providing a secure fit without coming out.
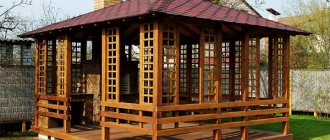
How to make a decorative lattice on a gazebo yourself
- As the second row is being installed, wood glue is applied under each bar at the joints, after which the rail is put in place and secured at the edges with self-tapping screws.
After this, you need to give the glue time to dry.
Advantages and disadvantages of wood
Most summer residents prefer wooden gazebos, explaining their choice by the following advantages of wood:
- easy to process;
- gives an elegant look to the gazebo;
- a rich assortment of cheap building materials (timber, wooden gratings, chipboard panels, MDF, plywood sheets);
- natural, environmentally friendly material;
- long service life (if periodically treated with antiseptics);
- retains heat well inside a closed gazebo;
- step-by-step instructions for building a wooden gazebo with your own hands are freely available.
Disadvantages include the fact that wood burns, rots, and is damaged by insects and excess moisture. Wood has reduced strength, and softwood is brittle. To prevent disadvantages, the tree must be treated with protective agents and only durable wood must be used.
Protective agents also include paints, which are widely available in specialized stores. So how can you paint a wooden gazebo to protect it from damage?
The answer is simple - oil paint, followed by two layers of alkyd varnish. This will increase moisture resistance, extend service life and improve the appearance of the structure. In winter, it is good to install double-glazed windows to protect against snow.
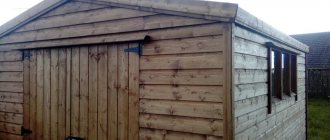
Material of manufacture
Wooden gazebos are built from logs, timber, and boards.
Log
is expensive, but for wealthy summer residents it is quite possible to build a closed or seasonal gazebo in the Russian style.
timber
This is softwood lumber. For gazebos, it is recommended to use hardwood timber up to 7 m long. It is lightweight, so it does not require a heavy foundation.
It is not damaged by insects, combines well with other materials, is inexpensive, and beautiful to assemble. For construction, a more expensive gable beam (carriage) can be used.
Board
For these purposes, edged boards are suitable for cladding walls, flooring, and roof rafters. The material is inexpensive and visually attractive.
Installation locations
The choice of location for the gazebo depends on its purpose. If it will be a place for:
- official meetings should be set up close to home;
- relaxation and rest from the bustle of the city - place it in a quiet part of the site;
- a large family, cheerful gatherings - in the depths of the garden, providing the gazebo with water supply and electricity. A grill or barbecue would be appropriate in such a gazebo;
- enjoying nature and birdsong - in the most beautiful place in the garden, where the gazebo will be its decoration. These are usually places at the entrance or in the corners of the dacha.
Don't forget about the elegant path to the gazebo.
Covering the floor
- In order to lay the floor smoothly and neatly, it is not enough to simply throw the boards and secure them. In those places where the boards will rest against pillars and beams, it is necessary to make cuts so that the board passes through these conditional obstacles.
- Depending on how straight you can make the cuts in the boards, the fewer gaps you will end up with. The work is quite delicate, but even if something goes wrong, it will not be a serious problem. You can insert an additional block into the gap if things get really bad.
When it comes to flooring, it is always important to secure the first board evenly. If you succeed, then everything else will go much easier. If something goes wrong and a corner appears, then it’s better to immediately pull everything out and do it again. It will be faster and more beautiful than adding something and leveling it in the process.
Construction of structures
In a project to install a 3 by 3 meter wooden gazebo with your own hands, drawings must be developed indicating the dimensions of all elements.
Wooden gazebos of this size are the most common among summer residents because they have a low price, can accommodate 6 to 10 people, and require a small amount of building materials.
To build a safe and beautiful gazebo with your own hands, you should strictly follow the step-by-step work:
- Develop a project, including drawings and estimates.
- Treat the wooden material with antibacterial and flammability-reducing compounds and wait until they dry.
- Mark and prepare the area.
- Fill (raise) the foundation (if provided for by the project).
- Install the pillars (racks) made of timber strictly vertically.
- Erect the frame.
- Cover the roof.
- Lay and paint the floor boards so they don't get dirty.
- Carry out interior finishing work.
- Decorate the interior.
A gazebo is an amazing place to relax, enjoy nature, and sometimes a place to resolve important family and work issues. This is the best, fastest and most economical option for arranging a “personal corner”.
A variety of shapes, sizes, styles can satisfy the most demanding owner. A gazebo can serve as a decoration for a garden or plot.
Lattice assembly process
To understand how to make a wooden decorative lattice for a gazebo, you need to have certain carpentry skills. You must also have at least a little experience in performing such work.
Assembly steps
Frame assembly
The work must begin with assembling the frame. This is the basic structure that will be the basis for the future lattice structure. The first step in assembling the frame will be to measure the dimensions of the openings between the pillars of the gazebo. Having measured the distance, you can begin assembling the frame.
There are two ways to connect the beams of the future frame:
- straight joint;
- joint at an angle of 45 degrees.
A straight joint is much more difficult to assemble, so for beginners it is better to use a connection at an angle of 45 degrees, this method will be used:
Stages of frame assembly work
- To set the ideal angle of this size, you need to use a square; the connection of its parts is made at an angle of 45 degrees.
- Measure the required length of the bars and adjust them to size, you can measure the corners and saw them off.
- This can be done without the help of a square, just know the simple rules of geometry.
Note. To divide a right angle in half, you need to set aside the width of the block, in our case 40 mm along the long side, then draw a line and cut along it.
Approximate manufacturing model
- After this, it is necessary to make a recess in the frame blanks for the slats; its depth should be 10 mm so that the slatted beam is completely hidden in the frame.
- It is better to make the recess width 20 mm, this will preserve the reliability of the frame and also simplify the process of installing the grille.
- The cut is made along the entire length of the workpiece bar. The frame is fastened with wood screws 70 mm long.
Note. To strengthen the structure, you can use wood glue, which is applied to the joints. After all the frames are assembled, you need to give the glue time to dry.
Next, you can begin installing the grill slats.