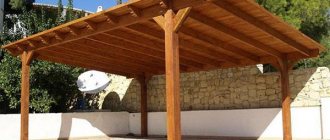
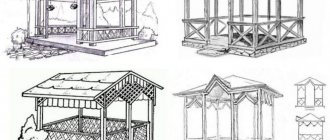
The need to build a shed may arise for various reasons. But how to build a wooden canopy with your own hands?
Some people need a canopy to protect their car from precipitation. Someone is building a shed that will be used as a summer veranda.
Or as protection of firewood, swimming pools, barbecues from external environmental influences. It is impossible to list all the options for using a wooden canopy. Everyone has their own needs, capabilities and thoughts on this matter.
Wooden canopy
It is not so important for what purpose the canopy will be used. The main thing is that it lasts for many years. Looked nice and didn't hurt my pocket too much. Read the article on how to build a wooden canopy with your own hands.
All of the above requirements are perfectly met by wood. Wooden canopies have an aesthetic, warm, homely, cozy look.
In addition, to build a wooden shed you do not need to have any special knowledge and skills. Experience with tools such as a hacksaw and hammer is sufficient.
Regardless of the shapes and types of wooden canopies there may be. They are subject to certain general requirements. Which must be observed so that the building serves you faithfully for a single year.
Selecting the type of structure and installation location
They create canopies taking into account the type of structure and environmental conditions. If you decide to attach a canopy to your dacha, you need to analyze the condition of the fundamental part and the front wall of the house.
Attention! It is better to build a wooden structure on an elevated place, away from woody plants.
The next stage in construction is the creation of a project. Experts recommend sketching on paper the future canopy for a wooden house and indicating the dimensional characteristics of the elements - this will make it easier to calculate the amount of material needed.
Tips for building wooden sheds
Wood protection
Wood, like no other material, needs additional protection. All wooden structural elements must be impregnated with antiseptics.
Moreover, they will be outdoors all the time. Impregnating wood with antiseptics will significantly increase the service life of the structure. At least for 5-7 years.
For buildings such as a wooden canopy or gazebo, it is best to use coniferous trees. Due to the fact that they contain a large amount of natural resin. And the resin, in turn, protects the tree from rotting.
Reliable rafter system
The sheathing and roofing must be fixed as firmly as possible. This is necessary so that the entire structure does not become loose over time.
Read also: How to lengthen the rafters of a gable roof
The fact is that for a canopy this is especially important, since the roof in such a structure remains open. And gusts of wind greatly undermine the roof. Which ultimately leads to the fact that the roof may lose its tightness, which, in turn, will lead to critical mechanical damage to the entire structure, up to and including its destruction.
Which roof to choose for a canopy
Installing a gable roof on a canopy will be very problematic. Preference for a canopy is better given to a pitched, flat roof. It is important to take into account the slope of the roof. The slope must take into account the existing drainage pattern at that location, as well as the direction of prevailing winds. This condition will increase the safety of the structure in general.
Construction stages
The work will cost much less, and the roof will be built faster if everything is done according to a step-by-step plan. The construction of a canopy made of logs consists of several stages that must be completed. So, do the work sequentially, first do the planning, calculate the amount of materials, and then proceed to construction.
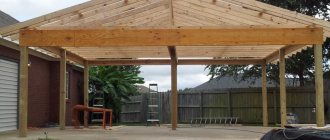
Carport with pitched roof
To create, you need to prepare the following materials:
- A – six metal anchors, pipes (about 30 cm), cement composition, sand, gravel.
- B – two bars measuring 10 by 10 cm and a length of 2.4 m, 2 bars measuring 10 by 10 cm and a length of 3.2 m.
- C – four boards measuring 5 by 15 cm and 3 m long.
- D – eight boards with dimensional characteristics of 5 by 10 centimeters and a length of 0.65 m.
- E - twelve boards measuring 5 by 10 centimeters and 3.15 m long.
For a lean-to canopy, the following may also be useful:
- F – plywood sheets.
- G – lining type carpet.
- H – soft roofing material.
Construction of a wooden canopy with a gable roof step by step
Installing canopy supports
First you need to install a strapping belt made of timber on the supports. It is best to use timber with a thickness of 200x200 mm. This is the optimal size of timber for building a canopy. A strong and stable frame is the key to a long service life of the canopy, without unpleasant “surprises”.
As we said earlier, the elements need to be fastened very firmly. Moreover, in the example we are considering a gable roof. A roof of this type requires a particularly stable structure.
When working, act slowly and carefully. To avoid shaking the vertical supports. If you are afraid of disturbing their stability, then it makes sense to temporarily connect all the elements together.
The part of the timber that will be buried in the ground must be well treated against various kinds of negative influences. Bitumen mastic is suitable for this. Some use used machine oil for these purposes.
Vertical supports should be buried in the ground to a depth of at least 1 m. It is best to install them on a bed of sand and gravel. The supports are installed strictly in a vertical position. Waterproofing materials, such as roofing felt, for example, will additionally protect the lower parts of the canopy support, buried in the ground, from rotting.
As soon as the treated beams are installed strictly vertically, the waterproofing material is fixed, they can be filled with concrete.
How to build a carport with your own hands
Building a carport for a country house with your own hands is not a difficult task for those who are minimally familiar with the basics of construction. For the construction of the structure, the most suitable location is selected and a detailed project is drawn up. Next, you need to pour the foundation, put a frame with supports on it, design the site, and install the roof itself. The easiest way is to make a pitched roof yourself, supported by six to eight pillars.
To date, a large number of projects have been developed that allow you to build a canopy.
Selecting a location, creating a project with drawings, diagrams
The most suitable place to create a shelter is from the entrance to the site. It is leveled, cleared of debris and large plants. If there is a garage, the canopy is adjacent to it in front or on the side. When creating a drawing, you need to measure the length, width, height of the car - it should not be “cramped”, and enough space should be left on the site to easily walk around the car.
In regions where the wind is strong and gusty, the roof slope is made flatter and the angle of inclination is 25 degrees.
Making the foundation
The base for a heavy canopy with supports made of brick, stone, metal tiles, is made monolithic - made of concrete. To do this, markings are made, a trench is dug, a frame of reinforcement and formwork is installed, poured, and the base is leveled.
We select the perimeter for parking at a level of 3x6 m.
For a small car, a light shelter made of boards and polycarbonate, a pile foundation is sufficient. Under the piles, which are taken according to the number of support pillars (6-10 pieces), holes are drilled or dug. The latter are filled with cement after the support (pile) with the “anchor” has already been placed inside, and crushed stone and sand have been poured onto the bottom. In another option, screw piles are screwed directly into the ground, to a depth of 1.2-1.6 meters, and pipes of the required height are welded to them on top.
Construction of a frame with supports
The frame is installed on a pre-prepared base - the concrete must harden and dry well. Afterwards, supports are mounted on pre-installed embedded parts, horizontal jumpers and inclined parts of the sheathing are placed on them. The standard distance between supports located on the side is 120-150 cm, from the entrance side - 270-290 cm, height - 215-250 cm. The depth of the support elements into the foundation depends on the weight of the roof - 50-70 cm.
Fixation is carried out using reinforced steel strips or corners.
Venue design
The shelter site itself is poured with concrete, laid out with bricks, paving slabs, and porcelain stoneware. It is permissible to decorate the platform with pre-painted boards impregnated with anti-rot and insecticidal compounds, but such a coating is not very durable, especially if the machine is large and heavy. It is permissible to install railings and full high walls on the sides of the structure.
The area under the canopy can be lined with paving slabs.
Roof installation
The roofing structure is mounted on a pre-created metal or timber sheathing. First, the longest horizontal beams or pipes are laid on the supports, then crossbars and inclined parts are screwed, nailed, or welded to them. A small canopy is covered with one or two sheets of material; for larger ones the number of elements exceeds 6-12.
Among the materials for roof covering, it is better to choose corrugated sheeting.
Corrugated sheeting, polycarbonate, and tiles on a sloping roof begin to be laid from the bottom edge so that rainwater flowing from above does not accumulate on the surface. The parts are placed “overlapping” by 20-30 cm, using fasteners suitable for a particular material in sufficient quantities.
Design
The canopy structure is decorated at your discretion, but so that the decorations do not interfere with the entry and exit of the car. For a metal or brick structure, elegant forged parts (railings, cornices), plants in pots located under the roof, LED lighting, and garland are optimal. Made of wood - decorated with carvings, tinted to match elite species, hand-painted with patterns. Installation of railings made of turned wooden balusters and openwork decorative grilles is allowed.
All parts must be coated with a layer of a suitable protective composition.
Assembling roof trusses
To make roof trusses, you need to use boards 200mm wide and 45mm thick. As a rule, the length of such boards is standard and is 6 meters. Before starting work, the boards must be treated with an antiseptic, preferably in two layers. Paying special attention to the ends of the lumber.
We assemble the trusses and fix the individual elements together with special bolts and screws.
The truss structure consists of:
- Rafter legs - 2 pieces
- Vertical rack
- Braces -2 pcs.
- Stretch marks
Make sure that all trusses are the same size.
To increase the strength of the tie rods, additionally secure them to the rafter legs and vertical post with bolts.
To do this, we make a hole in the board using a feather drill. Under the diameter of the washer and the height of the head of the connecting bolt. And with a smaller drill, we make a hole in the extension and the connected parts.
Next, insert the bolts with washers and tighten them with nuts on the opposite side of the structure. We install two guy wires on each farm.
How to make a wooden truss for a large span
In order not to make a mistake, DokhtuR13 took advantage of the power of the collective intelligence of FORUMHOUSE. He created a topic where he asked experienced portal users to help him calculate a wooden truss for a span of 7.5 m. DokhtuR13 also showed how he sees the design of such a truss.
But this option did not seem very reliable to the user, and he presented another roof option.
Estimated canopy dimensions:
- Width and length along the pillars – 7.5x7.5 m.
- Roof overhang – 50 cm.
- The height of the pillars is 2.5 m.
- The bottom trim is a beam with a section of 15x15 cm.
- The top trim is a beam with a section of 15x15 cm or a paired board of 15x5 cm.
- The sheathing is a solid board with a section of 10x2.5 cm.
- The height of the ridge is 1.3-1.5 meters, i.e. the angle of inclination of the roof is 17-20°.
- The roof covering is metal tiles or corrugated sheets.
According to Konstantin11, a canopy roof structure like the one in the picture above is only suitable for countries with hot climates without snow load. Because there are no ties or Mauerlat, and with a roof angle of about 20 degrees, a lot of snow will fall on the roof, and a safety margin is needed.
Konstantin11 FORUMHOUSE user
With a rafter length of 4.5 m and dimensions of 8.5x9 m, the total roof area is 76.5 sq. m. m. With such an angle of inclination and a covering of metal tiles, the structure must be calculated based on a load of 400 kg per 1 sq. m. m of area (for example, wet snow fell). Those. the roof must withstand a load of about 30 tons, which is quite a lot. I advise you to make a hipped or cross roof as a significantly more durable structure.
DokhtuR13
This roof doesn't suit me. I have a house with a gable roof, the canopy will stand opposite the house, so it should be in the same style as the cottage. In addition, a hip roof, and even more so a cross roof, is much more difficult to make.
In the case of a gable roof with a large span (more than 4 m), the best option is to use trusses with a full bottom tie on MZP (metal toothed plates).
As a result, DokhtuR13 decided to make wooden trusses using bolted connections or steel hidden connectors, without using MZP or plywood overlays, because the structure is open, and the serrated plates will spoil the appearance of the trusses.
One of the options for such a farm is shown in the photo below.
The key to trusses is the use of special metal fasteners, which are also a decorative element, but there are a number of nuances:
- Where can I buy such fasteners?
- The fastener, as in the picture above, is designed for a specific roof, including the opening angle of the “petals”, which correspond to the angle of inclination of the roof.
The solution is to calculate the fasteners yourself, then order plasma or laser cutting of metal with drilling holes, or make a “self-made” connector from a wide metal strip, 3-4 mm thick, and hide it between two boards, assembling a board-metal strip-board package.
SergeChe FORUMHOUSE user
The connector is made from a thick metal strip. The metal is cut with an angle grinder and then drilled by hand. All connections are bolted. This design has many advantages - the metal is covered with wood from the outside, and only bolts and nuts are visible. The fasteners are made according to a single template and look aesthetically pleasing. I have already made a similar farm and am pleased with the result.
SergeChe recommendations for making connectors for wooden trusses:
- As a basis, we take the truss for the minimum wage, already calculated on the portal, from a 5x15 cm board.
The design of the universal truss is designed for spans up to 10 m long and loads up to 300 kg per 1 sq. m for an installation step of 60 cm. By changing the pitch and angle or the amount of overhang, you can optimize the design of a wooden truss to suit your needs.
- Metal connectors can be cut from a single metal sheet or assembled from 12 cm wide metal strips. The bolts simultaneously tighten the boards and connect the connector elements
The connectors remain inside the paired boards with a cross section of 30-40x150 mm, because a 15x5 cm board is redundant.
A variant of trusses, which are also an element of indoor decor, using a hidden connector.
Assembling the frame of a wooden canopy
So, let's start assembling the frame of the wooden canopy. First of all, we attach the horizontal beams to the vertical supports. For fastening we use bolts, which we screw into specially drilled holes and tighten very tightly and firmly.
This connection must withstand lateral forces, and very significant ones at that. In order to increase strength, you can connect them with brackets made of building reinforcement. The diameter of the fittings is 6-8mm.
The second step is to saw down the rafter legs to install the finished trusses on the canopy. Measure and make cuts in the first truss. A portable circular saw or electric saw is best suited for this job.
By the way, if you make the trusses completely identical, then you don’t even have to measure the cuts of the rafter legs. And do it under one template.
Then you can install the structure in its place. Install it and secure it with supports temporarily. Then you will remove these supports. We screw the truss itself to the beams with 5cmX5cm corners.
Choose a corner thickness of at least 1 mm. We install the last farm using the same method. And we stretch a rope between the trusses. The remaining elements should be installed on it.
Temporarily fasten the trusses together with boards or slats. Anything you have on hand. Subsequently, all this will be removed. In no case should the difference between the outer trusses be more than two centimeters. If it is more, it must be corrected. Therefore, try not to make mistakes. It will be very difficult and time-consuming to correct them later.
Construction and installation work
During any construction there are usual work algorithms. The early stages are practically the same; the differences begin during the construction of the structure.
Clearing the area for construction. This includes cleaning the soil (if the site is filled), clearing debris, tools, and other things.
Site marking. Performed according to the drawing (sketch).
At the site of future support pillars, it is necessary to dig holes about a meter deep (for structures with a height of no more than 3 m in the center). Pit dimensions: 40 by 40 cm, depth 1 m. Usually, there are 6 such holes, but sometimes 8 are made.
Installation of support posts for the canopy frame. There are some nuances here. When constructing supports made of metal or pipes, they must be anchored and concreted. In this case, the hole expands. The anchor must be no shorter than half the length of the underground dimension of the structure. All pipes must have the same length and must be aligned using a level or level.
The pillars must be fastened together to improve the rigidity of the structure. To do this, frame elements are mounted on top, but of a smaller diameter along the entire perimeter at the same level.
Roof installation. The rafter system, prepared in advance, is welded right on site, level. Usually they take a step of 1 m, the angle is selected in the sketch and it is advisable to calculate it. But most often there are designs with an angle of 30-40 degrees.
The rafters are welded at the joint with the external contour so that the flooring protrudes beyond the structure, providing good waterproofing and protection from excess moisture.
The final stage of installation will be roof sheathing. More often they use polycarbonate or profile flooring. If we talk about corrugated sheeting, it is laid overlapping, from bottom to top (hitting the edge). The overlap is about 15 cm. It is trimmed at the ridge, after which it is sheathed with tin.
In cases with polycarbonate, the sheets are laid end-to-end, after which they must be coated with waterproofing (acrylic, silicone). Both elements are attached to self-tapping screws with washers.
It is advisable to attach them to a small dab of silicone for better insulation and to prevent oxidation of the thread at the joint. What to make the canopy from is up to you.
We install the roof on a wooden canopy
On the installed trusses we attach a continuous sheathing made of OSB board, 12 mm thick. The OSB board is attached to the rafters with nails or self-tapping screws. Next, flexible tiles or any other roofing material are installed.
Next, we install the waterproofing lining barrier. As one of the options, non-woven material with bitumen impregnation.
We complete the arrangement of the canopy by installing a drainage system. We fix the gutter on short plastic brackets. We install the holders after laying the roofing.
We told you how to build a wooden canopy with your own hands, it’s up to you)
Subscribe to our Yandex.Zen channel
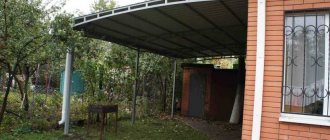
DIY canopy attached to the house (photo report)
It was decided to attach a canopy to the house, under which to hide favorite equipment - a car and a boat.
First, using a motor drill, we dug holes 1.5 m deep - below the freezing depth. Motor drill to help you
We inserted waterproofing sleeves, a frame made of 10 mm rods with welded mortgages, and filled them with concrete.
Base for pillars
The installation step of the pillars is 2 meters.
This is what a poured row of supports for a carport looks like
When the concrete set, the pillars and top trim were installed. They are sanded and treated with protective impregnation. To prevent the frame from moving, we secured it with what we had - aluminum corners. The joint between the posts and the frame was reinforced with metal plates.
The pillars are screwed to the “heels”
A support board was nailed to the wall of the house. Roof beams (50-200 cm board) were attached to it. The slope turned out to be small, about 9°, but it was enough. Small cuts were made in the beams to fit the size of the timber - for support, the edges were cut off to create an even overhang.
Gaps on beams
The beams were fastened to the frame with nails diagonally, 2 pieces on each side.
A board was nailed to the wall, beams were attached to it
The beams on the wall are fixed to U-shaped metal plates.
Plates that attach beams to the wall
The rafter system was assembled - the beams were installed with a small pitch - 40 cm, they were made from 50 * 200 mm boards.
Rafter system of a lean-to canopy from below
OSB was attached to the rafters on top. Roofing material - soft tiles. It needs a continuous sheathing underneath.
OSB laid on the roof
A board was nailed to the side between the posts: for greater rigidity and so that the rain would wet the site less.
The sidewall was sewn up with a board - so that the rain would get in less
Soft tiles were laid. It worked - at least dance. You can dance on the canopy
Now there's competition in the parking lot.
Ready carport
Things to consider
In order not to feel uncomfortable under the canopy, you should maintain a height of at least 2 m.
The carport and rest areas should be equipped with lighting so that it is comfortable to be there at night.If you choose a canopy for games or rest made of polycarbonate, you should duplicate it inside with fabric sun protection.
To make a wooden structure last longer, it should be treated with an antiseptic and painted or varnished.
In any case, it is better to entrust the construction of canopies to professionals in their field. After all, you need to pour the foundation, install lighting, ensure the strength of the structure and build the roof.
On the other hand, wooden sheds can be built using a simple set of tools, and if you have the skills to do the work, you can build a shed yourself. You should decide what needs to be done after carefully weighing all the pros and cons.
Tools and materials
To build a canopy you will need bars and boards of the following cross-section:
- racks: 90x90 mm;
- beam for attaching to the wall: 150x50 mm;
- rafters: 150x50 mm.
Before work begins, the lumber is kept for 5 days in the open air in a shaded place to dry.
- end caps;
- connecting profiles;
- seals for self-tapping screws.
Tools also needed:
- sanding machine or sandpaper;
- plane;
- hand-held circular saw or wood saw;
- a drill with an impact mechanism or a hammer drill (you will need to drill a wall) with two types of drills: for wood and for concrete;
- screwdriver;
- garden drill
What to pay attention to when drawing up a project
When starting to design a wooden canopy, it is necessary to take into account its location as a separate structure or in the form of an extension, foundation features, operational and climatic conditions, which include wind load, snow thickness, and sunlight intensity. The presence of decorative elements, the type of roofing materials, the shape and size of the structure itself, its purpose, taking into account:
- temporary storage of the car;
- allocation of a site for a recreation area;
- placement of gardening supplies and equipment;
- storage of everyday items.
Since a canopy can be used simultaneously to solve several problems, its parameters and internal organization of space should take this into account . To arrange a resting place and store things, you need one size, and in the case of parking a car, another. For a comfortable positioning of a machine whose length does not exceed 4 meters, the optimal canopy values will be 5.5x2.5.
For large cars and SUVs, the length and width of the sides of the shelter must be at least 6.6 and 3.5 meters. The height is selected taking into account the car itself and, if possible, the luggage located at the top, but not more than 2.3 meters, since then the likelihood of side entry of rain and snow increases. In the case of arranging a place for relaxation, at least 2 square meters are laid out for each person; the optimal size of a gazebo with a barbecue is 4x6 m.
Another important indicator is the location of the canopy. You should choose taking into account:
- Ease of use. It is better to install it for a temporary garage near the house on the area in front of the gate, and for relaxation - near the garden or garden.
- Terrain. The presence of small hills is welcome, since then during heavy rainfall the area will not be subject to flooding.
- Practicality. The canopy should provide the necessary protection and ease of access to the car, and comfort during rest.
Installation of the rafter system
The next step in installing a wooden canopy after preparing the foundation and installing the supports is installing the rafter system. Typically, beams with a cross section of 150x50 mm are used, which is quite sufficient for accurate calculations to cover a span of six meters.
The distance between the rafters is about a meter. If it is adjacent to a house, one of the sides of the canopy is attached directly to the wall or a support board fixed on it in advance, and the other is supported strictly perpendicularly on the posts. To connect the elements together, wood screws are used, but fastening to a brick wall is carried out through metal corners, consoles or using dowels and anchors.
Now lathing is done on top of the rafters, using for these purposes edged boards with a thickness of at least 30 and a width of over 160 mm. They are placed perpendicularly and so that they pass under the joints and the middle of the slate sheets, the standard size of which is 900x1800 mm, and the first and last lines should be along the edges of the slope. Fastening is carried out using self-tapping screws.