Features of selecting a bird breed
As you know, chickens are specific animals. There are many breeds of chickens that require more or less careful care, but if we are talking about what is called “for yourself, for the soul,” then you can choose the simplest breed, suitable for both collecting eggs and meat.
This option is suitable for summer residents of any type, and the farm will always please the eye with the availability of products.
Among the breeds for eggs:
- Leghorn,
- Loman Brown,
- Hisex,
- Rhode Island,
- Plymouth Rock,
- Cochin.
Meat breeds:
- Brama,
- Broiler,
- Jersey Giant,
- Dorking,
- Cochin,
- Cornish,
- Malin,
- Primutrock.
As can be seen from the listing of just some of the breeds, opinions agree that the Korkhinkin will be the most universal bird.
Laying the foundation
After the preparatory stage has been completed, you can begin the process of building a chicken coop for laying hens. The first thing that will be built will be the base of the chicken coop - the foundation.
If you want to raise just a few chickens, then you won’t need a foundation; a very small portable chicken coop will be enough.
But if the chicken coop is planned to be large, then you can choose a base option from three possible ones:
Columnar - this option involves the installation of pillars on which the chicken coop itself is gradually erected using frame technology.
Pile foundation - this option is suitable for uneven and complex soil. Piles are also suitable for installing a building on a hill. They are driven into the soil, and after that the construction of the frame structure begins.
- Summer shower at a summer cottage: review of designs, materials, and schemes for self-construction
- Do-it-yourself tandoor - a traditional oriental stove in a summer cottage, photos of completed projects
A polycarbonate greenhouse is a joy for a gardener, let’s understand the structures step by step (photo + video)
The strip foundation is familiar to everyone; it is an ordinary concrete foundation. First, a ditch is dug for it, then special shields are installed and the base is poured with concrete mortar. This option is the most reliable.
How to choose the right chicken coop shape?
The shape of a do-it-yourself chicken coop, parameters and drawings depend directly on the number of inhabitants in it. It should not be made too spacious or small (when chickens are crowded together, there is a suppressive effect and even a tendency to cannibalism, slaughtering relatives and chicks).
The easiest way to navigate in size is that one chicken takes from 25cm to 45cm of space. At the same time, you can save a lot on the space of a chicken coop with several tiers.
As practice shows, multi-tiered chicken coops are better suited for birds and are quite comfortable to clean.
If you get very sophisticated, you can come up with the most original shapes, ranging from the shape of a barn, cart or an entire villa, ending with small chicken coops for a summer house in the form of a box or a triangle. As mentioned earlier, everything depends directly on the number of chickens.
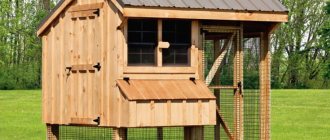
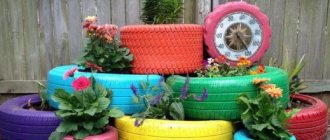
Interesting design ideas
Making a chicken coop with your own hands is a fascinating process that allows you to bring many interesting ideas to life. The result will be not only practical, but also original construction. Among the implemented ideas for a chicken coop, there are many beautiful and original models that are worthy of becoming a source of inspiration:
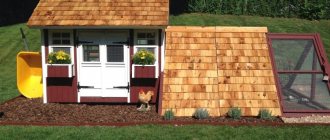
- An example of not only a comfortable, but also a stylish bird house, which can not be hidden in the depths of the garden, but placed right in the yard. Highly located nesting sites always remain clean. Double side doors make cleaning easy for owners. The building has an elegant, decorative appearance thanks to white walls, a dark roof and contrasting details.
Comfort in a modern style Source i.pinimg.com
- The owners of these birds approached the issue of lighting the chicken coop in a non-standard way, not sparing a chandelier in the Art Nouveau style. Extending daylight hours in winter will invigorate the birds, which will have a better effect on the number of eggs. The main thing is to choose light bulbs in the warm yellow spectrum, reminiscent of the sun.
Unexpected, but why not? Source image.hnol.net
- Sometimes it is easier to reconstruct an old building than to start construction from scratch. In a previous life, this chicken coop was a home for gardening tools.
Cozy and safe Source livelihoodtechnology.org
- Mobile chicken coop on wheels. Thanks to its neat appearance, it can be placed anywhere.
Always in the right place Source roomadness.com
For a large company Source www.thehenhousecollection.com
- A fun project that kids will love.
Thought out to the smallest detail Source trevormade.com
- The appearance of the chicken coop is especially important in small areas, where it often has to be placed in plain sight. The house, made in the style of the other buildings, became a decoration of the landscape.
When you want creativity Source 3.bp.blogspot.com For three birds Source farm5.staticflickr.com
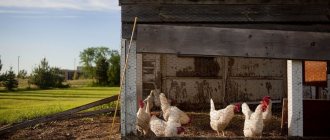
Where and how best to place a chicken coop in the country?
If you choose a specific location, without the possibility of mobile movement of the chicken coop, then you should definitely take into account the non-windy side, since chickens in winter simply risk getting cold from a draft in the wall.
Advice: Remember, any poultry tolerates temperature changes well, even down to sub-zero levels, but any draft is more destructive for birds than even the wettest and dampest weather!
The shape of modern chicken coops for a summer residence is not limited by imagination, but for convenience it should be noted:
- The chicken coop should be well protected from rain, sun and wind.
- The possibility of mobile movement and collection/disassembly will only be in +.
- Possible access to birds with a removable roof/cover of the chicken coop.
- Possibility of placing a pull-out tray for litter.
- Availability of walking and feeding areas SEPARATELY.
Interior arrangement
Heating
As already indicated, the optimal temperature for breeding birds is 12-15 C. In order not to disturb the natural biorhythm of animals, it should not be raised above the specified range. Moreover, this will not lead to increased productivity. Temperatures below +8 C are critical and should not be allowed.
Heating with infrared lamp
To heat a room in winter, you can use several options:
- stoves or stoves
- oil heaters that do not burn oxygen
- infrared lamps: perhaps the most cost-effective option, for 10-12 sq. m of room, a 250 W lamp is sufficient; Moreover, at the same time it can serve as a lighting device
When building a small chicken coop, you can heat it the old fashioned way. To do this, you need to cover the floors with lime (slaked, of course). For 1 sq. m you will need about a kilogram of it. It will serve as protection against ticks.
Then a layer of straw, sawdust or peat is covered with a layer of 5-8 cm and trampled down. During the process of rotting, it will release enough heat to maintain a comfortable temperature. Rotted grass or sawdust can be used as fertilizer in the spring.
Lighting
The optimal daylight hours for birds are 15-17 hours. Moreover, birds need enough light not only during the day, but also in the evening, so that they have the opportunity to move around the chicken coop. In the dark they become completely disoriented.
It is better to use fluorescent lamps that are more comfortable for them. When building a chicken coop for 10 chickens per 3 square meters. m will require 30 W, per 6 sq. m 60 W, etc.
Lighting with fluorescent lamps
Chicks require more light - from 30 lx . Adult birds need 5 lx, roosters 15 lx. The use of flickering lamps with fluorescent lighting is also permitted. Their pulsation frequency is from 26 kHz.
Since such rooms are always quite humid, take care of reliable insulation of the wires. Move all sockets and switches outside the room. To prevent birds from accidentally damaging the lamp, put a protective cover or shade on it.
Pay attention to the color of the lighting too. Blue reduces aggression, green or orange are beneficial for normal physiological development. Lighting with red lamps is undesirable - it can reduce egg production.
You should choose lamps with adjustable lighting . A sudden flash of a light bulb after complete darkness can cause chickens to trample each other in panic. Therefore, when entering a room, turn on the light gradually.
If there is a fight in the chicken coop, dim the lighting slightly. This should calm the troublemakers.
Ventilation
Arrangement of natural ventilation
A damp, unventilated room is one of the reasons for the death of birds. They also have a hard time withstanding elevated temperatures. Therefore, it is simply impossible to do without ventilation in a room for growing them. Moreover, it is required not only in summer, but also in winter.
When building a chicken coop for 20 chickens, a natural ventilation device is sufficient. In summer premises, it is enough to make a window above the door or perch. Fresh air will flow into the open door, and exhaust air will be drawn out through the window.
In a chicken coop intended for winter breeding of birds, it is necessary to prepare a supply and exhaust system consisting of 2 pipes. The first, exhaust, is mounted above the perch just below the ceiling. It is brought onto the roof so that it rises 1 m above it. The gaps between the roof and the pipe are sealed with polyurethane foam.
The supply pipe is mounted at the bottom of the opposite wall away from the perch. The distance from it to the floor is 20-25 cm.
Making perches and nests
When setting up perches for laying hens, it must be assumed that each bird needs at least 30 cm of space. It is also necessary to leave a space of at least 25 cm between the poles. The first row of perches is raised 60-80 cm above the floor. Use square hewn bars 40x40 or 50x50 mm for them. This size is more comfortable for chickens - they will be able to grab the perch well with their paws without fear of falling. Round perches are uncomfortable for birds and can cause them to slip off.
The perch should be as comfortable as possible
Nests are made of wooden boards, plywood or plastic. Each of them can accommodate 4-5 birds. It is better to completely close the nesting site, leaving only a hole for the hole. In this case, the eggs will be better protected from droppings. If there are a large number of chickens, it is possible to make nests from baskets or boxes. They are placed in the very corner of the room away from drafts, raised above the floor by 30 cm.
When assembling nests, you should take into account that they will need to be cleaned and dried periodically, so the shape should be simple. Sawdust is used as bedding - the birds will periodically push the straw out of the nest.
Chicken feeders
Birds are able to scoop food onto the floor in a short time, so feeders should be installed on a slight elevation or suspended. The drinking bowls must be secured, otherwise the birds will immediately overturn them. Closed automatic drinkers are very convenient.
Feeders are placed on a slight elevation and secured to the floor
The material for making feeders and drinkers can be anything from wood, metal to plastic. A separate feeder should be provided for chalk and shells, which serve as mineral supplements. For grass, prepare small metal meshes.
To destroy bacteria and small insects, the walls and ceilings of the chicken coop are whitened with slaked lime 2 times a year.
Ash and sand baths
To get rid of parasites that often live in feathers, birds need periodic “bathing” in sand or ash. Mites, bugs and lice beetles negatively affect the health of both broilers and laying hens. It is unlikely that it will be possible to achieve a significant weight gain in this case. And the number of eggs in laying hens infected with insects will decrease sharply.
Ash and sand bath
To get rid of insects, provide birds with ash and sand baths. To do this, place a box in the chicken coop. A length of 0.5x0.5 m will be sufficient. Pour ash and sand into it in equal proportions. The bath for your chickens is ready!
Features of keeping laying hens
Laying hens are always more in demand in nutrition than broiler and feed breeds. To always maintain the immunity and the bird in good condition, do not forget that in addition to vitamins and supplements, much depends on their comfort of keeping.
There should always be hay or other bedding in the chicken coop as insulation for the roost, also do not forget to change the perch and treat the chicken coop from insecticidal parasites (mites, lice, lice, etc.)
Making walls
It is necessary to begin the construction of the walls of the chicken coop with the side posts, which will further support the entire frame.
In order to make a pitched roof, the front pillars must be slightly lower than the rear ones. A roof with two or more slopes provides an even ratio of the height of the racks, but this type is rarely used for a chicken coop.
It is necessary to make the roof slope on the outside side of the place where your chickens roam, so that it does not flood when it rains.
Next, you will need to make the top frame of the structure from boards, securing them to the posts with nails. After this, you can begin to make the strapping, but it is laid in accordance with the dimensions of the insulation.
The insulation layers are laid in the distances that are formed between the supports. Where there will be doors and windows, it will be necessary to make transverse guides, so it is best to outline these places in advance.
Once the frame is ready, you can sheathe the ceiling and floor with edged boards. But first, thermal insulation and moisture protection are laid on the floor.
Materials for building a chicken coop
- Plywood,
- chipboard,
- Barrel,
- Net,
- Chiffoner.
Of course, you are not limited to all this. Take a closer look at the materials market to see what is most convenient for you to use. In addition, do not forget that the costs also depend on the chosen form of the chicken coop.
How to build a mini-house for chickens: step-by-step instructions
To make such a chicken coop you will need little material. Its base is no more than 1x1.5 m, and its height is only 1.2 m. It is designed for 3–4 laying hens. You can keep chickens in it if the ladder is placed at a smaller angle of inclination.
Mini chicken coops are ideal for summer cottages
Since such a chicken coop does not require a foundation, all work can be carried out right on site:
- Frames for the lower box are assembled from timber using self-tapping screws and a screwdriver. Immediately the mesh is attached to them using a construction stapler.
- They are also connected to each other, after which two crossbars are attached to them.
- The upper frames are made. A window frame is attached to one of them so that you can open the chicken coop from above and supply food and water. The mesh is attached to them with a construction stapler.
- A compartment for the future “house” is fenced off, for which boards of the required size for the floor are filled.
- The remaining three walls of the “house” are decorated, a hole is cut and a ladder is installed.
- The finished side frames are installed on the top box and fastened together. The ends are covered with mesh.
- The ridge part is formed, for which you need to attach three longitudinal boards on top. A cross member is attached to the free end to enhance the rigidity of the structure.
- A door is installed in the “house”, a nest and a perch are designed. We install bolts.
Video: building a mini chicken coop
Mini chicken coop or full-fledged aviary?
It doesn’t matter whether you want to build a small chicken coop with up to 5 birds, or a full-fledged large pen. The main thing is to take into account the features of the content, and the rest can be left to the judgment of your aesthetic pleasure and placement possibilities.
As the practice of poultry farmers shows, it is best to make small chicken coops. They are easier to control and can be moved if necessary. The aviary is exactly the same. When “replenishing” it is very convenient to expand or move it.
Some summer residents do not like to complicate the situation for themselves, and build two chicken coops, one winter - from denser materials and narrower, and a summer one - from lighter ones.
The simplest and most convenient shape is a triangle. The back cover can be made hinged so that when walking you can easily clean the chicken coop and collect eggs.
The only peculiarity in a chicken coop in the country for broilers must be a little more space than for laying hens.
Main stages of construction
If you are planning to get serious about poultry farming, it is better to build a permanent building. Moreover, for this it is absolutely not necessary to use expensive materials.
Materials used in construction
No special drawings are required to build a chicken coop. Its shape and size can be any. Such a building can be erected not only from timber, logs, or bricks, but also from cinder blocks or even adobe. Since these materials are capable of absorbing moisture, they must be plastered. Cinder blocks retain heat less well; they need to be insulated more carefully.
Summer building made of boards
A birdhouse can even be assembled from old boards of suitable size. To do this, it is enough to dig pillars into the ground, lay floorboards, sheathe the walls with boards, and cover the roof with roofing felt. Since there will be drafts in such a room, it is additionally upholstered on the inside with batting or old blankets.
Foundation
The choice of foundation for a building depends on its weight. To set up a small chicken coop for up to 20 chickens, it is enough to use a lightweight structure and a columnar or shallow strip foundation. A deep foundation is required only when constructing massive buildings made of brick, timber or logs. Although such buildings are more expensive, they can reliably protect its inhabitants from the winter cold.
Chicken coop foundation
A columnar foundation is also convenient because it is more difficult for rodents and predators to get into it. If you raise it half a meter above the ground, it will be possible to equip a place for walking underneath it. When building on marshy soils, it is better to use a pile foundation, otherwise the building may sink.
Floors
When arranging a columnar foundation, prepare a grillage in the form of a wooden frame, which is isolated from the base with roofing felt. The strapping is laid on the frame and the logs are attached, and then the subfloor.
Floor insulation with sawdust
There are no feathers on the birds' legs, so special attention is paid to floor insulation. The ideal floors for a chicken coop are adobe. Concrete floors are covered with removable wooden joists, which are removed for the summer and disinfected. You can cover them with a layer of straw or hay. For the summer period, an earthen floor is sufficient.
Mesh floors or floors with deep litter are used more often in non-walking conditions. As bedding, you can lay straw, sawdust or peat 10 cm thick. In the future, it is periodically replaced. To arrange mesh floors, frames with a stretched mesh are laid on 50-70 centimeter stands. It is allowed to make floors in the form of wooden planks, under which pallets are placed to collect litter.
Building walls
High walls are not needed in the chicken coop. However, for the convenience of caring for the bird, you should not make them lower than 1.8-2 m.
Whatever type of material you choose to build walls, they need to be insulated. Even in log cabins that reliably retain heat, it will be necessary to seal all joints with tow or moss.
Insulation with mineral wool from the inside
A winter chicken coop made of cinder blocks or adobe can be lined from the inside with any type of insulation: inexpensive polystyrene foam, mineral wool, and then covered with boards or chipboard. To attach the heat-insulating material, use a frame made of wooden beams or profiles. To protect from wind and provide vapor barrier, an additional overlap of polyethylene film is laid.
Then the heat insulator is covered with boards, fiberboard, chipboard or slate. You can even use OSB sheets as walls. But in this case, they must be made in two layers, with a layer of mineral wool or other insulation placed between them. In the southern regions of Russia, you can use sawdust, pine needles or dry leaves. To strengthen them, lime is added in a ratio of 25:1.
A good heat insulator is a mixture of clay and shavings (sawdust). A similar mixture, infused for several hours, is applied to a double layer of shingles. The thickness of the clay-shaving layer is 3-4 cm.
Cover the windows with transparent film for the winter. To protect against drafts, lay felt or batting around the perimeter.
Door insulation
Door insulation
The main door leading to the winter chicken coop is insulated with film and felt, carpet or several layers of thick fabric. It should fit as tightly as possible to the jamb. In the northern regions, you can also insulate the door leading to the vestibule.
Roof
When building a chicken coop, the roof for winter maintenance is covered with slate. You should not use a metal profile - drops of even light rain will make a lot of noise, and the birds will behave restlessly, and in the summer it will get very hot and transfer heat inside, thereby creating uncomfortable thermal conditions
Roof insulation
A pitched roof is easier to implement. But, if you equip a gable roof, you can save on the walls. In this case, some of the walls are made high enough so that it is convenient for a person to care for pets, and the remaining walls are low.
Thermal insulation is also required for the attic so that drafts do not move through it, taking away precious heat. It is covered with sawdust or coated with clay. If the roof structure is beam, it can be used as sheathing and sheathed with foam plastic. It is better to additionally lay the sheathing of boards with roofing material or at least parchment.
If the autumn and spring were warm, you can let the chickens in at a temperature of 12-15 °C. In this case, it is necessary to arrange a small vestibule-box in the area of the manhole, which will serve as protection from drafts.
What should you pay attention to when designing?
It is important that a home for chickens is not only comfortable for them, but also for you. Consider the location of feeding and walking areas; be sure to take into account that it is better to make chicken coops with a rise from the ground at a distance of 15-20 cm. This is done so that, regardless of weather conditions, there are no difficulties in care.
Elementary rain can ruin all the work, and the chicken coop will begin to deteriorate and get wet, which will eventually lead to rotting of the wood. In addition, when the chicken coop is “raised”, the first tier actually becomes larger due to the walking area, and this is only a plus for your feathered inhabitants.
The feeding and walking areas should be separate. Shared areas are only permissible for mini-chicken coops, and most importantly, they must always have open access for cleaning and cleaning, otherwise the remains of chicken droppings and feed will turn the feeding and walking area into a swamp with infections.
Based on the tips listed above, it follows that the shape of the chicken coop directly depends on your maintenance capabilities. You should not give the bird too much space or shrink the coop if there is not enough working space.
Calculate the number of chickens and seasonal characteristics, and only then start designing a single-tier or multi-tier chicken coop.
Perches and nests
Perches with nests are an important part of a well-equipped chicken coop. You can create them using plywood, plastic containers, buckets, baskets. Litter is arranged at the bottom of the nest.
When creating a chicken coop yourself, it is important to install perches. For this you can use perches with a diameter of 40 mm.
If the poles have a rectangular or square cross-section, then the corners should be rounded as much as possible, and the surface should be carefully processed using sandpaper.
- How to obtain permits for construction: list of documents
- Modern Bluetooth headphones
Construction services for business
One of the first perches is formed at a height of approximately 50 centimeters, the rest - approximately at a distance of 35 centimeters from the next one. Chickens should not sit as close as possible in a row so that the birds on top do not pollute the birds below.