Specificity is now gaining popularity at breakneck speed. People are looking for new solutions so that their yards, gardens, and houses have at least a drop of zest, inspire and surprise passers-by. Few people are interested in banal houses made according to a standard template. The desire to distinguish themselves and build a specific house on their site forces many to turn to designers and professional builders. It is not at all uncommon to have hemispherical structures in the private sector. They are filled with grace, beauty and originality. But the dream of living in such a house under a dome is quite feasible without builders and designers. After all, such a unique residential structure can be built with your own hands from various materials.
Specifics of domed houses
The spherical design can withstand heavy snow loads and resist gusty winds. For regions with harsh climates, domed houses are an ideal option. This is a stable and powerful structure that does not have load-bearing walls. Thanks to the symmetry of the forms, the appearance of the dome is visually reduced when the space inside it increases. Getting the optimal amount of usable space, while the house itself takes up only a handful of space, is the main feature of these extraordinary buildings.
Houses in the shape of a hemisphere weigh little, since modest quantities of materials are used in construction. Thanks to this, you can save quite a lot in the construction of the base. The technology of the dome structure has its tricks, but it can be easily mastered.
Features of construction
Strip foundation for a frame domed house
The construction of a spherical building has a number of features. The sizes of the segments limit the area of window or door openings. The curved surface does not allow equipment or furniture to be attached in the usual way. Constraints affect planning and operation.
- Removing the segment filler does not affect the strength of the structure. However, installing a polygonal door is not always possible. To install a regular one, they resort to tricks. The easiest way is to install a vestibule. If this fails, remove the frame segment with a reserve. A frame with shortened ribs is mounted inside the cavity and an entrance door is installed.
- The partitions inside the building are made of the lightest materials - plasterboard, wood boards and are placed randomly; they do not affect the structure in any way.
- The layout of the round building involves a common passage room in the center and segmented placement of the remaining rooms around it. Closer to the center there is a living room, bedroom, dining room, then a kitchen, bathroom, and corridors. If the house is two-story, a spiral staircase is located in the center.
- A beautiful addition is the glazed area in the center of the dome. This ensures sufficient lighting during the day and a view of the starry sky at night.
- Windows in a domed house are placed according to the same requirements as in a regular one. The shape can be traditional or repeat the shape of the segment.
Furnishing and decorating the interior is not that difficult. Only one wall can be left curved - the outer one. But if the interior is decorated in a futuristic style, they prefer to give the internal partitions an unusual look.
Advantages of a house under a dome
An attractive round house has a lot of advantages, which lie not only in its uniqueness and appearance, but in the following useful properties:
1. Spheres can withstand loads better. 2. Spheres with the smallest area occupied by the surface have the largest volume. 3. The time for construction and arrangement of the home is minimal. 4. The ability to install the structure on the simplest foundation. 5. High thermal insulation properties. 6. Minimum material consumption. 7. Minimum material costs. 8. High strength and stability. 9. Original and aesthetic appearance. 10. Excellent sound insulation. 11. Free internal layout is feasible.
Due to their high energy efficiency, domed houses can be built with your own hands in any region. Also, these buildings are not afraid of hurricanes, snowfalls and other natural disasters, as they are much more stable than rectangular ones.
Additional tips and insights
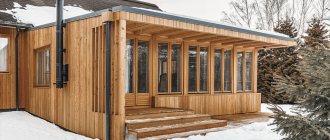
If you buy a domed house, you can eliminate many of the difficulties listed above. However, even in this case, personal topic knowledge will come in handy. They will help you choose the right project and materials, and confidently control the actions of performers. When exploring an alternative option, it is necessary to take into account not only direct, but also indirect costs. In some situations, it will be beneficial to purchase a ready-made kit for creating a reliable frame with manufacturer’s guarantees.
The finishing and equipping of the property can be done independently, using standard construction technologies
Watch this video on YouTube
Construction of a domed house
The nuances of building a domed house
Before constructing a hemisphere with your own hands, you should familiarize yourself with the following points: 1. The foundation of the house. There are no exact requirements for the support of a round building. The structure weighs little, so a shallow strip foundation would be an excellent option for it. 2. Material. The hemisphere is constructed mainly from wood. Taking into account the expected loads on it, the required cross-section of the beam is selected, usually 50x50 mm. It is important to use timber with an increased cross-section to create a dome, which they plan to sheathe inside and outside. You can find unsurpassed dome structures made of stone or concrete.
3. Assembly method. For the construction of large domes, it is essential to use connectors. Five-beam or six-beam connectors combine wooden structural elements. For modest domes, connectors are inappropriate. If there are enough skills in construction and woodworking, then you can generally refuse to use them. At the same time, it is necessary to make the ribs specifically to suit each other’s build. This ensures that there are a minimum of seams in the connection of all components of the sphere. 4. Roof. To create a roof, it is preferable to use flexible tiles; the use of roofing felt and aluminum sheet roofing materials is also acceptable.
Manufacturability
Any developer will appreciate the time savings on house assembly due to the unique patented design of wooden locks. The frame of a small house is assembled by two people in a day, and the construction of a turnkey building, regardless of the season, takes from two weeks to a month and a half, depending on the model. You can bring a set of frame parts for a small house in a Lada Largus passenger van. All elements of the building can be easily carried by one person.
Thanks to the use of soft tiles to finish the entire surface of the “walls”, there is no need to paint the facade and worry about additional protection of the wooden structures of the house. During installation, it is easy to cover the first floor, and you can cover the rooms completely or partially, leaving a second light.
Necessary materials
Before construction, it is necessary to prepare absolutely all materials and devices, so as not to delay the construction in the future by searching for them.
Kit for constructing a hemisphere with your own hands: 1. Wooden beam. 2. Galvanized steel sheet. 3. Screwdrivers, screws and fasteners (screws, nails, etc.). 4. Foam for installation. 5. Roofing material. 6. Roofing scissors. 7. Corner and building level. 8. Hammer. 9. Roulette. 10. Hacksaw. 11. Electric jigsaw and drill. 12. Bulgarian. 13. Wood processing machine. 14. Brushes. 15. Protective gloves.
Dome building project
The dome housing project can be found on the Internet or ordered. The presence of drawings is mandatory, without them it is almost impossible to build a structure in the shape of a sphere with your own hands.
A selection of drawings for a dome house is presented in the pictures below.
Calculator blocks
When opening the calculator page on devices with the most popular screen sizes, you can only see the top area of the calculator. Blocks are usually visible in it:
- "Initial data"
- "Results and methods of connection"
- "Rib sizes"
- "Measurement results"
- Dome diagram
- Buttons for switching tabs: “Frame”, “Scheme”, “Roof”, “Plan”.
To see blocks with drawings of edges and diagrams of faces and vertices, you need to scroll down the page.
General view of the calculator page.
Preparatory work
At the preparatory stage, the following must be done:
1. Project selection. The following points should be displayed in the project drawings: - the shape of the building; - square; - number of rafter elements; — cell parameters; — number of connectors, etc. 2. Selecting a location. At the chosen location for building the dome, markings should be made in accordance with the dimensions of the future building. 3. Manufacturing of necessary products for construction. Based on the drawings, you need to make your own connectors, rafters and plywood elements. 4. Materials processing. Wood naturally needs to be treated with an antiseptic; if metal connectors are used, they are treated with anti-corrosion substances.
Construction instruction
Measurement results
The contents of the “measurement results” block become visible when you click on the title of this “measurement results” block.
Block with measurement results
The name of each field is self-explanatory.
The “Dimensions” block indicates the number of sizes and the number of elements themselves:
“Faces” - the first number indicates the number of sizes, the second number shows the number of faces. In the diagram, edges of the same size are shown in the same color.
“Ribs” - the first number indicates the number of sizes, the second number indicates the number of ribs. In the diagram, ribs of the same size are shown in the same color and indicated by the same letters.
“Vertices” - the first number indicates the number of vertices to which different edges are connected, without taking into account the fact that fewer edges are connected to the vertices at the base. The second number shows the number of vertices.
Step-by-step instructions for constructing a dome structure:
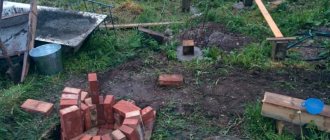
1. Creating a foundation. It is important to thoroughly clear the area where the sphere will be located from fertile soil layers. The excavation is filled with crushed stone and compacted. A mound of sand should be made on top of it and compacted as well. The best option is a pile foundation. The number of holes for the foundation and their placement must be done according to the diagram.
The support made of thick pipes deepened into the ground is quite strong, and thanks to the concreted reinforcement, the possibility of deformation of the piles is eliminated; it is also not so difficult to build this support with your own hands.
2. Foundation piping. This is a structure on which an entire house will stand, so its construction should be approached with particular scrupulousness. It is better to stock up on 10% more boards than indicated in the project, since after sawing there may not be enough meter for strapping. It is necessary to create 5 trapezoids from the beams. These trapezoidal-shaped elements will be laid on piles.
Before fastening the strapping, it is important to make sure that it lies clearly horizontally using a level. All elements are connected to each other with screws, and to the foundation - with anchor bolts 40 cm long. Instead of anchors, in order to save money, you can use reinforcement with a diameter of about 20 mm, and it is even more resistant to fastening with anchors. A hole should be drilled in the head of the pile and the reinforcement should be hammered into it with a sledgehammer. It is important to put roofing felt on the pile heads before connecting them to the beams. It is recommended to fasten the boards with additional corners, increasing their stability and fixation to 100%.
3. Arrangement of support beam. The geodesic house frame is assembled on support posts. A suitable beam is installed vertically at the corners of the trim. All vertical posts are fastened with screws. It is important to cover finished vertical walls with boards so as to prevent water and snow from entering the house.
4. Creating frames for windows and doors. In the manufacture of frames for mounting doors and windows, pairs of horizontal and vertical boards are used. It is advisable to connect the bars using the tenon-to-groove method, additionally reinforced with screws.
5. Making ribs for the main frame. Focusing on the project, you need to make panels of triangular and trapezoidal shapes in sufficient quantities with your own hands.
6. Frame assembly. Connectors are often used to connect finished elements; you can make them yourself or purchase ready-made products in a store. In order to make fasteners yourself, you need to have welding skills, a pipe and a metal sheet. It consists of a pipe and 4.5 or 6 metal petals welded to it
.
You can connect the ribs of a domed house without connectors if you assemble the dome from triangular-shaped elements, the boards of which are precisely fitted. Then all the panels of the outer dome are connected with screws.
When assembling the frame, you must leave openings for doors and windows. The assembly and finished dome are shown in the photo below.
7. Exterior finishing. For the exterior finishing of a hemisphere, it is easier to use roofing felt. Triangles should be carefully cut out of it, matching the inside of the triangular panels used in the construction of the frame. These triangles are fixed with special glue or melted resin on the dome.
8. Decorating a house in the shape of a dome. The following actions relate to the interior arrangement of the premises: - installation of doors and window glass; — arrangement of water supply; - electric installation work; — floor installation; — installation of a ventilation system; - insulation of the building. You can see how the domes are arranged inside in the photo below.
Ergonomic domed houses look great on the outside, but inside, thanks to a flight of fancy, you can create any layout and it will be amazing. And the main thing is that constructing such geodetic buildings with your own hands means significant savings on construction work and materials, as well as on operation.
Two variants of one technology
The construction of frame houses is carried out in two ways:
- Using the Canadian Platform method. First, the ceiling and floor of the first floor are arranged, then large sections are assembled on it - entire walls or their segments. After installation in the design position, the structures are secured, insulated and sheathed.
Step by step assembly. All elements are cut out and fixed in place. First the lower harness, then the racks and the top harness. This method takes longer, but it allows you to get by with 1-2 helpers or even build a small house alone.
The “Canadian platform” is used in standard construction, when structures of a high degree of readiness are manufactured at the plant. They are brought to the construction site and installed using lifting mechanisms in a few days.
When building a frame house yourself, step-by-step installation is simpler and easier. With the efforts of two or three people, it is possible to install not only individual elements, but also enlarged blocks, combining the traditional method and the “Canadian platform”.
General information
Specifics
For many, it will be a discovery that the spherical structure can withstand heavy snow loads and withstand gusty winds. For regions with harsh climatic conditions, this is an ideal option. Such structures are stable and powerful, and what is noteworthy is that they have no load-bearing walls. Due to the symmetry of the forms, the appearance of the dome visually seems smaller, but on the contrary, the space inside is larger. Getting the right amount of usable space given that the house actually takes up little space is the hallmark of such custom buildings.
Such houses weigh little, since usually few materials are used during construction. Due to this, you can save money when creating the base. The construction technology has some tricks, but it is not difficult to master.
Advantages
A beautiful round house has a huge number of advantages, which lie not so much in uniqueness and appearance, but in the following useful properties:
Due to energy efficiency, you can build a domed house in any region. Such buildings are also not afraid of hurricanes, heavy snowfalls and other natural phenomena, since they are many times more stable than rectangular ones.
Required materials
Before starting construction, you should prepare all the equipment and materials so that when work begins, you do not delay construction by searching for this or that item.
So, you will need:
You can choose a dome-type housing project from the options offered here, or order it from an agency. There must be drawings, since without them it will not be possible to make a spherical structure.