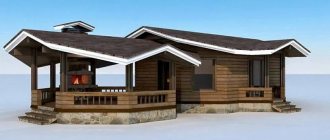
During the life of a private home, reasons arise that require the installation of additional premises in it. Increasing the area of your home and improving comfortable conditions will help by installing an extension to it. We will tell you how to make an extension to a wooden house on your own in this article.
Economical extension option - on screw piles
Where to begin
The construction of an extension must begin with its design.
It is important to draw a schematic plan that reflects the internal layout of the house, its dimensions, and the connection points of the parts.
An extension to a wooden house, the designs of which are drawn up based on climatic conditions, the location of groundwater and the material of manufacture, will last a long time.
Drawing up a full-fledged project will allow you to avoid mistakes during the construction of an extension and determine its features. You can use the free SketchUP program or its paid version SketchUP PRO.
Useful tips
Before construction, you need to take into account some subtleties. For example, it is not advisable to build an extension from foam blocks if it will house a bathroom or bathhouse, since this building material absorbs moisture, which contributes to its destruction. It is better to build an extension with a toilet and shower with an exit from the bedroom or corridor.
When building a garage, it is good to use shell rock or brick to build walls. The strength of these building materials allows them to be used in rooms with high humidity.
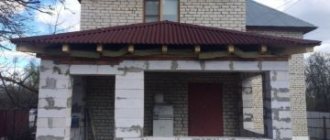
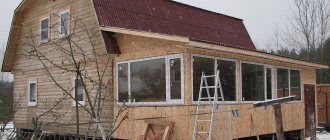
Frame garage attached to the house
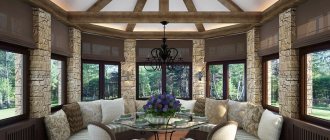
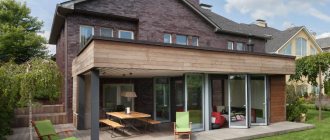
In an extension with a veranda, instead of walls, you can use glass panels mounted on a metal frame. This design solution will increase the lighting of the veranda and allow you to admire the surrounding landscape in any weather.
It should be noted that modern construction technologies make it possible to quickly build an extension from any building materials.
Types of foundations for extensions
The following types of foundations are erected for the extension:
- tape Basically, it is applicable to houses made of bricks and blocks;
- monolithic. For walls made of heavy materials, it is accordingly the most expensive.
- columnar. It is installed for wooden buildings;
- on screw piles. It is used for houses of small mass: wooden, frame;
Let's consider the stages of construction of different types of foundations.
Tape
The construction of a strip foundation is carried out in a certain sequence:
- The site is being marked. 4 pegs are placed at the corners of the extension. The pegs are connected with construction cord. The marking determines the perimeter of the foundation;
- a trench is being dug. The depth of the foundation of the extension corresponds to the depth of the foundation of the house;
- a sand cushion 100 mm thick is laid at the bottom of the trench and then compacted;
- Formwork is made from wooden panels;
- to protect the foundation from groundwater, waterproofing is laid;
- A frame of reinforcing bars is placed inside the formwork. Reinforcement is necessary to strengthen the strength of the foundation;
- the foundation is concreted. Concrete class B20 or higher is used. First, only one third of the height is poured, while the mixture is carefully vibrated with a deep vibrator so that no air cavities arise in the future and the foundation is not destroyed, then it is topped up to the design level;
- the formwork is removed after three days at a temperature of +15+20 degrees;
- The hardened concrete is covered on top with 2 layers of roofing felt. It is necessary for waterproofing the foundation.
Monolithic
For a monolithic foundation, a pit is dug manually or using machinery. Geotextiles are placed at the bottom of the pit. Drainage is poured: sand cushion 100 mm, compacted. Crushed stone preparation 200 mm, compacted. Removable formwork is assembled from boards. A reinforcement frame consisting of two meshes, 200*200 mm, and reinforcement with a diameter of 12 mm, which are tied together, is installed over the entire area of the pit.
A protective layer of concrete is maintained 50 mm below the bottom mesh, 50 mm above from the top mesh and along the perimeter of the frame.
Class B20 concrete is poured. To ensure that the surface is level, the concrete is leveled using a long rule along the beacons, which are a 40*20*2 mm profile pipe, leveled in advance. The beacons are then removed from the concrete when it begins to gain strength, and the cavities are covered with mortar or concrete.
An original solution to the expansion issue - the adjustment goes under the house with stas_ssp
Almost in real time you can watch a most interesting experiment, the likes of which have never been seen on the forum before.
stas_sspForumHouse Member
There is a one-story frame-modular house with an area of 72 m². Our family has grown, and there is no longer enough space. It was decided to increase the area, but not by adding an upper floor, but rather by adding a lower floor and raising the house to the required height of this extension. Since the house stands on a pile foundation, it was decided to dismantle the base and dig a pit for the installation of a monolithic slab. And then rest the jacks on this slab to lift the house.
All discussion participants who were interested in Topicstarter’s original approach to solving the housing problem agreed that “the problem is interesting.” The main difficulty is not to destroy the house during the lifting process, since even a strong gust of wind can turn the house into a pile of firewood. But the eyes are afraid, but the hands do.
Foundation - in addition to the insulated monolithic slab, there will be an insulated blind area and an insulated base, so there will be no problems with the piles concreted into it. The load from the modular floor will be transferred to the slab by walls made of expanded clay concrete blocks.
Walls - several rows are laid out under load-bearing walls, the house is jacked up, the next few rows are laid out, the house is jacked up, and so on until the finish. At the moment, “the process has begun.”
stas_ssp
The house was raised about a meter from the level of the slab, all the piles were cut off, and the laying of the first rows began. We lay out three rows, install jacks, carefully lift the house, and lay “columns” of blocks under the floor beams. To insure against slippage from the jacks and distortion, we are thinking of installing strut stands at the corners. There is already experience when the ohm deviated from the design axes, now the verticality of the rise is the main cause for concern.
As of the 26th of this month, the construction site looks like this.
The professionals who joined the discussion estimate the lifting and construction time to be approximately fifteen days, with a normal crew of four people. So it will be possible to find out how the most important stage of this extraordinary reconstruction will end in the foreseeable future. The topic is called “Raising the house by 3 meters and building a new floor at the 0.000 mark.”
Extension floor options
The floor of the extension can be concrete or wood. If the foundation is strip, then both floor installation options are possible. A columnar foundation requires a wooden floor on the joists.
Concrete
The concrete screed in the extension is made using a certain technology.
- The soil is selected from the foundation. It is loosened and removed to a depth of 25-35 cm.
- Instead of soil, a 10-15 cm sand cushion is poured and compacted.
- Then a vapor barrier is installed from a special film.
- Penoplex insulation 50 mm thick is installed.
- Reinforcement is placed on top - a welded mesh made of 5Вр wire with a cell of 150*150 mm.
- Beacons are mounted according to the level from a 20*40*2mm profile pipe. The distance between them is 2 or 2 m, depending on the length of the rule with which you will level the concrete screed.
- Concrete is poured and leveled according to the rule. Concrete screed gains strength in 28 days.
- After the construction of the extension, any covering is laid on the floor.
Wood
A layer of waterproofing is laid on the foundation pillars. Beams are treated with antiseptics. They are attached to the foundation with anchor bolts and fixed to each other with metal corners. Cross beams (joists) are laid. Insulation is being installed. The subfloor is laid, and the flooring is laid on it.
You may also be interested:
- What is the best way to sheathe the outside of a wooden house?
- Porch for a private house made of wood
Construction of extension walls
A rigid connection is not used to fasten the walls of the house and the extension. The difference between the new and old walls of a log house can lead to uneven shrinkage and the appearance of cracks on them. It is better to leave a gap of 2-3 cm between the walls, which should be filled with polyurethane foam or jute rolled into a “sausage”, or high-density mineral wool.
From timber
You can build an extension to a wooden house with your own hands from construction (raw) timber. The timber has a pleasant appearance, is strong, durable, and has excellent thermal insulation qualities. It creates a healthy microclimate in the house, releasing phytoncides and distributing them throughout the rooms.
If you decide to build a permanent extension from 15x15 cm timber, and it has considerable weight, you will have to build a columnar foundation with a concrete grillage.
The rows of beams are connected using dowels. The most common timber connections are: key and root tenon. They ensure the tightness of the structure. Voids and cracks are sealed with polyurethane foam. The corner areas are secured with a tongue and groove lock. The timber shrinks over a long period of time, so it is important to arrange expansion gaps on the walls and rafter system.
From the frame
The wooden frame extension is fixed using metal corners. The lower trim can be attached using a tongue-and-groove cutout. The strapping bars are 25-40 cm thick.
Vertical supports are placed with a step of 40-50 cm between them. They are nailed to the wall of a wooden house. The top binding is done in the same way as the bottom. Windows and doors are being installed. The walls of the house are sheathed from the facade. Various panels, boards, and plywood are used for cladding.
Made of brick
To build brick walls, it is important to level the surface of the foundation. If the foundation is not level, the attached walls may crack during shrinkage. Attaching an additional brick room to a wooden house must be done in accordance with building codes: holes are drilled in the wall into which reinforcement with a transverse stop is inserted. The stopper will help the reinforcement stay in the hole without slipping out of it. Reinforcing bars should be installed every 2-3 rows of masonry. The horizontality of the rows can be controlled by level. The verticality of the supports is adjusted using a plumb line.
To ensure that the walls of the extension are firmly connected to each other and to the wooden walls of the house, a concrete belt is made at the top. To do this, formwork is built, reinforcement is placed in it, and concrete is poured. After some time, the formwork is removed, and then the ceilings are installed.
From blocks: foam, gas, slag
Foam block materials weigh little and do not place a significant load on the foundation. Gas silicate blocks do not burn, so they do not need to be coated with fire retardants. You can immediately install windows and doors in them. The blocks do not harbor insects and are not subject to rotting. The surface of the foam blocks is smooth, so any materials can be easily mounted on them. They retain their positive properties under high temperature and humidity changes.
If you need to build a small extension, then a reinforcement frame is not needed. But to ensure the durability of the structure, it is important to install reinforcement between the rows. A reinforcement belt made of metal profiles is installed at the window openings. This way the structure will be more durable and reliable. An extension made of foam blocks should be installed on the most rigid foundation possible. In order not to install internal lintels, the foam block masonry can be stretched along one wall, making the extension more stable. Using foam blocks, you can build an extension with an intricate configuration.
Insulating the extension from the inside
If the extension is residential, then you can insulate it from the inside. Insulate the ceiling, walls and floors. Insulation in the form of slabs of mineral wool or expanded polystyrene is laid between the bars of the frame house. A vapor barrier film is fixed on top with staples, which is overlapped and glued together with double-sided tape. It is covered with cladding in the form of lining, OSB or plywood. Brick walls are insulated in the same way.
Thermal insulation of the floor occurs in the following order:
- Transverse joists are mounted on the floor beams;
- arrange the subfloor. To eliminate cold bridges, the boards are laid out as a continuous flooring, they fit tightly to each other;
- Mineral wool is laid between the lags or expanded clay is poured. A vapor barrier film is installed on top of the rough coating;
- installation of the finished floor and cladding is the final stage of floor assembly.
Roof installation
The roof is installed using standard technology, taking into account the characteristics of the building materials used. The roof can be gable or single-pitch. In both cases, the rafter system is made simply: the sheathing is installed along the load-bearing elements, and then the roofing material is attached.
note
In order for a house made of timber to look harmonious, the roofing material must match or be identical to the roof covering of the main building.
Among modern materials there are the following popular varieties: soft roofing, ondulin (Euro slate), metal tiles (in the form of profiled metal plates imitating tiles).
The roof of the extension can be made separately or be shared with the house. The second option is carried out during the reconstruction process, when, for example, an attic room (bedroom, children's room) is built and the configuration and size of the roof of the old house is changed entirely. It is difficult to do such a volume with your own hands; it is better to hire professionals.
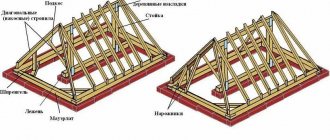
Assembling the roof and connecting it to the main one
The roof for the extension should be pitched, like a continuation of the roof of the house. The roof slope is 15-25 degrees. Lathing is laid on the rafters. Sheet materials are mounted on it. To protect the insulation from moisture, steam and waterproofing are installed. Mineral wool, polystyrene foam, and penoplex are used as insulation. Corrugated sheeting is installed on the roof. You can use ondulin or soft roofing made of flexible tiles.
Extension roof fastening unit
How to save money without sacrificing quality
High-quality insulation will allow you to save on space heating costs. If the extension is made of brick or foam blocks, then the extension is insulated from the outside. In this case, a ventilation gap is required.
Careful study of the project, the size of building materials to minimize trim, and competent preparation of estimates will help reduce costs by 10-20%.
You can also save on the foundation. The cheapest is the pile-screw type.
You can save on calling specialists. But before construction, you need to evaluate your strength, whether you can cope with this work.
You can profit by purchasing. But buying cheap materials at the expense of quality deterioration is illogical. Sometimes they save on delivery. To do this, it is better to buy materials in one place. Savings can also be due to the volume of purchased material and corresponding discounts.
Legal nuances
Attaching new premises to a house requires obtaining a building permit and registration of the extension if the structure is built on a foundation. Construction without proper documents and compliance with regulations may be illegal.
The procedure and price for registering an extension in accordance with Russian legislation depends on the location of the structure. If the house is located on a site that belongs to the lands of populated areas, you must contact the architecture department before construction begins. Installations in dacha communities can be done without registration with the BTI or you can call specialists after the completion of the construction process. In both cases, an important requirement is maintaining a safe distance between objects. This is regulated by SP 4.13.130-2013.
For legal registration of the extension, prepare the following documents:
- construction project;
- building permit.
An unauthorized building erected on a house without registration entails difficulties in legal registration during sale and inheritance.
Common mistakes
When building an extension by inexperienced builders, problems may arise due to construction errors.
These include:
- incorrect and insufficient fastening of load-bearing beams, vertical supports of the lower and upper frames, logs. Negative consequences may arise, leading to the destruction of the extension;
- ignoring antiseptic treatment of lumber at home, hoping that it was carried out by the manufacturer. Illiterate processing of materials will cause wood to rot and harmful insects to appear in it;
- illiterate installation of plastic windows and doors, carried out independently or by unskilled workers, can cause jamming of the window sashes, the appearance of cracks and drafts. The window may warp, deform, or crack;
- the foundations of the old and new houses are incorrectly connected to each other. Insufficient connection between them will lead to negative consequences: the extension may move away from the main house;
- errors appear during the design and calculation of estimates. Due to the desire to save money, cheap low-quality material is chosen, which can lead to cracks and destruction of the house;
- There are also mistakes when laying the foundation. Lack of knowledge about the depth of groundwater and the level of soil freezing leads to the wrong choice of foundation and its illiterate installation.
Video description
And the next video shows the first part of the work on the reconstruction of the same house, which talks about the preparation - laying the foundation.
The interesting thing here is that the extension is larger than the main building: There is a third way - connecting the facade and wall of the extension with brackets. To thermally insulate the joint, tape insulation is placed in it and covered with a flashing. After the end of the active phase of shrinkage (at least a year), the stripping and staples are removed, the joint is caulked again, the staples are driven in again and again covered with the stripping.
How to legalize an extension
Before constructing an extension, you must obtain permission to use additional living space. Documents may be needed when selling a village house or renting it out.
You need to submit a notice of reconstruction to the local administration by filling out a form and providing a sketch of the project. If after some time you receive permission, then you can begin construction. When construction is completed, it is important to notify the administration of the completion of work by providing a technical plan. The technical plan is prepared by a cadastral engineer.
Specialists will come to you to check compliance with building codes and declared characteristics. Afterwards, the municipality submits information to Rosreestr in order to enter changes into the Unified State Register.
If you decide not to waste time on obtaining permission before reconstruction, then it will be much more difficult to legalize the finished extension, only through the court. When the case is lost, the log extension will have to be demolished without monetary compensation.
Selecting a construction team and the secrets of strict control
When choosing a team of workers to build an extension, it is important to immediately clarify the timing, cost and quality of the work. It is better to use the recommendations of friends and see with your own eyes the result of the work of this team. It is important to draw up an estimate and approve it, establish stage-by-stage payments, and not pay an advance (or give the minimum).
Selection of a construction team
To control the work, you can hire an independent foreman, carry out unexpected checks yourself, and pay for the work only after drawing up a handover certificate.