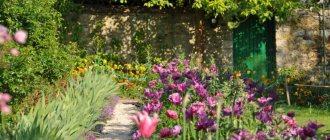
Owners of suburban areas strive to make their estate well-groomed and attractive. They go to great lengths for this - they sow lawns, plant flower beds, create ponds and plant green spaces.
The final point in the matter of landscaping is the installation of a border for garden paths. It breaks the landscape into separate zones and gives it a finished look.
Why you need borders, what they are like, how to make them yourself - this article will tell you.
A little practice or why you need a border
In addition to the aesthetic effect, a small fence performs several practical functions:
- prevents soil erosion during rains
- protects sidewalks and paths from dirt
- prevents uncontrolled plant growth
- keeps gravel from scattering and increases the wear resistance of the bulk base.
Despite all the usefulness of the design, the issue of choosing a border should be approached wisely. The dimensions and depth of the mini-fence should not interfere with the normal development of the root system or impair soil aeration.
Pouring concrete into molds
A high-quality concrete product can be obtained by using a vibrating table. Forms filled with concrete are placed on it, and air is removed from it through vibrations. If this is not available, then compaction of the concrete solution can be achieved manually by tapping the form with a hammer until all air is removed from the solution. If it is necessary to make a more durable reinforced product, then the forms are first half filled with concrete, after which metal rods are placed in them and filled again with the remaining mortar. Its compaction is performed in the same way - vibration. The concrete poured into the molds must be kept for at least 48 hours, the molds must be removed and the product must be left to gain strength for another 3-4 weeks. Only then can you begin installing the curbs. If you rush and do it earlier, there is a high risk of the product breaking.
Choosing a border by size
Many people think that curbing is a simple matter. But photos of a garden border can debunk this myth.
There are many frames that differ in size:
- small borders up to 5-7 cm, the main role is to visually highlight and outline the boundaries of plantings.
- medium structures 10 cm high, serving as the edges of garden paths.
- high (up to 40 cm), protecting flower arrangements from animals and children.
Enclosures must also be compatible with what is growing inside them. Agree that a low border looks ridiculous against the backdrop of tall peonies or roses.
Preparation of concrete
The solution is best mixed in a concrete mixer. Thus, the finished products will be durable and of high quality. Manually thoroughly mixing concrete with a mixer is a difficult task, since the solution contains crushed stone. This will negatively affect the final result of the work and the quality of the product. It is important that the water and sand are clean. The sand should not contain clay impurities, which reduce the grade of concrete and reduce the service life of the curb. Therefore, before work, the sand must be sifted. It is best to take tap water or from a well. To easily remove finished products from the molds, it is recommended to lubricate their inner walls with machine oil. A concrete solution of grade M400 is prepared from cement, sand and gravel in a proportional ratio of 1:2.5:3, and grade M500 - in a ratio of 1:3:4. First, half of the required portion of sand and crushed stone is poured into the concrete mixer, and the resulting mass is mixed for 2-3 minutes. After this, cement and the remaining parts of sand and crushed stone are added and mixed again in dry form for 4-5 minutes. A plasticizer or liquid detergent is diluted in water and gradually added to the dry mixture in a concrete mixer until the solution of the desired thickness is obtained. Colored borders can be obtained by adding a coloring pigment to water. The concrete mixer must operate continuously at all stages of adding materials. The procedure for preparing a concrete solution for pouring into molds and formwork is the same. The only difference is the required amount of solution. The more forms, the faster the process of making borders will happen. It is recommended to have at least 8-10 forms.
Choosing border material
The main characteristic of a curb is the material from which it is made. Manufacturers offer a wide selection:
PVC. The main advantages are low cost, light weight, ease of installation, moisture resistance. Among the disadvantages is fading in the sun after several years of use.
Tree. The most environmentally friendly material on the list. Wood is easy to work with and does not heat up under the sun. But the lifespan of such a border is about 10 years, taking into account constant treatment with anti-rotting and insect repellents.
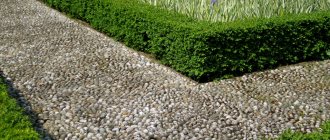
Brick, stone. They are most attractive from an aesthetic point of view. Stone structures act as drainage barriers, preventing water from stagnating in the flowerbed.
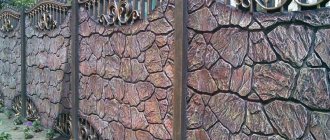
Metal. An expensive but durable design option. It is highly durable and easy to install.
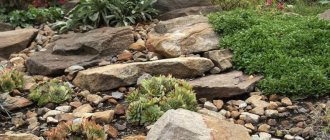
Ideas for flower beds made of stones
Do-it-yourself flowerbeds made of natural stone are a decorative element designed to create a well-groomed appearance of the area adjacent to the buildings. It’s easy to build a stone flower garden yourself from available materials and materials that are located on the site.
Ideas for flower beds made of stones:
Arbitrary flower bed. The stones in such a composition are laid out around the perimeter without securing anything. Such a flower garden, created with your own hands, can always be expanded or reduced by changing the number of stones, and can also be easily moved to another place. At the beginning of the season, adjustments to the curb are most often necessary due to the fact that loose cobblestones gradually slide down the soil.
Flower beds made of stone and concrete. For such a design, a permanent place is chosen. When rocks adhere to each other using concrete or cement, tall, beautiful flower beds are obtained.
Multi-tiered flower beds. Such designs are especially suitable for small areas. Plants in a flower garden are planted taking into account the flowering time so that all tiers look harmonious. On a multi-level flower bed you can place bright flowers or create a natural landscape in the style of a rock garden.
Flowerbeds in the form of a staircase. The flower bed is placed along the entrance or wall of the building. To create such a composition with your own hands, you will need flat stones or bricks.
Flowerbed borders. The flower bed is placed along a building or path, using stone to create a smooth or winding border.
Stone islands create accents to the property that last for years.
PVC borders
Plastic borders for garden paths are available in two versions - flexible rolled tape and individual blocks.
Popular plastic models:
- “Country” (ribbon) - easily recognized by the thickening of the upper end of the wall. Available in green and black colors.
- “Labyrinth” (segments) - stylized as stone or brickwork. The blocks are attached to each other and the ground using plastic nail pegs.
- “Garden board” is a tape with a flat or corrugated profile, which is in demand for decorating children's playgrounds, beds, and sandboxes.
How to make a flowerbed out of stones with your own hands
In order to lay out a flowerbed of stones with your own hands, you need to determine the place where it will be located temporarily or regularly. A stone flowerbed can successfully eliminate uneven surfaces and decorate any corner in the garden or near the house and veranda.
Small stone flowerbed
You can make a flowerbed at the dacha with your own hands from medium-sized stones very bright or in soothing colors. Decorative chips do not disrupt air exchange and do not interfere with plant development.
A small stone in a flower garden looks aesthetically pleasing throughout the season, including after precipitation.
How to make a flowerbed from stones with your own hands step by step:
- Create a sketch on paper or in a program, on which they mark the places where the plants will be located.
- In the selected area, mark the space using pegs with twine or painting the outline.
- Remove the top layer of soil to a depth of about 5 cm.
- Make holes in the soil, plant the plants and frame the planting site with border tape.
- The remaining space is covered with gravel.
- A geotextile is laid out over the resulting surface, which will prevent the mixing of decorative chips with drainage and soil, as well as the appearance of weeds.
- Stone chips are poured onto the geo-textile in one tone or separating its shades with a border tape.
- The border is made with a larger stone.
Flowers or plants in such a flower garden are planted pointwise so that the background is clearly visible. Decoration with decorative crumbs is also done on an already created flower bed. To do this, geotextiles with slots are placed under the plants and crumbs are also poured on top.
Large stone flower bed
You can make a rocky island in the style of a rock garden with your own hands both in the front part of the site and in the backyard. Plants characteristic of this type of flower bed tolerate partial shade well.
Advice! Rockeries are not recommended to be placed near trees due to the difficulty of clearing them of falling leaves.
In flooded areas, sand drainage is organized or drainage pipes are installed. In areas where moles often appear, a net is placed at the bottom of the flowerbed.
Stages of decorating a flower garden with stones:
- Remove the turf layer.
- Geotextiles are placed on the bottom.
- Large stones are placed on the surface of the covering material.
- Mark the places where the plants will be located. Holes are cut in the geotextile for planting plants. Holes are dug depending on the size of the root system. Soil of the required acidity is added to the planting holes, the plants are planted and watered.
- The remaining space is filled with crushed stone.
Coniferous plants, dwarf pines, and saxifrage are suitable for a stone flower bed. If desired, roses can be planted in such a composition.
Plants are placed taking into account their further growth. Trees and the largest stones are placed together, often creating the center of the composition.
Wooden borders
Making garden borders with your own hands is very easy if you have a few wooden pegs on hand:
- They are preparing the site. To do this, mark the contours of the future fence on the ground and dig a small ditch.
- The pegs are sharpened at one end and deepened into the groove by a third of the length. The distance between adjacent stakes is 5-7 cm.
- Level the height of the fence from above by tapping the protruding parts with a mallet.
- Alternately pass willow twigs, cleared of bark, between the pegs, creating a semblance of weaving.
Border varieties
Wooden fences
Decorative structures made of wood are needed both to create an exotic appearance and for practicality. Wood pegs, pieces of boards, logs, twigs, twigs - perform a specific function as a border:
- preserve the style of the garden plot;
- protect the flower bed from washing out the soil during rain;
- prevent weeds from growing into the flower bed;
- partially protected from debris;
- protect green spaces from pets;
- protect the flowerbed from trampling.
Palisade
To build a picket fence for a flower garden, you need to prepare pegs or small logs. The part of the peg that will be in the ground is sharpened. Along the perimeter of the flower bed, each log is dug into the ground. The height is adjusted according to the purpose of the border and the growing annuals and perennials. Such a fence can protect a flower bed from washing out the soil during heavy rain, prevent small pets from invading flowers, and prevent plant growth. When the plantings in the flowerbed are medium-sized or lower, the height of the palisade is made up to 30 cm.
Network
Wicker fences will decorate any area. They are woven from long willow twigs. Summer residents recommend cutting rods in the spring to build such a fence. The twigs are cleared of green bark, and then the pegs are braided with them. There are many options for wicker weaving. Today you can find detailed lessons on the construction of such fences on the Internet. The height of the wicker can be different, it all depends on the growing plants inside. But, beds with tall plants and tall wicker fencing look amazing!
The use of young willows will also be effective. If 2-3 willows are planted nearby, then intertwining their vines can make a living wicker hedge. Only part of such a hedge is used for a flower garden. Typically, such a fence serves as a backdrop in a flowerbed.
Fencing with several tiers
Structures of several tiers are used for flower beds and vegetable beds. The multi-tiered structure adorns the summer cottage with its unusual and spectacular appearance.
Different materials are used to decorate the flower pyramid. Such flower beds made of brick and wood, stone and plastic, wooden pegs or logs look beautiful and original.
With multi-tiered border designs there is room for imagination! Unusual and original labyrinths of three or four tiers using plants of different heights on each tier. When creating a composition from wood, it is taken into account that the wooden parts will be subject to rotting due to moisture. Therefore, the wood used is first treated with moisture-resistant agents.
When creating a flowerbed-labyrinth, drainage is laid out at the bottom of the first tier. It is enough to lay out 10 cm of expanded clay or pebbles. Another layer of drainage is laid after the second tier.
Metal borders
Metal fences for flower beds are usually made to order. They have a stylish, sophisticated look. Often these are forged openwork grilles with unusual shapes. Lovers of the classics decorate the flower garden with more formal, low fences. Metal borders are used for flower gardens, both with tall plants and with short ones. For example, in rose gardens, with clematis plantings, with climbing annuals and perennials. Or like in these photos, where there are two beautiful compositions with metal fences:
Original ideas for borders
An alternative to traditional materials can be a decorative border made of greenery. This is a compact hedge, which is created from low-growing plants (boxwood, cotoneaster). Requires constant attention, care and maintenance, including cutting and irrigation.
The most budget-friendly way to border a flower bed is to place glass bottles around it, neck down. And if you paint them in different colors, then your homestead will definitely not go unnoticed.
Pergones
This design is a border made of mesh, inside which there is broken brick, glass or wood.
Pergons not only perfectly complement flower beds, but also provide support for plants.
Making this type of border is very inexpensive. In addition, there is no need to make a special foundation for the pergon.