- Do-it-yourself compost pit: options for manufacturing and design
- How to make a compost bin: features of this type of construction
- How to properly make a compost bin at your dacha: choosing a location
- What can and cannot be put in a compost bin
- Features of caring for a compost heap: recommendations from experts
- Compost pit: what is it and what is it for?
- DIY compost bin: manufacturing options and design requirements
- DIY compost bin: manufacturing options, photo examples
- DIY compost bin: manufacturing options and instructions
Do-it-yourself compost pit: options for manufacturing and design
The better the quality of the soil, the richer the crop grown on this land will be. But it happens that the initial data is not very good, and you have to fertilize the soil. To do this, you can use various fertilizers, but it is best to make a compost bin , which will become a source of environmentally friendly material. Let's consider how a compost pit should be made, manufacturing options and materials suitable for this purpose.
Using a compost pit or box you can create nutritious soil for garden and vegetable plants
Natural soil ECO pit
A natural open-ground pit is the most inexpensive and widely used option for a compost pit, which allows products to decompose faster.
It is very convenient and practical when the compost ECO heap, pit, container, box or basket is located directly on the plot.
The choice of structure design depends on financial capabilities and specific preferences. Opt for natural organic fertilizers that can be obtained from plant waste.
How to make a compost bin: features of this type of construction
In order to understand how to properly make a compost pit, you first need to understand what it is used for. Typically, a compost pit is used to dispose of organic waste, which, as a result of the rotting process, turns into organic fertilizer. There are many design options and each owner can only choose the most suitable option for himself.
By following the rules for laying layers and fertilizers in a compost pit, you can obtain nutritious soil in a short time.
A compost heap does an excellent job of disposing of mowed grass and fallen leaves. Under the influence of time, moisture and microorganisms, all this turns into fertilizer, which can be used to grow any type of crops both in gardens and in the vegetable garden.
Making a compost heap of organic fertilizers with your own hands is not at all difficult, especially since there are many ideas for independent implementation that can be used as a basis. You can make your own compost pit using pallets, which are usually used for transporting and storing building materials. They can be bought at a fairly low price, or it is quite possible to simply find them on your own site.
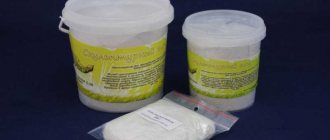
Biological products for making compost
To obtain humus, ready-made fertilizer as a result of processing organic residues, it may take a year or even more than 2. There are means that serve as accelerators of the process. There are various brands of preparations on sale, which contain microorganisms (bacteria) that act as catalysts for the decay process.
When using such technologies, the rotting process takes only 2-3 weeks. The finished fertilizer obtained by adding biological products is organic and suitable for use in growing fruit crops. Tip: manure is used as an accelerator for humus.
How to properly make a compost bin at your dacha: choosing a location
Speaking about arranging a compost heap, one cannot fail to mention the importance of its correct location. First of all, the structure must be sufficiently distant from residential buildings. In addition, the place where it is installed should be well blown by the wind to avoid stagnation of air and concentration of the unpleasant odor emanating from it. In addition, access to the compost must be ensured so that the process of adding raw materials or removing finished fertilizer is as comfortable as possible.
In order for the rotting processes in the compost bin to proceed faster, large branches and waste should be crushed.
On a note! In order for the rotting process to proceed faster, it is recommended to periodically mix the layers inside the heap. Therefore, even at the stage of planning and arrangement, it is worth considering how this can be accomplished.
In addition, the following criteria for choosing a site suitable for a compost pit must be taken into account:
- the selected location should be located at a sufficiently large distance from any sources of drinking water, for example, a well or borehole. The distance between these objects must be at least 25 m;
- if the site is not level, but on a slope, then you need to make a compost pit below the water level (preferably at the lowest point of the site). This will prevent the entry of rotting waste and clean water;
- You should inquire in advance about the most common direction of the wind, since the pit often becomes a source of a rather strong and unpleasant odor, and can cause discomfort to both you and your neighbors;
- It is worth making sure that there is not only a free approach to the pit, but also enough space to be able to bring in waste or remove finished compost using a wheelbarrow.
Scheme of construction of a compost bin.
On a note! It is advisable to choose a shaded place for the compost pit, since sunlight has a negative effect on the rotting process, significantly slowing down the composting process.
Concreted ECO pit
A concreted humus pit is a costly, costly and labor-intensive option. The pit is formed below the soil level, filled with concrete or lined with brickwork, so it is much more expensive than previous options.
It should be taken into account that the concrete structure must have holes that will provide access to the soil and earthworms.
What can and cannot be put in a compost bin
In order for the fertilizer obtained as a result of rotting to be of high quality and bring benefits to the plants and not harm, each summer resident needs to familiarize himself in advance with the list of those products that can or cannot be added to the compost. So, the following are great for composting:
- grass, weeds, leaves, hay, straw, etc.;
- berries, fruits and any peelings from them (raw);
- waste from wood products that have not been painted;
- paper products (napkins, bags, cardboard) in crushed form;
- waste from the preparation of tea, coffee or cereals;
- tree branches and roots after grinding;
- needles;
- herbivore manure (biennial only);
- wood ash.
In order to obtain the highest quality compost, you should carefully select waste for the compost pit.
Note! The percentage of compost containing peelings from products such as potatoes and tomatoes should not exceed 15-20%.
It is strictly forbidden to add to the compost heap:
- any plants that have been affected by pests;
- plants exposed to diseases such as powdery mildew, late blight, etc.;
- excrement of domestic animals, as they may be contaminated with helminth eggs;
- bones and leftovers from meat products. They will cause an extremely unpleasant odor and will also become food for rats;
- inorganic waste - plastic, rubber, synthetic fabrics and metal;
- plants that have been treated with herbicides;
- the remains of cabbage, the rotting of which provokes an extremely strong and unpleasant odor.
As for composting weeds, experts recommend putting them in a separate pile, which is covered with film on top. Thus, the risk that the plants will take root again is eliminated and you can count on their death with one hundred percent probability.
A list of products that are suitable or detrimental to the processes of creating quality compost.
If you add weeds to the general pile, you often have to deal with the fact that perennial plants take root, especially if, as a result of regular watering or rain, the humidity is quite high.
Note! To speed up the decay process of waste, it is recommended to first crush it. This is especially true for items such as branches, roots and paper products.
Tips for proper use
Storing compost is not everything. Proper further actions will help speed up the decay process and make the fertilizer more nutritious. Please adhere to the following guidelines.
- Moisten the pile periodically, but don't overdo it. When dry, rotting stops.
- From time to time, pierce the compost with a pitchfork and, as it were, “comb” it. This is necessary for better access of oxygen, which is an important component of the overall process.
- A black film used to cover the top of the pile helps to reduce cooking time.
- If possible, add earthworms to the compost.
- To improve aeration, maintain looseness of the mass and accelerate decay, the compost must be stirred occasionally.
The following additives help speed up cooking.
- Rotted horse manure.
- Some types of plants (valerian, chamomile, dandelions, yarrow).
- Specially produced activating preparations, for example, Baikal EM-1, Compostin and Compostar.
- Stale (dried) bird droppings.
- Legume stems.
- Bone and dolomite meal.
- Superphosphate and complex mineral fertilizers.
As the contents rot, the temperature inside rises, and light steam may even rise from the heap. This is normal and indicates that everything is going well.
Spare no effort and time for this simple structure. This will solve the problem of recycling a considerable part of organic waste, and will provide valuable fertilizer, the quality and environmental friendliness of which you will be absolutely sure of.
Features of caring for a compost heap: recommendations from experts
Having figured out what can be put in the compost pit and what cannot, all that remains is to familiarize yourself with the rules for caring for waste in order to ensure that it rots as efficiently as possible. Moreover, the duration of the period during which the compost will be formed directly depends on the correctness of the care:
- Humidity is the most important indicator that affects the rotting of waste and the formation of compost. In order to maintain the desired level, it is recommended to periodically water the pile with a watering can. In this case, it is important that the end result is moist, but not wet, since the abundance of water will negatively affect the viability and activity of bacteria;
- Once a month you need to carefully stir the pile, thus ensuring access to oxygen. This allows the waste not so much to rot as to burn out. At the same time, if it is not possible to completely dig up everything, you can use a pitchfork and pierce the pile in as many places as possible;
- To speed up the process of compost maturation, the addition of nitrogen is required, which is found in large quantities in the green parts of plants, as well as in slurry.
In order for the compost creation process to proceed correctly, you should carefully select a location for the composter.
It usually takes 1-1.5 years to form high-quality compost. During this time, almost any waste and residues will fully decompose. You can tell when the compost is ready visually and by smell. The finished mixture is a crumbly brown mass and has the smell of forest soil.
How to fill it correctly?
Before laying the raw materials, clear the bottom of the pit from the turf and dig it well to a depth of 30 cm. This will provide conditions for the active life of worms and the penetration of beneficial microorganisms, which will provide indispensable assistance in the waste processing process. In addition, excess water will drain well into the loose soil.
We begin laying, alternating layers of wet and dry, brown and green raw materials. Their optimal ratio should be approximately the following: 3 parts brown waste to 1 part green waste, and there should be 5 times more wet raw materials than dry ones. Anything large should be broken or chopped.
Moisten (not too much) and close with a lid.
The raw materials should not be compacted too much, but excessive looseness is also undesirable. Everything should be in moderation, especially humidity.
Compost pit: what is it and what is it for?
The issue of using compost is one of the most popular. After all, not every summer resident knows how and why to use the resulting mixture, and how great its benefits are. In fact, you can fertilize the soil with compost for almost any plant. Cucumbers, peppers, zucchini and pumpkin respond best to this type of feeding. The result can be seen already in the next harvest season - the fruits grow large, have a bright and rich color, the taste and aroma are well expressed.
But there are also plants for which compost is not so beneficial. For example, root vegetables, tomatoes, melons and watermelons should not be fertilized abundantly in this way, since this leads to a decrease in the yield, and on the contrary, the amount of green mass increases.
Strawberries respond well to compost, especially if you first cut them “at the root” and cover them with a semi-decomposed composition. Then all this needs to be watered, and all that remains is to wait for new fresh foliage, as well as a bountiful harvest next season.
With the help of compost, you can naturally enrich the soil on your site, thereby increasing the quantity and quality of the harvest.
DIY compost bin: manufacturing options and design requirements
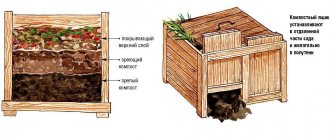
In order to properly build a compost pit, you need to understand how the compost heap should be structured. There are many options for making it yourself, but first of all you should pay attention to the fact that it should consist of three parts. In this case, you need to install 8 support posts, each of which must be treated with a protective agent.
On a note! Machine oil, fuel oil or even tar can be used as a protective composition for posts.
A fence can be used as a fence on one side, but boards are better suited for the rest. Partitions are constructed from them, in which holes for ventilation must be left. This promotes the decay process. It is also necessary to install a door that allows access to the compost.
The compost heap can be divided into compartments for easy removal of compost and laying new layers.
Setting up a compost pit at your dacha with your own hands involves ensuring the proper level of ventilation and at the same time protecting the contents from precipitation. So that the compost heap does not turn into a swamp, during rainfall it needs to be covered with a special lid of a suitable size. And if the weather conditions are not too harsh, then it is quite acceptable to use plastic film for this purpose.
Another option is to use construction pallets that are pre-disassembled. Using a circular saw, the boards can be divided into individual elements and then assembled into a suitable structure. In this case, it is better to fasten the boards vertically. The front board can be secured with adhesive. To give such a structure stability, it is necessary to use a building level and level the lower strips.
It is also important that the height of the walls of the homemade composter is such that it is convenient for a person of any height to add, stir and remove compost.
On a note! You can pay attention to the designs of compost pits made using Finnish technology. In this case, some design features are of interest, for example, when you remove humus from one compartment, it is automatically filled with raw materials from the adjacent one.
An example of a compost bin made from old pallets.
DIY compost bin: manufacturing options, photo examples
The type of compost pit is determined based on several factors. One of them is the installation method. Let's consider all existing options:
- allocating a specific place for organizing a compost pit. In this case, a pit is initially prepared, which is very similar to a well, but at the same time has a shallower depth. The walls of the pit are additionally strengthened to prevent the soil from shedding and are sheathed at a distance of 20-25 cm from the bottom. This distance is necessary in order to provide the microorganism with free access to the waste;
- Another option is to install a special container in the garden plot designed to collect waste and process it into compost. This method allows you to get the finished product at any time. This design is based on a pit with formwork, as well as a special box made of boards. When implementing this option, it is extremely important to pay due attention to the organization of ventilation;
- a DIY compost heap is the easiest way to solve the problem. To do this, it is enough to make a substrate consisting of sand, gravel and dry grass. Waste is simply placed on top, which will begin to rot on its own over time.
You can make your own compost bin using many different technologies and instructions. The proposed designs may differ in the materials required for work, dimensions, properties and ease of use.
On a note! Regardless of the type of structure chosen, before you begin laying raw materials inside the structure, it is necessary to thoroughly loosen the bottom and install ventilation holes.
Depending on the needs, the compost pit may vary in size.
Setting up a compost bin
To obtain compost, two types of structures are used. This could be a hole or a special box. Let's look at both options in detail.
Construction of a compost pit
Before starting work, you should decide on its depth. You can make it small, then the contents of the heap will be easy to mix and the substrate will be ready faster. A deep hole is good because it completely hides the raw materials. At the same time, it is more difficult to establish ventilation here. The optimal depth is considered to be 40-50 cm. The pit is constructed in the following sequence:
- A hole of the required size is dug.
- A wooden box is being built. To do this, pegs are driven into the bottom at a distance of 20 cm from the walls in the corners, and boards are nailed onto them at some distance from each other.
- The resulting box is divided into two halves using a wooden board.
- A drainage layer 10-15 cm high is placed at the bottom of the structure. This can be bark or tree branches, straw, spruce branches, etc.
Now you can stack the waste. Only one half is filled with raw materials. This way you can regularly transfer the compost mixture from one part of the pit to another to allow for ventilation.
Photo: Instagram yrojai
Photo: Instagram yrojai