For serious gardeners and gardeners, the cellar is the most important functional room in their summer cottage. It creates ideal conditions for preserving fruit and vegetable stocks in their original form, without loss of taste. Building a cellar with your own hands is a complex process, but it is necessary to save stored food. By observing all the norms, following the regulations, adhering to the chosen technology during construction, it is possible to achieve a relatively constant temperature, create conditions for storing preserved food stored until the next harvest and products collected from beds and trees.
Preparatory work
Construction of a ground cellar
Before proceeding with the construction of a cellar, it is necessary to determine the groundwater level. The easiest way is to go around your neighbors and ask how things are going in their areas, but this method cannot be called reliable. It makes more sense to involve a specialized company and drill several test wells.
After the wells have been standing for two to three days, measurements can be taken. And if the soil moisture rises higher than 50-60 cm from the bottom of the future cellar, its construction will have to be abandoned in favor of a semi-buried or above-ground storage facility.
Next you need to decide on a location. Because of the same groundwater, it is best to make a cellar at the highest point of the site. It is advisable that there are no trees or shrubs with strong roots nearby that could damage the walls of the storage facility.
The cellar pit must be at least a meter from the foundation of the nearest building, otherwise there is a serious risk of collapse
Selecting a location
The safety of products and the durability of the structure itself largely depend on the location chosen for construction.
You should not build a cellar on:
- in an open area illuminated by the sun - it is better to choose a place in the shade
- near large trees that can damage the structure with their roots
The highest possible location for the building is selected. In this case, the likelihood of flooding by groundwater when it rises in the spring is reduced. Plus, rainwater or melt water will not accumulate on such a site.
The vegetable storage facility is located on an elevated area
To avoid the collapse of buildings, the cellar pit should be located no closer than 0.5 m from the foundation of the buildings.
When building a vegetable storage facility under an unheated room, you will not only save space on the site, but also ensure ease of use - you will no longer have to clear snow every time you go for food supplies.
The walls and roof of the building will provide additional protection from cold winds and scorching heat.
When building a ground cellar, the exit is located on the shady side. If this is not possible, you will need more thorough thermal insulation of the vestibule and the entrance door.
Excavation
It is best to carry out excavation work at the end of summer - in August or early September. If you do this in the spring, when groundwater rises to its maximum height, the hole will simply flood.
Of course, all work should be carried out only in dry and warm weather. When it rains, the pit will have to be covered with a waterproof film, which it is advisable to purchase in advance and keep on hand.
As for the size of the future cellar, there are average indicators that can be considered optimal. The minimum depth of the storage is 2-2.5 m. Then you can stand up to your full height in it. But the pit will have to be made even deeper, taking into account the gravel-sand cushion that protects from moisture and the floor covering, which together will be 25-30 cm.
The cellar area for three to four people is 4-5 m². If the family is large, you will need at least 8-12 m². Add 0.5-1 m to the estimated length and width, which will be taken away by the walls.
It is advisable to dig a pit for the cellar manually. An excavator bucket will not provide even, neat walls and a smooth bottom, which are necessary in this case
If the soil on the site is loose, it is better to make the walls of the pit with a slope to prevent crumbling. The excavated soil must be protected from rain by covering it with film. It will be needed to fill the ceiling of the cellar.
After the foundation pit is ready, it must stand for several days. It is important to ensure that it is not flooded by groundwater. If the pit fills with water, the construction of a cellar will have to be abandoned. In this regard, we once again remind the reader of the need to accurately determine the level of soil moisture in the area.
Construction of a horse cellar
The cost of this design is quite low compared to the underground option. And it’s more convenient to use such storage - it is equipped with a regular door, and you won’t have to climb down the stairs. However, maintaining the optimal temperature without going deep into the ground is not easy. For this purpose, a special building design is provided.
Types of horse cellars
By type, horse cellars are divided into:
- storage sheds with embankment: simple structures made of boards or logs, reminiscent of a hut; to maintain a comfortable temperature, such buildings are covered with a sufficiently large layer of earth on top;
- a horse cellar without embankment: its design is similar to that of a conventional outbuilding; To maintain a comfortable temperature, the walls of such a building are made double with a layer of thermal insulation laid between them.
Types of cellars with bunds
Construction of a cellar with embankment
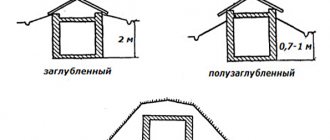
Unlike a deep-seated cellar, most of the upper cellar rises above the surface. To maintain the required temperature in the room, it will require additional thermal insulation.
- Such a structure is erected in the form of a hut, the roof of which rests on strong supports made of logs.
- At the first stage, a pit with a depth of 0.5-0.6 m is prepared. The excavated soil is left nearby - it will be useful for embanking. The floors are covered with crushed stone and compacted tightly. A clay castle is placed on top (more on this below).
- When choosing soil from a pit, it is better to immediately cut a staircase of several steps from the soil. Subsequently, it is finished with reinforced concrete, brick or a wide, durable board. It is advisable to install steel corners into the edges of concrete steps to prevent concrete from spilling out.
- Floor supports are installed in advance. To protect the tree from moisture, part of the logs that will go deeper into the ground are covered with bitumen or fired.
- After digging the log supports into the ground to a depth of 50-60 cm, they are tied at the top with long poles.
- At the stage of wall construction, it is necessary to take care of ventilation. The principle of its design is similar to ventilation installed in deep cellars. The exhaust duct is installed near the ceiling, and the supply duct is installed on the opposite wall just above the floor.
- The end wall is sheathed with two rows of boards, coated twice with bitumen and sandwiched with a layer of roofing felt.
- The roof ridge is prepared from edged boards of sufficient thickness, covered with roofing felt. All cracks are caulked with moss.
- The ceiling must be as strong as possible so that it can withstand the earthen embankment. Do not forget that in addition to the pressure of the soil layer, the roof will also be subject to a significant snow load in winter.
- The entrance must be equipped with a small vestibule, which serves as additional protection against heat loss. The door leading to the vegetable storage area is carefully insulated.
- To drain water around such a storage facility, a ditch 0.5 m deep is made. A blind area 1 m wide with a slope from the cellar is also provided along the perimeter of the cellar.
If the water passes close to the surface of the earth, an above-ground cellar can be built on an area with topping.
Embankment
Preparatory process before bunding
- The earthen backfill (embankment) must reliably retain cold in summer and heat in winter. Its optimal thickness is 35-45 cm.
- Before bunding, the ceiling is covered with a 5-centimeter layer of clay-straw mixture. A thick film of polyethylene or roofing felt is laid on top of it.
- The soil, especially at the top of the floor, may settle over time. To avoid the need for additional embankment, it is necessary to provide a special fence to protect against soil sliding along the slopes.
- To strengthen the embankment, it must be immediately covered with turf or sown with low-growing grass, for example, lawn grass. The intertwined roots of the plants will prevent the soil from sliding down.
Ready storage
Like any other building, a horse cellar can be made visually attractive by decorating it to your liking. The design of the site will only benefit from this.
The main stages of building a cellar without embanking walls
Full-walled horse cellars take up too much space on the site. In recent years, land owners have found another solution. Instead of embankment, they began to build cellars with double walls.
Outwardly, they look like ordinary buildings. However, due to the massive walls lined with insulation, such a storage shed maintains a comfortable temperature for vegetables.
In the literature it is recommended to insulate the space between the walls with polystyrene foam, sawdust or expanded clay.
Building without embankment
Only the one- or two-slope roof of such a vegetable storehouse is insulated with earth using embankments. The thickness of the layer of backfilled soil is up to half a meter. Just as in the previous case, a vestibule is provided in such a storage shed.
The door leading to the storage room is carefully insulated.
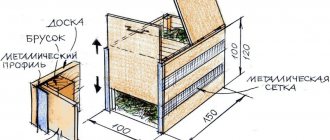
When constructing such a vegetable storage facility:
- The earth is removed to a depth of 0.5 m.
- The floors are covered with crushed stone, covered with bitumen, and then a clay castle is prepared.
- Bricks are sunk into wet clay so that a minimum gap is formed between them.
- The lower part of the walls is also laid with bricks. The masonry should rise above the surface to the height of the spade bayonet. Sand, clay and lime are used as masonry mortar. Its proportions are 3:1:0.3. Double walls can be made entirely of brick or stone.
- The ceiling and walls are sheathed with 2 rows of thick-walled 40 or 50 mm boards, and earth is filled in between them and compacted tightly.
- The walls are coated twice with bitumen. A layer of roofing material is fixed on top of them.
- The roof can be single or gable. Before backfilling, it is covered with roofing felt.
- Ventilation must be provided in the cellar.
- A drainage ditch is laid around the cellar.
Semi-buried cellar
Such a structure goes into the ground to a depth of about a meter with a wall height of about 2 m. The entrance is through the vestibule, and the door is located at the same level with the ground. The second, insulated door provides passage directly into the cellar, where you go down the stairs.
Such structures are erected in areas where the groundwater level is no more than 1.5-2 m.
Semi-buried cellar
The procedure for performing the work is in many ways similar to the stages of building an above-ground cellar:
- To create a layer of thermal insulation, the roof of the building and the upper part of the walls rising above the surface are also covered with earth.
- The overlap is made from a slab aligned on the sides, which is covered with clay. Roofing material glued with hot bitumen is laid on top.
The walls are built from brick and concrete. It is not advisable to use cinder concrete in wet areas - it will quickly become unusable.
Cellar made of reinforced concrete rings
The maximum diameter of reinforced concrete rings is 2-2.5 m, so with their help you can only build a small vegetable storage. But for a small family such a room will be quite enough.
- To build a cellar, 2-3 rings will be enough, which are placed one on top of the other in the pit. The height of the rings can vary - it can be equal to 0.4 and 0.6 m, and higher ones are made with a height of 0.8 and 1 m. From them, 2-3 rings of the required height are selected so that after the construction of the storage facility an adult person will be in it was able to stand up to his full height, and there was little space left above his head.
- It is better to buy rings that have locks. Such a connection will be stronger, plus it will be easier to seal. It is also better to buy a ready-made cover made of reinforced concrete with a manhole.
- Before immersing the rings in the pit for waterproofing, they are treated twice on the outside with bitumen.
- To install them, it is better to use a loader or winch.
- After lowering the rings into the pit, all joints are coated with concrete and then waterproofed with bitumen mastic.
- Another option is to gradually excavate the soil under the rings. After removing the earth, they will gradually sink down under their own weight.
- If groundwater is close, it is better to purchase one lower ring with a bottom or concrete the floor, having previously filled and compacted a clay castle at the bottom of the pit to cover the perimeter of the walls.
- A hole is prepared in the well cover for the ventilation pipes.
- It would be wiser to make a small cellar above the storage - it will protect it from extreme heat and winds.
- To drain water around the perimeter of the cellar, a drainage is prepared - a ditch 0.4 m deep, filled with crushed stone.
Sealing joints in a concrete cellar
If groundwater passes close, a cellar made of concrete rings can be made shallow. That is, bury only part of the rings in the ground. The top and side walls of the storage facility, as in the case of high cellars, are covered with soil (banked).
Cellar in the garage - built to last
Creating a floor
Obviously, the cellar floor must be waterproof, durable and level. The simplest and cheapest coating option is the so-called clay castle. This technology was used by our ancestors many centuries ago. Adobe floors last for 200 years or more, so there is no need to worry about reliability.
A concrete screed was poured on the floor in the cellar.
So, to waterproof the floor, you need to lay a layer of clay 20-25 thick (extending as far as possible beyond the perimeter of the walls) and compact it. This is quite enough to reliably protect the lower plane of the cellar from dampness. Moreover, in the future the clay castle will cake, becoming more and more durable and reliable.
Before laying, the clay should be soaked in water for several days. If a layer of clay of natural origin is found at the bottom of the pit, this can be considered great luck. After all, then, to create a floor, it will be enough to dig it up to achieve uniformity, crush it properly, just walk on it, and then loosen it again with a shovel and compact it again.
Well, for those who find old-fashioned methods outdated, we can recommend a concrete screed. To create it, a layer of waterproofing is laid on top of a gravel-sand cushion at least 20 cm thick, after which a layer of concrete is poured.
To create a reliable floor covering, the thickness of the concrete screed in the cellar must be at least 6 cm
To reduce the cost of coating, you can use the following recipe. For 4 parts of crushed stone, take 3 parts of sand and 1 part of M400 cement. To make the coating even, after setting (which usually takes about a day), a thin layer of cement-sand mixture can be poured on top. However, there is no urgent need for this, because you almost never have to walk on the floor of the cellar. They go down there only to put or take food.
Master Class. Brick grill step by step
Traditionally, the construction of a brick barbecue begins with the construction of a reliable foundation. The dimensions of the latter should be selected in accordance with the dimensions of the future structure.
First, dig a pit and arrange wooden formwork along its walls (you can use the same old pallets). Fill the foundation with concrete, having previously completed the reinforcement. Wait until the concrete has completely hardened (this usually takes from 7 to 14 days).
When the concrete has dried, begin the actual construction of the barbecue.
It is very useful to have a ready-made drawing on hand - it will help to more accurately determine the amount of required consumables. These include:
- fireclay brick;
- lime;
- steel wire for reinforcement;
- reinforcing bars or, as an option, mesh;
- cement;
- galvanized corners;
- sand.
To pre-calculate everything, lay out the bricks in advance where they will be located, but without using mortar. This will determine how many quarters/halves you will need and where the seams will be.
This brick absorbs moisture well, and therefore it is recommended to lay waterproofing underneath it. The best option is roofing felt laid in several layers. Now you can begin the actual construction work.
Prepare the solution by mixing lime, sand and cement in a ratio of 3/4:3:1. You will use the finished mixture for laying bricks.
Be extremely careful and careful during laying. Align the bricks, and be sure to watch the seams.
Remember that the rows should be laid in a checkerboard pattern. Start laying from the corner, then gradually fill the side space.
Obviously, the grill will be exposed to high temperatures. Therefore, for laying the second row, it is imperative to use a fireclay clay mixture.
To build a base for the brazier, install reinforcing bars between the walls. Install the firebox base on the latter (you can use, say, an iron pallet as such).
For efficient combustion of fuel, it is necessary that oxygen constantly flows inside. For this purpose, leave several gaps in the masonry that are not filled with mortar.
Install a grate over the rods and select a suitable countertop.
Construction of walls
Theoretically, the walls of the cellar can also be made of adobe, gradually covering them with clay with a layer of at least 25 cm and carefully tamping, but it would be wise to abandon this method - it is very long and labor-intensive. Here it is better to call on modern technologies for help.
Quite often, cellar walls are made of concrete. They are poured over formwork, like a strip foundation. Important! It is extremely undesirable to make single-circuit formwork by pouring concrete into the gap between the boards and the walls of the pit. First of all, because this will lead to a huge overconsumption of the mixture. In addition, cement laitance will seep into the soil, which will significantly reduce the strength of the material. And finally, in this case there can be no question of any external waterproofing, but it is necessary, otherwise soil moisture will quickly destroy the concrete.
You can also resort to masonry materials - red baked bricks or concrete blocks. You cannot use white (silicate) bricks and cinder blocks, as they do not have the proper strength.
No more than five rows can be laid out in one work shift. If you do more, the solution will not withstand the load and will begin to settle strongly and unevenly.
During the laying process, you can lay metal pipes or corners for future shelves, installing them so that they protrude from the walls by 15-20 cm. For some, this will seem like a hindrance that slows down the process, but it is better to immediately solve the issue of storing seams than to waste time later and strength for the construction of shelving.
There must be a gap of at least 50 cm wide between the walls of the cellar and the walls of the pit. This is necessary for laying waterproofing
Regardless of the technologies used, the outside of the cellar walls must be protected from moisture. Bitumen-based materials, coated or rolled, are best suited for this. Upon completion, the void is filled with earth mixed with crushed stone, pebbles and broken bricks. This is necessary to prevent soil shrinkage.
The design of a recessed wooden cellar
Design of a buried concrete cellar
Construction of an underground concrete cellar
Project template for a gazebo with a utility block from the Internet
As construction progressed, I had to customize the “Shishkin Forest” drawing, which became the basis for my project for a brick winter gazebo.
Ventilation
Even at the stage of constructing the walls, you need to make holes in them measuring at least 25x25 cm to create ventilation. This is not a luxury, but an urgent necessity. After all, vegetables stored in the cellar will actively release moisture, which in the cold atmosphere of the cellar will inevitably lead to the formation of mold.
There should be two ventilation ducts - for supply and exhaust. The exhaust pipe is passed through a hole in the ceiling and brought out so that it rises at least 0.5 m above the ground.
The supply channel is made differently. The pipe is placed on the wall opposite the hood, so that its lower edge is at a distance of 30-50 cm from the floor. The upper edge, brought out, should rise above the ground by only 20-25 cm. In this regard, it is useful to cover it with a fine metal mesh to protect it from insects, rodents and birds.
Cellar ventilation pipes should not have bends. Expansion and contraction are also unacceptable
To prevent the air coming out from cooling too much (this leads to the formation of plugs), you can put a casing on the pipe and lay a layer of thermal insulation inside, for example, mineral wool.
View a 3d model of a brick gazebo
Here you can zoom in and rotate the gazebo 3D gazebo project.
The seating area of the gazebo has spacious glazing; you can place a coffee table for 6-10 people, next to it there is a corner sofa. A utility area with a separate entrance and two windows, a fairly spacious room in area.
Main characteristics
| Gazebo dimensions | 6 x 6 m |
| Total area of the gazebo | 19.55 sq.m |
| Total area of the utility block | 11.7 sq.m |
| The length of the barbecue complex by the width of the gazebo | 3.4 meters |
| Number of bricks, straw and chocolate color, 1 row red per base. | 3000 |
Rafter system in the gazebo
After treatment with an antiseptic, we began to work on the rafter system. First of all, we laid a mauerlat made of 150*150 mm timber along the maximum edge of the brickwork. For reliability, 8*270 mm staples were installed at all corners where two beams were joined, the old “old-fashioned method” gives good strength. Also, corners were added in the corners (Fixing corner 105*105*90*2.0) 1 piece each connecting two beams.
For additional waterproofing, a three-layer AMPARA Premium diffusion membrane, gray-beige color, was used. Here you need to pay attention: you should always attach such waterproofing with the logo facing up. Moreover, it is necessary to pay attention to the builders, they may make mistakes, and this is what happened in my case - this can be seen from the photo below. We secured the membrane with the fuzzy side up and the smooth beige side down; if left like this, a “greenhouse effect” could occur. What this effect leads to is clear; humidity inside under the roof leads to rotting of the rafter system. He forced me to redo it, made it with the “Ampara” logo at the top, the color was beige.
We install windows and a door in the gazebo
Windows and doors made of aluminum profiles:
- Profile systems ALUTECH ALT C43
- Colour: RAL 8017
- Filling: SPO-4S (DSRedGold)-16TSS-4M1
- Fittings: Stublina
Brick and masonry mesh for gazebo
Bricks for the gazebo were purchased in chocolate, straw and red colors for one rough row; it took no more than 3,000 bricks. Under the stained glass windows in the gazebo, the width of the wall is brick, because... the windows will be heavy, as long as they are supposed to be made of metal, the rest of the walls will be half brick. There are a total of 10 pillars made of chocolate-colored brick, of which four corner pillars are one and a half bricks thick to strengthen the gazebo, the remaining 6 pillars are brick thick. Inside there are 4 corner posts with reinforcement Ø 12 mm, filled with concrete with broken bricks.
In the photo, the wooden formwork was recently removed, the waterproofing was bent and brick was laid to rest. The first row of red bricks will be laid on the waterproofing.
We purchased masonry mesh for bricks, it was laid every three rows, so a lot of mesh was used... Below in the photo, masonry mesh with a thickness of Ø 4 mm, (a legacy of the USSR, this was previously used in construction), at the base they said the last batch will no longer be like this, so I bought everything they had leftovers. I liked the Ø 4 mm mesh, not like the modern thin one.
Finishing
Wooden gazebo-sheds require good regular care. The paint layer should be renewed every six months. You can impregnate the wood with heated drying oil, which is applied in two layers. Cover the top with oil paint or leave it in its natural form. To prevent the wood from rotting, it is better to install a house made of timber for the household needs of a dacha on a special platform - a flat platform made of concrete, boards, or paving slabs.
Pots of flowers on the windows, a wall of green climbing plants, and garden furniture will help you decorate your home built by yourself.
A veranda for a summer residence made of timber, combined with an outbuilding, will become a place for relaxation from garden work and simply for pleasant time with the family.
It is clear that building from timber is not as simple as it might seem at first glance. It will take time, material costs and physical strength of the owner. But the site will acquire such a necessary structure for a dacha, such as a change house with a veranda, built under one roof. In addition, any work done with one’s own hands warms the soul and increases self-esteem.
Layout, dimensions, drawings
If you are seriously thinking about building a bathhouse and gazebo, then you will definitely need to prepare a project for the future structure with drawings and dimensions.
If for an ordinary gazebo experienced craftsmen perfectly know all the moments and important components, then for such a massive structure it is vitally necessary.
We have selected projects and drawings of the most interesting and understandable options that you can implement on your site. Your building may differ from what is shown in the project. You may want to make a corner option or change the location of the gazebo relative to the bathhouse.
We continue to make the roof, cover it with OSB boards, waterproofing and tiles
The first sheets of OSB-3 board 12x1250x2500 mm Kronospan were placed on the sheathing, the thickness of the sheets was 12 mm (20 boards worth 13,960 rubles), the laying distance between the boards was 3-5 mm. We had to carry the OSB sheets up the stairs and cut them with a gasoline saw, which was not an easy job. After laying OSB slabs on the entire roof, the rains came again. Therefore, the day before I had to play it safe and coat the edges of the slab with Aquatex-extra paint (red color, you can see in the photo), it took 0.8 liters, it was hardly enough, the paint consumption was high. When an OSB board gets wet, the edges usually suffer, the ends themselves swell and when dry do not return to their original place. After laying OSB, fastened:
- Gutter bracket (Alta brown metal) for the drainage system.
- Cornice strip 100*60*2OOO (PE-01-8017-0.45) brown color - chocolate.
It must be said that a rope was attached to the top to secure the roofing work.
Before laying the waterproofing GN0884 TEGOL "Safety Base 2", I personally (and quite decently) spread the first row and subsequent rows with mastic - BRAUF glue (can price 444 rubles). TEGOLA “Accent red-brown” tiles were chosen as a soft roof (priced RUB 1,353.15, total RUB 25,709.85), which were attached to TEGOLA roofing nails length 25 mm x 3.5 mm. improved fit. We had to cut the same shingles for the 4 corner ribs, because when purchasing we were told: - Tegola does not have starting and corner shingles.
Action plan
Having understood the functional purpose of the utility unit, you should consider a number of the following questions:
- Choose a suitable place for construction.
- Decide on the size of the building.
- Come up with your own or choose a floor plan from a construction company.
- Clarify the complexity of construction work (foundation, insulation, interior decoration, communications).
- Select high-quality building materials.
Wooden garden utility blockSource paneldomstroy.ru
Having some construction skills, you can independently develop a simple project and implement it. To implement complex projects for a utility block with a shower and toilet, it is advisable to contact a construction company.