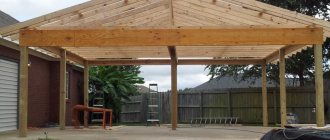
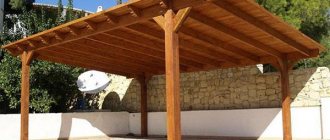
A lean-to canopy made of metal profiles attached to a house is one of the most common types of canopies in general. It is practical, inexpensive, strong and durable. In any case, if you choose the right materials and carry out all the work exactly according to the technology. Compliance with building codes becomes even more important if you are attaching a canopy to a house made of corrugated sheets, and not installing a separate structure - the roof of the extension, torn off by strong winds or unable to withstand the snow load, can damage the wall of the building on which it rests.
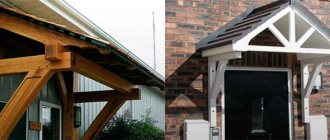
Canopies for a house made of metal profiles - a classic extension for covering terraces and gazebos
To prevent this from happening, follow our instructions exactly. Our experts have compiled a detailed guide, which describes step by step how to install a canopy for a house made of metal profiles with your own hands. But, before we begin the calculations, drawings and installation instructions, we will describe the types of canopies made of corrugated sheets adjacent to the house and provide several visual photographs so that you can choose the appropriate option.
- Preparation for installation
Types of attached buildings
Canopies made from corrugated pipes are classified according to the type of support and rafter systems.
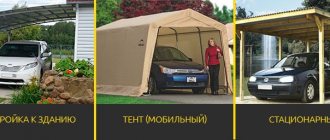
The type of support system depends on the location of the canopy relative to other buildings. There are attached, cantilever and free-standing structures.
| Canopy type | Scope of application | Design Features |
| attached | terraces, verandas, open cafes, attached parking lots, canopies over entrance areas | attached to one or more walls of an existing building, have additional supports |
| cantilevered | small canopies over entrances, windows, balconies | has no supports, is attached directly to the wall of the building, additional fixation is provided by a suspension system, also attached to the wall |
| standing separately | outbuildings, canopies over playgrounds, sports fields or individual equipment, private and public parking lots, summer cafes, bus stop pavilions, etc. | rests on one support (umbrella canopy) or a support system of several posts |
Since the roof is the main part of the canopy structure, the complexity of erecting a canopy depends on the shape of the roof.
According to the type of rafter system, single- and double-slope, arched and hipped canopies are distinguished.
| Canopy type | Design Features | Installation features |
| single-slope | one side of the support system is higher than the other, if the canopy is free-standing; for cantilever and attached canopies, the upper ends of the rafter legs are attached to the wall, the lower ends rest on a suspension or support | the simplest type of canopy to implement, which does not require complex calculations and special equipment; any roofing material is suitable; for installing a canopy over a large area, the rafter system is assembled based on trusses in the form of a right triangle |
| gable | the upper ends of the rafter legs rest on each other or on the ridge; additional vertical and inclined elements are required for the stability of the system | if you have the correct calculations and drawings, installation is not much more complicated than a single-pitch canopy; installation of roofing material is complicated only by the need to install a ridge; trusses for installing the rafter system of a large canopy have the shape of an equilateral triangle |
| tent | the rafter legs meet at one point - the top of the tent | the calculation of the rafter system becomes more complicated as the number of roof slopes increases; to complete the roof, precise cutting of the roofing material is required; special roofing elements are needed to protect the joints and the roof top |
| arched | the roof has the shape of a wave, arch or semi-arch; the rafter system is assembled on the basis of arched rafter legs or trusses | independent production of rafters or trusses is only possible if you have a pipe bender and the skill to form equally curved pipes; the roofing material for such a canopy must be flexible; curvilinear canopies are rarely installed with your own hands |
Design requirements
When planning to decorate the entrance to your house with your own hands, it would be wise to first familiarize yourself with the various design options and safety requirements.
- To fully protect the porch from precipitation, the dimensions of the protective element must exceed the area of the porch by no less than 50 cm.
- The canopy must be strong, have reliable fastenings to withstand gusty winds and withstand the mass of possible snow cover.
- The appearance of the structural element must be in harmony with the overall design of the building.
For this reason, at the planning stage it is necessary to consider the design and fastening of the protective structure.
Manufacturing of sheathing
A wooden sheathing is placed on the trusses, on which the roofing covering is installed. The easiest and most reliable way is to lay a simple metal profile flooring. It is reliable, quite durable, and relatively inexpensive. The use of polycarbonate sheets for the manufacture of canopy roofing is also widespread today. In addition, no one has canceled slate, and you can also use sheets of polymer. To ensure that wooden sheathing lasts longer, wooden structures should be treated with antiseptic preparations. The polycarbonate roof is laid directly over the girders of the truss.
Constructive points
To facilitate the construction of a suspended structure, it is necessary to carefully review in advance the features and subtleties of the design solutions that are used during construction. Any type of hanging structure has common elements - nodes. But these parts differ in execution technique. The main 3 nodes in hanging structures of any type are as follows:
- Suspension of console models, otherwise - frame or support frame. Concrete-filled or dug-in pillars, frames, and a set of fastening elements.
- Rafter system. There are different types - arched, domed, wavy, hipped, lean-to. It consists of sheathing and rafter legs, crossbars, mauerlats, tie rods, and struts.
- Roof. They are made from different materials - slate, PVC, roofing felt, metal tiles, ondulin, polycarbonate, profiled sheets. Lighter types (corrugated sheeting, etc.) are more often used to make the structure less heavy and reduce the load on the supporting part.
Large hanging structures require a complex rafter system, which is assembled from trusses with a large number of struts and supports. Using different types of rafters, roofing materials, and supports, it is possible to create a unique structure that enhances the decorative and functional components of the local area. You can place tubs of flowers on the supports of the hanging structure or plant flowering and fruiting plants along them.
Do-it-yourself canopy for a house made of metal profiles. Step-by-step instruction
When all the materials for work are ready, you can begin installing the canopy. The assembly technology consists of several stages:
- Preparations.
- Frame assemblies.
- Roof coverings.
- Checking the structure for strength.
Before installation begins, preparatory work should be completed.
Preparatory work
At the initial stage, the site for construction should be prepared. To do this, the area is cleared of debris and vegetation. The site must be leveled and the soil compacted. Then the marking is carried out: using a tape measure, marks are made for the location of the pillars. Places should be marked with pegs, between which a rope should be pulled. Then holes are dug 1 m deep (for a large structure 1.5 m).
The next stage of preparation is cutting the pipes. If round pipes are used as supports, the diameter must be at least 80 mm. The optimal length is 3000 mm. It is also necessary to prepare pieces of pipes with a diameter of 83 mm.
The cut parts of 83 mm pipes are placed in the prepared holes. 80 mm pipes are inserted into them
It is necessary to pay attention to the fact that the support should not be visible from the cut short pipe. Then the support with the cut pipe must be bolted
The finished structure must be inserted into the hole, covered with sand and filled with concrete. Leave for 1 week for the mixture to dry.
Frame installation
When the concrete mixture has dried, you can begin assembling the frame. To do this, each row of pillars is tied with profile pipes. Such beams are secured with bolted connections. The levelness of the installation must be constantly checked with a building level. If the pillars are of different sizes, then they should be cut, and then continue working.
Then the strength of the structure should be increased. To do this, jibs are installed - metal profiles that connect support pillars and beams.
Then the installation phase of the supporting truss structure begins. It is mounted on beams. This design will strengthen the canopy, allowing it to withstand heavy loads.
The truss is a triangle, in the center of which profiles are installed in a zigzag direction. To make a truss correctly, it is necessary to carry it out according to the drawings. Trusses are installed every meter.
Logs (rectangular pipes) are mounted perpendicularly on top of the truss. All elements are connected with bolts. After assembling the structure, it is necessary to check the strength of all connections. If necessary, more reliable protection must be provided.
The finished structure must be coated with a layer of primer and then painted. This will extend its service life. When the paint is completely dry, you can install metal profile sheets. Installation starts from bottom to top.
The sheets must be secured with self-tapping screws. It is necessary to perform at least 8 fastenings for one sheet. The first row of metal profile sheets is laid overlapping. The second row is installed end to end with the first row. But all the sheets of the second row are overlapped relative to each other.
Erection of the roof
Roofs are either solid or collapsible. Their main difference lies in the method of fastening the elements to each other: in the first case, the components are welded, and in the second, they are bolted together. In addition, structures are single-pitch and double-pitch.
Fastening trusses with a threaded connection
Using the example of a non-removable gable roof, we will consider the technology of its installation. You will need to weld pieces of a metal profile to the support pillars so that you get a regular rectangular frame. Then, we proceed to welding the rafters. On the ground, we weld pieces of a metal profile to the beam on one side and the other in increments of 1 m at an angle of no more than 30º. It is important to consider that the resulting structure should protrude somewhat beyond the welded upper frame. Next, we place the welded elements on the support rectangle and weld them at the joints.
Roof trusses
To simplify the procedure for constructing a roof frame, the metal rectangular base, located on supports, should be reinforced with transverse beams in the center of each side. Then we weld 20–30 cm sections of profile pipe to the central safety beam, which will act as a support for the future skate. Next, we use pipes from the profile to fasten the extended sections to each other and to the rectangular base.
Roof sheathing
Having finished installing the frame, we proceed to covering it with corrugated sheeting. The sheets are fastened directly to the prepared frame on the rafters, overlapping each other using rivets, self-tapping screws or bolts.
When making a carport yourself, it is important to follow the instructions and observe the dimensions of the component elements reflected in the prepared drawings based on accurate calculations. All these conditions, combined with the right approach and due diligence, will allow you to build a quality metal shed.
Single-pitch carport. Project preparation
The construction of a canopy begins with the preparation of the project. It includes a drawing with basic dimensions and a description of the parameters of the future design. The project takes into account optimal operating conditions, coating composition, characteristics of the base and coating.
- Choosing the best winter option.
All the benefits of a carport are fully realized in winter.
When developing a project, the climatic features of the area must be taken into account.
It has been proven that it is better to store a car under a canopy in winter.
The structure of support pillars and roof reliably protects from precipitation, and also does not create its own microclimate. Having driven under a canopy in winter, the car gradually cools down, which means it does not become covered with dew. In the garage, due to temperature changes, dew falls, which gradually destroys the metal of the body.
In areas with cold and long winters, a more durable design is chosen that can withstand a thick layer of snow. The frame made of wood or metal is additionally reinforced to withstand a load of up to 150 kg per square meter. m of roof.
Among roofing materials, only polycarbonate does not change its qualities in harsh winter conditions.
- Choice of site coverage.
An inexpensive and simple covering method is backfilling with crushed stone. To avoid descent, the covering must be at ground level. The rigidity of crushed stone is achieved by high-quality compaction.
05994503908b7f8a7a98934d092c6c18.jpe
cf164ad0d03c99f2f60f14325c6cfdbc.jpe
More expensive methods are laying concrete or paving slabs. In any case, the site is prepared before laying: the soil layer is removed, backfilled with crushed stone and sand, and compacted.
- Selection of design dimensions.
Depending on the number of cars, sizes are chosen.
The standards establish that for one car, the canopy must be one meter longer than the car, and up to two meters wider.
For two cars, the width of the canopy is calculated by the formula: W = W1 + W2 + 2 m + 0.8 m, where:
- Ш1 and Ш2 – machine width;
- 2 m – 1 m margin on the outer sides of the vehicles;
- 0.8 m – distance between cars.
The height is selected taking into account the dimensions of the car with cargo on the trunk. With a very high canopy, slanting precipitation enters the structure. The optimal height is 2.3 meters.
The following sizes are considered universal:
- An average car with a small platform – 6.0 x 3.0 m;
- Minibus, SUV – 6.5 x 3.5 m;
- Two cars – 6.5 x 6.0 m.
- Selection of support materials.
Suitable building materials for racks are: metal, wood, concrete, brick, stone.
Typically, supports are made of metal or wood. They are easy to install, and most importantly, they are cheaper than other building materials.
Metal stands.
The main requirement for prefabricated metal supports is strength. To withstand the load of a roof with snow cover, 100 mm metal pipes will be required. The diameter depends on the installation pitch. The minimum size of pipes is allowed if there are many racks. But for a pitched roof with four posts, pipes of maximum diameter will be required.
Wooden stands.
There are special requirements for wooden supports. First of all, this is due to possible rotting due to moisture. Supports made from high-quality wood, treated before installation, will last up to 15 years.
Sufficient reliability is provided by 200 mm rounded logs and 150 mm timber.
Before purchasing material, you need to calculate the number of racks. Depending on the step, different quantities are required. Each rack must withstand pressure up to 250 kg.
It is estimated that the average car with a small area will require 6 racks. A distance of up to 3 m is selected between the supports. Racks must be placed at the corners of the building.
- Selection of materials for coating.
Corrugated sheeting or ondulin are best suited as a covering for a detached building. They have high reliability and durability, so they last more than 20 years. Only metal tiles last longer, but they are more expensive, and most importantly, they delay snow melting. These coverings do not allow light to pass through, so there is always shadow under them.
Polycarbonate is best suited for canopies
The main attention is paid to the choice of material quality. In hot weather, three-layer polycarbonate with a high rate of absorption of sunlight creates good shade
For a shed attached to a house, it is logical to have a roofing covering of the same type as the house.
The main parameters of roofs are established by the “Building Codes and Rules”. They are used when designing roofs with any covering. The slope in degrees or percentage is determined by the horizon level. The type of roofing material is of great importance when choosing a slope.
For all roofs on pillars, the optimal slope is considered to be from 15 to 25 degrees.
Materials
Before you move on to drawing up drawings of a canopy with a pitched roof, you should decide what material the frame and the roof itself will be made of.
It is equally important to take into account the size of the canopy, its installation, weight and rules for working with a particular material. Of course, first of all it all depends on personal wishes
For example, you can build a canopy on stilts or from a soft roof.
Frame
There are three types of materials for the frame of the structure.
The metal is galvanized cold-rolled pipes or steel profiles with increased rigidity. In this case, the frame can be standard, complex or forged. This type has a long service life, high quality, and also withstands exposure to natural factors.
Another type of frame is very rare - stone. Of course, this option is time-consuming, but it is also more durable. This design will last 2-3 times longer compared to other types.
Roofs
Currently, among the roofing materials suitable for lean-to sheds, several options stand out.
Basic rules for canopy drawings
When drawing a canopy, it should be taken into account that the minimum height of the structure (from the ground to the lower edge of the roof slope) is 2000-2400 mm, the maximum depends on the type of roofing system.
Roof - what to consider in the drawings
Above, we discussed in detail how to calculate a pitched roof for a canopy; a gable roof is calculated according to the same principle. The angle of inclination depends on the choice of roofing material and the climate in the region:
- 45-60o – snowy areas;
- 9-20o – windy areas;
- 15-30o – universal slope, suitable for almost all types of roofing materials: corrugated sheets, roofing felt, soft tiles, slate, polycarbonate, galvanized iron, metal tiles, ondulin, etc.
Single- and double-pitched roofs are optimal for all types of canopies made of wood, brick, concrete, stone, and for forged products. For welded metal structures, an arched roof is increasingly being installed. In order to correctly calculate a canopy made from a metal profile with your own hands, the drawings must reflect, in addition to the size of the building, the radius of the roof arc.
97755b208b16e89d69a56c0b4f2d92fe.jpe
To be fair, let’s say that welded and prefabricated metal structures are crowned not only by arched roofing, but also by other types of trusses. Calculation of a truss for a canopy and calculation of the structure of a canopy depend on the overall dimensions of the building. It is very difficult to calculate the rafter system on your own, so it is better to use an online calculator, contact specialists, or take as a basis a ready-made standard truss project, as in the photo below.
An example of how to weld a truss for a canopy, drawings of typical structures
Materials
Here are standard materials that are suitable for all standard drawings. For wooden canopies:
- Supports, piping around the perimeter - profiled or glued beams, 100*100, 150-150 mm, rounded logs with a diameter of 200 mm. The distance between the pillars is 1.5-2.0 m.
- Rafters – edged board 150*40 mm.
- Lathing – lath 15-20*40, unedged board, moisture-resistant plywood, OSB.
Drawing of a wooden canopy with the estimated dimensions of the main structural components
Metal canopies:
- Vertical posts - round pipe with a diameter of 100-150 mm, profiled pipe 50*50, 80*80 - for small structures up to 6 m, 100*100, 150*150* - for large buildings.
- Truss for canopy, frame (upper and lower chords) - corrugated pipe 40*40, 40*60, 30*60 mm - depending on the size of the structure, wall thickness 2-3 mm.
- The slopes and stiffening ribs of the truss are metal profiles 50*25, 40*20, 25*25 mm, thickness – 2 mm.
- Lathing – corrugated pipe 20*25, 20*40 mm.
Drawing of a standard visor
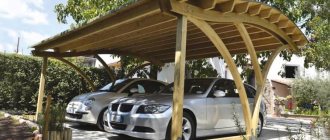
Arched canopy
The arched design will fit organically into any style. As a rule, semicircular products are provided with a frame and profiled pipe and covered with colored polycarbonate.
How to cook a canopy and assemble it
How to assemble a canopy
If you do not know this craft at all, then it is better to entrust welding to a specialist. But if you have a welding machine and the skill, then you will be able to make welding with a tubular cross-section. First, splicing is carried out along the edges. Then continue towards the center. Spot baiting, level checking, straightening with a sledgehammer, welding of all elements - these are the stages of welding work. As a rule, the side parts and rafters are assembled alternately and separately, and then they are also placed one by one on supports - the side ones and then the rafters on them. If you have a lift, the frame can be completely assembled directly on the ground and lifted into place once assembled.
The finished frame is placed on supports; this will require help, since one pair of hands cannot do it. Next, the same spot welding is carried out, accuracy is checked using a level, and finally permanent welding is carried out. When the frame is assembled, the joints should be cleaned to remove scale, and then the metal frame is treated with an anti-corrosion coating. Often the metal profile already has such a coating. If it is not processed, the processing must be carried out independently.
Installation features
To ensure installation goes smoothly, the profile dimensions are taken into account at the design stage. They may differ between different manufacturers. The metal stamped sheet does not fit together in a loose state. It is imperative to install a base at the junction of individual parts of the roofing material. This can be a rib of a metal truss, or a sheathing lath. If there is a planning error, the work will increase significantly. You will have to cut the metal profile or reinstall the support system.
«>
Application of metal profiles
Metal profiles are well suited for the construction of canopies for both commercial and recreational purposes. Recreational ones are used as protection from the sun and wind over swimming pools and playgrounds.
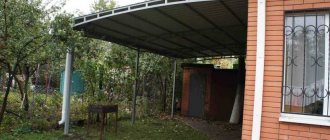
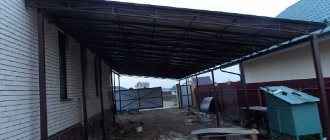
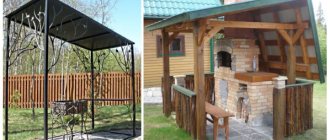
A utility shed is constructed in a place where a summer kitchen is installed, where household equipment is stored, or where a car is parked. The canopy structure can be free-standing or an extension of the house. In the first case, the canopy is erected on separate supports, and in the second, one or two sides rest on the wall of the house.
Single-pitch canopy
The easiest to install is a lean-to canopy. When erecting it, one row of supports is lower than the second, which is why the sheet of metal profile is mounted at an angle. Due to this roof design, the snow flows down without any hindrance.
There are other types of metal profile structures: gable, arched. In the first case, it will be more difficult to construct the frame and select more sheets of metal profiles to cover the roof. A gable canopy is often used to protect a large area from wind and rain. It is more resistant to adverse weather conditions.
To complete an arched canopy, you will need to use the services of professionals. It is quite difficult to make an arched structure yourself. Therefore, lean-to sheds are often installed.
Corrugated sheeting as a roofing material is often chosen due to its advantages:
- Environmentally friendly.
- Durability.
- UV resistance.
- Resistant to low temperatures.
- Durability.
- Strength.
- Reasonable price.
- Easy to care for.
- Fire safety.
In addition to all the advantages, corrugated sheeting can be easily installed with your own hands. You can build the structure without outside help, but provided that the canopy is small in size. A canopy made of metal profiles can transform the exterior of a house if its installation is carried out competently.
Most manufacturers offer a ready-made kit for assembling a canopy. It is enough to understand the finished drawings and assemble the frame using them. But this option will cost more than assembling a frame from separate profile pipes. In the case of the latter option, you will have to spend time selecting and trimming supports.
Additional recommendations
Canopies made of metal profiles in the courtyard of a private house or public building are made taking into account the following rules:
- Before laying the foundation, you need to find out the depth of soil freezing for a specific area. The pillars should be buried no higher than this level. This will guarantee the strength and durability of the structure.
- All elements of the metal frame must be coated with a special primer and paint. This will prevent the material from being destroyed by moisture.
- Arches for a canopy from a profile pipe are made using special equipment that helps bend the metal to the desired radius. It is impossible to do this on your own.
- To fix pipes with a diameter of up to 25 mm, you can use the crab system. These are special clamps that provide simultaneous connection of several frame elements.
An example of using a crab system Source greenhouse-yaroslavl.rf
- To connect elements from a profile pipe, in addition to welding, you can use bolted connections. They are no less durable and can withstand significant loads.
Kinds
According to its design, the building has various methods of execution. It all depends on the purpose of the canopy, the material and the personal preferences of the owner. Today, you can build an extension in various ways, taking into account the selected material. Metal or wood can be used to construct supports. The roof frame is made in the same way. But you can see what wood-like metal siding looks like here.
The versatility of corrugated sheeting is that there is no need to adjust the ceiling to the fastenings
(It is also worth paying attention to how the pediment is covered with corrugated sheets). This is due to the fact that the edges of the sheet are concentrated very close and this is quite enough to fix the iron sheet
The cladding around the perimeter can also be different. The attached structure is open, trimmed with boards with windows, and presented in the form of a terrace.
But what kind of canopies and awnings there are over the entrance can be seen here.
In the video there is a canopy made of corrugated sheets adjacent to the house:
https://youtube.com/watch?v=RxbGI0EqdnM
Canopies made of polycarbonate can have different designs. The most common ones include:
- arched;
- single-pitched;
- gable.
The difference between them lies in the complexity of installation and the amount of material used.
But what types of polycarbonate carports there are, and how they can be made, this information will help you understand.
Arch
This polycarbonate canopy option has a rather attractive appearance. To attach it to a house, you need to have significant construction experience, because this design is distinguished by its complexity.
Canopy arch made of corrugated sheets adjacent to the house
They arise for the reason that the roof straps to which the corrugated sheeting is to be fixed must be presented in a curved shape. And to obtain such a bend, special equipment is used.
Single-pitch canopy
This type of corrugated sheet extension does not require special experience or the use of special equipment
But at the same time, increased attention will be required when choosing the correct angle of inclination of the roof.
Single-pitch canopy
Thanks to it, the canopy will not be subject to constant accumulation of snow in winter, and the sheathing will be freed from unnecessary pressure. A polycarbonate canopy over a porch can look exactly the same.
bbb77658765d88a0938f3bf98f404168.jpe
Gable canopy
This design is a full-fledged roof. To obtain such a canopy, one corrugated sheet will not be enough. A gable roof can be used when a spacious open-type summer kitchen is required. There is also another roofing option - multi-slope. This type of construction is the most difficult to implement. Only professional builders can make it.
Gable canopy
If we talk about the dimensions of the canopy, then their choice should take into account the load and purpose of the structure. The canopy adjacent to the house should not be large, otherwise the wall will not be able to withstand the load. If this canopy is over the porch, then it should not be very small. But the carport is calculated taking into account its size. But you can see what the texture of the wall looks like under the plaster here.
If the car is small, then it can fit under a structure of at least 2.3 x 5.5 m. For an SUV or truck, you will have to find a load with dimensions of 3.5 x 6.6 m. It is also worth considering the height of the canopy. The optimal parameter is 2.3 m. But for a gazelle this will not be enough. As the height of the canopy increases, the likelihood of rain and snow getting under the extension increases.
Maybe
Visor options
There are several types of construction.
- A single-pitch (sloping or straight) element, the upper side of which is necessarily attached to the wall.
- A gable structure, the slopes of which are directed in opposite directions.
- A semicircular visor in the shape of a round arch.
- Tent structure.
The choice of construction type is determined by the overall building design, skill and financial investment.
Deciding on the type and size of the canopy
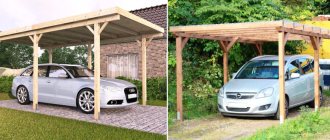
Having set yourself the task of building a canopy from corrugated sheets with your own hands, you need to clearly decide how it will look and what you plan to hide under the canopy. According to their design, sheds made of corrugated sheets can be adjacent to the house or free-standing. An attached carport is usually built over a terrace or porch; attached carports are also possible.
A canopy for a house is made from corrugated sheets even when the roof of the house is made of the same material. In this case, the canopy and the house look like a single whole.
The shape of the canopies can be single-pitched, gable and arched. A lean-to canopy is the easiest one to implement with your own hands. The roof is tilted to one side so that rainwater flows onto the ground; in addition, less snow settles on the roof. However, the angle of inclination should not be too large. This will lead to drops of slanting rain falling under the canopy, unless, of course, the canopy is adjacent to the house.
In regions with snowy winters, it is more reasonable to make a gable canopy, since its angle of inclination can be greater than that of a single-slope one. A gable canopy can cover a much larger area. This canopy design requires the presence of trusses, since the holding force of the beams will not be enough. It is easier to buy metal trusses ready-made than to make them yourself, especially since they come in different sizes.
An arched canopy made of corrugated sheets will look most attractive, but it is also the most difficult to build with your own hands. In order to bend a sheet of metal into an arc, you need special equipment; it is almost impossible to do it yourself. Canopies over the porch have the greatest bending arc, so they are rarely made of corrugated sheets.
As for the dimensions of the canopy, they must be selected taking into account the load and purpose of the structure. The canopy adjacent to the house or building should not be too large, and the load on the wall should not be the maximum permissible. If this is a canopy over the porch, then it should not be too small. The carport is calculated based on the dimensions of the car.
For a small car with a length of 4.3 m and a width of 1.6 m, the platform under the canopy will be at least 2.3 x 5.5 m. For an SUV or truck, you need to look for a platform measuring 3.5 x 6.6 m. At the same time, do not forget about the height of the canopy . The optimal height is 2.3 m, but this may not be enough for a gazelle. By increasing the height of the canopy, you will increase the likelihood of rain and snow getting under the canopy.
We draw up a drawing and estimate
Before building any shed, you must first draw up a drawing and estimate. It is not at all necessary to make a drawing in accordance with all GOST standards; it is enough to indicate all the necessary dimensions of the canopy and reflect its structure. Let's look at how to make a canopy with your own hands, using the example of an arched structure for a car that is not adjacent to the house.
The area of the site under the canopy is 5.45x5.4 m, height 2.1 m. For individual sizes, you can independently calculate what material will be needed for construction; all the formulas for this are in the article How to calculate a canopy and make a drawing. For the design we have chosen you will need:
- profile pipe measuring 80x80 mm and 3 m long - 6 pieces;
- profile pipe for a run size 50x25x2 mm, length 6 m - 6 pieces;
- corrugated sheeting NS 35 x 1000 x 05 – 7 sheets 6 m long. It will ensure good water drainage and withstand snow loads;
- galvanized screws;
- ready-mixed concrete or cement, sand and crushed stone;
- single-pitch ready-made trusses with a length of 5.45 and a height of 1.17 m, made of profile pipes 50x25x2 mm and 25x25x2 mm - 3 pieces.
And, of course, you can’t do without tools: a tape measure, an angle grinder, a marker, a drill, a screwdriver.
Where to buy or order
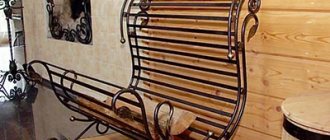
Currently, forged awnings are used quite widely . They are installed above swimming pools, above cars, above porches. And in the countryside, they perfectly protect firewood for barbecues, etc. from getting wet. The high demand for metal structures gives rise to a wide range of solutions offered by manufacturers.
Employees of the companies that are collected in the section “Where to buy or order forged awnings” provide customers with a wide range of products to choose from. Tags: wrought iron entrances, wrought iron carports, wrought iron canopies over the porch
Production and installation of a canopy
Let's look at the step-by-step production of a do-it-yourself canopy coated with a metal profile.
Marking and pouring the foundation
First you need to prepare the tools:
- wooden blocks;
- cord;
- roulette;
- square
Marking of the foundation begins on either side according to the dimensions indicated in the drawing. Pegs are hammered along the edges and the cord is pulled, while using a square to control the right angle. Then the twine is pulled on the other sides.
To assess the correctness of the markings, measure the diagonals between opposite corners: the distance should be the same.
A canopy made of corrugated sheets does not require a very strong foundation. This is due to the fact that the structure will be affected by only two factors:
- snow load;
- wind load.
The simplest option for arranging a foundation is to drill a hole 80 cm deep, cover the bottom with a 20 cm layer of sand, install a support post made of a profile pipe, leveling it with a plumb line. The space between the stand is filled with concrete. To prevent frost heaving forces from pushing the support outward, a metal plate is usually welded to the bottom. To level the post, before concreting it is secured with temporary spacers made of metal or wooden supports.
Construction of farms
Truss designs vary, but they are all designed to withstand heavy loads.
The most popular designs include the following:
- rectangular;
- triangular;
- arched
For trusses, a square metal profile, a round pipe, an angle or a channel are most often used.
Installation
If the distance between the support posts is no more than 5 m, then for the upper horizontal trim you can use square pipes of the same size as for the posts themselves, for example, 40x40x2 mm.
Depending on the specific situation, reinforcement with diagonal supports may be required. If the distance between the supports exceeds 5 m, it is necessary to use rectangular trusses, which are characterized by greater reliability and the ability to withstand high loads.
e99efaa3c1012a79f0d823a828f4f4a0.jpeWhen working at height, the use of ladders is prohibited: for safety reasons, scaffolding is used.
Lathing
The lathing structure is secured by welding perpendicular to trusses made of metal profiles of square or rectangular cross-section. The pitch between the sheathing elements is chosen within the range of 300-700 mm, which depends on the thickness of the profiled sheet and its configuration.
During the installation of the sheathing, the plane is leveled and checked using a cord, which is pulled from the bottom of the roof to the ridge, and deviations of more than 2 mm should be avoided. In order to protect the elements of the truss structure, before installation they should be coated with a metal coloring material.
Installation of corrugated sheets
To construct a canopy, it is recommended to use load-bearing corrugated sheeting, designated by the index H.
To fix the roofing material, special fasteners are used, consisting of drill-shaped self-tapping screws, which are screwed in with a screwdriver.
Such fasteners are mounted using a rubberized washer to ensure tightness. The self-tapping screw is installed in the lower groove. This ensures a tight fit of the corrugated sheeting to the sheathing.
If the roof structure is made of two slopes, the junction at the ridge is covered with a ridge element. You can purchase one or make it yourself from a galvanized sheet. Installation of this part is carried out using self-tapping screws to the upper groove of the corrugated sheet. To ensure that the roof structure is as rigid as possible, it is recommended to use solid sheets of roofing material. This will allow you to withstand high snow and wind loads.
Since corrugated sheeting is made by rolling metal sheets, it is possible to make custom-made material of different shapes, profiles and lengths.