Stages of canopy construction
Preparation work.
First of all, prepare a place for the canopy. It is cleared of plantings and debris, and markings are made. The prepared site is leveled by pouring soil, sand, small pebbles or crushed stone into the depressions, or cutting off the existing hills. Then everything is thoroughly compacted. In the case of attaching a canopy to a residential building, you need to drill or dig holes to a depth of 50-60 centimeters, with a diameter of about 20 centimeters. They are necessary to build a base for a canopy. At the same time, the cable for lighting should be laid. Depending on the size of the canopy being constructed and the materials used for its construction, the pillars are placed from each other at a distance of 1-1.5 meters. The convenience of such a base for a canopy is that there is no need to connect it to the main foundation of the house.
You need to pour a bucket of crushed stone into all the recesses, install vertical pillars and fill them with cement mortar. Each support is leveled. If the canopy is constructed from wood, then the lumber must be dried and sanded. Before installing the boards, it is necessary to soak them with an antiseptic, dry them or paint them. If the canopy is located in a low area, then the ends of the wooden posts need waterproofing. To do this, they are wrapped in roofing felt or film and hot bitumen is used to fill them. When planning the installation of metal supports, it is recommended to take an aluminum or galvanized profile. If ordinary metal is used, it should be treated with a primer containing zinc phosphate.
The covering used as a floor under a canopy can be:
- poured, made of concrete or cement mortar;
- tiled paving or wooden;
- from medium-sized gravel or sand.
Installation work on the construction of a fiberglass canopy. Assembly of the extension begins after the concrete under the supports has completely hardened (about 14 days). The brackets necessary for mounting the load-bearing transverse beam and the attached canopy are attached to the wall.
Lathing. After installation, the top trim is made. Cemented supports are connected from the ends to the beam, and then to each other. If the frame is made of wooden parts, then they are connected with a steel angle, if it is made of metal, they are welded. Welding seams must be cleaned and coated with primer. Rafters are attached to the transverse beams at a distance of 60 centimeters. Place the sheathing across the rafters at a distance of 30 centimeters from each other, attaching it with self-tapping screws.
When using wooden beams, its dimensions should be:
— 12*12 cm for racks; — 10*10 cm – cross beams; - 7*7 cm - rafters; - 5-5 cm - lathing.
When making a frame from a steel profile:
— 4*6 cm – racks; - 3*5 cm - sheathing and rafters.
Roof construction. To install it, you need to cut fiberglass sheets to size. Then, holes are made in them for fasteners and screwed to the sheathing. Make sure that the cells on the sheets are directed downward, which will facilitate the removal of condensate. There should be a rubber thermal washer on the screws that secure the sheets.
It is necessary to leave a small space between the sheets when covering with polycarbonate, as they have the ability to expand when heated (for example, sunlight). When making holes for fasteners, you should also leave a margin of 2 to 3 millimeters. A polycarbonate canopy does not require special care. It is enough to periodically wash it with clean water, and it will serve according to the manufacturers’ warranty for 50 years.
So, a canopy attached to the house is an excellent place for a full-fledged summer holiday on a summer cottage. It’s not difficult to make, all you need is the desire and the necessary tools.
By frame type
The roof is one thing, however, the frame of this building is important. They come in a variety of forms, each with its own positive and negative properties. The following types are distinguished:
- wooden;
- metal;
- brick;
- forged.
Most often, a frame is selected for the purpose of maximum integration into the landscape design of the site (in other words, so that it is in harmony with nearby buildings).
Wood
A carport frame made of wood is an ideal option for lovers of environmentally friendly materials. Wood is used quite often, and there are a number of objective reasons for this:
- low price;
- attractive appearance;
- availability of processing;
- reliability of structures.
Soft tiles on the roof of a gable carport
. However, there are also disadvantages. One cannot help but recall the easy flammability and susceptibility to rotting. Also, a wooden carport must be constantly treated with anti-insect compounds.
If you still decide to give preference to a wooden canopy, then you can familiarize yourself with the main types, characteristics, average prices and photographs of wood in an interactive form.
Metal (corrugated pipe)
A metal structure is, first of all, a reliable building. Metal is not afraid of destruction, it is durable and easily withstands bad weather. It is also worth saying a few words that such canopies will not cost you that much - if you choose corrugated pipe as a material, then the assembly will not increase your budget.
The disadvantage of the material will, of course, be corrosion - you will have to periodically treat the frame with anti-corrosion agents.
Brick
Brick is a material that makes sheds more like good-quality garages. Brick has quite a lot of advantages:
- strength;
- little fear of temperature changes;
- durability;
- aesthetic appeal of buildings.
Frame on brick pillars
Unfortunately, the material also has many disadvantages: it is not cheap, and it takes quite a long time to build from it; you will also have to think about a stronger foundation, because the construction will be heavy.
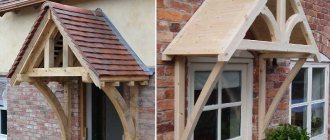
Forged
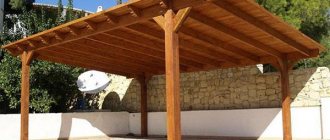
A wrought-iron canopy over the porch or a free-standing one will not only protect your car, but will also create a feeling of aesthetic harmony in the yard (especially if you want to use the building as a resting place when you are not in the car). The disadvantage may be high airflow - such structures are rarely sheathed, so it will only protect you from summer rains, but not from precipitation in winter.
How to cover a carport: the best materials
After determining the general requirements, it is necessary to make several clarifications before choosing the type of roof covering. In this case, there is no enclosed space underneath, so the structure will only have supporting elements and a surface layer without insulation or insulation. The lining of the lower part is installed only to improve aesthetic characteristics.
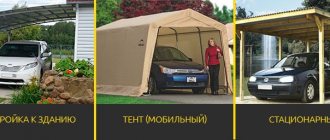
Canopies can be:
- single-pitched;
- gable;
- arched;
- console;
- combined, made up of several different forms.
Drawing of a canopy with a gable roof
Cantilever design diagram
Example of a project with a pitched roof
Truss with a large span of complex shape
Polycarbonate carports: simple and reliable
During the manufacturing process of this polymer material, dyes are added to the composition. They create not only the desired aesthetic characteristics, but also change transparency.
06d42685e2b0ab074f3926ffee93f7ab.jpe
9790b8c198d5af92cb9eff080c16662a.jpe 9533925193a2f6e20ca5cc2032d48be0.jpe
| Color | Light transmittance,% |
| absent | 80-85 |
| yellow | 65-75 |
| orange | 55-60 |
| brown and bronze shades | 40-45 |
| blue and green | 25-35 |
| red | 10-15 |
Here are the average parameters of products from one specialized manufacturer. Currently, products are produced with different levels of color saturation, which makes it possible to obtain different levels of transparency, up to its complete absence. A wide range of proposals allows you to choose an option in strict accordance with the criteria defined by the project.
Polycarbonate carports are highly resistant to ultraviolet radiation. To reduce weight, sheets with cavities (honeycomb structures) are created. Such products are easier to install with your own hands. They are lighter than their monolithic counterparts, but are designed for a shorter service life.
| Options | Unit | Type of material | |
| Monolithic | Cellular | ||
| Specific gravity | kg per sq. m. | 7,1-7,5 | 1,1-1,3 |
| Life time | years | 10-15 | 20-25 |
The thickness of polycarbonate is selected taking into account the specific instructions and possible loads during use:
- For a standard single-, double-slope, arched carport: 4-6 mm.
- Span overlap for two cars: 8 mm.
- Particularly large distances between support lines, increased wind and loads in a certain region: 10 mm or more.
| Material type | Brand/Name | Thickness, mm | Sheet dimensions (width x length), cm | price, rub. |
| Cellular, transparent | Sellex/Matador | 3,3 | 210 x 600 | 1780-2300 |
| Cellular, transparent | Sellex/Solaris | 4 | 210 x 600 | 1950-2200 |
| Cellular, transparent | Sellex/Premium | 4 | 210 x 600 | 2900-3250 |
| Cell phone, color | Sellex/Comfort | 4 | 210 x 600 | 2380-2800 |
| Cellular, transparent | Plastilux/ULTRAMARIN | 6 | 210 x 600 | 3020-3400 |
| Cell phone, color | Plastilux/SUNNEX | 6 | 210 x 600 | 3900-4100 |
| Cellular, transparent | Sellex/Solaris | 8 | 210 x 600 | 4080-4300 |
| Cell phone, color | Plastilux/SUNNEX | 10 | 210 x 600 | 4300-4500 |
| Monolithic, transparent | Polygal | 6 | 205 x 305 | 13200-14800 |
| Monolithic, color | Polygal | 12 | 205 x 305 | 26800-28400 |
The length of the sheet reaches 12 m, which is useful for covering large spans with a width of 2 cars
A canopy made from polycarbonate sheets as large as in the photo will not be too heavy
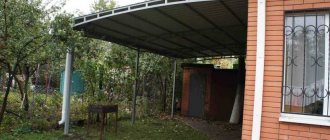
Canopy for a dacha with walls
Inexpensive garage "replacement"
The figure shows how to make a simple extension to a utility block with a pitched roof
Carport made of corrugated sheets: iron to iron
This material is well suited for roofing. It weighs little and is well protected from corrosion by a multilayer coating. It cannot be damaged by strong mechanical influences. Structures made from corrugated sheets are not too difficult to build with your own hands.
In a wide range of products in this category, you can quickly select the optimal coating option by color, profile, thickness and cost
This drawing can be used to create a small carport
The photo shows that profiled sheets are suitable for the construction of large structures
When choosing these products, the following factors must be taken into account:
Special screws with rubber washers ensure reliable fastening of the sheets and prevent moisture from entering. The color can be selected according to the decorative coating of the sheet
Carport made of metal tiles: making one with the house
The photo shows an example with the same material on the roofs of the main building and the extension. This solution simplifies the creation of a single harmonious architectural ensemble
As in previous options, a drawing will be useful
In the process of creating it, it is necessary to coordinate the dimensions of the cells of the roof slope with the width and length of the metal tile sheets. It is necessary to provide reliable supports at the joints. Careful design design simplifies DIY construction. It will also be useful if the implementation of the project is entrusted to a specialized company on a turnkey basis. The knowledge gained will help control the actions of performers.
b545e4d4a626a48c06316ba04ec152be.jpePaving slab area
It is usually settled on waterlogged or clayey soil. Preparing the base for the tiles is carried out in the same way as for a crushed stone platform.
4-7 cm of sand or grit is poured on top of the crushed stone, compacted and leveled. Then the paving slabs are laid. It should rise 0.5-1 cm above the installed curbs.
We recommend reading:
The best options for site planning: modern ideas, the best solutions and beautiful arrangement and design schemes (125 photos + video)How to make drainage on a site: device, types, design and camouflage (110 photo ideas)
Do-it-yourself sliding gates: projects, designs, drawings, photos and video description of the construction (135 photos)
To prevent sand or grit from penetrating into the crushed stone, it is recommended to place geotextiles between them.
After laying the tiles, it is necessary to fill the seams with grout and water the area for several days with water.
The design of the area for the car can be seen in the photo.
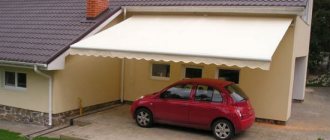
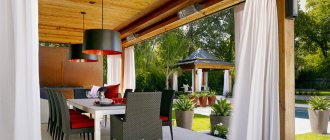
Fabric awnings in the yard
If you don’t want to bother with complex structures of canopies made of metal or wood, we recommend turning your attention to lightweight canopies made of thick fabric. They are sold with a ready-made metal frame that is attached to the wall, so there is no need to build anything additional
A special advantage of this design is the ability to quickly remove the awning by simply folding it - special levers and automation allow this to be done in a second.
Fabric sun canopy
You can make an awning from fabric yourself, but then it will differ little from buildings made of corrugated sheets or polycarbonate, although the appearance of such a canopy will be more picturesque and interesting. This kind of sun canopy can be made by building a metal frame and putting a piece of bright fabric on it.
Country canopies made of fabric
Carport: photo options
If we have inspired you to create your own building, but you have not yet decided which polycarbonate carport will be the best option for you, we are ready to show you the most interesting and original models. We think that among them you will find, if not your own future building, then at least a lot of ideas for creating it.
Material for frame and supporting structure
The “skeleton” of the mini-garage is formed from the following materials:
- tree;
- metal;
- stone;
- brick;
- concrete.
The supporting pillars and frame parts of the roof are made using precise geometric technology with straight, diagonal and rounded elements. In the case of wood, there are at least 4 main options for connecting roof parts. They are connected with ordinary and construction hardware. Metal structures are welded. Working with wood and metal requires the participation of at least several people. With brick, stone and concrete buildings the situation is more complicated. You can still build a brick structure yourself, but not a concrete or stone one. In the last 2 cases, teams of craftsmen work. Metal canopies look good against the backdrop of garden plants, just like wooden ones. They have many absolute advantages, and well-finished wooden ones at least look beautiful. Stone mini-garages are not much inferior to them in terms of aesthetics. In addition, buildings made of stone look more modern. A brick and concrete canopy is decorated with panels or something like that.
Stone, concrete or brick
These are not the best materials for self-construction. The frame and supporting structure made of brick, concrete and stone take much longer to calculate. Heavy equipment is used to install bulky elements. The coverings of the finished canopy are left unchanged or finished with something like lining, siding, or relief panels. As a result, owners receive an aesthetically pleasing structure and save money by eliminating the need for a conventional garage. Combining materials, including topcoat, offers durability benefits. Maintaining stone/brick/concrete supports does not require much effort, but takes more time than maintaining structures on thin posts. A brick structure is primarily about durability and variability in terms of configuration. They try to emphasize good taste and status with stone, and the coatings do not require additional finishing.
Metal
Profiled pipes with a cross section of 80×80 mm are also used. Modifications with protection from dampness are selected, because the metal is subject to corrosion. After pouring the foundation, points for the pillars are marked, after which the recesses are made with a drill. This is a convenient approach with high precision of action. The holes are then filled with concrete. The pillars are connected by cross members and go to the main frame. The metal top of the canopy is mounted using a welding machine. The roof frame is made closed or everything except the top layer with roofing material is left free. That is, in the end they get a monolithic structure or a canopy with a truss. The upper part of the metal canopy is assembled from profiled pipes with a cross-section of 40×20 mm. Under wide canopies you will have to make long curved elements, and the complexity of the work will increase several times.
Tree
Anyone who is more or less versed in carpentry and construction can assemble a homemade structure from wood. Processing and preparing wood yourself leads to a significant loss of time. It includes cutting and preparing elements. Although the preliminary work will take at least a week, the implementation will be relatively simple, especially since there is the largest selection of tools for woodworking. All nodes are connected with plates and hardware. Wood is used mainly in the form of bars. They are inserted into the foundation or screwed in with special metal connections with large anchors. The material for the canopy is processed with double care so that fungus does not appear on the wood near vehicles and automobile accessories. From an aesthetic point of view, the worst that can happen is cracking. Wood is inferior in durability to other materials.
Preparatory work
Choosing a location near the entrance gate or close to the driveway will allow the car to easily enter and turn around. In addition, natural moisture removal will be ensured.
It is also necessary to pre-calculate the dimensions of the site. For passenger vehicles, an area of 3x6 m is sufficient. But a larger vehicle will require an area of 4x11 m.
At the initial stage of work, you need to use pegs to mark the perimeter of the future parking area. Stretch a string between the pegs. In the marked area, the top layer of soil is removed. In its place, a special pillow is formed from several layers:
New Year in the yard: how to beautifully decorate the yard with your own hands!- How to make a modern landscape design with your own hands?
- Microgreens at home
- sand – more than 100 mm thick in several stages with moistening and compaction;
- gravel – more than 50 mm.
Construction
Now directly about the construction of the canopy itself.
- Initially, the site is prepared;
- After this, the supporting racks are installed. Their number is determined from the size of the building. To reduce the load on the structure, it is necessary to install a stand every 2 m of the length of the canopy. That is, a building 4 m long should have 3 racks on one side, and there will be 6 in total;
- Before manufacturing the roof frame, its shape is determined. The roof can be straight with a slope on one or two sides, wavy, in the shape of an arch, etc. It all depends on the imagination and the material of the shelter.
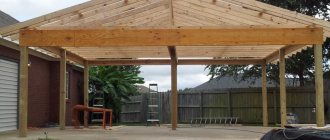
Let's look at the simplest design - a separate wooden canopy for one medium-sized car with a polycarbonate coating and a slope on one side. Canopy length – 5 m, width – 3.5 m.
So, first the site is prepared - leveled, concreted or asphalted, but you can simply fill it with crushed stone.
Since the length is 5 meters, it is better to install 4 racks with a distance of 1.25 m. This will distribute the load as much as possible, but if there are 3 racks on each side, then you will have to use massive wooden columns so that they can hold the load.
On one side, the racks should be 10-15 cm higher than on the other to ensure a slope.
After installing the racks on top of them, load-bearing beams are fixed along them. Each beam must be equal to the length of the building. To give strength to the structure, braces are made between the posts and beams.
3064aaed694eecd3f7ccd0fe7e0f6b67.jpe c8b87363de0c17a58240549d0083904e.jpe
50337850e7052f231bc06a4a6b3faf1b.jpe b78030fe7d36f05a5417557485623a26.jpe
Logs from boards are laid transversely on these beams and secured. All that remains is to correctly lay the polycarbonate sheets on the joists and secure them with self-tapping screws.
The final stage is decorative finishing, treating wooden elements with water-repellent and protective agents. If necessary, walls are made from polycarbonate sheets, attaching them to the racks on the required sides.
This is the simplest of the sheds that can be built on a summer cottage. If properly organized, such a building can be erected in just a day, provided the necessary materials and tools are available.
We draw a conclusion
So, after analyzing the characteristics of polycarbonate and corrugated sheeting and comparing them with competitors, we can draw the following conclusion. Corrugated sheeting is a universal material suitable for the construction of most sheds. It is durable, inexpensive, and can withstand heavy loads. The advantage of polycarbonate is that it can be used to create structures of complex shapes. For clarity, we have summarized all their pros and cons in a table. Decide for yourself what is more important to you, good choice!
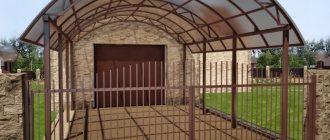
From corrugated sheets
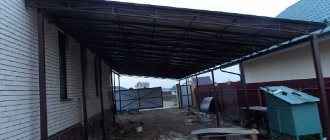
For cars made of corrugated sheets
Sheds made of corrugated sheets are most often used for parking cars in the country. Such structures stand alone and are not adjacent to the wall of the house. The roof of the canopy is supported by vertically installed metal pillars. The main beams and sheathing are mounted on them, and sheets of corrugated sheets are attached to it on top.
To make a free-standing canopy from a metal profile, you will need several racks made from a metal pipe. Dig holes 60 cm deep. Their number depends on the number of support posts and the size of the canopy. Place the racks with a step length of 1 m. Place a cushion of crushed stone at the bottom of the hole, install the rack vertically, and fill the hole with concrete.
Hemmed canopy made of corrugated sheets
After waiting for the concrete to dry completely, continue installing the canopy. The next stage of work will be the installation of horizontal beams; do this by welding. The sheathing on such canopies is made of metal pipes of small diameter. Using self-tapping screws, install sheets of roofing material onto the sheathing.
The lack of a welding machine is often an obstacle to the construction of a canopy made of metal profiles. Fastening with bolted connections will cause a lot of trouble.
What is important to consider when installing polycarbonate canopies
Before starting work, draw up a drawing with an exact indication of all dimensions. Long sheets (6 - 7 m) bend well, but complicate the installation process. The main application of such polycarbonate is spherical structures.
Installation of frames for polycarbonate canopies of complex shape is carried out in compliance with special requirements:
- for water drainage you need a slope of at least 5°;
- the rafter frame made of wood is treated with antiseptics or fungicides;
- metal structures are coated with a primer and metal paint (it is not necessary to paint the aluminum profile);
- rafters are installed with equal spacing (from 1 m or more, for installation of heavy roofing materials the spacing is reduced);
- high temperature expands polycarbonate, it needs “loose” fixation;
- sheets with UV protection are fastened with self-tapping screws with the marked side up (the average fastening distance is 30-40 cm).
Important! The first polycarbonate sheet is inserted into the end profile, the last sheet is also attached to the end profile, and the lower part of the polycarbonate is sealed with a special tape.
Choosing a roofing covering: emphasis on style!
Now everything is more or less clear with the design, and we can move on to the roof. Almost any roofing material is suitable for arranging a country carport, as long as it is light enough and does not put too much pressure on the supports (like ceramic tiles, for example).
Thin metal roofing or soft asphalt shingles are excellent for this purpose.
But it is polycarbonate that fits flawlessly into the surrounding landscape design, colored or transparent - it doesn’t matter
The important thing is that it gently diffuses light, and it will be comfortable to work with the car both in the rain and on a hot afternoon:
If you have chosen this option, then get ready for the fact that there will be a lot of work, but the strength and durability of the entire structure is definitely worth it.
Even a small canopy right in front of the entrance to a country house looks bright, stylish and quite practical:
By the way, polycarbonate is such a light material that it allows you to build even such a thin frame under it:
If you want something unusual, or you are not yet ready to purchase the same polycarbonate, then use the advice of skilled summer residents. Have you ever imagined that you could literally build a canopy out of plastic bottles? Country crafts - yes, small attributes for the garden, yes, but - a whole building?!
As it turned out, it’s still possible, look what comes of it:
For this undertaking, you will only need transparent plastic bottles, water, paint of different colors (you can use regular gouache), wooden stands and a strong rope.
The installation instructions themselves are brilliantly simple:
- Step 1. First prepare the bottles: pour a little water into the bottom of each, tint it in the desired color and fill it with decorative decorations if desired.
- Step 2. Next, make holes in the caps of plastic bottles and thread ropes through them. Tie them from the inside, making a knot.
- Step 3. Build a smooth horizontal frame from wooden planks.
- Step 4. Drive nails around the perimeter of the frame and stretch a mesh of ropes.
- Step 5. Tie plastic bottles to this mesh so that they are pressed quite tightly together.
Interestingly, this is easy to do with a ready-made pergola, and there is no need to build a separate frame. And the roof itself is short-lived, of course, because the plastic begins to deteriorate in the first 5 years under direct sunlight. But why not build a new “roof” in a couple of years? Moreover, the whole process takes a couple of hours at most.
a2ddc84f8075bf2858b47a63e6239b6d.jpe 3ee3caf5029a5b1cb858375e685f5aeb.jpe
5070745e6820bc57449e094e80670d3d.jpe a9307bfcb4a2d5966352e0bdd54ed3d5.jpe
c2a6e997a502e1b713160677f4fd8bb9.jpe
Our advantages
17 years on the market
Own workshop
500 meters of fencing are installed in 1 working day
A surveyor can visit on the day of your application.
Work is possible without prepayment, or with a minimum prepayment of 5%
We accept payment in any way convenient for you, with or without VAT
15 years warranty on materials, 2 years on installation work
Russian-speaking foremen in all teams
Loyalty programs for regular customers and for pensioners
10 experienced teams work daily
Selection of roofing material
Instead of numerous selection criteria, one principle can be applied - use the same material as for the roof of the main house. The justification for the monolithic option increases if the canopy is an extension. For the roofing material on the rafter structure, a sheathing is made of transverse strips or sheets. For hard coatings, a lattice is formed, and for soft ones, a solid version of canvas is formed. At the same time, manufacturers provide precise information about the pitch for sparse battens, as well as about the configuration in general. Hard coating is definitely better. Moreover, one of the options, corrugated sheeting, is suitable for self-assembly. If you take polycarbonate, then multi-chamber is better. With at least 3 rows of plastic and 2 rows of cells - to protect vehicles from heat. Using the same principle, you can use roofing materials in light shades.
Polycarbonate
The buyer usually receives 2 options: monolithic material or cellular. They almost do not differ in standard sheet width - about 2000 mm. Cellular has long panel models of 6 and 12 m, while monolithic has a standard of 3 m. In terms of specific gravity, monolithic ones are worse, because they are almost 6 times heavier: 7.2 kg/m² versus 1.3 kg/m² for segmented ones. The latter have a larger bending radius. Monolithic polycarbonate lasts up to 25 years, while less reliable cellular polycarbonate lasts only 10.
Segmented material has a higher resistance to heat transfer. But the light transmission coefficient is approximately equal. For a cell phone it corresponds to 82%, and for another variety - 85%.
SNiP II-3-79 and SNiP 21-01-97 will help you choose the ideal thickness. Protection from strong winds will be provided by models with a thickness of 6 to 8 mm. Panels thicker than 10 mm are installed due to difficult weather conditions.
Corrugated sheet
When choosing corrugated sheets, pay attention to 5 criteria, not counting the issue of delivery. Including the following:
- Thickness;
- Appearance;
- Features of the wave;
- Evenness of edges;
- Price.
The first of them, the thickness is selected according to the principle “the higher the indicator, the better.” If you use roofing decking, then the second rule also applies: there should be no excess load on the base. For roofing on the site, a thickness of 0.5 mm or more is suitable. Sheets should be checked for stains and scratches. This is the second point. In turn, the geometry of the wave determines compatibility with the roof. Look at the dimensions and thickness of the comb. A good corrugated sheet has edges that are perfectly smooth and free of jagged edges. A material that is poor according to this criterion will become covered with rust in areas with flaws. You should not buy a profiled sheet with a large thickness and a low price. It is probably of low quality or even a fake. Delivery sometimes becomes a problem, because the sheets can bend and deteriorate at this point.
Roof tiles
It can be hard and soft. People prefer bitumen and metal tiles.
Soft ones should not be placed at sub-zero temperatures, because they partially harden and become brittle. You cannot walk on it in the heat - in this case it will soften. On the other hand, asphalt shingles produce minimal waste on curved surfaces. Soft tiles are used to decorate complex shaped elements. In terms of durability, it also has an advantage, but it all depends on use. With a maximum of 50 years for metal tiles, bitumen tiles can last as long as 70 years.
Solid tiles are more reliable and practical. It does not deform and has a high temperature limit. But due to sudden snow melting, sometimes a system is installed on it to detain it. These are additional costs. Among the disadvantages of metal tiles there is also the problem of noise resonance.
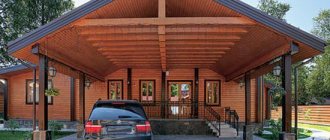
Construction of a carport made of wood with your own hands
Any construction process includes several stages. When constructing a structure for a car, you will need to do the following:
- choose a suitable place for construction;
- pour the foundation;
- installation frame;
- carry out roofing work;
Choosing a place to build
Before you start building a canopy at your dacha, you need to decide whether it will be an independent structure or an extension to an existing one. The best place to build is the area in front of the entrance. You can also store equipment there while working. In addition, it is advisable to build the canopy on a hill. Then puddles will not accumulate under it.
Foundation
The foundation for the structure must withstand the entire load of the frame and roof. There are two options for pouring the foundation. You can use a pile-screw structure, which will make the finished structure stable.
Construction of the frame
After installing the vertical piles, longitudinal beams are installed along the entire length of the structure. In this case, it is necessary to control the mounting angle. Longitudinal beams, which are fixed on the opposite side of the roof, are installed only after checking the level of inclination. It is not advisable for the tilt angle to exceed 3 degrees.
After this, you need to lay the rafters so that you can install the roof on them. It is worth leaving a distance of at least 60 centimeters between the rafter boards. Such boards are screwed to the support beams. If there is a gutter in the plan for water drainage, about 10 centimeters need to be cut off from the last rafter.
Roof installation
The final stage of construction is laying the roofing material. For the roof you can use slate, tiles, wood, glass insulation or polycarbonate. However, when using boards, the roof may leak, so it will be necessary to cover it with a layer of material that protects against rot.
When using slate or polycarbonate, such problems will not arise. The sheets are attached from the bottom to the top, so that each subsequent sheet overlaps the joint with the previous one.
7cff2384099814834dc0b81038ab7d23.jpe f04256b78c0e13c03c77e0b9ed072df8.jpe da1adee286ea4e20541985309964717e.jpe
c776d1a932ae2cd30a4492e4cc14d0da.jpe
On a gable roof, attach a canopy on top of the structure to protect against moisture getting inside. After laying the gutter, it is worth pointing the pipe vertically downwards. Around the foundation, at a short distance, it is worth digging small trenches to drain excess water. To avoid inconvenience, you can cover them with a rigid mesh.
Schemes and drawings of canopies
We have collected the best shed designs for building in a country house or in the courtyard of a private house. Please note that dimensions in the drawings may vary and are indicated in millimeters or centimeters.
Create a project
After you have decided on the material, you need to make a sketch of the construction. It is necessary to take into account the location, dimensions and appearance of the structure.
The project must be drawn up taking into account the design features and location:
- Take measurements near the house, above the door. In these places the canopy will be adjacent to the building.
- When making a structure for a car, you need to take into account the location of the supports so that the entry/exit is consolidated.
- The design for the recreation area must take into account the height of the grill, barbecue, that is, adhere to fire safety rules.
- Materials that can withstand high humidity are used above the pool, taking into account the size of the reservoir.
The roof can also be of different configurations: straight, sloped, single or double slope, complex.
To ensure the stability of the device and hold its shape without deformation, it is necessary to make a calculation that takes into account the speed, direction of the wind, and the amount of snow.
Canopy: is it needed on the site?
It is advisable to install this structure if the budget allocated for the construction process allows it. This will protect the car from exposure to ultraviolet radiation, which has a bad effect on the appearance of the vehicle.
In addition, if the site is properly arranged, the car will be protected from rain, hail and snow, which will not damage the metal body and will not provoke premature corrosion of the body.
Choosing a location
The protective function of the canopy is very important, but its location and compatibility with the design of the structure are also important. If a dacha or country house, also located within the city, has not yet been built, in this case the canopy is installed separately from the structure being built
It is good to attach the structure to the facade of the house, directly against its wall.
If the size of the plot allows, then preference is given to a canopy with a larger area, under which several cars can be placed. This will perfectly solve the problem of relatives coming to visit by car, or the family having several cars. When choosing the side of the facade, the windy side and architectural differences of the house are taken into account; sometimes its design does not allow installing the structure from the front side.
Why do we need a platform?
If you make a small area with a canopy that will serve as a parking space, this will not only help relieve neighbors from possible discomfort, but will also significantly increase the safety of the car. You won't have to worry about possible theft.
In addition, this will protect the vehicle from fading of the upholstery and dashboard under the scorching rays of the sun, as well as from precipitation in the form of rain and snow.