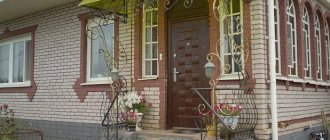
Everyone knows that the front entrance to a house begins with a porch, which may have a reliable and colorfully decorated wooden canopy above the door. The need for it is explained by the fact that this part of the facade is the hallmark of the building and emphasizes the style and taste of its owner.
We also note that a wooden canopy over the porch of a country house, designed in the form of a reliable and attractive canopy with its design, should perform a purely utilitarian function. It consists in ensuring that the canopy serves as reliable protection for the entrance area from rain and snow.
What to give preference - a canopy or a canopy
Although these two designs are very similar, there are still some technical differences. If vertical support beams are usually installed for a canopy, then the canopy is attached directly to the wall of the house. Therefore, you need to pay attention not only to the shape and materials of the extension itself, but also to what the main building is built from and whether it will be possible to securely attach the frame to the wall or whether additional supports will be needed.
Canopy over the front door
It is worth considering where you plan to place the extension, and what is more important to you – aesthetics or functionality. After all, a beautiful and elegant forged canopy may look out of place over the entrance to the utility room, and a bulky wooden canopy will spoil the exterior of the front entrance to the house. Also, when planning in advance, check whether the selected dimensions of the structure are appropriate and whether there is available space for construction.
Canopy supports become a harmonious detail of the house’s exterior
No. 2. Wood species
It is no wonder that the most important performance qualities of the visor depend on the selected type of wood. The most commonly used breeds are:
- Pine is a soft wood that can be easily processed and has a high resin content, which makes it less susceptible to cracking. The color of pine is quite interesting, even noble, the pattern and color are preserved for a long time;
- spruce has almost the same properties as pine and is also actively used in the production of visors;
- maple is the most popular among hardwoods. It lends itself perfectly to cutting and polishing, practically does not crack, and is easy to paint.
Whatever type of wood is chosen, it is important to pay attention to ensure that the material is free of defects, wormholes and incipient rotting processes.
Selection of reliable materials for construction
In the question of how to make a canopy over the porch, the first thing you have to decide on is what material the frame will be made of and what to use for the roof. In home construction, wooden beams and metal pipes or profiles are most often used for the frame, but each option has its own pros and cons:
- The wooden frame is easy to manufacture, it is easy to attach to the wall of the house, and the cost is relatively low. But wood is a short-lived material, and even after special treatment, such a structure will have to be regularly repaired or replaced.
- Metal structures are strong and durable. But to work with metal you need: additional equipment (welding machine), special fasteners and skills in working with such material.
Drawing of a metal canopy with a polycarbonate roof
Suitable for roofing are polycarbonate, roofing iron, metal tiles, corrugated sheets, ondulin, slate, glass - almost any available material. Often in home construction, remnants of the material used to cover the roof are used for a canopy over the porch. It is worth considering that the weight of the entire structure, and therefore the method of fastening, depends on the roofing material.
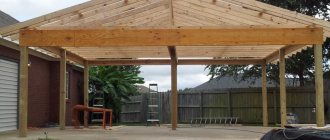
Types of supporting structures
The nature of the supporting structures depends on the configuration and size of the building, although generally 4 supports are used in the form of metal pillars, which are fastened together along the perimeter by metal elements. Depending on the design, the distance between the supports is chosen to be one and a half meters, for greater reliability. The following options for supporting structures are possible:
- From stone.
- Made of concrete.
- Made of metal.
- Made of wood.
- Made of brick.
In any case, you will have to fork out money, since any options require serious capital investments. You will need not only supports, but also elements for communication, as well as a frame for the roof
It is very important to choose the right thickness of metal supports so that they look harmonious against the general background. The good thing about the metal construction is that it makes maintenance easier in the future.
Canopy with support posts made of 8mm metal pipe
A good-quality large canopy will require a significant area, as well as the use of special construction machinery and equipment. It is hardly possible to do without additional help even when installing supports. If you use additional building materials and cover the canopy, you can get a protected structure in the form of a garage.
As a rule, pipes with a diameter of 8 centimeters or more are selected. They are filled with concrete mortar and also coated with anti-corrosion compounds.
Supports made of brick, stone or concrete look good and do not require additional protection measures, while their durability is decades. The use of wood is considered a cheaper option, despite the fact that wood requires high-quality protection and is not durable. The roof is not necessarily made of the same material as the columns. This approach allows you to have a unique design that combines incompatible design elements. As a rule, everyone wants to get away from templates in order to get their own, unique building.
Wooden supports
Wooden support structures are installed without the use of special equipment and you can often get by with just one assistant, having first dug the hole yourself or by hiring one worker.
Wooden structures have one significant drawback - they are afraid of moisture. To increase their service life, wooden structures must be treated with antiseptics, and such actions must be carried out regularly, every year. Naturally, only hard trees are suitable as supports.
Wooden pole option
If you pay attention to the table, you can make the right choice:
| Breed | Brinell hardness) | Density (kg/m3) | Note |
| Birch | 3,0 | 600 | Stability is average. Over time the color will deepen. |
| Larch | 2,6 | 500 | After a few years, a gray coating will appear. Regular treatment will be required. |
| Oak | 3,7 | 700 | After a couple of years the tree will become darker. |
| Ash | 4,0 | 700 | Fade quickly. Treatment with impregnation twice a year will correct the situation. |
| Pear | 3,3 | 680 | After a couple of years, a reddish tint will appear. If the house is made of red brick, it will look organic. |
| Cherry | 3,0 | 580 | Excellent stability. The color will become deeper in the future. |
| Pine | 3,5 | 550 | Features increased stability. Practically does not change color. |
When choosing structural elements made of wood, it is very important to understand that after several years of use, building elements made of wood will have a completely different appearance. If there are cracks, you should understand that the wood will dry out over time.
The best combination of factors such as price and quality is found in species such as pine and larch.
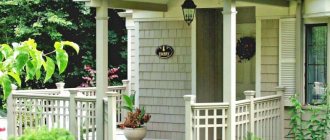
Standard variation of an open wooden canopy
It is important to know! The part of the support that is dug into the ground is especially susceptible to external influences. To extend its service life, this part is tarred or covered with a special impregnated material.
How to build a wooden canopy with supports over a porch
Wood is one of the most affordable building materials. In addition, it is easy to use, and if properly processed, a structure made of wooden beams can become a real decoration of the house. Therefore, it is not surprising that many owners who decide to install a canopy over the porch themselves choose wood for construction.
Wood is an affordable material for construction
What should you pay attention to when purchasing a substrate?
Planting material should be purchased at trusted specialized retail outlets. Preference should be given to sawdust, which contains fungal spores - they are more resistant to disease.
Also, a sawdust substrate is much more fruitful than others, because it allows the root system of fungi to take root and spread better.
Drawing and calculations for a wooden canopy
Before you make a canopy over a wooden porch with your own hands, you need to prepare a drawing and correctly calculate all the dimensions of the parts. It is very important to check all the angles and lengths of the beams in advance, since during the construction process even a slight error will lead to severe distortion.
The dimensions of the extension are calculated individually. The height of the building must be sufficient for an adult to stand on the porch without bending. The roof slope angle should be within 25-35°. When calculating the length and width of the structure, you should focus on the dimensions of the porch - you can add 50-60 cm to the original dimensions on the sides and free edge.
Advice. To clarify the dimensions of the canopy, you can lay slate or corrugated sheets on the ground, taking into account overlaps, and measure the resulting rectangle. These will be the dimensions of the roof of the extension.
Approximate drawing of a canopy with supports
Materials and tools for construction
To build a canopy over the porch, you need to prepare the following materials:
- processed wooden beam 15x15 cm for supports and rafters;
- wooden beam 75x75 mm and board 25 mm for sheathing;
- roofing material (slate, corrugated sheeting, galvanized iron);
- anchor bolts, staples and screws for installing the sheathing;
- self-tapping screws and slate nails;
- shovel, hacksaw, screwdriver, hammer, paint, tape measure and plumb line.
Before attaching the canopy to the house, you need to clear the construction site, mark the installation locations for the supports, and treat the wooden parts with bitumen or another compound to protect them from moisture and rot.
Description of species
Hanging structures may vary depending on various factors. For example, according to the location of buildings, they are divided into the following types.
Attached to a house or other object, it may have one or two walls. Most often, such a canopy is closed. In this case, when attaching timber to already finished walls, you can save some money on materials.
Awnings may also differ in roof type:
flat is most often made simply rectangular, without any tricks;
According to their purpose, canopies differ as follows.
for a car, as one or more parking spaces;
According to the organization of the roof, the suspended timber structure can be divided into:
single slope;
The lean-to option is most often presented in the form of an open structure. It can also be used as an extension or used as a utility unit. The gable version is somewhat more convenient and practical. It also fits better into different types of designs. It can be either a separate building or adjacent to residential or other facilities.
Step-by-step instructions for building a wooden canopy over a porch
Installation of the support beam on the wall above the porch:
- The location for attaching the support beam is marked on the wall.
- Using a plumb line and tape measure, draw an even horizontal line.
- A 10 cm beam is secured to the wall with anchor bolts. You can pre-cut grooves in it for attaching the rafters, or you can attach the sheathing on top of the support beam or with staples.
- If the width of the porch along the facade exceeds 2 meters, then it is necessary to install additional vertical supports along the edges of the horizontal beam.
Installation of vertical supports:
- Dig wooden supports into the ground to a depth of 40-50 cm.
- The holes with supports are concreted.
- After the mortar has hardened, cut the pillars to the required height and lay the second support beam on them.
Advice. To ensure that snow does not linger on the roof of the canopy, experts recommend calculating the height of the free edge using the formula - 10 cm for each meter of length. That is, if the length of the porch is 2 m, then along the wall the height of the structure should be 20 cm higher than along the free edge.
Support beam with rafter brackets
Lathing installation:
- Rafters (beam 75x75 mm) are attached to the support beams.
- The distance between the rafters should be no more than 80 cm, since with a larger step in winter, under the weight of snow, the roof can be severely deformed.
- The rafters are attached to the support beams in grooves or with brackets.
- Sheathing boards are laid perpendicular to the rafters.
- The distance between the boards should be such that each sheet of slate or corrugated sheet rests on the board in 3 places - the top of the sheet, the bottom and the middle.
The rafters are attached with U-shaped brackets
Laying roofing material:
- After the frame of the sheathing is ready, it is recommended to paint it or treat it with an anti-rotting compound.
- The slate is laid from the free edge. The roofing material is secured with slate nails.
- The finished canopy can be “ennobled”: install decorative railings or cover the sides with clapboard.
Finished wooden canopy with supports
Projects
As is the case with any other buildings on the site, before erecting a canopy it is important to develop a competent plan for the future structure. First, the master must draw up detailed drawings indicating absolutely all dimensional parameters and nuances of the structure
Only having a carefully drawn project at hand can you count on its high quality and quick construction without unnecessary errors.
You can draw up a project for a future building yourself, but this can be difficult to do if the home craftsman does not have extensive experience in such matters. In order not to waste time and avoid serious shortcomings in the drawings, it is advisable to use ready-made plans for canopies for parking spaces on the site. Let's look at several optimal projects.
A good gable canopy for a parking space can be built from bars with a section of 100x100 and 50x100. The height of the structure can be 2 m, and the width – 2.7 m. The structure will be neat and will be quite enough to accommodate one car.
Wooden canopy over the porch
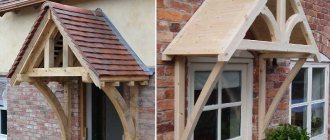
Another option for making a canopy over the porch with your own hands is to build a wooden canopy. The small structure can be easily assembled by yourself and then mounted above the porch on the wall. Such canopies can be of a wide variety of shapes - single-pitch, arched, gable, curly. But for a novice master, it is better to opt for a simple single-pitched frame.
Single-pitch wooden canopy
Before starting construction, it is necessary to calculate the dimensions of all parts according to the drawing. The width along the façade should be 50 cm greater than the width of the porch, and the length along the slope should be at least 70 cm. For consoles and crossbars, you will need a wooden beam with a cross-section of 75x75 mm; for lathing, thinner slats - 40-50 mm - are suitable. It is better to make the inclination angle of the visor approximately 30°. All parts must be treated with drying oil or painted before assembly.
The console of such a frame consists of three bars:
- the vertical one is attached to the wall and is the basis for fixing the strut and horizontal crossbar;
- the front support beam of the sheathing is attached to the horizontal crossbar;
- The strut serves as a support for the entire visor.
Construction of a wooden canopy
The rear support beam is attached to the ends of the vertical bars. To attach the sheathing, you can select grooves in the rafters or simply cut off the ends of the slats at the desired angle and screw them onto the rafters with self-tapping screws. You can cover such a canopy with slate, galvanized iron, corrugated sheeting or ondulin. To reduce noise from rain, it is recommended to lay roofing material or mineral wool under the roofing material.
Anchor bolts are used to attach the wooden canopy to the wall. It is worth considering that the fasteners must fit into the wall at least 2/3 of their length - then the canopy will not move away from the wall and will be securely fastened to the facade. For a strong fixation, it is better to attach not only the consoles to the wall, but also the upper support cross member of the sheathing.
Polycarbonate canopy - how to make it yourself
Polycarbonate structures stand out not only for their beauty. These are strong, reliable and durable structures that are easy to assemble even for inexperienced builders. Therefore, it is not surprising that many owners of private houses want to install a polycarbonate canopy over their porch instead of the old wooden canopy.
Polycarbonate is well suited for making canopies and awnings
What you need for a polycarbonate visor
To install a polycarbonate canopy with your own hands, you will need the following materials and equipment:
- frame drawing (calculate the dimensions of the parts in advance using your measurements);
- metal pipes or corners for making a frame;
- polycarbonate for roofing;
- welding machine, grinder, drill;
- screws, brackets, anchor bolts.
A simple diagram of a cantilever-type direct visor
The dimensions of the polycarbonate canopy should not be very large; it is enough if the roof protrudes from each side of the porch by 25-30 cm. It is better to take cellular polycarbonate for an arched canopy, with a thickness of 6 mm. Monolithic polycarbonate is more suitable for straight structures. The size of the polycarbonate sheet is calculated according to the dimensions of the frame - the roofing material should protrude from the sides by 10-15 cm, along the free edge - by 20 cm.
Stages of installation of an arched polycarbonate canopy
It’s not difficult to make your own polycarbonate canopy on a metal frame. The main thing is to have the necessary equipment and experience with welding. The frame is assembled on the ground and only then attached above the porch.
Approximate drawing for an arched canopy under polycarbonate
- According to the prepared drawing, it is necessary to cut out the parts for the frame and mark them.
- To make arches on pipes, use a grinder to make deep notches of ¾ of the diameter at regular intervals, then bend the parts with an arc.
- Connect the arcs together with crossbars. In total, you will need 4-5 crossbars - two connect the edges of the arches, the rest are evenly distributed along the length.
- Two long pipes are welded along the length for rigidity; along the free edge of the arch, instead of a pipe, a forged patterned element can be installed.
- Vertical consoles are attached to the wall edge of the arch by welding or connecting corners.
- To give strength to the frame, struts must be installed from the free edge of the arch to the console supports.
Ready-made metal frame for a canopy
Before covering the frame with roofing material, you need to decide how to attach the canopy to the wall of the house. If you plan to use anchors, then you need to drill holes for bolts on the console supports and the wall arch, attach the frame to the facade, mark the mounting points on the wall, and then drill the wall according to the marks.
To fasten with brackets, mark the location of the canopy on the facade, install the brackets and fix the frame on them.
The final touch remains - polycarbonate sheathing. This material bends well and is easy to attach yourself. The polycarbonate is secured to the outer and central crossbars with screws and a thermal washer. Experts recommend making holes for screws 5 mm larger than the diameter of the fastener - this will avoid distortions and deformation of the visor.
Polycarbonate fastening scheme
Options for attaching canopies to the wall
Information on how to build a canopy over a porch will be incomplete if you do not consider the issue of mounting the structure to the wall of the house. The reliability of the extension itself and its service life depend on the correct fastening of the frame to the wall. There are several options:
- welding to built-in fittings;
- mounting on brackets;
- fixing the support beam to the wall with anchor bolts.
Scheme for attaching a wooden canopy to the wall before facing work
With built-in fittings, everything is simple - sections of steel pipe or rod are laid in the wall during the construction of the house, and the frame is welded to them. But other options need to be considered in more detail, since they are the ones most often used for light awnings over the porch. The pictures below show how to screw awnings directly to the wall of an already built house.
Fastening the canopy rafters with brackets and on the beam
Figure (c) shows how to attach the rafters with staples to a support beam fixed to the wall with long anchor bolts. In Fig. (a) shows a U-shaped bracket, such as is used for light awnings. Figure (b) is a diagram of fastening the rafters in the grooves of the support beam (1 – support beam, 2 – canopy rafters, 3 – anchor bolt, 4 groove of the support beam, 5 and 6 options for fixing the rafters with a pin and nail).
Important! If the length of the canopy exceeds 2 m or there is no confidence that the wall will support the weight of the roof, then pillars must be placed under the support beam.
The rafters are fixed to the wall with brackets
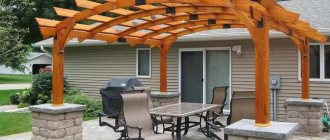
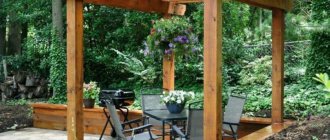
Ideas for building canopies and canopies - photo gallery
Above are examples of the simplest canopies. But such designs can be more complex. The photo shows that the design of canopies in the yard depends on their purpose - for economic purposes (storing firewood, hay) they choose simple forms, but for recreation and decoration they erect real works of art.
A canopy over the porch is not only about protecting the front door from bad weather. It is also a decorative element that emphasizes the architectural style of the entire building. Elegant and massive, metal and wood, plastic and forged - the design of canopies in a private house in the photo is varied and depends only on the imagination of the master.
As you can see, even an inexperienced craftsman can make a canopy over the porch with his own hands. But if you are not confident in your own abilities or you need an exclusive version of the canopy, then there is always the opportunity to turn to professionals who will not only develop a project especially for you, but will also help with the installation of the finished canopy.
Design
Quite often a situation arises when it is necessary to erect a canopy or canopy over a building. This is a fairly simple design that any man can build without any special skills. There are many ideas for this building on the Internet. However, it is necessary to take into account certain design features to ensure that the canopy lasts a long time and properly.
It is necessary to take into account the climatic features of the area in which the canopy is created, the location of the building on the cardinal points, and the features of the foundation of the building
It is equally important to choose the right coating
The easiest way to create a canopy or canopy is when it is attached to an already finished building. The more thoughtful the project, the easier it is to make all kinds of calculations of the required material. There are no small details in construction, and absolutely everything needs to be taken into account. If the calculations are made correctly, and the project includes a variety of little things, then construction will proceed with ease.