Useful tips
To make a bird feeder, you need to have a few simple items and tools.
You can make a feeding trough with your children, but keep in mind that you need to watch every step, since during the construction process sharp things are used - scissors, knives, screwdrivers and even, sometimes, a saw.
There are many options for feeders - made from plywood, plastic bottles, tin cans or cardboard.
Here are the most interesting, popular and original ideas for creating a feeder:
Feeder made from a plastic bottle. Option 1.
You will need:
- any plastic bottle
- tape, thread or fishing line
- an awl or drill (for making holes in the bottle and plastic cap)
- bolt and nut
- stationery or simple knife (if necessary)
- deep plastic plate.
1. Prepare a plastic bottle. Remove the label from it, wash it well and dry it.
2. Make a hole in the middle of the lid and plastic plate.
3. Attach the lid to the plate using a bolt and nut.
4. Make a hole in the bottom of the bottle (bottom).
5. Make several holes on the side (4-5), near the neck of the bottle, so that the food can spill out when you turn the bottle over. Holes can be made with a stationery knife if the bottle is not too thick.
6. Take the ribbon, fold it in half, and tie the ends in a knot. Thread the ribbon through the hole at the bottom of the bottle.
Now you can pour food into the bottle, screw on the cap and turn it over. The ribbon will allow you to hang the feeder on a branch.
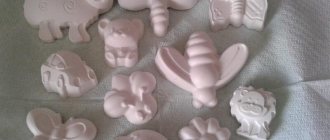
Original polymer clay feeder
You will need:
- polymer clay
- rope
- thick wire or piece of aluminum
- a baking bowl or any other dish that can be placed in the oven
- a small piece of fabric.
1. First roll out the clay on a flat surface until it is about 6mm thick.
2. Carefully place the rolled out clay inside the baking bowl. Trim off any excess pieces so that the clay lies flat. Make 3 large holes in the clay for the rope.
3. Place the bowl of clay in the oven. Read the clay instructions carefully to know how long it takes for the clay to harden in the oven.
4. When the clay has hardened, carefully remove it from the bowl, tie three pieces of rope to it - tie a knot at one end of each rope, and insert the other end into the hole of the clay plate.
5. Tie all ends of the rope and secure them with wire.
6. It is advisable to place a small piece of fabric inside the plate so that the birds do not accidentally peck the clay along with the food.
Features of bird food
The diet of birds, like any living organism, should be healthy and balanced. You can include in your diet:
- watermelon, sunflower and pumpkin seeds;
- dry rowan and viburnum;
- fresh apples;
- peeled raw crushed nuts - pine, walnuts, peanuts and hazelnuts;
- oats, millet, buckwheat, barley and wheat - in the form of cereals.
Tits will not refuse fresh lard without salt, and bullfinches love to feast on maple and ash seeds. All birds are allowed stale wheat bread and its crumbs, but you must make sure that there is no mold on it.
You cannot feed the birds with fresh white bread and baked goods made from rye flour (black bread), salted nuts and fried seeds. Also prohibited are oatmeal, snacks (crackers, chips), desserts, and sweets. The peels of citrus fruits, mangoes and bananas with avocados contain sugars that are poisonous to birds, so they should also be excluded. Buckwheat, rice, and pearl barley porridge tend to swell and cause discomfort. Ornithologists add oatmeal and any smoked, salty, spicy food to this “black list”.
Thus, everyone can do a good deed - make a convenient feeder and save birds from starvation in winter. All you need is a little inspiration, free time and a desire to make the world a better place!
Original do-it-yourself pumpkin feeder
You will need:
- small pumpkin
- wooden crossbars (even branches can be used)
- thin wire.
1. You need to cut off the top of the pumpkin.
2. Using a knife or screwdriver, make 4 holes in the pumpkin to insert branches or wooden slats into. Make 2 opposite holes at the same height and two other opposite ones slightly lower - this way you will have one branch slightly higher than the other.
3. Take a thin wire and wrap it around each end of the branches so that the feeder can be hung on the tree. Connect all the ends of the wire so that the feeder can hang evenly. Twist them into a hook.
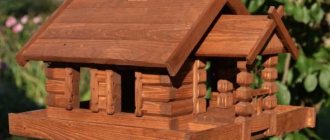
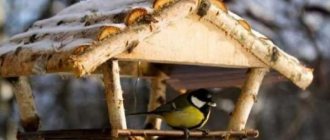
Forest dining room made of wood
The most common food platforms for winged residents are wooden. A wide range allows you to choose wood to suit your taste. It is easy to process and does not require many tools. An important condition is the resistance of the rock to moisture.
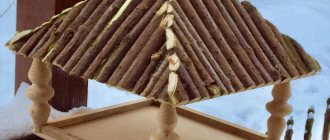
Wood of larch, cedar, and some other species are suitable for blanks. In other cases, it is possible to use roofing felt, which will protect the roofs of small houses and dining rooms from rain and snowfall.
They are made from planks and slats. Planks treated with impregnation or a protective coating will last a long time. The slats are secured with small nails or universal glue.
Sticks and plywood on trees are almost invisible. The finished product from them does not need to be processed. Birch wood produces real works of art. For durability and safety, the craft must be varnished.
There are a sufficient number of sources where it is easy to find the version of the product you are interested in.
A drawing of a bird feeder made of wood with dimensions and photos can be found at the bottom of the article, and you can simply print it out.
The proposed versions are convenient and save time. There is always an opportunity to make changes.
The variety of designs is amazing. Each proposal presented has advantages and disadvantages. Experienced craftsmen invent incredible masterpieces for birds. Elite options are being created. They require experience and skill in working with a jigsaw to decorate birdhouses and living rooms with openwork patterns.Feeder diagrams are attached to the drawings. They are clear and easy to read. With their help, it’s not difficult to build a small house for birds, or invite them to the table.
To create your own version, you must first think about how to draw a feeder, and then create diagrams on which to make the product. Various ideas appear.
When the future model is selected, the necessary materials and tools are prepared.
Original DIY bird feeder idea
This feeder is suitable for sub-zero temperatures.
You will need:
- large plastic bottle
- small plastic bottle or small plastic container
- knife
- scissors
- coniferous branches
- berries (optional)
- seeds
- water.
1. Cut off the bottom of a large and small plastic bottle. First you can make a hole with a knife and then cut with scissors. You will have the base of the feeder.
2. Place spruce branches, berries and seeds in a circle in the cut-out bottom of a large bottle.
3. Place the bottom of a small bottle or small plastic container in the center of the base.
4. Pour earth, sand or pebbles into a small container.
5. Tie strong threads or fishing line to the feeder so it can be hung.
6. If you put the feeder in the freezer overnight, and then take out and remove the plastic parts, you will get an ice feeder.
How to make a feeder with your own hands using a bottle
You will need:
- a small glass or plastic bottle (preferably with a lid)
- a small saucer or the bottom of a plastic bottle
- plywood
- wire
- saw (if necessary)
- half-ring screw (hook).
1. Using screws, connect two small pieces of plywood. In this example, the dimensions of the plywood are 11 x 15 cm and 31 x 15 cm.
2. Using the bottle that you will later attach to the stand, mark the places where you will need to attach two pieces of wire - one at the neck, the other at the bottom of the bottle.
3. The neck of the bottle should be approximately 3-4 cm above the base.
4. Drill holes for the wire, insert your wire through the bottom, wrap it around the bottle and secure it to the back of the plywood (you can twist the wire or secure it with a stapler).
5. Fill the bottle with seeds, screw the lid on so as not to spill the seeds, turn it over and insert the bottle between the wires, place a saucer under it and remove the lid.
6. Screw a half-ring screw into the top of the plywood to hang the feeder.
Rules before production
- Sides are needed to protect the feed from the wind.
- To avoid injury, it is better to sand sharp edges.
- A roof is required, then the food is not afraid of bad weather.
- Close the way for cats.
- Do not create closed places; birds are afraid of them.
- Choose reliable material.
- Consider weighting agents for a lightweight product.
- Ensure that food cannot fall out on the ground to avoid attracting predators.
Original DIY bird feeder
You will need:
- tin can (preferably with a lid)
- sisal rope (sisal rope) or thick rope
- a piece of thin plywood, a branch or any small metal part
- hot glue.
1. If you have a jar with a lid, then the lid needs to be bent in half.
2. Take a small branch, piece of plywood, or other small piece that birds can perch on and glue it to the jar.
3. Insert the bent lid as shown in the image (slightly inside the jar and over the metal part) and secure it with glue.
4. Take a thick rope or rope about 80 cm long and start wrapping the can so that the long ends of this rope (30 cm) remain at the beginning and at the end. Use glue to secure the rope to the can.
5. Cut the rope, tie the ends in a knot and secure with glue.
Wooden feeders
Quite a common type of product. It will last much longer if all parts are treated with special impregnation during manufacturing. You can use not only wooden planks as parts, but also blocks and slats.
For additional decoration, you can use untreated tree branches, such as birch. All parts are fastened either with self-tapping screws and nails, or with glue.
How to make a bird feeder from a plastic bottle
You will need:
- plastic bottle (1.5 l or 5 l) or canister
- sharp scissors or stationery knife
- rope
- scotch
- sand.
1. Cut a large side hole in the bottle, preferably through. It is better to first draw a marker where the hole will be.
2. To make it more comfortable for the birds to hold on, it is better to cover the edges of the bottle with tape.
3. Place sand on the bottom of the feeder to prevent it from swaying too much.
4. Tie a rope to hang the feeder.
You can decorate the bottle to your taste.
Here are other similar feeders:
Unique cafe
The good thing about a bird feeder made from a juice box is that you don’t have to separately prepare and purchase cardboard. This technique does not cause any difficulties at all. To create the result you will need scissors or a knife and a thick thread.
Large holes should be cut along the two wide sides, and two tiny holes should be made at the top with a knitting needle or awl to thread a thread or lace. The product is ready. All that remains is to hang it in the garden. It's time to invite residents.