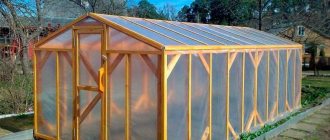
Polyethylene, polycarbonate and even metal-plastic - what greenhouses are built from! Did you know that an inexpensive, easy-to-build, but very reliable and generally good structure can be built from old window frames left over, for example, after replacing wooden windows?
Greenhouse made from old window frames
The following detailed instructions will help you carry out construction without any problems.
Greenhouse made from old window frames
How to choose a location and size
It is best if the place for the greenhouse is on a hill. Firstly, snow melts faster in spring, and secondly, water will not stagnate during summer rains. Plus good natural light, necessary for the development and growth of plants.
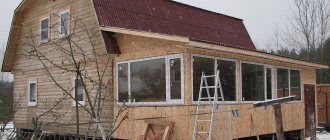
As for the size, it all depends on the number of frames. For example, from 6 old window frames you can build a greenhouse measuring 2 × 4 m, as in the photo.
Construction stages
Before starting construction work with your own hands, it is worth considering the location of the frames in advance in order to minimize the adjustment of the greenhouse in height and width. Therefore, it is better (if possible) to use old window frames of the same height.
You can simply lay out the frames on the ground to understand how to correctly arrange the parts, then number each frame. Then sketch out the drawing on paper. Mark the approximate location of the beds, taking into account the passage between them (a person with a small wheelbarrow should move freely).
Also read: How to build a chicken coop for 10 chickens with your own hands
Polyethylene film or polycarbonate is suitable for the roof. The latter option is more reliable and will last 2-3 years. The film will have to be changed next year.
Tools required for work
During the installation of a greenhouse you will need:
- cord and pegs;
- hammer;
- screwdriver;
- a circular saw;
- building level;
- drills of various diameters;
- square;
- roulette;
- shovel;
- polyurethane foam.
During work, it is convenient to use a tool with a battery or a power tool.
How to make a foundation
To begin with, you need to decide on a place. It is better to choose a site taking into account the following requirements:
- protection from strong winds;
- good lighting - do not build a greenhouse under trees or next to a high fence;
- away from the septic tank or latrine;
- It is better to position the greenhouse from north to south to provide natural light throughout the day.
When choosing a location, you should pay attention to the composition of the soil. Building on wet or swampy ground is not a good idea. A building made from old window frames will sag over time. It is best if the area chosen for the greenhouse has dense and dry soil.
Before starting to build a greenhouse with your own hands, it is worth checking the depth of groundwater. If the indicator is less than 1.5 meters, then it is better to choose another site for the greenhouse.
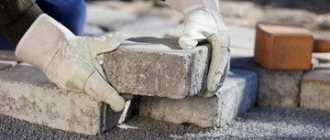
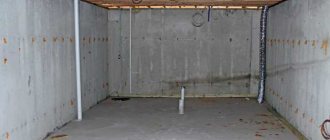
It’s not bad if there is a layer of sand under the fertile soil layer. If not, then you will need a gravel-sand cushion for the foundation. To do this, you need to remove the top layer of soil, as in the photo, evenly distribute gravel on the surface, and on top - a layer of sand (about 20-25 cm).
Strip foundation step by step
Pouring the foundation can take from 14 to 20 days (depending on the weather), so it’s worth calculating the timing in advance. Dig a trench around the perimeter of the future greenhouse; 40 cm deep will be enough. The width, depending on the weight of the future structure - for wooden frames 30 cm is enough. If you plan to build a large greenhouse, when calculating the depth of the foundation, take into account the level of soil freezing.
The next step is formwork. Boards and moisture-resistant plywood are suitable. To prevent the boards from moving, parts of the formwork are fixed with wooden pegs. The structure should rise 30-40 cm above the ground.
Crushed stone (10-12cm) is poured into the bottom of the trench and leveled. For additional reinforcement, you can use an armored belt.
Afterwards, cement mortar is poured with the addition of fine gravel (cement grade M-200). To prevent the formation of air pockets and voids, the concrete mass is often “pierced” with an iron rod (rebar).
Afterwards, the structure must be covered with film and left for 4-5 days. This is necessary to prevent rapid evaporation of moisture from the surface and prevent cracking. When the cement has set, the formwork is removed, the structure is again covered with film and left for 10 days to completely harden.
Advice! In hot weather, the foundation should be periodically watered to prevent cracking.
Before installing the frames, the base is covered with waterproofing material. For these purposes, roofing material in 2 layers is suitable.
Frame preparation
First, you should check the frames and remove rotten or damaged parts. To prepare structures for installation, you need:
- remove excess handles and hinges that will not be used later;
- remove the peeled paint - the main part using a scraper or an ordinary knife, the remaining part - with a grinding machine;
- treat the wood with an antiseptic to prevent rotting, fungal infection, and protect against insects;
- For additional protection, the frame can be painted;
- remove the glass from the frames so as not to break it during installation;
- Fix the windows so that they do not interfere (adhesive tape, self-tapping screws, nails will do).
After that, all that remains is to adjust the frames in height - it depends on the height of the future greenhouse.
Step-by-step instructions for constructing a greenhouse from window frames on a foundation with photos
Detailed step-by-step instructions for erecting the main part of the greenhouse:
| Illustration | Process |
| Cover the foundation and base with roofing felt sheets for waterproofing. | |
| Mount beams for the bottom trim on top of the anchors. Connect with corners. | |
| Make markings for vertical supports. | |
| Install the corner posts, checking their level. Install intermediate supports. | |
| Using bars, make a temporary fixation so that the supports do not warp. They can be removed only after completing the entire installation. Build a harness on top. It will prevent the racks from tilting. | |
| Attach the frames to the frame using self-tapping or ordinary screws. This will prevent damage to the glass that may occur when using nails. Seal all cracks with foam. | |
| Build a roof. | |
| Install doors and caulk gables. You can use film or polycarbonate on the roof. |
Note! If the structure is long, intermediate posts will be necessary to ensure the structure is secure.
Forming beds
This is best done before installing the frames. The first layer (the so-called biofuel), approximately 2/3 of the height of the foundation, consists of cuttings of branches, mowed grass, and manure. The mass is compacted and watered generously.
On top is prepared soil. The soil extracted while digging a trench for the foundation is used. If you first sift the soil and remove the roots of the weeds, then later you will have to weed the beds much less often.
Heavy soil can be mixed with sand and peat. Proportions are selected depending on what crop is planned to be grown in the greenhouse.
Also read: Flower beds and flower beds with your own hands at the dacha that bloom all summer
The level of the beds should be 15 cm below the base. The remaining soil can be collected in bags and used for filling after subsidence.
Building a frame
After pouring the foundation, you can proceed to manufacturing the frame of the future greenhouse. The most suitable materials for this are timber or board. However, you need to know the width of the frames in advance.
Next, along the perimeter of the foundation, you should measure segments that exceed the width of the window opening by 5-7 cm. At the junction of the segments, you need to make a mark. In the marked places, risers made of timber are installed. They should all be the same height.
A thick thread is pulled along the tops of the pillars. It is best to use a level to immediately see how level the pillars are. Protruding tops need to be corrected.
The pillars themselves must be smooth on all sides, so it is better to cut down branches and bulges. Once they are completely leveled, timber can be laid on them. It is placed on the tops in a horizontal direction.
Now it is possible to see the cells in which it was originally planned to install window frames. Next, you can begin installing the windows. The glass should be fastened carefully so that there are no gaps. It is important to be careful not to accidentally break the glass.
The resulting cracks and joints are covered with a layer of polyurethane foam. To prevent the dried foam from drying out under the rays of the sun, it is treated with putty or paint.
Do-it-yourself mini-greenhouse on the windowsill from photo frames
If you want to make a small greenhouse for growing seedlings on a windowsill, it is best to use photo frames for this rather than large window frames. They are very inexpensive, and the finished greenhouse will be not only functional, but also very beautiful.
| Illustration | Process |
| It is best to use wooden frames. You will need:
Before use, they must be polished to remove paint. |
| First of all, the frame is assembled. The 28 x 35 frame is combined with the 20 x 25 cm frame so that their 28 and 25 cm sides touch, the back side of the 25 cm frame must be pressed against the outside of the 28 cm frame. |
| You need to connect the frames by drilling a small diameter hole through the inside of the larger frame and going through to the middle of the smaller one. Then fasten the frames using a screw that matches the diameter of the drilled hole. |
| Continue connecting frames until you have a rectangle formed by the four largest frames (two 28 x 35 cm frames and two 20 x 25 cm frames). | |
| The next step is to assemble the roof. You need to connect four small frames with dimensions of 13 x 18 cm. Connect them in pairs and fasten them together, making a triangular roof. Attach a hinge so that you can open the greenhouse and water the plants. Place two 13 x 18 cm frames side by side so that their short sides touch. Connect them using 5 cm strip steel plates, screwing it to both parts. To make your task easier, you can drill a pilot hole. Repeat for other 13 x 18 cm frames. Connect the structure of small frames, placing them at a 90° angle along the long boards and secure it with corner brackets. |
| The next step is to attach the roof to the main structure using inch hinges, placing them on the connecting boards at equal intervals. |
| Afterwards you need to seal the triangular hole in the roof; you can use a piece of plywood. It can simply be nailed to the frame with small nails or screwed with screws. |
| Paint the finished frame with wood paint before installing the glass. |
| Insert glass. The greenhouse is ready! |
Roof installation
This is the final stage of the process of building a greenhouse from old window frames. The roof can be made in two versions - single or double slope. Do-it-yourself installation of a lean-to structure consists of several stages (the photo shows how to do it correctly):
- First they make a support for the rafters. To do this, boards are laid on a horizontal beam. Since the beams will be inclined, nests are cut out in the boards to ensure that the roof is stable.
- The next stage is the formation of the slope. Risers are installed in each corner of the wall, and timber is laid between them. It is due to this that the front side of the roof will be attached.
- The side boards installed on the roof are attached to the cross beam with screws.
- Locks for the rafters should be made in the board located on the edge. A special template similar in shape to the letter “P” is best suited for this. The groove is cut along the entire length of the beam.
All rafters must also be carefully aligned. The easiest way to check this is with a stretched cord. Once the rafters are in the same plane, you can begin laying roofing material on the roof. Cellular polycarbonate, as well as glass or special film, are ideal for the roof of a greenhouse.
In such a greenhouse the plants will be very comfortable. And the appearance will delight the owners. To obtain an ideal result, it is better to use a level at all stages of construction and eliminate unevenness.
Construction of a mini-greenhouse
Having completed the construction of a “frame” greenhouse, you can practice a little by creating a mini version.
Preparatory stage
If, when creating a regular greenhouse, you use window frames as walls, then for mini-greenhouses the frame plays the role of a roof. Wooden planks are used to construct the walls. During the day, the roof opens to ventilate the planted plants. When calculating the size of the future building, take into account the width of the window frame. It must match the dimensions of the greenhouse. The shape of a mini-greenhouse is usually made in the form of a rectangle rather than a square. To do this, the roof is laid out from several windows.
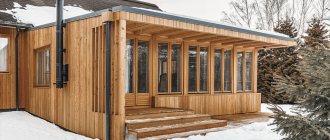
Greenhouse made from window frames in the country
To build the frame, you will need boards. For racks, use wooden beams (4 pieces). Dig prepared beams in the corners, and special shields need to be built from the boards. The height of the shields should be different so that precipitation can roll off the sloping roof. To do this, nail one more board on one side than on the other. Make sure that the roof fits tightly against the panels. Trim off the excess edge of the board. Secure the boards to the beams with nails.
Old windows are very practical in the household
Erection of the roof
The assembly procedure for a mini-greenhouse is simple, so there is no need to remove the glass from the window frames.
Greenhouse made from window frames
You can begin installing the roof right away.
Step 1: Position the window frames perpendicular to the long side of the greenhouse.
Step 2. Secure them to a high wall using window hinges.
Scheme of a greenhouse made from window frames
Step 3. There is no need to connect the frames together. This will allow you to ventilate the greenhouse by opening one part of the roof. All parts of the roof must fit tightly to each other.
Step 4. Screw special handles to each frame so that they (the frames) can be easily opened.
Step 5. Install the retainer on the short board.
Step 6. Cut a special strip that you will use to support the open frame.
At this point, the construction of the mini-greenhouse is completed. You can plant seedlings there and pamper your family with fresh vegetables.
Frame made from old windows and straw bales. Manure or compost is placed at the bottom under a layer of fertile soil, this will help retain heat.
Useful tips
For those who are building a greenhouse with their own hands for the first time, the first step is to familiarize yourself with advice from professional builders.
This will allow you to avoid many mistakes when building a greenhouse.
- An electric tool makes the job much easier. A jigsaw and a screwdriver will help you make a high-quality greenhouse and also save time.
- If you decide to build a greenhouse frame from timber, you need to calculate its thickness in advance. Very thin supports may not support the weight of the roof, and the greenhouse will quickly collapse.
- Vertical supports can help make the greenhouse truly reliable and durable. They should be prepared in advance. You should not use old windows to build a greenhouse roof. Polycarbonate or a special transparent film are better suited as roofing materials.
- If the roof turns out to be too transparent, it is recommended to cover it with a layer of chalk suspension. Otherwise, too bright light will come inside, which will cause heat. Additional processing will allow the plants to be in diffused light.
- The beams for the greenhouse must be absolutely dry. If one of the supports does not dry out completely, it will quickly become warped. This may cause the window to crack. The service life of a greenhouse built from old window frames with your own hands may vary. But it will be quite long if all construction rules are followed.
Antiseptic measures and regular glass washing also contribute to the long-term operation of the greenhouse. Step-by-step instructions and photos will help you do everything without mistakes.
Post Views: View statistics 1,044