Review author: Terrari School of Design
Everyone is familiar with a grill or a barbecue, but the tandoor is used less often, since making it yourself seems too complicated, and the high price of the finished product scares off potential buyers.
But, if you consider the detailed instructions on how to make a tandoor for your own use and understand its useful functions, then this idea does not seem useless. Thanks to it, it’s easy to boil water, cook pilaf using a cauldron without additional devices, you can bake golden brown flatbreads and create other delicious dishes.
What does tandoor look like?
If you look at a photo of a homemade tandoor, you can see the shape of a cylinder or barrel, but sometimes a large product in the form of a jug is used. Thanks to the simple device, it is possible to create very tasty dishes or various flatbreads.
The main advantage of the tandoor lies in maintaining high efficiency as a result of fuel combustion. Easy access to high-temperature processing of products is available based on maintaining the long-term operational condition of the product. But kebabs can only be placed vertically. Therefore, horizontal grills and barbecues for preparing it look preferable.
However, many consider the vertical arrangement to be a significant advantage, since the meat juices flow downwards and provide a richer flavor without losing much of the nutrients.
Other masonry options
To save consumables, some craftsmen use masonry - a vertical spoon. At the same time, the height of the stove also has 4 rows, but when building walls, the bricks are joined together not by a bed, but by a long side edge. But all technology remains unchanged. But it should be said that the strength of this design leaves much to be desired. Therefore, in this case, it is imperative to lay out the outer frame.
You can simplify the masonry process and make the stove in the shape of a strict cylinder. That is, do not make a neck at the end. At the same time, heat loss during cooking will increase, but not critically. And in this case, you can go two ways. Use a vertical poke in the masonry or place the brick horizontally.
Masonry from halves Source ad-cd.net
Tandoor dimensions
Usually vertical or horizontal versions of the tandoor are used. But multifunctional qualities are provided by the first option, which is why it is very popular.
Thanks to it, it is easy to create a temperature of 250 - 400 degrees, which will not work if you use a barbecue or grill, since they involve increased heat losses.
To create a high-quality device, you need to rely on well-thought-out tandoor drawings. The product must take into account various factors:
Convenient maintenance is provided: with firewood with the possibility of comfortable access to the internal sections based on the extraction of ash, thanks to the neck.
The standard size of a tandoor is 1 - 1.5 in height and 1 meter in diameter. The middle part is 40, the diameter of the hatch is 60 cm, they are reinforced with a metal ring.
Features of operation
During the operation of the tandoor, the following aspects must be taken into account:
- When igniting, the firebox must be filled 2/3 full. This is enough to get optimal heat.
- It is recommended to ignite the fuel using a nozzle. It is not recommended to use gasoline or diesel fuel. When they are lit, there may be popping noises that can damage the walls of the oven. In addition, unpleasant odors can be absorbed into food, affecting its taste.
- The walls of the tandoor become very hot - the temperature inside can reach 400 degrees. Therefore, it is not recommended to touch the walls of the stove while fuel is burning. In the future it is possible, but only with the use of special heat-resistant gloves.
- The stove can be moved only after the fuel has burned out.
- When the fire is burning, you should not lean over the neck of the tandoor. This can cause burns, as there is very high heat above its surface.
Taking into account the above recommendations, operating the tandoor will not cause any difficulties. Thus, the design can be made independently. You can also buy a portable tandoor in Moscow or another city in specialized stores.
How to keep more heat?
To increase efficiency and retain heat, additional laying of the base of the product is used, and the space between them is filled with refractory material, such as slag or expanded clay. This method of device allows you to increase the combustion power.
Additionally, a blower is mounted from the bottom. To protect from rain and wind, a sealed lid is used to cover the neck. To understand the basic principles of proper use, you can rely on video lessons that allow you to see how this happens and what needs to be done.
Creating a "rule"
Traditionally, the width of the base of the roasting pan being made should be the same size as the height. The neck is one third smaller in relation to the base.
Based on this, a “rule” of the following dimensions is assembled:
- Pole height - 100 cm;
- base length - 0.3 m;
- second level - 0.25 m;
- the distance between the guides is 0.25 m.
You can take a piece of plywood as a template for building a vertical wall. In particular, you can use a wooden slats from a regular bed.
Stages of making a tandoor
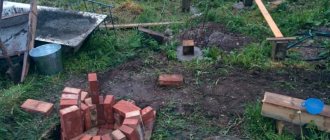
To make a tandoor with your own hands from a barrel, you will need a little material and time to work. The manufacturing process occurs in stages:
- A clean drum is used based on a volume of 200 liters. It is thoroughly washed using high water pressure. It is better to use a new barrel, which will save time on cleaning it and guarantee an increase in service life. But in both cases, disinfection with alcohol or high temperature is necessary.
- Choose a convenient place to place the device. A mound of sand is created in a pre-dug hole based on a height of 1.5 meters and a diameter of 70-90 centimeters, depending on the size of the barrel. To begin with, a brick foundation is laid out.
- You will need a grinder. It will help cut barrels and bricks.
- The end side with the filler hole of the barrel is removed.
- A hole is made in the lower part of the barrel on the side. This place is used as a blower and will provide air injection. Otherwise, there is no traction and the fuel will not burn.
- The inner surface is lined with bricks; it is better to rely on a fire-resistant type of material. The layers are connected with clay or fireclay mortar.
- After the connecting solution has dried, the inside of the tandoor is coated with clay. Cement should not be used as it spreads and may crumble.
- To close the ashpit, a brick with a built-in metal or wooden handle is used.
The fat is collected on a tray, which is mounted at the bottom of the barrel. It is attached to metal chains, thanks to brackets connected to the top of the tandoor. If you abandon such a reliable and simple device, there will be difficulties in the process of removing this dirty part of the product.
Based on suitable dimensions, a reliable wooden or metal lid is created. Additionally, you can make a small lid with holes for kebab skewers. The main one will close the tandoor to maintain high temperature.
After the tandoor has dried, it is necessary to heat the created stove. The inner surface of the product must not be allowed to crack. To do this, the clay coating is coated with vegetable oil. Thanks to this, high temperature transforms clay into ceramics, which guarantees a long period of operation.
Important: Do not touch the hot surface of the tandoor; this can cause a serious burn.
Design and principle of operation
A stationary tandoor is a cylindrical clay oven, the neck of which is narrowed so that the structure resembles a large jug. But there are also designs in the form of a regular cylinder or shaped like a barrel. When both the top and bottom are narrowed.
As a rule, the stove is installed on a wide pedestal, and the structure itself has a blower at the bottom, which provides draft for burning the fuel. The latter can be charcoal, firewood or large brushwood. Its insertion is carried out through the neck. And in many models it is also necessary to remove ash through it.
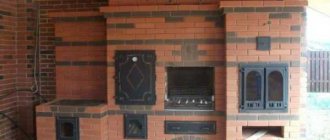
In the classic design, a clay grill is surrounded in a circle with a brick frame. It can be round or square in shape. Thermal insulation material is distributed between the masonry and the outer walls of the furnace. In the old days, sand, salt or powdered clay were poured there. This helped keep the fireplace warm literally until the very end of the day. And they melted it in the morning.
Brick lining Source ideas.homechart.ru
Modern technologies make it possible to produce refractory materials of almost any shape. Yes, and such structures are used more for exotic things, instead of a regular barbecue. Just to pamper guests with original vertically cooked kebab and famous, delicious Uzbek flatbreads. And to do this, light the stove for a maximum of three hours.
Therefore, current tandoors are most often made only of brick, and structures in the form of a clay jug perform only mobile functions. But even a modern stove has thick enough walls to accumulate heat for a long time. And if the kindling is carried out correctly, the inner surface heats up to 400°C. Therefore, the tandoor device allows you to bake bread directly on the walls.
For convenience, the tandoor is equipped with various accessories. For example, a special holder for skewers. In this stove they are not stacked horizontally, but hang vertically inside the fireplace. There are also different grates on which you can bake vegetables or fish. True, it requires considerable experience and caution to handle them without getting burned. The fireplace with hot coals is covered with a lid on top.
Stationary tandoor Source postroika.biz
A distinctive feature of a tandoor from a regular barbecue is that food in it retains literally all its juices throughout the entire cooking process. Thanks to the tightness of the structure, a constant temperature is maintained and this does not allow the products to dry out. You can also cook and fry in a tandoor.
For this, special dishes are used. For example, a large cauldron with a rounded bottom and larger than the neck. It is installed on top, and it closes the oven like a lid. It makes delicious soups and roasts. Also a huge frying pan with the same bottom as a cauldron. Pilaf cooked on such a brazier is considered the most delicious in the world.
Rules for using a homemade tandoor
Our product is dug into the ground, so it cannot turn over. This is its main advantage over the purchased option; you do not need to look for a flat surface for installation.
Thus, our tandoor for a summer house or country house is initially provided with additional safety. However, let’s consider the main points of its operation:
- After kindling, the product becomes a source of heat. A fire burns in it that can rise above the neck. Therefore, the temperature is maintained at a safe distance. The coals are stirring thanks to the blower;
- The logs are placed carefully after the previous fuel load has burned. Do not throw from above, as this may damage the product;
- During the cooking process, it is forbidden to lower your head into a hot vessel. Do not climb with open hands, as you can burn your skin;
- Products are inserted using special devices. They heat up, so thermal gloves are used;
- Cold water should not be used. It needs to be warmed up a little. But you can cook soups and porridges. Although you should make sure that water is not poured into the tandoor.
Thus, we created a simple do-it-yourself tandoor for outdoor use. It is possible to create more complex versions, but this will increase the cost and time to manufacture the product. This version is quite functional, so it will help at the dacha in the process of preparing delicious dishes for the whole family and guests.
Historical reference
A tandoor is an Asian oven-broiler that has a cone shape and is intended for cooking.
A tandoor is a jug-shaped or spherical roasting pan. Distributed among the peoples of Asia. The specific shape and material ensures the highest heat capacity of the furnace. The tandoor allows you to get by with a minimum amount of fuel, which is important for areas where there has never been an abundance of wood.
This type of brazier has been known for more than 5 thousand years. It is believed that it first appeared in Mesopotamia and then spread throughout the eastern region. It was heated with brushwood, firewood, and dung. For a long time, only stationary models were built, but as blacksmithing developed, portable ones began to appear.
The tandoor is for cooking, not heating. In East Asia, baked goods come in the form of flatbreads, so baking trays or racks are not needed. Pieces of dough are molded onto rounded walls, where they are quickly heated and baked.
DIY tandoor photo
What kind of brick can be used
Fireclay refractory brick
The temperature during firing of the furnace is quite high and depends on the nature of the fuel. Coal, for example, provides stronger heating than brushwood or dung. Traditionally, clay is used for this design because it can withstand heat up to 1100°C.
A country tandoor is built only from fireclay bricks using fire-resistant masonry mortar.
PORTAL
The corners, cut at an angle of 45°, were fastened by welding in the form of the letter U, the legs of which, after cooling, were butt welded to the lower horizontal connecting strip. In the strip itself, I first cut out a strip of metal so that it would not interfere with the installation of the plug - half a brick with a handle.
I didn’t have handles for removable bricks, so at first I used pieces of wire. Then I bought unpainted wooden handles with a pin fastening. I also bought MB furniture screws and got a very reliable grip that doesn’t slip out of my hand.
The end result is a design that I am generally pleased with. Thus, the wall thickness of purchased budget tandoors is only 4 cm, and of more expensive and heavier ones - 5 cm. I used fireclay bricks 6.5 cm thick - this allows you to do two cooking sessions after heating.
There is no need to worry about dripping juice on the lower bricks - all the smells of previous cooking are burned out during the new heating. Any damaged brick can be easily removed from the masonry and replaced with a new one.
Since when cooking food you have to come into contact with hot metal, at first I used welding gloves, but they were inconvenient. Then, on occasion, I bought aramid gloves that protect well from burns. They allow you to manipulate skewers over a hot rod.