Most gardeners and gardeners are accustomed to perceiving a dacha as a field for active physical activity, where they need to dig beds, harvest crops, and care for planted crops from morning to night. Currently, lovers of countryside pastimes are more inclined to believe that a house in nature is a break from the bustle of the city, enjoying the scenery, clean air and complete harmony of the landscape ensemble with buildings for relaxation.
A cozy terrace is one of these structures. It is particularly popular and provides conditions for a comfortable stay at the dacha, communicating with friends and family, sitting comfortably at the terrace table. Below we will discuss the methods of its construction and design. We will teach you how to build a terrace at your dacha with your own hands.
Key points in building a terrace
If you have ever seen photographs of a terrace at a dacha, then you may have noticed that this is a very painstaking task in which many different rules must be followed.
We will tell you about the basic rules when building a terrace in a country house.
The floor of your future terrace should be hard and durable. It should not sag or spring as you walk on it.
The railings must also be durable, since the terrace is a direct extension of your home or cottage.
You need to make the foundation for your dacha from durable material, for example, concrete blocks. It is necessary to lay the foundation without mistakes so that no shifts occur in the future. Since the foundation of your terrace supports the entire structure on itself.
We recommend reading:
Winter greenhouse - design, arrangement and operation features, cultivated plantsVeranda at the dacha. Which interior to choose?
How to make a utility block for a dacha - a step-by-step description of how to build it yourself and instructions for arranging a utility block (115 photos)
Project development
When creating a drawing of a future extension, you need to remember that the veranda is a harmonious continuation of the house. Therefore, the materials for its creation, dimensions and interior design must be similar to the main structure.
But also during design you should consider:
- possible load on the foundation;
- shape of the room and roof;
- type of finish;
- soil type;
- frequency of precipitation;
- dimensions of the structure;
- climate features;
- staircase design (if provided).
Since the entrance to the building often runs through the building, you must not forget to add a porch to the project, which can be refined with the help of forged railings and stone steps.
And in order for all construction work to have a legal basis, you need to obtain permission to carry it out from government authorities. Therefore, as soon as the drawing of the veranda is completed, you should contact the design service, whose employees will evaluate the correctness of the calculations and eliminate errors.
Having received the final copy, you can safely go to the appropriate authorities to legalize the extension. You must have with you:
- passport;
- certificate confirming ownership of the house;
- statement;
- new project.
The obtained permission will significantly simplify the procedure for selling or renting a building. If at the time of concluding the transaction the necessary paper is missing, you will have to pay a fine and still have it completed.
Depending on the region, the set of documents may differ. Therefore, to save time, it is better to first clarify all the nuances by telephone.
It is worth noting that the process of discussion and approval of the application can last up to 2 months. Therefore, if construction is planned to begin in early spring, it is recommended to resolve paperwork issues already in the winter months.
Location of your terrace
The location of the terraces is completely different. Mostly there are attached terraces. These terraces are notable for the fact that they open directly from your dacha. This is a very convenient way considering that you don’t have to go far.
You can also put all unnecessary things there, or things that you rarely use and they take up space in the house.
There are also closed terraces for summer cottages. They are usually placed to store some things that should not be exposed to external influences.
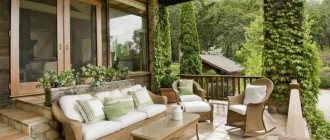
Open terraces. Open terraces are the complete opposite of closed terraces. They are great for tea parties and meals outdoors. Such terraces are also very similar to summer kitchens.
Summer terraces. Used for any work in it in the summer.
We recommend reading:
How to build a bathhouse from timber - 125 photos of the best projects and ideas on how to build a bathhouse correctlyDo-it-yourself canopy: step-by-step description of how to build a canopy correctly. The best ideas and beautiful design options (95 photos)
Beautiful canopy over the porch - installation options, design options and installation tips (95 photos)
Preparation of materials
Correct calculation of the required number of building elements will reduce the financial costs of creating a future structure. And it will turn it into an inexpensive and high-quality corner for family recreation.
When making and arranging a veranda you can use:
- A natural stone. Suitable for laying floors on the ground. In open buildings it is recommended to use granite or basalt.
- Tree. The most popular material for creating a terrace. Treated boards are not susceptible to external influences. Easy to install. When choosing species, it is recommended to pay attention to moisture-resistant teak, ipe, larch or iroko. Wood is used to make floors, supports, roofs, and decorative elements in the form of balusters.
- Concrete. Tiles made from this material are suitable for durable laying of veranda floors on the ground. Depending on the color, shape and size, prices vary significantly.
- Clinker or ceramic tiles. The first type of material is used when paving open terraces. The second is when creating unusual crosshairs and patterns on the floor in summer verandas of any kind.
- Decking is a combination of wood composite and polymers or decking board. This modern material does not require special care and is resistant to moisture and temperature changes. Does not fade in the sun. Thanks to this, it has a warranty period of up to 25 years. Easy to install. Purchasing such a terrace system significantly saves money and allows you to create the exterior of the room in the same style.
To build a frame open veranda on a summer cottage you will need:
- Concrete pillars.
- Beam for creating supports and strengthening structures with dimensions of 150*150 mm and 120*120 mm.
- Wooden screws 25 mm and 100 mm.
- Cement.
- Material for sheathing (OSB boards or slats).
- Sand.
- Anchor.
- Brackets.
- Boards and beams (150*150 mm) for the roof.
- Rafters measuring 60*120 mm.
- Wooden lining.
- Ondulin.
- Lags.
- Boards for flooring.
- Waterproofing material in rolls.
- Stain with varnish.
Tools you need to prepare:
- drill;
- screwdriver;
- building level;
- jigsaw;
- hammer;
- saw.
But it is important to remember that an open terrace made of timber will look ridiculous against the backdrop of a brick house. Therefore, the material of the structure must be similar to the main structure.
Roof for your veranda
Usually, I make a roof for the veranda in the shape of a slope. The shape of the roof usually does not follow the shape of the roof of the house to which this veranda is attached.
Reinforcing overhangs is best done using cornice strips. The tiles must be laid from the center of the roof in both directions.
How to cover the ceiling
To finish the ceiling, you can use various types of wood, polycarbonate, and siding (with the exception of heavy ones). An excellent option for ceiling covering in an extension is a wicker surface.
c306865da361528384a65dbce102ad6e.jpe ea6a2065c5162d25248336828af9d4f6.jpe 8842a54f079af5bb770819f04d062f77.jpe 2a51df1a98f57e9bcfcff2b2 9f7c528b.jpe
4db6af583591dad53846969f535bba43.jpeThe following materials can be used:
- Lining. The use of such ceiling cladding is no different from covering vertical surfaces. In addition, the combination of this material in the ceiling and wall coverings will create a complete design image. To add some zest, the lining on the ceiling can be laid, for example, diagonally, and on the walls - horizontally or vertically. For the ceiling covering, boards up to 0.7 cm thick are used due to its lighter weight.
- Plastic. PVC panels are ideal for covering ceilings due to the light weight of the material, its versatility, ease of installation and the ability to level ceilings without unnecessary hassle and expense. Such panels are mounted in the same way as they are mounted on walls.
- Polycarbonate. In addition to all the previously described advantages of the material, its use as a ceiling covering has another advantage - transparency. You can choose a material of any color that partially transmits the sun's rays. In this case, there will be light shading on the terrace, with enough light for a comfortable pastime.
- Wicker cover. This surface will add a touch of country style to the interior. A veranda, the ceiling of which is made in a similar manner, will resemble a cozy country bungalow. This ceiling is made of thin plywood (3–4 mm) or veneer. To do this, the sheet is spread into strips (5–15 cm) and intertwined. The edges of such a mat are lined with a transverse strip of the same material. The covering itself is attached to transverse wooden beams using slate nails.
Today on the market there is a large selection of materials for cladding the internal perimeter of the veranda. There are a huge number of options for floor and ceiling coverings. Materials are presented in the widest price range: both budget options and premium ones.
Video: sewing up the veranda ceiling with plastic panels
At the same time, the low price of a material does not mean that it has poor performance characteristics. Thanks to the wide range at a reasonable price, you can tile your veranda with high quality.
Floor and walls for your veranda
The floor and walls are also the most important components for your veranda.
If you are going to make your terrace frequently visited or even want to separate a separate room for it, then it is advisable to insulate the floor in your terrace.
For insulation, it is worth cutting out special cells and placing the insulation there tightly.
Roofing
To create a future roof, it is necessary to secure wooden beams with brackets.
The next step is the installation of rafters, which form the basis for the roofing. They are mounted at an angle of 100 - 150 degrees (the inclination depends on the design of the house), at a distance of 1 m from each other.
When all the necessary parts are secured, ondulin is laid, which should protrude 30–50 cm from each edge of the roof in order to provide better protection of the structure from precipitation.
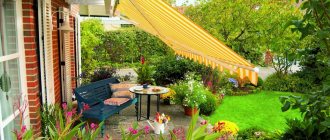
A more economical option is to create a removable roof. For this purpose, an awning, retractable fabric awnings or a summer umbrella made of tarpaulin are used. Such a coating can protect the building from light rain and scorching sun.
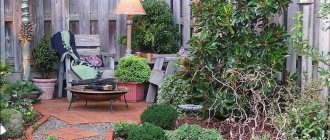
Climbing plants (grapes, hops) can partially create shade on the veranda.
An example of such a solution is clearly visible in the photo:
However, you should not use shrubs or flowers with a pronounced aroma - this will create a cluster of insects inside and outside the building.
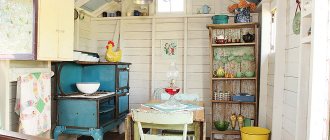
Interior view of your veranda
If you have already figured out how your veranda will look from the outside, then it’s time to think about the interior appearance of your future terrace.
The inside of the veranda should be made of wood, which should be varnished. The walls should be slightly lighter in color than the floor.
We recommend reading:
How to attach a terrace to a house - step-by-step description of the construction, design options, projects and installation instructions (115 photos)Building a gazebo with your own hands - the best design ideas and main stages of construction (115 photos + video)
Construction of a chicken coop for a summer residence - how to make simple and high-quality chicken coops (105 photos + video)
We recommend that you make the ceiling white. This will give your deck some interior space. The inside of the building will become visually more spacious.
The rest of the interior elements should be arranged according to your taste and preference.
You can make a terrace as a separate building for housing, or you can make it in the form of a garage, or a large storage room. The final choice is already yours.
Frame construction
This is a mandatory stage of work, since it is thanks to it that the roof or walls of the veranda will be built.
It is carried out according to the following scheme:
- The entire timber is treated with a fireproof solution and an antiseptic.
- Then it is installed. The connecting elements are wood screws. One part of the material is installed vertically, the other acts as a frame fastening and is laid horizontally at a distance of 0.8–1 m from the ground.
- In the lower part of the room, where a passage is planned according to the project, the material is not attached.
- In the corners, the timber is mounted at a distance of “half a tree”.
To avoid distortions when creating a structure, you need to use a building level, which will indicate the correct degree of inclination of the corners.
And the height of the frame and rooms in the house should be the same. This is necessary to ensure that the roofs of the main room and the extension fit together correctly.
Furniture
Selection requirements:
- Practicality - simple care will allow you to relax without worrying about spilled juice or stains.
- Resistance to temperature changes - allows you not to remove the products from the veranda into the main room. Furniture can be placed in a corner of the house and covered with covers to protect it from dust.
- Reliability – furnishings are demanding only in the summer.
Suitable products are those that can withstand all the negative effects of pressure.
Wooden crafts
They fit organically into the environment. The variety is great. Manufacturers offer the following items: chairs, tables, benches, armchairs, as well as furniture sets.
Pine is commonly used to create furniture pieces. Prestigious products are made from oak, maple and ash. All are treated with special compounds that form a film on the surface of the wood - it protects the material from insects, high humidity, and fungus. Durable and expensive teak furniture can be outdoors all year round. Under the sun, the natural shade of wood can glare.
Furniture made from universal plastic
Made in a traditional or original form. Reliable molded plastic products cost less, but retain their normal appearance for several years. Stools, chairs and tables are often made from plastic.
Insect protection
Methods:
- Using a window and a mosquito net. If the veranda is located at the entrance of the house, frameless glazing is usually used, where a panoramic view is open. Next, to protect against insects, the windows are equipped with a mosquito net.
- Ultrasound in this application is a special device that operates from an electrical outlet or a battery. Covers the area allowed to repel mosquitoes.
- Thermal. Electric lamps that attract insects. Impact area – 70%.
- UV. The same principle as thermal ones, but instead of light there is a small discharge of current. It is used in domestic and industrial conditions.
To protect furniture from parasites, you need to regularly carry out preventive maintenance: clean surfaces from dust, wash floors, keep air humidity normal. The usual way for a veranda is a mosquito net on the window.
Recommendations for strengthening the slope
Before creating a slope on a site, it needs to be strengthened and protected from landslides. But first, check out:
- how deep the groundwater lies;
- how many degrees is the slope of the site;
- how high is the ground pressure;
- what is the composition of the soil?
This knowledge will help you choose and place retaining walls or their alternative correctly, thereby preserving the created landscape for a long time.
We begin work on strengthening:
- Plant plants with developed strong roots to support a raised area with a slight slope.
- Build small retaining walls if the slope is strong and the ground pressure is high. Later we will look at the advantages and disadvantages of retaining walls made of different materials.
- Lay down geotextiles that will help protect the soil from mixing and shifting. Suitable for slopes up to 60 degrees. Use geomats in windy areas: intertwined with the roots, they form a stable coating that protects against erosion.
- Lay a strong geogrid: it follows the relief, strengthens it, and protects it from washing out and sliding of the soil.
- Include decorative gabions in the landscape design of a site on a slope: they add style, protect against movement, and become stronger and more reliable over the years.
- Install low monolithic fences (made of brick, slabs, stone) along the contour and between zones - they do not require maintenance and are an excellent alternative to retaining walls.
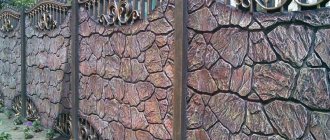
Retaining walls are made from:
- Stone. The main advantage is natural origin and durability. It looks appropriate surrounded by grass and trees and easily fits into a design project for decorating a site on a slope. The ancient technology of dry masonry is complex, requiring knowledge and skills: blocks that are ideally suited to each other are selected, they are laid without mortar, and this design will last for many years. Modern technologies make installation easier: parts are secured using cement mortar, so it is not necessary to select stones according to shape. The gaps are sometimes filled with crushed stone.
- Tree. It is pre-treated with protective impregnations. In the construction of retaining walls, wood of different cross-sections is used: round, square, flat. Natural wood also easily fits into the design of the site, but unlike the first option, it is not so strong - therefore the height of the structure is limited to ~35 cm. To keep the boards or logs in place, they are reinforced with metal supports or concrete mortar.
- Brick. Despite its industrial origin, red brick goes well with lush greenery and bright buds. Laying is done using concrete, the retaining wall is strong and wear-resistant. Before construction, the foundation must be poured - it will preserve the structure for many years to come.