A cellar located on a summer cottage is an indispensable thing for those who are seriously interested in gardening and want to preserve the results of their harvest unchanged for a long time. Building a cellar with your own hands is an excellent chance to provide yourself with high-quality preserved food products.
If all regulated standards are observed during construction, the room will maintain a stable air temperature necessary for storing canned and fresh products.
Types of cellars
There are several types of cellars, depending on their design and location relative to the top layer of the earth. Photos of various types of cellars can be viewed on our website.
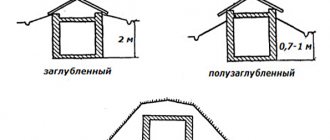
Ground - the name speaks for itself. The construction of this type of cellar is determined by a very high groundwater level.
The cellar can be made in the form of an insulated structure, attached to the main wall of the house and actually representing an additional room, only covered with earth. Or it could be a storage facility built from brick walls with embankment.
Semi-buried - goes underground about a meter. Relevant for areas with one and a half to two meters of groundwater level relative to the surface of the earth.
To build a cellar, soil is excavated to a depth of about a meter. The foundation is constructed of bricks or concrete, with the walls raised to a height of up to two meters. The basis for the ceiling is wood, concrete or slate.
The erected structure is covered with soil. The entrance to the room is flush with the ground and includes a vestibule, a staircase leading down and an additional door that must be insulated.
In-ground is the most popular type of cellar, going underground to a depth of two meters. It can act as a separate building with its own cellar, or be located under a permanent building
How to finish
Before you start decorating, you will have to go through a difficult stage of rough work. It is not so pleasant, but without proper finishing the room will not have ventilation, communications and heating. The base of the future flooring, or screed, as builders call it, is created first. In a monolithic foundation, concrete is impregnated with special solutions, which, upon contact with moisture, crystallize and tightly “seal” the floor. If a tape-type base has been laid, then a real “layer cake” made from materials is laid on it:
- Sand cushion;
- Roofing felt layer;
- Reinforcing mesh.
And only the screed is laid on top. After the rough stage of working with the floor is completed, it can be safely covered with laminate, linoleum, parquet or ceramic tiles. The choice of material depends on the room design project. If the basement will be used for living, then a heating system will be provided between the flooring and the screed, which will ensure regular heating.
The walls are primed several times before final finishing. Two or three layers of antiseptic composition will not only improve the “adhesion” between the surface and the material, but will also reduce the risk of the formation of fungi and mold. In the future cellar or pantry, the walls are simply plastered or lined with wood panels and moisture-resistant plasterboard. The latter can be painted in the desired color if necessary. It is better to use mineral-cement plaster, as it is more resistant to moisture than its lime and gypsum counterparts. The wood will have to be treated with special solutions that will stop the processes of decay and the spread of fungus. In residential premises, insulation is carried out with mineral wool, and on top of the plaster the walls are finished with PVC panels, wallpaper, wood, plasterboard, or simply painted.
The ceiling in the basement plays an important role, especially if the room is being restored, and was previously used to carry out numerous communications. The hanging option will help you cleverly “hide” all this splendor from pipes and wires, but at the same time leave constant access to them if necessary. Unfortunately, this method is not suitable for basements with low ceilings, because its frame will “eat up” too many precious centimeters. In this case, it is better to resort to moisture-resistant drywall. In high basements, you can make a multi-level ceiling from this material, which will become the highlight of the interior. In simpler versions, the surface is primed and plastered.
The corners and all joints of surfaces in the basement must be coated with the waterproofing solution, which is used to impregnate the base to create the screed. This way you can protect the room from dampness and mold.
Digging a pit
First, you need to mark the area for the foundation pit, adding from 50 to 100 cm to the estimated dimensions in order to waterproof the structure.
After extracting the top fertile layer of soil, which can be profitably used for the formation of flower beds or alpine slides, digging a pit begins.
To avoid falling off the earth, the walls of the pit are dug with a slope. If water leaks in any place in the pit, you should dig holes to a depth of up to half a meter and fill them with compacted fatty clay.
How to build a cellar from well rings if groundwater is close
Preliminary work must be carried out in advance - in March or April, when the water level reaches its maximum. At this time, it is best to carry out small geological surveys on the site.
They do it like this:
- holes are drilled at several points to the designed depth of the cellar (from 2 m and deeper);
- every other day they check whether there is water in the holes and at what height is its level;
- make a control measurement after another day;
- choose a place with a minimum water level (ideally dry).
If there is no “dry” place for a cellar on the site, then construction is postponed until the summer, when the perennial water has completely disappeared.
Selection of materials
As mentioned above, the easiest way to make an airtight cellar is to assemble it from reinforced concrete rings. They are selected from the range of wall rings according to GOST 8020-2016. There are several options for designing a cellar from prefabricated reinforced concrete elements. But in order for the storage volume to be sufficient, it is necessary to consider only those elements whose internal diameter is 2000 or 2500 mm. In the first case, the cellar floor area will be 3.14 m2, in the second - 4.9 m2.
For a cellar, either KS20 or KS25 are suitable. But each of them has its own nuances.
For a well with a diameter of 2000 mm there is a complete set of elements: a wall ring, a blind bottom (PN), a support ring with a bottom (KOD), a floor slab (PP) with an outer diameter of 2200 mm, a ring with a floor (KSP).
Floor slab
There are several options for cellar design based on these elements:
- bottom, two or three rings (standard height range from 290 to 1190 mm), floor slab;
- a ring with a bottom, one or two wall rings, a floor slab;
- bottom ring, wall ring, ceiling ring;
- a ring with a bottom and a ring with an overlap (subject to the choice of maximum internal dimensions in height - 1200 mm and 1000 mm, respectively).
For KS25 only a floor slab is provided. And as the bottom you need to use either road reinforced concrete slabs, or pour a concrete floor over the ground. In the first case, two slabs of type PD 2-6a or PD 2-9.5 are needed - one is not enough due to the limited size of standard slabs in width. But such a stove is not cheap - about 7,000 rubles. a piece. If you fill the bottom yourself, you will have to wait until the concrete is ready to put the rings on top.
We reinforce the floor before pouring the screed
Construction of a cellar
The technology for building a cellar in conditions of high groundwater looks like this:
- They dig a pit of the designed depth, taking into account the arrangement of the cushion and drainage. The diameter of the pit must provide the possibility of installing rings and carrying out waterproofing work.
- They compact the bottom. Ditches are dug along the perimeter for ring drainage with a slope towards the storage well.
- They are drilling a well for a storage well. Install a storage tank.
- A trench is used to connect the cellar pit with the storage tank. Fill the bottom of the ditches with small crushed stone. Drainage pipes wrapped in geotextile are laid and connected to a storage well.
- Cover the bottom of the pit with a layer of sand and crushed stone. Level and compact.
- Lay two layers of rolled bitumen insulation on the bottom. Boil the seams of each layer with hot mastic. The edges of the canvas extend beyond the perimeter of the bottom by at least 20 cm.
- Before installation, treat the bottom (or ring with the bottom) with bitumen mastic.
- Install the lower element.
- Mount the wall rings and the ceiling (or a ring with the ceiling).
Seal the joints with a waterproofing cement mixture (penetrating coating waterproofing). - Treat the outside of the ring with bitumen primer. The waterproofing strips protruding from under the bottom are glued to the walls.
- Cover the outside of the wall with rolled waterproofing. Gluing is carried out around the circumference, from bottom to top, with stripes overlapping by 15-20 cm.
- The pit sinuses are filled with clay, which is compacted in layers.
- Arranging the interior space of the cellar.
Ventilation pipes are installed. Insulate the ceiling. They are building a cellar.
What you can get as a result:
dizlandshafta
Construction of walls
The most popular material for these purposes is brick or concrete blocks.
But it is possible to perform a monolithic pouring of concrete onto a pre-strengthened reinforcement frame with installed formwork.
Floor installation
The choice of material for flooring is largely determined by what loads it will have to withstand during further operation. It can be produced:
- wood - beams or logs on which boards or beams are laid on top. Since there is always high humidity in the cellar, all wooden elements must be treated with an antiseptic
When building a cellar, all wooden elements must be treated with an antiseptic
Country cellar decorated with climbing plants
- metal beams on which concrete slabs can be laid. In this case, it is necessary to especially carefully process and seal the seams (joints of plates)
- monolithic concrete floor - poured in the same way as monolithic walls
Anyone can build a cellar with their own hands at the dacha
Ladder
For ease of use, you can install an extension ladder. But if you want to make the descent convenient and safe, then it is better to make a stationary version.
We equip the floor and walls
The best option for constructing a floor screed is a clay mortar. It is prepared from clay, quartz sand and water. The consistency of the solution should resemble thick sour cream. The solution should be poured four centimeters above the gravel level.
To protect the cellar from groundwater, it is necessary to additionally fill the floor with concrete mortar. The surface is leveled and left to dry.
Brick is used to build walls. It is recommended to carry out the laying in one brick, starting from the corner of the wall with the doorway. To remove excess air on the brick, you need to tap the handle of the tool. It is recommended to check each row of bricks using a building level.
Do not forget to fill the cracks and spaces between the bricks with mortar. It is allowed to proceed to the next stage only after seven days, when the solution is completely dry.
Waterproofing
A very important point is the waterproofing of the walls, which must be covered with cement mortar to ensure tightness.
The dried plastered layer is covered with bitumen and then with roofing felt. Next, the soil is filled with soil.
Insulation
During severe frosts, the cold penetrates into the room through the weakest points - hatches, doors, insufficiently insulated walls and ceilings. If frost is periodically detected somewhere inside the cellar, then the thermal insulation is not coping with its function.
In underground basements, the entrance area and ceiling most often freeze. For insulation, you can use polystyrene foam, polystyrene foam, polyurethane foam, securing them to the surface using dowel bends or glue and filling the joints with polyurethane foam.
Polymer materials have very low thermal conductivity and are not afraid of moisture. Their only enemy is rodents. To protect the insulation from mice and rats, it is recommended to cover the materials with a fine-mesh metal mesh.
Ventilation
For proper air ventilation, it is necessary to provide two pipes located at a considerable distance from each other.
One of them is an exhaust unit, installed under the ceiling and insulated, the second is a supply unit, located 50-60 cm from the floor level. It must be fenced with a grill to protect it from rodents.
With the correct organization of the ventilation system in the cellar, a balanced level of humidity and a suitable temperature will be maintained.
If you notice fungus, condensation or an unpleasant odor, it means that the ventilation system has been damaged.
Paints with a strong odor should not be kept in the cellar, since the products stored there can absorb it. Before the next storage season, the room must be dried and ventilated.
Digging a basement yourself is not a good idea.
Digging a basement under an already constructed building is dangerous. Not every professional will undertake such work. To begin with, it is worth remembering that the basement is part of the foundation. It is developed at the design stage. Do-it-yourself activities are fraught with distortion or destruction of the house itself. Wooden buildings can sag, and brick buildings can crack. Basement walls are usually a continuation of the strip foundation, which is buried, that is, the room and the foundation of the house are a single whole. It is much easier and more economical to pay extra according to the estimate during construction than to pay a tidy sum to professionals for the restoration of a house damaged by independent excavation work.
Photo of a cellar at the dacha
Wiring
Due to constant humidity, the cellar is classified as a high-risk area, so the electrical wiring is installed according to strict rules:
- sockets are located outside the basement in a dry room;
- cables are laid only openly in corrugated channels or boxes; metal pipes cannot be used;
- luminaires must be sealed to avoid condensation.
It is recommended that you consult a professional electrician before installing wiring.
A few more ideas
The use of ground floor and basement space is fraught with unlimited possibilities. In addition to the well-known methods of converting these premises into laboratories, workshops, garages, etc., there are many others.
For example, a young man involved in bodybuilding, or a girl and her mother who are watching their figures, can turn the basement into a wonderful gym . To do this, you will need weights of different weights, a barbell, parallel bars screwed to cantilever beams embedded in the wall (wall bars), sports mats and, if money allows, a simulator (KeSheg, for example).
Gym in the basement
The hall can be equipped with a mini-swimming pool (but then the issue of arranging the hall must be decided in advance, before the start of construction, since it will be necessary to dig a foundation pit for the pool and introduce water supply and discharge sewerage from the pool). The pool is made of reinforced concrete and lined with ceramic tiles inside.
Pool in the basement
A person who is interested in filming or watching films can set up a cinema hall . For this you won’t need much: a TV or a screen for a projector, shelves and cabinets for film, cassettes and discs, a comfortable sofa and, preferably, a speaker system.
Home cinema in the basement
Often there is no place for young people to practice rock music . The basement in your house, equipped with equipment, with walls covered with posters with photographs of rock idols, is an ideal place for the self-expression of young, as yet misunderstood talent. True, it is advisable to soundproof the ceiling in the house in advance.
Music studio in the basement
Some craftsmen grow champignons and oyster mushrooms , which is a great help for the family.
Growing mushrooms in the basement
5/5 — (5 votes)
Using the basement as a storage room
The basement space is quite suitable for storing household items, food, work and seasonal clothing, tools, sports equipment (skis, sleds), strollers, bicycles and much more. etc.
Using the basement as a storage room
Such a pantry noticeably frees the house from bulky things; There is less street dirt and dust in the rooms. You should think in advance about the placement of utility cabinets in it. Cabinets can be built-in, with natural ventilation. It is connected to the kitchen or stove smoke ventilation duct. The lower part of the door of a ventilated cabinet is equipped with holes for air flow. Typically, such holes are drilled on site or the door leaf is not brought to the bottom by about 10-15 cm.
Ventilation at the bottom of the door
If you want to store various food products in the basement, then it is better to place them in special utility cabinets located near the outer wall and equipped with natural ventilation. Here you can store potatoes, vegetables, fruits, pickles, marinades and other supplies all winter. Typically, such cold storage rooms are located on the north side of the house . To enhance thermal insulation, the perimeter walls are covered with sawdust or covered with tiled insulation, which is covered with board cladding. Keep the pantry temperature low with ice. On the side of the house, a cold, unheated room should be adjacent to the wall (figure below).
Arrangement of a cold storage room in the house: 1 - ice chamber; 2 - metal sheet of the wall; 3 — cabinet for food; 4 — shelves; 5 - racks; 6 - supply of firewood (for stove or fireplace heating)
To provide the pantry with fresh air, various simple adjustment devices are used. Thanks to them, you can get an additional refrigerator of impressive size inside the house. Ventilation is provided by an additional attached duct or pipe. You can install two additional ventilation ducts (supply and exhaust) in the main internal wall and lead them to the roof or attic. Channels made in a brick wall, as a rule, have a cross-section of 140 x 140 mm.
Shelving in pantries is made of wood and its derivatives; plywood, chipboard and fiberboard. The simplest rack (figure below) is a structure consisting of metal or wooden racks, to which wooden or thick plywood shelves are attached. If desired, the side surfaces of the rack are limited by sides. You can make the sides through.
Rack for storing products and equipment: a - welding unit; b, c connection nodes; 1 - wooden stand with a section of 20 X 50 mm, height 1600-2700 mm; 2 - stand made of pipes or round fittings with a height of 1500-2500 mm; 3 - wooden shelf measuring 20 X 200 mm, length 800-1200 mm; 4 - side made of plywood 4 mm thick
If the racks are made of metal, then they need to be welded; wooden ones are easy to make yourself. The racks are attached to the wall using plugs pre-hammered into the wall. Installation of shelves with racks is carried out using metal hooks. Before installation, metal and wooden parts are sanded and coated with nitro enamel.
The indicated dimensions are, as it were, basic, basic. If desired, the dimensions of the rack can be changed both smaller and larger. It can occupy the entire wall, running along the entire room, or stand in the corner.
Storing food in the basement
Before placing vegetables and fruits in the basement, you should ensure that they sit for about a week in a well-ventilated area. This measure will allow you to prepare the products for long-term storage, while possible cuts and damage to the surfaces of vegetables and fruits will be covered with a crust.
After a week of aging, the harvest (or purchased supplies) is carefully placed indoors.
Storing food in the basement
There is a certain loading rule that should be followed whenever possible: vegetables are placed along the air flow - from inflow to air removal. First, large products are laid out : cabbage, watermelons, pumpkins, large zucchini, etc. Then something smaller is placed - apples, pears, eggplants, etc. Potatoes and onions are added at the very end.