To make the garden plot beautiful, you need to outline in advance where the buildings and plantings will be. The layout of the garden plot and vegetable garden is very important. This determines how the site as a whole will look and how convenient it will be to use the buildings, small architectural forms and plantings. The article describes how to draw up a garden plan, taking into account the characteristics of the site.
Garden plot plan for 2 adults and a dog.
Design and proper layout of a vegetable garden for planting
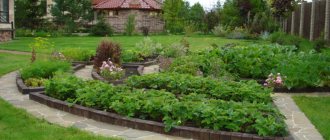
A vegetable garden can look almost as beautiful as flower beds. Now it has become fashionable to design a vegetable garden not in the form of traditional long beds, but in French, English styles and in the form of flower beds. After all, garden crops look very decorative.
The vegetable garden usually occupies about 30% of the entire area of the site. The vegetable garden is usually allocated a place at the rear border of the plot. Low ornamental shrubs can be planted between the garden and the rest of the area.
Basic conditions for a vegetable garden:
- water source nearby;
- lack of shadow from a fence or tall trees.
Location of beds for vegetable crops
The beds should be positioned north to south to receive maximum sunlight during the day. Make the width of each bed no more than 70 cm. Then you can easily reach its middle. We arrange passages between the beds more than 40 cm so that a garden cart can pass through them.
Before planting the beds with vegetable crops, carry out preliminary preparations:
- Make a planting plan. This is necessary in order to fit all the plants, as well as to subsequently implement correct crop rotation.
- Distribute the plants in the beds so that the taller ones are in the center and the shorter ones are at the edges of the plantings.
Vegetable planting scheme, crop rotation, description
Plant vegetables according to the plan drawn up in advance. This scheme should take into account crop rotation and the compatibility of various garden crops.
Since different plants consume nutrients differently, taking them from the soil, the planting locations of these plants are changed every year. This is called crop rotation. In addition, by changing the place where vegetables are planted, we fight unwanted diseases. It is advisable to return plants to one place no earlier than after 3 years. During this time, the earth will replenish the spent useful elements and be freed from pathogens.
To properly carry out crop rotation, divide the entire garden into several parts. It is most convenient when there are four such parts.
- Leafy crops: lettuce, cabbage, green onions, spinach, etc.
- Fruit crops: tomatoes, cucumbers, peppers, zucchini, eggplants, pumpkins, etc.
- Root vegetables: carrots, potatoes, beets, radishes, etc.
- Legumes: peas, beans, lentils, chickpeas, etc.
Scheme of planting plants in the garden in the first year.
If in the first year the plants are planted in the order shown in the diagram, then in the second year the plantings change.
You can combine beds differently:
The second option for forming crop rotation in the garden.
In certain areas, plants are arranged as follows:
- Pumpkin, cucumbers, squash, zucchini, cabbage.
- Potato.
- Radish, beets, carrots, root parsley.
- Tomatoes, peppers, radishes, garlic, onions.
The next year, swap the plantings, moving them clockwise, and so on every year.
You can create your own planting patterns in accordance with the following table:
| Culture | Friends with... | Enmity with... |
| Potato | Peas, radish, beets, horseradish, eggplant, lettuce, dill, beans, corn, garlic, onion, parsley | Cucumbers, tomatoes, fennel, celery |
| Tomato | Cabbage, onions, asparagus, beans, mint | Potatoes, cabbage, fennel, cucumbers, peppers |
| Eggplant | Peas, beans, potatoes, legumes | Fennel, onion, garlic |
| Cabbage | Potatoes, onions, lettuce, beets, celery, dill | Beans, tomatoes, fennel |
| Carrot | Peas, onions, tomatoes, rosemary | Celery, fennel |
| cucumbers | Peas, cabbage, beans, lettuce, dill | Pepper, tomato |
| Beet | Onions, cabbage | Beans, mustard |
| Melon, pumpkin | Corn, radish | Potato |
| Peas | Eggplant, radish, potatoes, carrots, cucumber, beans, corn | Onions, garlic, tomatoes, fennel |
Some vegetable crops are perennials. These include:
- sorrel;
- rhubarb;
- tarragon;
- some varieties of onions;
- lovage;
- asparagus.
They can be planted separately, in a specially designated area.
Summer residents often practice the method of small crop rotation, when several crops are grown in one place during the season. This method is justified when there is little space on the site for a vegetable garden. If there is enough space, then after harvesting early ripening crops, it is better to plant green manure in their place.
On the slope
Sites on a slope are considered not very successful, although from the point of view of landscape designers, this is simply a godsend: the landscape changing in height looks attractive, and the created multi-level terraces make it possible to zone the garden space not only along the surface of the ground, but also in height.
However, a sloped area has the following disadvantages:
- the fertile layer is washed off;
- water is poorly retained;
- the wind dries the ground very much.
Therefore, for a site on a slope it is necessary to provide terraces. This is a labor-intensive undertaking, but there is no other way.
You can do without terraces only when the slope of the site does not exceed 10%. In this case, the slope can be strengthened by planting plants with a highly branched root system on it:
- broom;
- elder;
- barberry;
- quince;
- juniper;
- periwinkle.
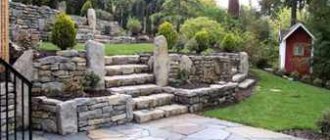
To create terraces, you can use retaining walls, gabions or geogrids. For a vegetable garden, high beds are an excellent option on a site with a slope.
Terracing formed on a site on a slope.
For safe movement around the site, steps must be provided. Such steps can be made of boards, concrete, paving slabs or simple logs. The width of the stairs should not be less than 60 cm. Along the length, the steps must be interspersed with level platforms. You can place benches and flower pots on the platforms. Illuminated steps look very original.
Small vegetable garden 1–2 acres
The problem often arises: how to place all the necessary vegetables in a small area? Here are a few tricks that will save space in your garden.
- Compacted plantings. To save space, you can do some plantings very close to each other: plant onions and garlic between the rows of strawberries, cabbage - between the rows of potatoes, and tomatoes - near the currants (it will be easy to tie up the tomatoes and there will be fewer pests on the currants).
- Let climbing plants run along the trellises. Climbing plants such as cucumbers, pumpkins, melons, watermelons, and peas take up a lot of space. It makes sense to make special trellises or pergolas for them. Then you can save space. When the fruits become heavy, they can be placed in a string bag hanging from a trellis.
- Multi-tiered plantings. The principle of such a garden is that the beds are arranged vertically. To do this, you can hang plastic bags from a vertical support and fill them with fertile soil, or use a hollow post placed vertically and also filled with black soil as a bed. This method is convenient for growing strawberries and herbs. Multi-tiered beds can be made by stacking several wooden boxes on top of each other.
For a small garden it would be appropriate to grow only rare plants. So you can buy carrots and beets in the store, since these vegetables are not expensive, and you can grow cherry tomatoes, cucumbers, eggplants, asparagus and sweet potatoes in your garden.
A garden of 1 acre in size, properly organized, will provide a family of four with all the necessary vegetables to eat in the summer and will allow them to make preparations for the winter.
Small vegetable garden 3–4 acres
A vegetable garden laid out on 3–4 acres is optimal for growing garden crops. On the one hand, there is enough space to grow all the necessary vegetables, and on the other hand, you don’t have to work too hard to process it.
The principle of setting up such a vegetable garden is also based on organizing proper crop rotation. This means that the garden is divided into 4 sections and plantings on them alternate in a certain order.
Vegetable garden 20 acres in the village
A large plot of 20 acres, given over to a vegetable garden, will require large resources in terms of maintenance. Typically, such a plot is cultivated by several families. It is also recommended to divide such a vegetable garden into several sections to ensure proper crop rotation.
If you have a large garden, you can sow part of it with green manure to give the soil a rest, and next year you can grow vegetable crops in this part. Sow the same part on which the vegetables grew with green manure.
English vegetable garden
A vegetable garden, which can be mistaken for a flower bed, it is so decorative, was borrowed from England and is called English. In England, for a long time, small vegetable gardens have been planted at home, which look very beautiful and bring a large harvest. In England, gardening is mostly done by men. They are very proud of their plantings. Such a vegetable garden is the owner’s calling card.
Beds in an English vegetable garden do not always have a rectangular shape. They can be in the form of a round flower bed, in the form of a spiral or any other shape. Vegetables are planted parallel to the edges and follow the shape of the bed. Garden crops can be combined with flowers, which gives the beds an elegant blooming look.
The English vegetable garden does not have the symmetry that is characteristic of the French vegetable garden. The main thing here is to arrange the crops so that the garden bed looks like a flower bed.
And one more touch of the English vegetable garden - here much attention is paid to paths. They are very wide and occupy most of the site.
An example of the arrangement of plants in an English vegetable garden.
Plan of a rectangular vegetable garden
A rectangular plot for a vegetable garden does not pose any problem. It is enough to divide it into 4 zones and plant plants according to the crop rotation given in the section “Vegetable planting scheme, crop rotation, description.”
Rectangular vegetable garden.
If you are not satisfied with rectangular beds because of their boring shape, you can always place the beds of a French or English vegetable garden on a rectangular plot.
An example of the arrangement of plants in a French garden.
To be very beautiful
To give your garden an attractive look, just follow the following rules taken from garden design:
- For single plantings, it is worth thinking about the design of the background. High crops are suitable for it: corn, amaranth, Jerusalem artichoke, herbs.
- To add additional volume and height to the garden, you can use pergolas and trellises for climbing plants such as cucumbers, beans, peas, and pumpkins.
- To add color to the garden, you can place nasturtium and calendula.
- Marigolds, parsley, lettuce, radishes, carrots, and basil will look good as a border for a garden bed.
By laying out a vegetable garden in the form of beds of a non-standard shape and decorating it with flowering plants, you can get a decorative corner of the garden.
According to Mittleider
A vegetable garden organized according to the Mitlider method takes up very little space and produces a good harvest. The method is based on creating narrow beds and balanced nutrition for plants based on mineral fertilizers.
Before organizing your garden, dig it up thoroughly and free it from weed roots. It is necessary to fulfill 3 necessary conditions to obtain a good harvest using the Mitlider method:
- Strictly follow the recommended sizes of beds and aisles.
- Stick to a specific planting pattern.
- Observe the correct regime of watering and fertilizing garden crops.
We choose the width of the beds to be 45 cm, the length can be any. Along the edge of the bed we make small earthen mounds about 10 cm high. The width of the passages should be 105 cm.
We plant seeds or seedlings along the sides in 2 rows. Before planting, we add fertilizer to the ground: 100 grams per linear meter of a mixture consisting of 5 kg of dolomite flour and 40 grams of boric acid, as well as macro and microelements. We fertilize once a week with a mixture of macro and microelements. We do not loosen the beds so as not to damage the root system of the plants.
Garden decoration
A beautiful garden in a country house can be separated from the house and yard by a low-growing hedge. For a living and useful fence, Japanese quince, cinquefoil, thunberg and admiration barberry, rose hips, hawthorn, black currant, golden currant, alpine currant, St. John's wort, gooseberry, and mahonia holly are quite suitable. These shrubs tolerate pruning well and can be used to form any original borders or fences.
With vegetables of different colors you can create a whole artistic canvas in your summer cottage. Anyone can do this. However, when creating such a flower garden, it is necessary to take into account several factors necessary for the planned garden to bring joy and benefit, to be beautiful and productive.
Let's look at a few tips for decorating a garden at your dacha, which will help you easily and simply achieve excellent results and harvests.
Before you begin to directly draw up a plan for laying out your garden plots, you should take into account that vegetables need a sunny place, protected from northern winds (you can protect the beds with a taller hedge, made of evergreen shrubs).
It is necessary to leave space for a compost heap, which can be decorated with herbaceous perennials (sage, lavender, St. John's wort oregano, etc.), and low-growing shrubs.
The place for the garden should not be located far from the irrigation system. Be sure to observe crop rotation in beautiful beds.
Layout of paths on a summer cottage
Convenient paved paths allow easy access to any area of the site, even in rainy weather, and keep the house clean. A site with beautiful paths looks attractive and respectable.
Paving paths is an expensive endeavor. You need to seriously think through the plan of paths in advance, so that later you do not experience disappointment from inconveniently laid out routes.
When drawing up a plan for paths on the site, be guided primarily by ease of movement. The cart should pass freely along the path and the path should be as short as possible.
On the other hand, in accordance with the rules of garden design, the paths must correspond to the style of the site: if a regular style is chosen for the site, it is better to make the paths straight. If the garden design has a landscape style, then the paths should be made in the same style: be winding. Alternatively, the main path can be made straight, and the secondary paths can be winding.
The main routes of movement on the site are often the following routes:
- from the entrance to the site to the house;
- from the parking lot or garage to the house;
- from home to garden;
- from the garden to the well;
- from the garden to the compost heap;
- from house to barn;
- from the house to the gazebo or recreation area.
It is enough to mark these routes on the plan with arrows to visualize all possible movements.
Necessary routes for movement around the site.
The most beautiful is the main entrance path from the gate to the house. The material here can be paving slabs or natural stone. It can have a beautiful curved shape and should be wide enough.
Paths that have an economic purpose - leading from the garden to the well or compost - are best made straight, with a durable simple coating: asphalt, concrete or artificial stone. The width of such paths should be sufficient for the passage of a garden cart: from 40 cm to 1 m.
Walking paths leading from the house to the gazebo or recreation area may have a winding shape. They can be made of wood, mosaic slabs. They can be covered with pebbles or tree bark.
Read about how to decorate paths with a living border in the article “What to plant along the path in the country to make it beautiful.”
Layout of flower beds
Before arranging flower beds, you need to put them on the general plan of the site. Flower beds can occupy the entire territory of the site that remains free after building a house, laying out a garden, constructing utility buildings and small architectural forms, such as a gazebo.
Flower beds can be made in the form of:
- flower beds;
- discounts;
- mixborder;
- rosary;
- curb;
- rockery;
- stalls
Flower beds can have the correct shape of a circle, rectangle or square with a regular layout of the site and an irregular shape in the form of a drop, a trapezoid with curved edges or another shape with a landscape style. For flower beds, choose an open sunny place. Both perennial and annual flowers are planted in flower beds.
Borders and ridges are arranged along the edges of the path, around the gazebo or veranda. They are long narrow flower beds ranging from 40 cm to 2 m wide and of arbitrary length. The sizes of flowers in discounts and borders are selected depending on their width. The narrower the border or border, the smaller the flowers on it.
There are special plants designed for planting on borders and ridges, for example, border chamomile. Flowers here can be selected in several varieties or limited to one type. Borders can be used to zone space on a site.
Complex compositions such as rose gardens and mixborders require special care. Mixborder is a planting of perennials, planted in tiers. A beautiful mixborder is the result of considerable work and perfectly decorates the site.
The rose garden also requires special care and serves as the highest testament to the gardening skills of the owners. It consists of roses of one or more species. The rose garden is located in the most prominent place in the center of the site.
Rose garden.
A rockery is set up in an open area using miniature plants and stones. It is also called a rock garden. Rock gardens use plants that do not require special care, but the design of the rock garden itself involves the use of certain skills and knowledge in the field of gardening.
Parterres made from perennials are usually used in regular layouts. The ground floor consists of various geometric shapes of flowers on the lawn. The placement of flowers can be plain without a pattern or with a pattern.
You can place just one flower bed on the site or as many as can fit. A flowerbed or rose garden is usually placed near the main entrance. Edges and borders are arranged along the paths and around the gazebo.
How I found “my” site
I have long dreamed of having my own country plot, which could be “populated” with fragrant shrubs and fruit trees (and no potato “plantations”!). There should be a spacious gazebo for intimate gatherings with family and friends, a house with a large terrace for tea drinking, a pond with water lilies for thoughtful contemplation, several beds of herbs, vegetables and strawberries. And ideally, maximum privacy.
Imagine that such a site has been found! True, it’s quite neglected: no blooming hydrangea under the window, no neat lawn, not even a decent fence around the perimeter. But the location is just what you need. Namely: the plot is extreme, bordering on only one side with the neighboring one, on the other side there is a quiet country road, and around there are vast fields.
When I saw him, I immediately decided: “We have to take it!” I was not stopped not only by the unkemptness of the site (no one has lived there for the last 5 years, the owners visited infrequently), but also by its irregular shape (30 x 20 x 28 x 10 x 40 m). Undoubtedly, it would be easier to “inhabit” a square or rectangular plot of land, but we are not looking for easy ways. In addition, a quite decent two-story house had already been built on the site, which only needed light cosmetic repairs.
However, guided by my dream of a large, spacious terrace, I decided to make a small extension to it. On the north side, I planned to dig a pond, plant shade-tolerant perennials, and organize a barbecue area with a gazebo.
This side of the plot adjoins the neighbor’s, from which I would not like to be fenced off with a high fence or hedge, but thought that I would make do with a chain-link mesh. The neighbors are my good friends, so it was necessary to leave the opportunity to communicate with them “through the fence.” But along the rest of the perimeter of the site I wanted to plant a hedge.
The eastern side of the site will become the “front door”: the main entrance will be framed by a flower garden, ornamental shrubs and fruit trees. On the sunniest, southern side I will place the vegetable garden. And I will “hide” all the outbuildings and the bathhouse at the far end of the site, on the western side.
To start testing the site design software, I drew up a plan for my dacha the “old-fashioned way” - by hand. I will use this drawing in various programs. And now - a detailed description of the site plan.
Orchard layout
When planning a garden, you need to consider the following points:
- Fruit trees should not cover decorative plantings, which means they should not be located between the house and decorative plantings.
- The garden should not block the view from the windows of the playground house.
Fruit trees do not need to be planted in a separate area, but rather distributed throughout the area.
Plant garden trees at a distance equal to at least half the diameter of the crown from the border with the neighboring plot. This is necessary so that the crown does not overhang someone else’s territory.
Selection of ornamental plants
Berry bushes are chosen from the point of view of productivity and decorativeness. Gooseberries and currants are suitable for border and zone planting, hawthorn, red bird cherry, and chokeberry are suitable for hedges. Barberry and honeysuckle tolerate pruning well. Raspberries and blackberries are placed along the fence, along the boundaries of the site or in rows near outbuildings. Dogwood, shadberry, viburnum, and red-leaved apple trees are planted as ornamental plants.
For a small area, it is better to select unpretentious plants that can perform a dual role. For example, barberry - on the one hand, it is a beautiful ornamental plant, and on the other hand, it is a joy for cooks and connoisseurs of traditional medicine.
Dwarf apple and pear trees are another practical solution for a small area
When planning a vegetable garden, beds, plantings, the design takes into account the compatibility of plants, the biological characteristics of crops, and the requirements of agricultural technology: frequency of watering, requirements for lighting.
Planting a variety of plants on the site will allow you to enjoy an attractive view throughout the year.
You need to plan your landscaping for the entire season. Perennial flowers are added as annuals, taking into account the flowering period, so that there will be flowers in different parts of the area all season. Shrubs that change leaf color in the fall are placed in the front area. Unpretentious crops are placed in hard-to-reach places, while those requiring care are placed in a free access zone. Crops are combined compositionally, coniferous crops with deciduous ones.
To decorate rockeries, you can use herbs and different types of lettuce. Flowers are planted in vegetable beds to repel pests.
Don’t forget about ornamental plants, which play an important role in the overall atmosphere of the garden plot.
Options for planning a garden and vegetable garden on a site with diagrams, photos of the best design solutions are presented in the selection. Other people's works inspire you to realize your own ideas.
Layout of garden trees and shrubs on the site
After choosing a place for the garden, you can begin to determine the number of fruit trees and shrubs and select specific varieties. To do this, you need to draw up a plan for planting garden plants on the site. When drawing up a plan, we are guided by the following questions:
- The possibility of trees planted nearby pollinating each other.
- Selection of crops with different fruit ripening periods.
- The need for some crops to have a male plant (sea buckthorn, actinidia, lemongrass).
- Taller trees should not obscure lower ones.
Sometimes fruit plants are planted around the perimeter of the site. In this case, shrubs are planted no closer than 1.5 m to the fence, cherries and plums - no closer than 3 m, apple and pear trees - 4 m. If trees are planted in rows, then the distance between them should be 5-6 m.
To satisfy the needs of an average family, it is enough to plant 1-2 trees of each type. We recommend having in the garden:
- cherries - 2 pcs.;
- cherries - 2 pcs.;
- quince - 1 pc.;
- plum - 2 pcs.;
- apricots - 2 pcs.
When planning a berry garden, bushes can also be planted along the perimeter of the site or a separate area can be allocated for it. The distance between fruit bushes should be:
- raspberries - 0.5 m between bushes in a row and 1.5 m between rows;
- yoshta, black and golden currants - 1.5 m between bushes;
- red currant - 1 m between bushes;
- honeysuckle, irga - 2 m between bushes.
When calculating the required number of shrubs for a family of 4–5 people, focus on the following figures:
- raspberries - 20 bushes;
- currants - 3 bushes;
- gooseberries - 3 bushes.
The berry garden is left in one place for 7–12 years. Then the plantings are moved to a new location.
Placement and Planting of Fruit Trees on a Dacha Plot and Their Compatibility with Each Other
Adult fruit garden How to properly plant fruit trees, taking into account their compatibility, how to place fruit and berry crops on your site so that they grow well and bear fruit. Just like in a small garden area, the proximity of different varieties and species of fruit trees will influence each other.
In this material we will try to reveal the basic principles of organizing an ideal garden on a site where all the trees and shrubs are arranged according to the principles of harmonious proximity and vertical arrangement.
No “water”, only useful condensed information for beginning gardeners. General recommendations are given, but specific ones, for example, how to plant apple trees, can be understood without problems.
An example of placing and planting fruit trees on a site
Planting trees in a dacha is a very important moment , but planting a garden is always preceded by a lot of preparatory work. The assessment and selection of sites is carried out taking into account the suitability of the soil for planting, and mistakes made are difficult to correct in the future.
Our gardeners most often do not have to decide on the choice of sites - we cultivate what we are given. But it is important to know their features and, if possible, try to correct the shortcomings.
Poor soil for planting fruit trees
Sprayed, highly podzolized soils, waterlogged, rocky and dense clay soils are undesirable for the garden Swampy, closed pits and hollows are completely unsuitable for planting a garden.
Areas with high groundwater levels are dangerous for fruit plants In such areas, plants are short-lived. The roots of fruit trees, having reached the water, die from lack of air, then the ends of the branches dry out, and the skeletal branches begin to die.
Placing and planting fruit trees - their compatibility on a plot of 4 acres
Groundwater level when planting fruit trees
When planting apple and pear trees, the groundwater level should be no closer than 2 m from the soil surface. Cherries and plums, which have less deep roots, can be planted with a groundwater depth of no closer than 1.5 m, and currants, gooseberries, and raspberries - if there is groundwater no closer than 1 m.
Useful and harmful trees - neighbors of the garden
It has been experimentally established that if tree species such as oak, maple, linden, bird cherry grow near the garden plot, then fruit plants will grow well. But if alder, sedge grasses, and horsetails grow in the vicinity, all this indicates swampiness and increased acidity of the soil.
Fruit tree compatibility - table
Compatibility table for planting fruit trees
Usually, various pome, stone fruit, nut and berry crops grow in a small garden plot. Apple trees, pears, cherries, plums, raspberries, gooseberries, currants and strawberries are compatible with each other, which has made it possible for centuries to grow them together in a limited area of the garden.
Thickened plantings are a mistake
A big mistake when placing fruit trees is dense plantings. Every fruit plant needs a sufficient amount of soil and air throughout its life for normal growth and fruiting. Therefore, it is initially important to distribute crops according to the area they occupy in adulthood.
Planting fruit trees on the site
Distance between seedlings when planting fruit trees
When establishing the distance between fruit seedlings during planting, one must take into account, first of all, the width of the crown. The closing of the crowns of neighboring trees, and even more so the mutual interweaving of branches, worsens the lighting inside the crown.
As a result, premature death of overgrowing and fruiting branches inside the crown occurs. In addition, spraying, pruning and harvesting are significantly more difficult with closed, intertwined crowns.
Fruit tree on a trellis
Garden on site: temporary compaction of plantings
Temporary compacted plantings can be carried out by placing currants, gooseberries, and strawberries in the rows of young fruit trees. As the trees grow, the latter are removed from the rows of the garden.
An excessive increase in the distances between berry bushes and fruit trees is also inappropriate, since the number of plants per unit area decreases, and the overall yield of berries and fruits decreases.
Fruit trees - compatibility
Placement of fruit trees on the site according to height
Fruit crops have different winter hardiness, so their location must be organized so that tall apple trees and pears grow on the northern or northeastern side of the site, do not shade other plants and protect them from strong winds.
On personal plots, where processing is carried out mainly by hand, apple and pear trees can be placed at a distance of 4-5 m from each other, and cherries and plums - at a distance of 2.5-4 m.
The idea of drip irrigation of a fruit tree seedling
Pollination of fruit trees
In addition, the placement of the varieties of each crop should be such that it promotes the best mutual pollination or, as they say, the best cross-pollination. In fruit trees (apple trees, pears, plums, cherries), a distinction is made between self-fertile and self-sterile varieties.
Self-fertile ones set fruit when pollinated by their own pollen, self-sterile ones only when pollinated by pollen of another variety. Almost all of our fruit trees are self-sterile, and for normal pollination and fruiting, several different varieties must be planted.
Relaxation area in the garden under the pear trees
Distance 20-25 meters
Observations have shown that between different varieties of fruit trees that should pollinate each other, the distance should be no more than 20-25 meters. Take this into account when planting them. Pollen from one variety to another is transferred by bumblebees and bees.
Cherries, sea buckthorn, and raspberries produce shoots, so strawberries should not be planted in close proximity to them. In addition, raspberries and strawberries have a common pest - the strawberry-raspberry weevil.
Lime on the ground is protection against ants. The mesh on the tree is protection against rodents.
Correct placement of fruit trees on the site
Often a gardener has a question: how many and where to plant plants of a particular species? Placing plants on the site is a personal matter for everyone. Most garden plots have consumer value, that is, they produce a variety of garden products to meet the family’s needs for berries and fruits.
Some gardeners deliberately give preference to one or another crop, such as strawberries, and receive a harvest that exceeds their own needs for sale.
There are gardeners who are interested not just in fruit harvest, but in growing some rare breeds and varieties grown in an unusual way, for example grapes, walnuts, etc.
How and when to plant fruit trees correctly
Fruit trees have a long life. Mistakes made when choosing a place and soil for fruit trees appear over many years and, as a rule, are difficult to correct.
When choosing a place for a garden, it is necessary to take into account the terrain, soil conditions, groundwater level and the presence of perched water. In the conditions of central Russia, during unfavorable winters, even relatively winter-hardy varieties of apple trees often freeze.
The results of overwintering largely depend on the location of the garden.
In winter, the air becomes heavier as it cools. On the slopes it flows down. On level ground there is nowhere for the air to flow and it cools down at night. In low places (closed valleys, basins, depressions, “saucers”) not only is there no flow of cold air, but, on the contrary, cold air additionally flows into them from areas located above.
An example of placing trees and plantings on a site
Production experience shows that apple trees grow well and bear fruit on soils that provide free penetration of roots to a depth of at least 60-90 cm. Therefore, when choosing soil for a garden, you should pay attention to both the top layer of soil and the underlying soil.
What soils are suitable
In the conditions of the Middle Zone, the most suitable for fruit trees are soddy-podzolic soils, developing on light loams and cohesive sandy loams, underlain at a depth of about 1 m by waterproof moraine loam.
Swampy soils and all soils with a high groundwater level or with prolonged high water in the spring months are unsuitable for apple trees and other tree fruit species.
Soil cultivation methods
However, the cultivation of fruit crops on such soils is also possible with appropriate cultivation and micro-reclamation. The oldest and most common methods of soil cultivation: constructing embankments, creating hills, using ridges, draining soils with open ditches, etc.
Shafts and hills are created in order to raise the root system of cultivated plants as high as possible above the groundwater level. With this method, like no other, the soil is well warmed up and aerated, which increases its microbiological activity and, consequently, fertility.
The shafts are arranged in different widths - from 2.5 to 4 m. The height is also different and depends on the groundwater level and the degree of waterlogging of the soil. Most often it is 0.6-0.9 m. Shafts can be built from existing soil, as well as from imported soil. The size of the shaft depends on the groundwater level in June. The upper edge of the shaft should rise 1.5-2 m above this level.
A more acceptable way is to grow fruit crops on hills
Hills are built on waterlogged areas from imported mineral soil of the humus horizon. The height of the mound should be 0.9-1 m, the width or diameter at the top 0.5-0.6 m, at the bottom - 2.5-3 m. The larger the mound, the better, since as the garden grows the hill has to be increased.
Planting fruit trees on permanent ridges
In overly moistened garden plots, planting fruit trees on permanent ridges up to 4 m wide is widespread. Excess moisture flows from the ridges into furrows, and from the furrows into ditches. The ridges are better warmed by the sun. Fruit trees should be planted in small holes equal to the size of the root system of the planted tree.
Soil drainage with open ditches
can also be used in the cultivation of fruit and berry crops. The most common and reliable method of draining waterlogged soils is closed drainage made from pottery pipes. But the high cost of this method does not allow it to be widely used in private plots.
Benefits of planting trees on ramparts
A study and comparison of the root system of apple trees showed that the mass of roots and the area of their distribution was much larger in trees on ramparts than on a flat surface. A powerful root system ensures good crown growth and fruiting of trees.
Autumn planting of fruit trees on the site
Pre-planting soil preparation
Optimal conditions for the growth and development of fruit trees are created on soils rich in organic matter, with high moisture capacity and good gas exchange. It is very important not only to choose the appropriate site for the garden, but also to properly prepare the soil in it.
It is possible to cultivate the soil before planting fruit trees in future row strips approximately 1.5-2 m wide. Organic fertilizers (manure, compost) are immediately applied to the entire area at the rate of 0.8-1 tons per hundred square meters.
In areas where continuous plowing with manure is applied, this is impossible to do. Here they dig large planting holes (up to 1-1.5 m in diameter, up to 80 cm deep). Then the holes are filled approximately three-quarters with the top, more fertile layer of soil.
Soddy soil is taken first from the edges of the pit, and then from the row spacing. 50-100 g of the active ingredient of phosphorus fertilizers, 10-15 kg of humus or peat compost are added to the bottom of the pit. In any case, fertilizers are mixed well with the soil.
When introducing peat into holes, you need to remember that peat is very slow and does not allow water to pass through it. Therefore, if you pour dry peat into a hole, it will remain dry for a long time, sometimes years, when watered from above. So it is necessary to add either already quite wet peat into the holes, or water the peat in the hole before planting the trees and be sure to shovel it to ensure even moisture.
Planting seedlings
The earlier the seedlings are dug up in the fall, the longer the period will be favorable for new root formation while the above-ground part is dormant. However, digging up seedlings too early is not suitable, since by this time the tree will not have accumulated reserves and will not have finished maturing its tissues.
Unripened tissues retain water much worse and suffer greatly from freezing and drying out. Therefore, seedlings should be dug up in the fall as soon as the ripening of the above-ground parts ends.
Late autumn planting of an apple tree, less than 20-30 days before a strong drop in soil temperature, that is, later than October 15-20, gives poor results. The consequences of winter damage to late-planted trees can be observed in plants even in subsequent years (worse growth, delayed onset of fruiting).
Transplanting mature trees
With such a transplant, it is important to ensure that the soil adheres sufficiently tightly to the roots of the transplanted trees. Typically, the developing roots and small roots of the plant push the soil particles apart, coming into close contact with them.
Small “lobes” are not retained in transplanted trees. The tree's need for water is especially great at this time. If planted carelessly, air-filled voids often remain between the main skeletal roots, as a result of which the roots can begin to mold.
It is convenient to carry out planting together, when one holds the tree, and the second supplies the soil, which the planter carefully packs under the roots and between them. After the earth is packed between the roots, the planter stands in the hole and tramples with his feet the earth thrown by the second worker.
At first, you have to lightly hold the tree with your hand. In order to avoid breaking the roots, the earth is trampled down from the edges of the hole to its middle (the heels should be directed towards the edges of the hole, and the worker should always be facing the tree).
The compaction should be such that the planted tree cannot be pulled out, even with some force.
Proper planting depth must also be ensured.
Planting too shallow leads to exposure of the roots after the soil settles and to their drying out. If planted too deeply, especially in heavy, clayey, poorly aerated soils, the trees will also suffer and grow poorly.
The tree must be planted at such a depth that after settlement its root collar coincides with the soil surface. The root collar of a tree is the place where the trunk transitions to the root. It can be identified by the change in the brown color of the trunk, which contains greenish tones, into the orange-yellow color of the root.
When planting, it should be remembered that the main skeletal roots will subsequently become very thick. If you leave them bunched together, much less twisted and intertwined, they will interfere with each other in the future. To avoid this, the roots must be straightened when planting.
In very strong winds , especially after heavy rains or watering, transplanted trees may fall under the weight of the crown. The larger the transplanted plants, the higher this danger. Therefore, when transplanting fruit trees older than two years of age, a stake is firmly driven into the bottom of the hole and the tree is tied to it.
When planting, high soil moisture is required
If the soil is moistened to a great depth and the trees are transplanted in rainy weather, there is no need to water them. When watering, pour water closer to the edges of the hole to avoid gullies at the base of the tree. When the water is completely absorbed into the soil, holes are made around the trees in case of further watering.
The level of groundwater has a great influence on the choice of garden crops. If they are closer than 2 m, then this place is unsuitable for apple trees on vigorous rootstocks and pears. Cherry, plum and apple trees on dwarf rootstocks feel satisfactory when the water level is no closer than 1.5 m, berry bushes - up to 1 m.
If the water reaches 0.5 m, then only garden strawberries can be grown. If the water is close, but you still want to have fruit trees, then you can plant them on ridges or mounds.
In order to make the most of solar heat, tiered plantings of garden crops are recommended: in the south of the site - low strawberries, then currants and gooseberries, then stone fruits; in the north - the tallest ones: apple and pear trees.
At the southern walls, where the plants receive additional heat, which is reflected by the wall, the most heat-loving plants are planted - grapes, cherries, apricots. Dessert varieties, in which the main thing is appearance, taste and aroma, also require the sunniest places.
Care of the crown and trunk
The trunk and main skeletal branches of the tree are conductors of nutrients. They should thicken evenly and match each other. Their uniform thickening depends on the condition of the cortex. Diseased, rough bark compresses the conducting vessels, which prevents the supply of nutrients from the leaves to the roots and vice versa. The layer of dead bark makes it difficult for the cambium cells to divide. In addition, dead bark is a refuge for pests.
Dead bark, mosses and lichens are removed from the trunk and main skeletal branches in the fall, preferably in cloudy weather. Metal scrapers and wire brushes are used for cleaning. On young trees, the trunks and bases of skeletal branches are wiped with coarse burlap or straw strands.
Before cleaning, lay a film under the wood
The bark is first cleaned with scrapers and then with brushes. After cleaning, the bark, mosses and lichens are burned, and the trunk and base of the crowns are whitened with lime mortar (1.5-2 kg of lime, 0.5 kg of clay and a little mullein are taken for 1 bucket of water). When whitewashing, special attention must be paid to the places where skeletal branches depart from the trunk, where pests usually overwinter and foci of fungal diseases are located.
Fertilizing young fruit trees
In the first years after planting, trees either do not produce fruit at all or produce little. At this time, the crown of the tree is laid. The gardener's attention should be directed to ensuring good shoot growth. It is desirable that a powerful crown be formed as quickly as possible. During this period, special attention should be paid to good (but not excessive) nutrition.
Enrichment of soil with minerals
There are a number of methods for enriching the soil with phosphorus, potassium, and organic matter. in a tree trunk circle (around the tree) with a radius of 2 m are filled with batteries
Phosphorus, potassium and organic fertilizers are applied along it in increased quantities. This work must be completed quickly - within three to four years. During this period, it is advisable to increase the potassium content in heavy soil to 15 mg, in medium soil to 12 mg, and in light soil to 8 mg per 100 g of soil. The amount of available phosphorus in all soils is up to 12-15 mg. These numbers are approximate.
It would be better to set the amount of fertilizer needed depending on the initial soil fertility. The less it contains of a particular nutrient, the more appropriate fertilizer must be applied. And vice versa. If there is no soil analysis data, it can be recommended to add 15-20 g/sq.m of the active substance phosphorus and potassium , i.e. 50-70 g/sq.m of superphosphate and 30-40 g of potassium chloride.
If there is only fruit and berry or some other ready-made mixture, it is added at the rate of 250 g/sq.m. In addition to mineral fertilizer, organic fertilizer should be given - 4-5 kg/sq.m. When applying organic fertilizer, the dose of potassium is reduced by one third. It would be better to compost mineral fertilizers (or, in extreme cases, just mix them) with organic ones.
Fertilizer is applied annually for digging in the fall
When the top layer is enriched with phosphorus and potassium (approximately in the fourth year), the area in this place is dug deep (22-25 cm). To reduce damage to the roots, when digging, place the shovel along the radius of the circle, and not across it.
The top layer, filled with fertilizer, should be placed down, where the roots of the tree will then develop, and the bottom (poor) layer should be placed at the top. In the future, it will not be difficult to enrich the inverted lower layer with nutrients by applying fertilizer in normal doses - 6-7 g/sq.m of active substance.
Some amateur gardeners improve the soil around a tree in one go:
first, fertilizers are applied continuously, as indicated above, then around the tree (a little further from the periphery of the crown) a groove is dug 35-40 cm deep and about 50 cm wide. This is done continuously (in a ring) or intermittently, so as not to disturb some of the roots.
The grooves are filled with soil from the arable layer, taking the missing soil from the row spacing. Phosphorus, potassium, and organic fertilizers are added to the soil intended for filling the ditch. The amount of phosphorus, potassium and organic fertilizers per 1 sq.m is increased by 2-2.5 times.
Plot layout 24 x 40 m from Ideas for Your Home
Site plan 25 x 40 meters
Video tips on garden planning and planting fruit trees
In conclusion, I suggest you look at the advice from an expert at the Greensad garden center on planning a garden plot.
Rose garden layout
The rose garden is usually the “signature of the site.” The rose garden is arranged in the most prominent place in the form of a flower bed of regular shapes: rectangle, circle, in a regular garden style. For a garden in a landscape style, a rose garden is arranged in the form of a free-form flower bed. Paths are laid around the rose garden or a lawn is sown. A rose garden illuminated in the evening looks very impressive. You can place a small pond near the rose garden in landscape style.
The rose garden should be planted with roses of various varieties that combine well with each other. Roses are planted in groups, 4–5 bushes each.
Rose garden in the garden plot.
When arranging a rose garden, it is better to play with color contrasts. At the same time, plants of the same color are planted together. Roses, the flowers of which are painted in several colors, are planted separately. Other flowers that look good together with roses can grow in the rose garden: clematis, daisies.
You may be interested in: “What flowers to plant in the flowerbed so that they match each other in color and height.”
Layout of recreation areas with gazebos
It is very important to have a recreation area on the site. It can be quite small and consist of a small bench. But if you approach its design creatively, then any bench can turn into a powerful source for restoring strength after a hard day.
A garden gazebo can become a central place for relaxation in a country house or on a personal plot, if you choose the right place for it and arrange it. Don't design the gazebo as a place to eat. It is more suitable for solitude after lunch or for tea. It is worth considering it as a place to relax.
It is better to place the gazebo on an elevated place. In order for your stay in the gazebo to be relaxing and truly comfortable, you should take care of its correct location and some arrangement. The following 5 items will turn your gazebo into a real paradise.
- Long shot. It will be great if your gazebo offers a view of some natural space: a lake or pond, a flower meadow, a forest edge.
- Close-up. Plant your favorite flowers next to the gazebo so you can admire them in close proximity.
- Aroma. Your vacation will become even more enjoyable if you enhance the feeling of comfort and peace with a pleasant scent. To do this, plant flowers with a light aroma next to the gazebo: sweet peas, lilies or roses.
- Home comfort. Decorate the gazebo with light curtains and matching sofa cushions. Sitting will be much more comfortable and the overall appearance will be more pleasant.
- Backlight. As dusk approaches, turn on the lighting. This will give the relaxation corner a special charm. Lamps can be the simplest. You can simply place candles in the gazebo.
There is no doubt that a gazebo or recreation area arranged in this way, consisting of even one bench, will attract all members of your family.
Site layout with features
Some garden plots have features that can be considered as disadvantages, or can be turned into advantages.
With a slope
An area with a slope of less than 10% can be used in the same way as a flat area. Such a small slope does not require special solutions. If the slope is more than 10%, then you need to divide it into separate terraces with retaining walls. Inside each terrace, the soil should be leveled and a level area should be created.
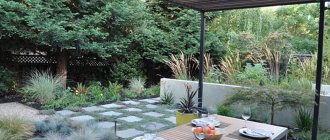
A plot with a slope, divided into terraces, makes it possible to organize several completely isolated zones located at different heights: a recreation area, a vegetable garden, a children's playground, a prairie garden. It's beautiful and convenient. Stairs also add a special touch to this garden.
Thus, the entire site will be divided into separate zones located at different heights. Each zone can be used differently:
- as a recreation area;
- as a children's playground;
- like an orchard;
- like a vegetable garden;
- as a garden area made in a certain style: English garden, prairie garden.
Connect each zone with other zones with steps or a common staircase.
This whole process of installing terraces and stairs is very labor-intensive and expensive. But as a result, you will get a multi-level plot that all garden designers dream of. The fact is that in landscape design there is such a thing as “giving volume to the garden.” A flat area is considered uninteresting in terms of landscape design. Designers deliberately arrange artificial terraces and elevated levels just to give the garden “volume”.
On a site on a slope, the “volume” appears natural and is of greatest value. The site, naturally zoned by height, has a special style and beauty. Steps also add extra interest to the garden, especially if they are equipped with lighting.
Long and narrow
A long and narrow section can be visually made closer to a square one, which is considered ideal. To do this, it needs to be divided into zones along its entire length. Each zone will be square in shape and treated separately from the others.
A long and narrow area seems wider when it is divided along its length into zones: 1 - entrance area, 2 - children's playground, 3 - recreation area, 4 - garden, 5 - vegetable garden.
Ornamental plants can be used as a screen dividing the area into zones. Winding paths leading to the next area, hidden from view by tall bushes, create intrigue: you want to walk along the path and quickly see what is hiding in the depths of the garden. An interesting touch to dividing the area into zones can be arches decorated with flowering vines. It's nice to walk through the arches to the next area.
Square
For a square, flat area, it is not difficult to plan the buildings and plantings. Such a site is considered the most successful for placing all the necessary buildings and plantings on it. Zoning is also possible here. The most common and convenient plan for a square plot is the following plan.
The most successful plan for a square plot. 1 - house, 2 - garage, 3 - lawn, 4 - flower garden, 5 - pond, 6 - children's sandbox, 7 - fruit trees, 8 - fruit bushes, 9 - vegetable garden, 10 - barn.
With this layout, a beautiful English lawn becomes the center of the site. Its green carpet provides a pleasant rest for the eye. The recreation area is separated from the garden area by a triple arch entwined with climbing roses and clematis.
How to make garden beds correctly
Careful planning of your garden will help you get a bountiful harvest from a small area. If you develop vegetable plantings according to the rules, the structures will become an element of the decor of the territory. Beautiful and comfortable beds will harmoniously fit into the landscape design of the site.
Dimensions
Growing plants in the garden should not cause discomfort to the owner. Traditionally, domestic farmers create beds whose width is more than 1 m. Such a structure is inconvenient to care for.
To maintain an attractive appearance of plantings, narrow solutions are recommended in landscape design. Options with access from one side have a size of 50-60 cm. If plants are approached from both sides, then parameters of 70-80 cm are recommended. It is easy for a person to loosen the soil, remove weeds and monitor the condition of vegetables.
The optimal size of the path between the rows is from 20 to 50 cm, but it is better to stop at 40 cm. Protect the paths from dirt with sawdust, crushed stone or sow lawn grass. If you put borders along the edges, the earth will not crumble. When planning a vegetable garden, the length of the beds depends on the requirements of the owner and the design features of the landscape. Traditional parameters are from 5 to 10 m.
Forms
Practical and convenient structures fit into the overall composition of the site, so they use geometric shapes. Familiar rectangular models are suitable for all stylistic designs. The shape can be folded into zigzags. Square solutions should not be made wider than 50 cm, otherwise caring for vegetables will be complicated.
Fencing ideas for garden beds Source www.pinterest.com
Triangular beds in the vegetable garden look unusual and are often used in the design of the French landscape. Several figures are assembled into strict geometry. To make it easier to care for a large form, you need to divide the space with paths.
The design of the garden and vegetable garden uses round rows. A huge flower bed looks impressive, but is difficult to process. The larger the diameter, the harder it is to plant vegetables and flowers. To make it easier to approach plants, ray paths that converge in the center will help. A spiral bed is a landscape modification assembled from a narrow strip. The path between the plantings will become a continuation of the structure.
Beds of different shapes on the site Source svoyabesedka.ru
Beds with streamlined borders look original. Irregular ovals and diamonds resemble random blots on the lawn. An unusual design solution for the landscape is necessarily fixed with a border. Cascading rows of trapezoids are placed on a slope.
Raised beds can be installed anywhere on the site. The complex multi-layer design looks harmonious against the backdrop of the tiles of the yard or lawn. Small vegetable gardens and flower beds are combined with a fence and mounted on the sides of the stairs. To ensure that the solution does not fall out of the landscape design concept, you need to decorate the borders.
Example of a French bed Source vk.com
Vertical layout of the garden plot
The vertical planning of the site must be completed immediately before building the house.
If there is a slope at the site where the future house will be built, then perform terracing: turn the sloped terrain into a flat terrain located at different levels and separated by a retaining wall. Terracing helps remove the large flow of water that invariably forms when water flows along a slope. Terracing can be done on the entire site or on a separate part of it.
If the site is flat, then when building a house or garage, the slope should always be directed towards the road or lawn so that water does not flow under the buildings.
If the road is located higher than the house, then there may be two solutions:
- The house is raised so high that water does not flood it.
- Using vertical soil leveling, a special ditch with drainage is made between the road and the house. The slope is made on both sides towards the ditch: the water flows safely into the ditch.
Thus, with the help of the correct vertical layout of the site, it is possible to ensure that rain and melt water does not flow under buildings or under plantings, but is diverted to the garden, onto the road or into special ditches.
Options for planning and arranging a summer cottage with your own hands with photos, depending on the size
The size of the plot directly determines how many buildings, plantings, flower beds and small architectural forms can be placed on it. When planning any site, it is better to divide it into zones. The number of zones and their size depends on the size of the site.
On large plots of 20 acres or 30 acres there is enough space for everything you want. Here the question is posed differently: not how to place everything you want, but how to develop the entire area of the site. By dividing a large area into zones, you can sequentially equip each zone, and thus develop the entire area. For large areas the following zones will be appropriate:
- entrance area with house and garage;
- recreation area with gazebo;
- sports area with sauna;
- garden;
- garden;
- children's playground with swimming pool, swings and sandbox;
- prairie garden or garden in Japanese, or any other style;
- forest zone;
- area with a natural or artificial reservoir;
- strawberry, cranberry or other berry meadow, blueberry.
A large area can accommodate several sculptures; pergolas decorated with climbing plants, galleries and green tunnels would also be appropriate here.
In this plan, the architect combined a gazebo and a swimming pool area.
Plots of 12, 13, 14, 15 or 16 acres are optimal in terms of area. Here you can place everything you need and not think about how to take up the extra space. The following areas will fit perfectly here:
- entrance;
- garden;
- garden;
- playground;
- rest zone.
When placing the main zones, you won’t have to feel crowded, since there is enough space in such spacious areas. A rectangular plot of 15 acres with a house, a bathhouse, a garage and a vegetable garden, as well as an orchard and beds, is suitable for an average family.
Top view of a plot of 15 acres.
A plot of 10 acres with a house, a bathhouse and a vegetable garden will satisfy the needs of a small family if this family does not have too many demands. On such a plot you can also place a small orchard of several trees.
Square plots of 7, 8, and 9 acres will accommodate either a bathhouse or a garden. Such plots may have a small house and a small vegetable garden.
The result of planning a small summer cottage.
A plot of 6 acres with a house is often found. It can accommodate a small berry garden, several fruit trees and a small vegetable garden. A small plot requires serious planning. Only after drawing all the elements of the garden onto the plan can you begin to implement your plans. In this case, you can place a minimum number of different buildings and plantings on the site.
How to Draw a Garden in Perspective
As a landscape designer, I often create perspective drawings for my clients so that they can better visualize the design of their future garden. Perspective drawing is a method of drawing a 3-dimensional scene (the space of your garden) on a 2-dimensional surface (on paper). Drawing a garden in perspective allows you to evaluate the current structure of the space, helps to visualize ideas, plan new plantings or redesign small architectural forms.
My personal method for drawing a garden in perspective can be done in 7 steps. What's good about it? For example, you have some ideas for your garden, but want to see what they will look like before you start investing your time and money in creating or remodeling the garden. The nice thing about this method is that you don't need a site plan to start designing.