Here you will learn:
- Determining the location of drilling a well in the country
- Types of wells for summer cottages
- Abyssinian well
- DIY sand well in the country
- Artesian well
- Dimensions of the well protection structure
- Ensuring the tightness of the casing pipe
- Using a Downhole Adapter
- Selection and installation of equipment for water supply
- Well care and operation
A well in the country is a convenient source of water so as not to depend on centralized water supply. You can organize an Abyssinian well, an artesian well or a sand well.
Determining the location of drilling a well in the country
First of all, you should get to know your neighbors and find out how they solved the water supply issue. If they already have wells on the property, look at their locations. It is possible that the neighbors use imported water. In this case, you will need to study the soil layers on the site. Research results are usually incorporated into a construction project. From the documents you will learn the level of the aquifer and the flow line of surface groundwater.
The next step is to determine the location of drilling a well in the country. The simplest and most commonly used method of finding water among people is the frame method or the rod method. A man holds two curved metal wires in his outstretched hands. Trying not to change the position of his hands, he moves around the area. In the place where the underground spring flows closest to the surface, the wires will begin to twist and cross. Having determined the drilling location, you need to choose the type of water well that is suitable for you.
The correct choice of location, depth and materials of a well at the dacha is a guarantee of obtaining clean drinking water in sufficient quantities.
Briefly about the main thing
Modern arrangement of a well in a country house or area with a cottage is carried out to protect the water source, equipment, and pipeline system from dirt, precipitation, dust, the negative effects of low temperatures, melt and rain water. To do this, the installation or construction of a protective structure is carried out. It can be above ground level or in the ground. One of the options is also to arrange a special technical room in the house. Regardless of the option, it is used for installing a pump, accumulator and automation.
Ratings 0
Types of wells for summer cottages
At dachas, three types of wells are mainly used.
Abyssinian
The Abyssinian water well is a small source that can be made in the territory of a private house, garage or other indoor space. The liquid is extracted from a depth of about 15 meters. Mostly the water is potable and clean. It has a favorable mineral composition.
Operating principle. It is based on an inch pipe. At its lower end there is a special filter and a drilling element – a needle. The pipe is driven into the ground, and a pump is installed on top to create a vacuum.
Pros:
- Made by hand.
- Does not interfere with landscape design.
- There is no need to rent special equipment.
- The pump is remote or located in a caisson above the source itself.
- The work will take about 1 day.
- Silting is excluded.
- Capacity up to 3 cubic meters/hour.
- If necessary, it can be easily dismantled and moved to another location.
Minuses:
- Depth limitation.
- Must be used constantly. Otherwise, you will have to pump, which is a labor-intensive process.
On the sand
The depth is determined by the level of the aquifer. The water well for sand is located in the second interlayer layer. Liquid accumulates in sandy deposits. Its depth can be a minimum of 15 m and a maximum of 30 m. It is produced mainly by the auger drilling method.
Operating principle. The source diameter is 100 mm. A special filter tube is placed at the bottom. Subsequently, it may become clogged and will have to be drilled again. The liquid is supplied to the top using pumping equipment.
Good to know: with constant use it will last up to 20 years - this is at best.
Pros:
- Minimum investment.
- The simple design allows you to do it yourself.
- Possibility of using small drilling rigs.
- Possibility to drill in any convenient place.
- There is no need to build a complex filtration system.
Minuses:
- Operational life.
- The performance is affected by the water level.
Artesian
Made for large houses. The depth can reach 100 meters or more. The dacha is equipped with a casing and service pipe. The first has a diameter of 159 or 133 mm. The second is 133 or 117 mm. The diameter of the well is determined based on needs.
Principle. First, the casing becomes clogged. It houses an operational and deep-well pump.
Pros:
- High performance.
- Long service life.
- Stable level.
Minuses:
- High price.
- Long production time, up to 7 days.
- Use of an expensive treatment system due to high mineralization.
- Use of large equipment.
- A package of permits is required.
Auger drilling rig
Such penetration into the soil is carried out using a special tool - an auger. It is a pipe with a diameter of 100 mm, to the bottom of which several turns of steel tape are welded. Their diameter is already larger - 200 mm. As a result, the design resembles a classic drill.
As the tool enters the ground, it is expanded with additional elements using a threaded connection, keys, hexagon or using couplings. A tripod tower is also required here, with the help of which the “drill” is secured. It can be made of wood or metal. The working pipe itself is quite heavy, and therefore it is worth using a winch with an electric motor to facilitate the process.
The essence of this procedure is as follows: the “drill” rotates, thereby destroying the soil layer by layer. Due to the spiral auger, excess soil rises upward. The end result is a well.
Only this method for creating a water well in a dacha with your own hands is applicable in cases where the soil is soft and loose and the depth of the well will not exceed 30-50 meters.
Abyssinian well
Abyssinian well on the site
Despite their name, "Abyssinians" are actually boreholes, often called "needles." Due to the shallow depth, the daily productivity of such structures is low - no more than 25 cubic meters. The well is characterized by simplicity of design and consists of the following elements:
- cone-shaped filter;
- surface device for supplying water (pumping station or manual “rocker”);
- pipes ø25 cm.
Plugging the “Abyssinian well”
First you need to understand a number of nuances associated with the installation.
- Drilling near toilets, VOCs, garbage heaps, etc. is prohibited.
- Installation of the “Abyssinian” is possible only if the aquifer is located no deeper than 8 m from the surface.
- The surface pump used for such wells is not capable of handling hard rock.
- A hand pump will be an excellent complement to an electric one. Moreover, it will make the water supply of the site independent of electricity.
Pros and cons of the design
The advantages of “Abyssinian” include:
- ease of installation (the entire installation procedure takes no more than ten hours);
- low installation price;
- conditional mobility - if necessary, the well can be dismantled and installed in another location;
- no need to obtain a special drilling permit;
- low hardness of the resulting water, minimal concentration of inorganic iron;
- Possibility of installation inside the building.
But there are also disadvantages:
- infiltration of contaminants due to shallow depth;
- the well is not suitable for all soil types.
Well drilling with portable units
Manufacturing of the structure
First you need to prepare all the elements of the well.
Step one. A pipe ø25 cm, 1-1.1 m long, is used as a filter. Slots of 2.5 cm are made in the walls of the pipe in increments of 2 cm (not the entire length, but only 80 cm).
Making a filter
Important! All dimensions must be strictly observed, otherwise the strength of the pipe will be significantly reduced.
Step two. Then the future filter is wrapped with steel wire and covered with a stainless steel mesh measuring 16x100 cm. Clamps are used to secure the mesh - they need to be installed in 10 cm increments.
Step three. Another filter element is a 10 cm long steel tip. It can be pre-ordered from a turner.
Hammer with cone
Hammer with cone
Step four. The mesh with the tip is fixed using tin solder.
Important! All elements must be made of the same material - this will prevent corrosion.
Step five. The remaining pipes are cut into sections of 1-1.5 m. At the ends of the sections you need to cut a small thread.
Installation
Below is the simplest installation option that does not require the use of special equipment.
Step one. First, a hole measuring 1x1x0.5 m is dug in the required location.
Step two. This is followed by preliminary drilling using a simple garden auger. After about half a meter, the drill is extended with a ø12 cm pipe (bolts and couplings from a pipe of slightly smaller diameter are used for connection).
Step three. After the appearance of wet sand, drilling stops and the actual driving begins. The previously prepared structure is installed in the well and driven in with a headstock and an ordinary sledgehammer. To do this, the upper section of the pipe is wrapped with flax, and a headstock is put on it. The blows are applied to the headstock until the pipe is completely hidden - after that the next section is attached and the procedure is repeated.
Important! The headstock must weigh at least 30 kg, and therefore you need to be extremely careful so that it does not fall on your feet while working.
Drilling an Abyssinian well diagram
Periodically, water is poured into the pipe and listening is performed. Every half a meter the pipe turns clockwise, while you need to monitor the sound:
- in coarse sand there will be a grinding sound;
- in fine fraction - rustling;
- There will be no sounds in clay soil.
When noise occurs, the well is filled with water. If the water disappears slowly, then you need to walk another half a meter, and if it disappears quickly enough, then only 30 cm.
Important! During driving, the gap between the pipe and the walls of the shaft is filled with earth and carefully compacted.
Hand pump
Hand pump
Step four. All that remains is to install the pump. The design of a hand pump is extremely simple - a piston installed in a hollow metal cylinder. Once installation is complete, the well is pumped until clean water appears. The base is filled with cement mortar. If desired, the “Abyssinian” can also be connected to a pumping station.
Abyssinian well
Important! After a test run of the well, it is necessary to submit the water for examination. To do this, you will need sterile containers - they will be given to you in the selected laboratory along with instructions for collecting water.
“Abyssinian wells” do not require any special care. Probably, in ten years the water supply will decrease, but this can be easily corrected by cleaning the filter or flushing the shaft with strong water pressure.
Well pumping
Types of drilling workings
The Abyssinian well is a driven well, which is the simplest option. To equip it on the site, the water layer must have a depth of up to 12 meters .
The quality of its water depends mainly on the structure of the soil. If necessary, such a production can be arranged in the basement. A sand well, the design of which is in great demand, is suitable only for personal use. The water from it is characterized as technical in its properties, therefore it is used only for bathing or watering the garden. On average, the aquifers in this well lie at a depth of about 10-50 meters.
By the way, drilling work in such formations can be done with your own hands, the main thing is that there is no shale passing through the area within a few meters. It is unlikely that you will be able to pass it without the help of professionals.
Of course, sand wells have some disadvantages . The main disadvantage of such production is the interruption of water supply. The problem is related to seasonal changes in the level of life-giving moisture. In addition, it needs to be maintained periodically, especially for summer residents who need water only in the summer. In this situation, the filter located in the well becomes silted over time. This is why the water rise must be regular. In addition, the service life of such a well is no more than 15 years.
Artesian production, although considered the most expensive, is the most effective method of centralized water supply. To drill it, large equipment is used, which allows it to go deeper by about 200–300 meters .
Water from an artesian well is better and of higher quality than from a sand well. Also, the filter in it hardly gets clogged. It is mounted at the bottom of a supply pipe with a diameter of 219 mm. This production guarantees a 99% constant supply of life-giving moisture, and its service life is 50 years.
True, such wells also have disadvantages. For example, sometimes it is necessary to install additional filtration systems, since the water may contain various iron compounds. In addition, as mentioned earlier, its arrangement is expensive. You will also have to obtain permission to drill such a mine and coordinate the project.
DIY sand well in the country
When getting down to work, you need to start by drawing up plans and diagrams. First of all, think about where the well will be located in your yard. Take into account all the buildings on the site to understand how convenient the location you have chosen is. Don’t forget about what you planned to build at your dacha in the future. Remember that a well is built once, and moving it to another location will not be easy.
Work order
Having settled all the location issues and created work plans, it is necessary to begin their implementation:
- Carefully mark for future work. Make sure your accuracy is as high as possible.
- Prepare a hole for the drilling tool to enter.
- Install the drilling equipment to the required position.
- Start drilling.
- Assemble a filter column from a pipe, a sump, and a filter, and lower it into the pit.
- Look closely and find the space between the soil and the outside walls of the casing. It must be covered with crushed stone or sand, your choice. If you choose crushed stone, be extremely careful not to damage the outside of the casing.
- Rinse the filter by pumping water into the pipe. This way you can seal the top part.
- Using a screw pump and a bailer, pump out water from the well.
- Make sure that the water from the well is clean.
- Carefully and slowly lower the submersible pump into the well. This procedure is performed using a safety cable.
- Connect the water pipe or hose to the pump.
- In order for the water supply to be adjustable, install a special valve on the pipe.
- The casing, which protrudes above the surface, should not allow water to pass through in undesirable places. For this purpose, perform waterproofing.
- Equip the wellhead with a caisson, and then carefully secure it to the head using a welding machine.
- If you planned to supply pipes to the house, at this stage it is time to lay them in trenches.
- Cover the caisson with soil, and also make a concrete blind area.
This is how, in less than 20 steps, a well can be made in the country. Of course, everything is not so simple, but by doing the work as accurately as possible, you will succeed.
Drilling a shallow well with your own hands
You can also drill a well manually, but for this, of course, you will need special equipment. We list it below:
- Boer;
- drilling rig;
- winch;
- casing;
- rods.
By the way, it is not necessary to take a drilling rig, but only if the well is not deep. For shallow holes, you can remove the drill string by hand.
As for drill rods, they are made from ordinary pipes and are connected using threads or keys. The lower rod should not be forgotten, because it must be equipped with a special drill.
To make cutting attachments you will need sheet steel 3 millimeters wide. And another very important point concerns sharpening the edges of the nozzles. They need to be sharpened in such a way that they end up going into the soil underground in a clockwise direction.
Now you should install a derrick on the site where you will be drilling. Make sure that the height of the derrick exceeds the dimensions of the drilling rod so that lifting and retrieving the rod occurs completely unimpeded.
To create a well, you will probably need an assistant. You can start rotating yourself, but after some time, when the drill goes underground, the efforts of one person will not be enough to continue drilling work.
If you and your assistant run into problems or simply get stuck, try pouring water into the soil, as it will soften it somewhat.
While drilling, pull the drill out approximately every half meter to remove excess soil from the well.
When the drill reaches ground level, an additional frame is attached to it. Continue drilling until you notice on the ground that you have finally reached the aquifer. After this, you need to clear the hole of the earth and sink the drill even deeper, trying to reach a layer called waterproof. Having reached this layer, an abundant flow of water will begin into the well.
Pump out the dirty water using a pump and soon you will find clean water. If suddenly you notice that the water is not getting cleaner, you need to deepen the drill a few more meters.
Purpose, nuances of the device
Compared to a well, the well has smaller dimensions, allowing you to save the working space of the site. The mouth of the source is sealed much easier; precipitation and dirt do not get inside. There is no need to remove large amounts of soil or transport it from the construction site.
Comparison of well and borehole
You can build a well yourself without equipment in several ways:
- by eroding the soil with water;
- extracting rock with a hand drill auger;
Auger removed from the well
- or a bailer of a homemade device.
Drilling a well with a bailer
The most economical method is the Abyssinian well, from which the soil is not removed at all. The soil becomes compacted when the expanding pipes are clogged, the column becomes operational, and water flows through it into the pressure line.
The principle of constructing an Abyssinian well
Artesian well
An artesian well is significantly deeper in depth than the previously described wells, since water is extracted from the aquifer of deep rocks. The flow rate of such a source is very high and can provide water consumption for several houses. Since to install an artesian well it is necessary to turn to specialists, we will not dwell in detail on drilling and installation of equipment.
Drilling an artesian well
When choosing a company engaged in the construction of artesian wells, you should not trust companies that offer plastic pipes for casing the well, because such casing will not withstand the pressure of deep rocks. The company must have several serious drilling rigs and a hydrologist on staff.
Therefore, drilling an artesian well cannot be cheap. Another disadvantage is the high probability of increased water hardness, as well as the presence of divalent iron and manganese compounds in the composition. But at the same time, artesian water, when installed correctly, does not change its chemical and bacteriological characteristics, regardless of external conditions.
Another difficulty in developing such a water source is obtaining permission to drill and operate an artesian well. This is also quite difficult to do because it is necessary to comply with three zones of the well’s sanitary protection zone. For example, within a radius of 200 m there should be no garbage heaps, toilets with an open cesspool, etc.
There is only one way out: collective installation of a well for several houses.
Dimensions of the well protection structure
The dimensions of the protective structure must be such that the installer can easily carry out his work.
Dimensions depend on the installation location of the equipment. If it is not located above the wellhead, 0.8 x 0.8 m is enough for a person to lower the pump. If a pressure accumulator or station is supposed to be installed in the caisson, add at least 0.5 m in front and behind.
If reinforced concrete rings are used to construct a protective structure, the minimum acceptable size is 90 cm, provided that the equipment will be located in the house. Inside the ring with a diameter of 150 cm, medium-sized equipment is placed, leaving space for the installer to work. A circle with a diameter of 200 cm allows you to place a tank with a volume of 200 liters inside.
Ensuring the tightness of the casing pipe
The casing pipe must be protected from the penetration of dust and melt water, which are sources of microorganisms. For sealing, a special device is used - a head made of cast iron or plastic, capable of withstanding a load of 200 kg. The device consists of:
- flange;
- covers;
- carbine;
- cuff;
- fasteners.
The head is selected according to the diameter of the casing pipe and, after being mounted on it, is fixed with a flange. The entrance cover has holes for entering the power cable and water pipe. All connections to pipes and cables are reliably sealed with rubber seals. A gasket is installed under the cover before fixing it with bolts.
How to properly casing a well?
As the casing pipe sections are lowered into the dug well, they are fastened together using a threaded connection, and for greater reliability and tightness, rubber seals are used. This is repeated until the well is completely cased.
The casing pipe can be made of different materials: steel, PVC, asbestos-cement pipes, sewer pipes. If water is needed for drinking, the casing pipe cannot be made from asbestos cement or sewer pipes.
Using a Downhole Adapter
An alternative to an expensive caisson or house is a well adapter. The design allows you to bring the water pipe into the house directly from the well. The device has the form of a collapsible fitting and consists of external and internal parts. The water main is connected to the outer one, and the hose from the pump is connected to the inner one. Both parts are fixed to the wellbore, repeating its shape. Tightness is ensured by double sealing.
Using a downhole adapter.
When choosing an adapter, you should consider the following:
- The structure is located below the soil freezing level, and in the event of a breakdown, excavation work will be required.
- The casing pipe comes to the surface and is closed with a lid. An electrical cable is inserted through it.
- In winter, the well may freeze through the casing, so it is wrapped in heat-insulating material.
- Installation of equipment is possible only in the house.
- Installation of the adapter requires a special key.
Laying pipes when carrying water to a private house from a well
If your cottage permanently houses no more than 15 residents, water pipes with a diameter of 2 cm are suitable. They must be laid at a depth of at least 150 cm, that is, below the freezing point of the soil. To prevent water from freezing even at -35 degrees Celsius, it is important to use insulation, such as mineral wool. When the pipeline is on the surface, it will have to be insulated.
To install water supply in the local area, the pipes should be buried and an electric cable should be laid for heating.
When installing pipes, they are joined using a hair dryer or soldering iron. Such welded joints are strong and reliable. To cut pipes you will need a hacksaw. The best option is to use a lever cutter; it is usually included with the soldering iron. The pipes are placed in trenches and then brought into the residential building through openings.
Pipeline equipment is the final stage of external work. First of all, you need to drill a hole in the walls of the house, the diameter of which is 5 cm. Then it needs to be sealed with a sleeve, into which you then insert a pipe. After this, the hole is closed with construction foam, and finishing work is carried out on the surface.
;
Water
Did you find this article helpful? Share it with your friends:
Selection and installation of equipment for water supply
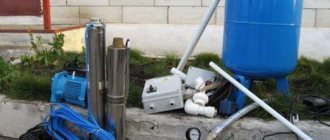
Equipment for individual water supply consists of the following elements:
- The pump can be submersible or located on the surface.
- Automation that controls the operation of the pump and protects it from overload.
- Hydraulic accumulator, open or closed (membrane tank). The latter is preferable, it ensures stable pressure in the water supply.
An open water storage tank must be installed at the highest point of the water supply system, in the attic or under the ceiling of the upper floor. A closed container has no restrictions on the installation location.
The nature of the well arrangement is largely determined by the type and location of installation of the water supply equipment. Let's consider the main options for equipping the source with equipment.
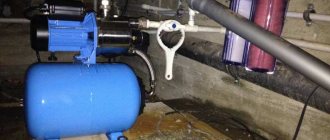
Surface pump for shallow well
A surface pump is significantly cheaper, easier to install and maintain than a submersible pump. The most rational and economically viable option is a three-in-one complete pumping station, which includes a surface pump, a relatively small (20-60 l) membrane tank and all the necessary automation.
Two pipes are connected to the surface pump: one of them goes into the well, the second goes from the pump to the water supply system.
A hose or rigid pipe immersed in the water intake is equipped with a mesh filter that prevents abrasive mineral particles from entering the pump.
Before turning on, the surface pump needs to be filled with water necessary for cooling and normal operation of the engine.
Before the water leaves the pump into the water supply network, there is a fine filter designed to protect subsequent equipment and to prepare the water for use.
Only the suction hose is lowered into the well. Thus, the construction of the well and pump maintenance are simplified. In addition, the hose has a small diameter, which allows it to be used in so-called “Norton wells” (Abyssinian wells), where a submersible pump simply does not fit.
Pumping stations have only one, but very significant drawback. A surface pump is not able to lift water from great depths; for most models the limit is 8-10 m. This limits the scope of application of pumping stations to wells and shallow wells.
Due to the low lifting height, pumping stations with an overhead pump often have to be installed as close as possible to the wellhead. Otherwise, you will have to additionally overcome hydraulic resistance from the water source to the place in the house where the pump is installed.
Submersible pump for deep well
To lift water from wells more than 10 m deep, submersible pumps must be used. Choosing the right pump and determining its suspension height in the casing is a separate and rather difficult issue.
Within the scope of the article, we only need to understand what additional equipment the pump is equipped with, how it is mounted and connected.
- If water will be pumped from a depth of more than 10 m, a submersible pump is required.
- Before installation, the submersible pump is connected to the water supply hose. A rope is used to hold the unit.
- The processes of connecting and servicing deep-well pumps are simplified as much as possible so as not to cause difficulties even for an inexperienced owner.
- You can easily prepare a deep-well pump for installation in a well by strictly following the instructions.
As we have already mentioned, the mandatory elements of the water supply equipment of an individual house are a hydraulic accumulator and automatic control systems. In the case of a submersible pump, the lift height of which is several times greater than that of a surface pump, there are no restrictions on the installation location of the closed hydraulic accumulator.
The membrane tank and control can be placed quite far from the wellhead; the distance to the source has little effect on the operation of the system. An excellent place to place equipment is a dry and clean technical room in the house, in the basement or first floor.
Scheme of autonomous water supply based on a submersible pump. The membrane tank can be located at a fairly large distance from the well
Equipment for autonomous water supply
To install a water supply from a well, in addition to the pump, we will need other special equipment necessary for the normal functioning of the structure.
Sealed container to protect the head
An important structural element for well construction is the caisson. This is a sealed chamber in which the well head is located. It protects the structure from freezing in the cold season and from the penetration of groundwater.
In addition, all the equipment necessary for the functioning of the well is located inside the tank. Therefore, the dimensions of the caisson must be sufficient to accommodate instruments and a person descending for maintenance or repair.
The caisson reliably protects the well head from low temperatures and groundwater. Here you can place all the necessary equipment
The sealed chamber can be made of different materials: plastic, concrete, metal, brick or polymer sand. Each option has its own advantages and disadvantages.
The container can be of any shape, but most often it has a round or quadrangular cross-section. The caisson can be purchased ready-made or made independently. In any case, the container must be equipped with a hatch with a tight-fitting lid.
The following video will introduce you to the arrangement of a caisson for an autonomous water source:
Hydraulic accumulator for pressure formation
The device is a container separated by an elastic membrane. One of the resulting compartments is filled with air, the second with water. The water entering the tank stretches the membrane, thereby reducing the volume of the first compartment.
The more water, the higher the pressure in the first chamber. After the consumer opens the tap, the amount of water decreases and the pressure in the air compartment decreases.
The hydraulic accumulator is complemented by a sensor that monitors the pressure in the chambers. When it drops below a predetermined level, the device sends a signal to turn on the pump and water from the well enters the system.
As soon as the pressure rises to a certain level, the pump turns off. The hydraulic accumulator is used to create pressure in the water supply system sufficient for the operation of household appliances.
The hydraulic accumulator is necessary to protect the pump from premature wear, in addition, it creates the pressure in the system necessary for the operation of household appliances
Some of them, for example, instantaneous water heaters, dishwashers and washing machines, require a pressure of at least 0.5-0.7 atmospheres.
In addition, the device protects the pump from premature wear. Without a hydraulic accumulator, the equipment will turn on too often. And this is extremely undesirable for him, because turning on the pump more than 10 times a minute increases its wear by 40%.
Filter system for water purification
Filters are necessary for wells of any type. Even deep artesian wells produce water with a high content of iron, heavy metals and other non-useful microelements. Therefore, purification of such water is necessary.
You can select the right type of filter only after conducting a water analysis. A complete cleaning system in its maximum configuration will look like this:
- Coarse mesh filter . Placed in front of the pump and in front of the hydraulic accumulator.
- Mechanical cleaning filter . The device delays inclusions with a size of 80-100 microns. It is a flask with replaceable fibrous filler.
- Aeration block . Saturates the water passing through it with oxygen.
- Set of special filters. Each of them eliminates excesses of a certain element: iron, potassium, sodium, salts, etc.
- Biological protection unit . It is a carbon filter or ultraviolet emitter that eliminates microorganisms from water.
- Fine filter . Stops inclusions up to 5 microns in size, which completely removes sediment and foreign impurities from the liquid.
As an option, a reverse osmosis filter can be installed, which allows you to obtain drinking water of the highest quality.
The figure schematically shows one of the options for constructing a water supply system from a well (click to enlarge the diagram)
Well care and operation
The fact that you equipped the well yourself does not mean that it will serve you for a long time, because it needs to be operated correctly and also requires careful maintenance.
If you notice that water has stopped flowing with its usual pressure, or it has begun to come out in small jerks, mixed with air, this may only mean the need to clean the well. This issue cannot be put off until later, because the problem will not disappear on its own and will grow like a snowball.
To clean the well you will need a water or air compressor. This way you can quickly and reliably get rid of sand and silt.
If the condition of your well is more neglected, we recommend that you use a short circuit, and maybe even acid. But it is better to trust these techniques exclusively to professionals who earn their living from this type of work.
Conclusions and useful video on the topic
Practice-tested options for constructing an autonomous water supply are presented in the video:
Assembling a water supply system from a well yourself is a rather difficult task. It is important to choose the right equipment that matches the type of well, install it correctly and connect it.
If you have no experience in such work, you should entrust it to specialists who will quickly and correctly set up the system. The owner will only have to enjoy the comfort of his home, equipped with an autonomous water supply system.
We are waiting for your stories about your own installation of water supply at your summer cottage. You can leave them or comments in the block below. Please comment, ask questions, share information and knowledge.