Home » Building a house
Alexander Korovaev 03.23.2020
38681 Views 1 comment
The basement under the house is not the best place for long-term storage of workpieces. The temperature there is elevated, and closer to spring the vegetables in it will become flabby. Therefore, sooner or later, novice homeowners have a reasonable question: “How to make a free-standing cellar with your own hands?”
Types of cellars
In essence, a cellar is a fairly deep hole in the ground with a reinforced ceiling and walls.
The depth of such storage can be different:
- deep-seated: completely underground to the entire height of the cellar; maintaining a comfortable temperature for vegetables and preservation at any time in such rooms is not difficult - a layer of soil reliably protects them from heat and cold;
- upper (ground) cellars: they can be erected on any type of site, but most often such structures are used when groundwater is close to each other, when it is not possible to deepen the cellar too much; to protect such structures from heat and cold, they are thermally insulated by backfilling with soil (embankment);
- semi-buried: somewhere between high-mounted and deep-buried storage; its lower part is buried in the soil, and its upper part is located above the ground.
When choosing the type of cellar, you need to focus on the depth of groundwater. They should not rise higher than 50-60 cm from the bottom of the cellar.
It is not easy to determine the groundwater level on your own, without the help of specialists. You can navigate to neighboring areas. Go around your neighbors and ask them what types of cellars are used in this area. More accurate measurements can be made by drilling test wells. Before measuring the water level, the finished well should stand for 1-2 days.
Based on their location, all underground storage facilities can be divided into 2 types:
1Freestanding
2 Wall-mounted: in order to save free space, it is allowed to attach the cellar to the walls of sheds, garages and other outbuildings; Cellars can also be located inside such premises; but in order to avoid excessive heating of the air, it is not recommended to attach the cellar to heated rooms.
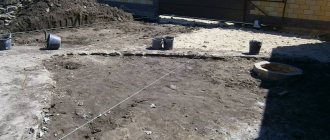
Pit preparation
If it is necessary to determine the groundwater level in the wettest season of the year, it is recommended that the construction of the cellar be carried out in the middle or end of summer. During this period, the groundwater level reaches its lowest point.
The dimensions of the pit are determined based on the expected volume of supplies for storage. Usually it is 2.5x2.5-3x3 m, but there are no restrictions on area. The optimal depth of the cellar is 1.8-2.5 m. With this height of the room, a person can stand up to his full height.
The width and length of the pit also depend on the properties of the soil. If it is loose and prone to crumbling, a larger pit is dug, and retaining walls made of shields and struts are installed inside. If the soil is dense and holds its shape well, no additional reinforcement is needed.
You can dig manually, selecting the soil with a shovel. It is lifted to the surface in a bucket and poured at a distance so as not to collapse the wall.
If the cellar is large, it is better to save energy and hire an excavator, and then level the bottom manually.
Selecting a location
The safety of products and the durability of the structure itself largely depend on the location chosen for construction.
You should not build a cellar on:
- in an open area illuminated by the sun - it is better to choose a place in the shade
- near large trees that can damage the structure with their roots
The highest possible location for the building is selected. In this case, the likelihood of flooding by groundwater when it rises in the spring is reduced. Plus, rainwater or melt water will not accumulate on such a site.
The vegetable storage facility is located on an elevated area
To avoid the collapse of buildings, the cellar pit should be located no closer than 0.5 m from the foundation of the buildings.
When building a vegetable storage facility under an unheated room, you will not only save space on the site, but also ensure ease of use - you will no longer have to clear snow every time you go for food supplies.
The walls and roof of the building will create additional protection from cold winds and scorching heat.
When building a ground cellar, the exit is located on the shady side. If this is not possible, you will need more thorough thermal insulation of the vestibule and the entrance door.
How to find the groundwater level in your area
Water is the main enemy of all building structures, especially those located underground. To find out the groundwater level on the site, it is recommended to conduct small geological studies:
- Drill a hole 3 m deep. It is better to work in late autumn or spring. If the groundwater level is close, a wooden pole lowered into the well will be wet.
- Contact your local hydrogeological organization. There are all the answers regarding questions about UGV.
- Talk to your neighbors. Usually, nearby areas have similar conditions.
- Explore the area for the growth of moisture-loving plants - horse sorrel, sedge, nettle, alder, willow and others. If they are abundant on the site, groundwater is very close.
Nearby ditches, wells, and boreholes are also a source of information. Another telltale sign of a nearby aquifer is heavy dew falling at night. If, in addition to a high groundwater level, the soil has a clayey composition, building an underground cellar is very risky. It is better to focus on more “elevated” options.
Construction of a deep cellar
The construction of any type of underground storage facility should not be carried out in the spring, when groundwater rises too close to the surface, but towards the end of summer, in August. All work must be carried out in dry weather. When it rains, the pit must be covered with film.
Pit preparation
1After choosing the storage location, they begin digging a pit. The depth of a full cellar should be 2-2.5 m.
2When preparing a pit, it is necessary to take into account the thickness of the floor, as well as the height of the bedding (cushion) of crushed stone, which serves as protection from moisture. The thickness of this layer is 25-30 cm.
3The optimal size of vegetable storage is 8-12 square meters. m. For a small family, 4-5 square meters is enough. m. 0.5-1 m is added to the estimated length and width for equipping walls, waterproofing and arranging a clay castle.
4Digging a pit is done manually - an excavator can damage the edges of the pit, and the thermal insulation of the storage facility will be damaged. The earth is removed in layers, carefully leveling the edges.
5In case of loose soil, it is better to make a hole with a slope (between the floor and the top, the difference in each direction should be 30-50 cm). In this case, the earth will crumble less.
6In the corners it is better to immediately hammer in supports from the channel. Floor beams will be laid on it in the future.
7Part of the earth will be needed to fill the top of the cellar, so do not carry the soil too far.
8After reaching the required depth, the pit must stand for some time - you need to make sure that it will not fill with groundwater. If water has slightly seeped into the hole, the points of its penetration are sealed with clay. In case of severe flooding, further construction, unfortunately, will be impossible.
Pit preparation
There is no point in hoping that water from a flooded cellar can be pumped out every spring. You will only wash out the channels, constantly expanding them, and every year more and more water will arrive. If the dug pit begins to flood, it is better to cover it with earth and build an above-ground cellar.
Preparing a clay castle
The best floors in the cellar are adobe. Our ancestors knew about the ability of clay to retain moisture and not let it into the room.
To this day, a clay castle is one of the best options for protecting the foundation, even during the construction of residential buildings. By the way, leaks in the basements of buildings erected in the 18th and 19th centuries arise only after the laying of new modern communications and the destruction of adobe surfaces.
Preparing clay
A clay castle is a layer of clay 20-25 cm thick, laid along the contour of the building, covering the perimeter of the walls. The ideal option would be a combination of modern and traditional protection methods.
First, rolled bitumen material (for example, roofing felt) glued with heated bitumen is laid on the floors, they are filled with cement, and a clay castle is built on top.
The clay must first be soaked in sufficient water for several days. If there is an excess of sand, 10-20% lime is added to it. It is better to compact the clay in the formwork, filling it in small layers. To compact it, it is trampled with feet, turning it over with a shovel from time to time.
If a natural layer of clay is found at the bottom of a hole prepared for a cellar, it must be dug up with a shovel, including an area slightly wider than the intended walls. Then the floors are thoroughly crushed with feet, dug up again with a shovel and trampled down.
The walls are also insulated with a clay lock. To do this, the space between a brick or concrete wall is filled with carefully compacted clay. The thickness of such a castle is from 25 cm. It is more convenient to fill the space with clay as the walls are built.
It is compacted using a piece of log or a special tamper in the form of a flat, heavy base and a handle attached to it.
An ordinary sand bedding (cushion), which absorbs water well, is undesirable for adobe floors. It is better to replace it with a layer of crushed stone, spilled with bitumen, which is covered with compacted clay on top.
Ventilation
Regardless of the type of cellar, ventilation must be provided in it. Indeed, in addition to the moisture coming through the capillaries from the soil, vegetables and fruits stored indoors will also release water during respiration.
There are two ventilation ducts in the cellar. The first exhaust is located above the ceiling with an outlet to the outside to a height of 10-15 cm (see photo). The end of the pipe located outdoors should rise 0.5 m above the ground.
When located above the cellar of an outbuilding (garage, shed, etc.), the exhaust duct is led to the roof of the building above the ridge. The pipe should rise 0.5 m above it.
Cellar ventilation diagram
The second supply channel, which serves to supply fresh air, is installed at a distance of 20-25 cm from the floor. The supply and exhaust pipes are mounted only on opposite walls. Their minimum length is 2.5-3 m. In order for the circulation of air masses to be uniform, the diameter of the channels must be the same.
They are laid already during the construction of walls. To do this, special holes are provided in the masonry or concrete into which pipes are inserted. The channels are equipped with canopies on top that protect against precipitation and the penetration of rodents.
Too large, as well as a small diameter, is undesirable. In the first case, the room will be too cold, in the second, the small size of the channel will not provide sufficient air exchange. Ideally, the pipes should not have any bends. Any expansion or contraction is unacceptable.
The size of the pipes is calculated depending on the dimensions of the room. For every 1 m2 of a standard 2-meter depth cellar, 26 cm2 of channel cross-section should be provided. If the storage depth is large, the diameter of the pipes is increased proportionally.
To prevent water vapor escaping from freezing, the channels are insulated at the exit points with soil. You can put on a casing lined with heat-insulating material on the outside.
In large vegetable stores, forced ventilation is installed. In the simplest systems, a low-power electric fan is installed in the hood for this purpose. In more complex versions, it is installed in both the supply and exhaust ducts.
In winter, the inlet openings must be carefully plugged with cloth.
Wall decoration
The most popular materials for their finishing are concrete, brick or concrete blocks. To pour concrete, formwork is prepared into which a reinforcement cage is built. All concrete work must be carried out within one day.
Otherwise, cold bridges will form at the joints, through which heat will escape. Such joints are dangerous and due to an excess of surface tension, the wall will turn out to be fragile.
Brick wall decoration
When erecting brick walls, the masonry is laid in one brick. A clay-sand or cement mixture is used as a solution. The outside walls are waterproofed with a double layer of bitumen and roofing felt. The remaining space between the soil and the wall is filled with earth and compacted.
The walls can be finished with asbestos-cement slabs. It is not advisable to use wood. Its service life in a damp room will be short. If there is a need for this, you can use the method that was used by our ancestors. Pegs are driven into the corners of the walls, into which boards or slabs, cut to length and dried for 1-2 years, are laid.
Cellar cover
To make the floor, you can use concrete, wood, or a combination of both. Fixing a plank ceiling and laying insulation in the gap between wooden beams is much more convenient and simpler.
In this case:
1Roofing felt is laid on top of the walls.
2Then, logs or beams made of 150x100 mm timber, pre-treated with an antiseptic, are laid at a distance of 0.5 m from each other.
3Next, a flooring is prepared from boards (slabs), in which space is left for a hatch (manhole) measuring 80x80 cm. After laying, it is coated with a layer of clay and then covered with soil.
4The wooden flooring is covered with a layer of waterproofing. You can use thick polyethylene as it. The film is spread so that it lies on the ground.
5Now we lay the reinforcement in the form of a lattice, prepare the formwork and fill it with concrete 4-5 cm thick.
6After the concrete has completely dried (you must wait at least a week), a double insulated, tightly fitted lid is attached to the hatch. Brick is laid around its perimeter or concrete is poured.
7When using concrete slabs as floors, they are laid on metal beams. The seams between the slabs are sealed with cement mortar; then this overlap is filled with bitumen. Roofing felt is spread on top of it, and then a layer of insulation.
8It is not advisable to use mineral wool as insulation - in a damp room, over time it will clump into clumps and completely lose its thermal insulation properties. The best option is polystyrene foam. The joints between its sheets are sealed with sealant or adhesive tape.
9If the underground storage facility is built separately, to protect it from the sun in summer and snow in winter, it is better to provide a small building with a gable roof (cellar) above the cellar. Its door is installed on the north side. Such a room can be used as a place to store gardening equipment.
Wooden floor
For reliable heat protection, the walls of the cellar are buried 60-70 cm into the ground, and a blind area of clay and crushed stone is made on the outside.
Ceiling insulation
To ensure optimal temperature in the room, the ceiling must be thermally insulated.
To do this, a lattice structure (lathing) made of timber is attached to the beams, between which foam plastic or any other heat-insulating material that does not absorb moisture is laid.
To secure it, it is sheathed with boards or fiberboard, which are screwed to the beams.
Ceiling insulation with foam plastic
Before installing the insulation, an overlapping polyethylene film is attached to the ceiling. This can be done with simple double-sided tape. All joints in the insulation are carefully sealed. Then it is covered again with film. Plaster or boards can be used as a finishing coating.
Walling
For the construction of the cellar, red brick, concrete blocks, rubble stone, and monolithic concrete are used. You can dig in large diameter sewer rings. It is not recommended to lay sand-lime bricks or large-porous cellular blocks in the ground. They have high water absorption, so they freeze and quickly collapse. If the cellar is above ground, the same materials are used as for the construction of buildings, but with enhanced insulation.
Masonry of walls made of bricks or blocks is carried out in bandaging seams with reinforcement every 3-4 rows. This will allow you to withstand the lateral pressure of the soil without the formation of cracks and eliminate the risk of collapse.
For the installation of monolithic walls, formwork made of plank panels is installed. Reinforcing cages are placed inside, concrete M250-M300 is poured. The solution must be compacted along its entire height with a metal pin to release air bubbles. It is advisable to carry out the pouring as quickly as possible, before the formation of seams between the set and fresh concrete.
You need to worry about a hole for ventilation in advance, so that later you don’t have to work with a hammer drill and break through the hardened wall. At a height of 50 cm from the floor, a sleeve is installed in the brickwork or in the formwork for concreting - a piece of pipe with a larger diameter than the future channel. The hole can be temporarily plugged with paper or a rag.
Construction of a horse cellar
The cost of this design is quite low compared to the underground option. And it’s more convenient to use such storage - it is equipped with a regular door, and you won’t have to climb down the stairs. However, maintaining the optimal temperature without going deep into the ground is not easy. For this purpose, a special building design is provided.
Types of horse cellars
By type, horse cellars are divided into:
- storage sheds with embankment : simple structures made of boards or logs, reminiscent of a hut; to maintain a comfortable temperature, such buildings are covered with a sufficiently large layer of earth on top
- a horse cellar without embankment: its design is similar to that of a conventional outbuilding; To maintain a comfortable temperature, the walls of such a building are made double with a layer of thermal insulation laid between them
Types of cellars with bunds
Construction of a cellar with embankment
Unlike a deep-seated cellar, most of the upper cellar rises above the surface. To maintain the required temperature in the room, it will require additional thermal insulation.
1Such a structure is erected in the form of a hut, the roof of which rests on strong supports made of logs.
2At the first stage, a pit with a depth of 0.5-0.6 m is prepared. The excavated soil is left nearby - it will be useful for embanking. The floors are covered with crushed stone and compacted tightly. A clay castle is placed on top (more on this below).
3When choosing soil from a pit, it is better to immediately cut a staircase of several steps from the soil. Subsequently, it is finished with reinforced concrete, brick or a wide, durable board. It is advisable to install steel corners into the edges of concrete steps to prevent concrete from spilling out.
4Supports for the ceiling are installed in advance. To protect the tree from moisture, part of the logs that will go deeper into the ground are covered with bitumen or fired.
5After digging the log supports into the ground to a depth of 50-60 cm, they are tied at the top with long poles.
6At the stage of wall construction, it is necessary to take care of ventilation. The principle of its design is similar to ventilation installed in deep cellars. The exhaust duct is installed near the ceiling, and the supply duct is installed on the opposite wall just above the floor.
7The wall is sheathed at the end with two rows of boards, coated twice with bitumen and sandwiched with a layer of roofing material.
8The roof ridge is prepared from edged boards of sufficient thickness, covered with roofing felt. All cracks are caulked with moss.
9The ceiling covering must be as strong as possible so that it can withstand the earthen embankment. Do not forget that in addition to the pressure of the soil layer, the roof will also be subject to a significant snow load in winter.
10The entrance must be equipped with a small vestibule, which serves as additional protection against heat loss. The door leading to the vegetable storage area is carefully insulated.
11To drain water around such a storage facility, a ditch 0.5 m deep is made. Along the perimeter of the cellar, a blind area 1 m wide is also provided with a slope from the cellar.
If the water passes close to the surface of the earth, an above-ground cellar can be built on an area with topping.
Embankment
Preparatory process before bunding
1The earthen backfill (embankment) must reliably retain cold in summer and heat in winter. Its optimal thickness is 35-45 cm.
2Before bunding, the ceiling is covered with a 5-centimeter layer of clay-straw mixture. A thick film of polyethylene or roofing felt is laid on top of it.
3The soil, especially in the upper part of the floor, may settle over time. To avoid the need for additional embankment, it is necessary to provide a special fence to protect against soil sliding along the slopes.
4To strengthen the embankment, it must be immediately covered with turf or sown with low-growing grass, for example, lawn grass. The intertwined roots of the plants will prevent the soil from sliding down.
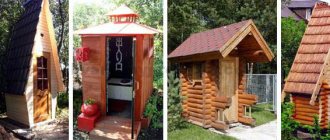
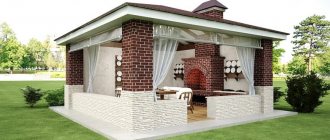
Ready storage
Like any other building, a horse cellar can be made visually attractive by decorating it to your liking. The design of the site will only benefit from this.
The main stages of building a cellar without embanking walls
Full-walled horse cellars take up too much space on the site. In recent years, land owners have found another solution. Instead of embankment, they began to build cellars with double walls.
Outwardly, they look like ordinary buildings. However, due to the massive walls lined with insulation, such a storage shed maintains a comfortable temperature for vegetables.
In the literature it is recommended to insulate the space between the walls with polystyrene foam, sawdust or expanded clay.
Building without embankment
Only the one- or two-slope roof of such a vegetable storage facility is insulated with earth using embankments . The thickness of the layer of backfilled soil is up to half a meter. Just as in the previous case, a vestibule is provided in such a storage shed.
The door leading to the storage room is carefully insulated.
When constructing such a vegetable storage facility:
1The earth is removed to a depth of 0.5 m.
2The floors are covered with crushed stone, covered with bitumen, and then a clay castle is prepared.
3Bricks are sunk into wet clay so that a minimum gap is formed between them.
4The lower part of the walls is also laid out with bricks. The masonry should rise above the surface to the height of the spade bayonet. Sand, clay and lime are used as masonry mortar. Its proportions are 3:1:0.3. Double walls can be made entirely of brick or stone.
5The ceiling and walls are sheathed with 2 rows of thick-walled 40- or 50-mm boards, and earth is poured into the space between them and compacted tightly.
6The walls are coated with bitumen twice. A layer of roofing material is fixed on top of them.
7The roof can be single or gable. Before backfilling, it is covered with roofing felt.
8 Ventilation must be provided in the cellar.
9A drainage ditch is laid around the cellar.
Semi-buried cellar
Such a structure goes into the ground to a depth of about a meter with a wall height of about 2 m. The entrance is through the vestibule, and the door is located at the same level with the ground. The second, insulated door provides passage directly into the cellar, where you go down the stairs.
Such structures are erected in areas where the groundwater level is no more than 1.5-2 m.
Semi-buried cellar
The procedure for performing the work is in many ways similar to the stages of building an above-ground cellar:
1To create a layer of thermal insulation, the roof of the building and the upper part of the walls rising above the surface are also covered with earth.
2The overlap is made from a slab aligned on the sides, which is covered with clay. Roofing material glued with hot bitumen is laid on top.
The walls are built from brick and concrete. It is not advisable to use cinder concrete in wet areas - it will quickly become unusable.
Cellar made of reinforced concrete rings
The maximum diameter of reinforced concrete rings is 2-2.5 m, so with their help you can build only a small vegetable storage. But for a small family such a room will be quite enough.
1To build a cellar, 2-3 rings will be enough, which are placed one on top of the other in the pit. The height of the rings can vary - it can be equal to 0.4 and 0.6 m, and higher ones are made with a height of 0.8 and 1 m. From these, 2-3 rings of the required height are selected so that after the construction of the storage facility an adult person will be in it was able to stand up to his full height, and there was little space left above his head.
2It is better to buy rings that have locks. Such a connection will be stronger, plus it will be easier to seal. It is also better to buy a ready-made cover made of reinforced concrete with a manhole.
3Before immersing the rings in the pit for waterproofing, they are treated twice on the outside with bitumen.
4To install them, it is better to use a loader or winch.
5After lowering the rings into the pit, all joints are coated with concrete and then waterproofed with bitumen mastic.
6Another option is gradual excavation of soil under the rings. After removing the earth, they will gradually sink down under their own weight.
7If groundwater is close, it is better to purchase one lower ring with a bottom or concrete the floor, having first filled and compacted a clay castle at the bottom of the pit to cover the perimeter of the walls.
8 A hole is prepared in the well cover for the ventilation pipes to come out.
9It would be wiser to make a small cellar above the storage - it will protect it from extreme heat and winds.
10To drain water around the perimeter of the cellar, a drainage is prepared - a ditch 0.4 m deep, filled with crushed stone.
Sealing joints in a concrete cellar
If groundwater passes close, a cellar made of concrete rings can be made shallow. That is, bury only part of the rings in the ground. The top and side walls of the storage facility, as in the case of high cellars, are covered with soil (banked).
Cellar in the garage. Built to last!
How to make a cellar in a private house or country house with your own hands: diagrams, step-by-step guide, proper ventilation (55+ Photos & Videos) + Reviews
Foundation structure
Without a solid foundation, you can only build a cellar made of wood. And if the walls are made of brick or concrete, a good foundation is required.
The foundation can be arranged in two ways:
- Lay reinforced concrete strip. To do this, a groove measuring 20x30 cm is dug around the perimeter. The bottom is covered with sand to a thickness of 10 cm and compacted. Then you need to lay reinforcement cages from Æ10 mm rods and fill the trench with concrete. After 2-3 days you can start laying.
- Fill the monolithic slab. The structure has a multi-layer structure - a cushion of crushed stone and sand 10 cm thick with compaction, a layer of lean concrete 50-100 mm, hot bitumen plus 2 layers of roll waterproofing, a reinforcement frame and concrete of a grade not lower than M250. Such a foundation is practically waterproof and serves as a finished basement floor.
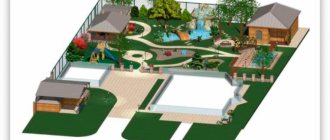
Ready-made structures for cellars
The industry produces ready-made sealed structures for cellars from a variety of materials: from plastic to metal. It is undesirable to use metal containers - they do not store heat well.
Plastic Cellar
Installing such a structure is easy. A pit of the required size is prepared under it, into which a sealed container is lowered. The space between it and the ground is filled with earth and compacted tightly.
If desired, the complete installation of such a cellar can be carried out by the manufacturer.
When groundwater rises high, light structures made of plastic or metal can easily be squeezed to the surface. Therefore, they must be made heavier by covering them with a sufficiently thick layer of soil.
You can see with your own eyes the process of laying a plastic cellar in the following video:
Floor installation
The roof of the cellar can be prefabricated - made of slabs, beams, boards - or monolithic reinforced concrete. The wood is pre-treated to prevent rotting. When laying slabs, the joints are carefully filled with mortar or foam.
If the cellar is underground and free-standing, waterproofing from roll or coating materials is installed over the ceiling. Then thermal insulation with a thickness of at least 300 mm is installed - expanded clay, clay with sawdust, polystyrene foam, slag wool. The last layer is laid earth. A slight slope is provided for water drainage.
In above-ground or semi-buried structures, waterproofing and roofing materials are installed on the insulation layer. In the basement, located under the house, in a garage or shed, the roof is the floor of the superstructure.
Waterproofing
Measures to protect structures from moisture are carried out comprehensively. The waterproofing shell must be airtight and continuous, including floors, walls, and ceilings.
The most effective is double-sided waterproofing, which protects structures both outside and inside. This option is more preferable because the materials remain dry, freeze less and last longer.
As long as there is access to the outer surface of the walls, they are coated with mastic, covered with roofing felt or covered with fused materials.
A good effect can be obtained by using clay soaked in water. The solution in a plastic state is poured into the sinuses between the walls of the cellar and the pit. After hardening, a waterproof lock is formed.
If it is not possible to install waterproofing from the outside, all that remains is to install it from the inside. This will not save the walls from moisture, but will significantly reduce the risk of leaks.
Deep penetration agents are used as waterproofing for concrete, forming insoluble crystals in the body of the material. For bricks or blocks, it is optimal to use waterproof plaster or ordinary plaster followed by treatment with a penetrating compound or liquid glass. Rolled materials are ineffective in this case, since when water leaks in and the walls get wet, they peel off.
On the floors, the waterproofing is spread on top of the insulation layer. This will protect it from getting wet during precipitation and melting snow.
Doors, stairs, hatch
The doorway is the main route for heat loss. If it is poorly insulated, icing and freezing of the door is observed in winter. To prevent this from happening, the canvas is insulated with polystyrene foam or polystyrene foam and additionally sheathed with boards. Along the perimeter you need to lay a sealing tape in 2 circuits - along the box and the canvas itself. If winters are very frosty, double doors are installed.
The staircase to the basement can be either stationary or mobile - portable, folding, retractable. Structures are made of metal, wood, concrete, brick. The main emphasis should be on descent safety and fall protection.
The hatch, unlike the entrance door, is installed horizontally. You can make it yourself from wood or metal or buy it ready-made. The optimal dimensions of the hatch are 80x60 cm. Factory hatches are equipped with holding devices, hinges and locks. You can similarly equip a homemade structure.
If the cellar is located in the house, the finishing is done with flooring material so that the crawl space is visually invisible. A box is constructed above the street hatch to protect against precipitation and freezing.
One and a half basement
The basement is only half buried underground. The above-ground part can be presented in the form of a small warehouse, shed, or cabin for storing equipment.
The descent can be designed in the form of a small staircase. Due to the protruding part in the basement, natural air circulation is perfectly maintained, but the temperature regime may be disrupted.
Interior decoration, racks and shelves
The most common method of finishing cellar walls is whitewashing with slaked lime. It dries the surface well, destroys fungal spores and insect larvae.
You can line the walls with waterproof plaster, ceramic tiles, and plastic panels. It is necessary to carefully ensure that the surface is as smooth as possible, without pores, since it is very difficult to fight mold on loose coatings.
Racks and shelves in the cellar are used in conditions of high humidity. Materials for manufacturing must be resistant to rot, moisture and fungi. This:
- impregnated timber and boards;
- metal with anti-corrosion coating;
- durable plastic;
- brick, stone, concrete.
Before storing supplies, the racks are dried, disinfected and, if necessary, the protective coating is repaired.
Insulation
During severe frosts, the cold penetrates into the room through the weakest points - hatches, doors, insufficiently insulated walls and ceilings. If frost is periodically detected somewhere inside the cellar, then the thermal insulation is not coping with its function.
In underground basements, the entrance area and ceiling most often freeze. For insulation, you can use polystyrene foam, polystyrene foam, polyurethane foam, securing them to the surface using dowel bends or glue and filling the joints with polyurethane foam.
Polymer materials have very low thermal conductivity and are not afraid of moisture. Their only enemy is rodents. To protect the insulation from mice and rats, it is recommended to cover the materials with a fine-mesh metal mesh.
Organization of indoor ventilation
In order to organize high-quality ventilation in the basement, you should use an ordinary galvanized pipe with a diameter of up to 15 cm.
One end is brought out, the second is lowered into the basement room. The inlet and outlet openings are covered with finely structured gratings.
Benefits of using basements
The basement, especially its underground variants, is an additional area for storing canned foods, vegetables and fruits, old things, and bottles of homemade wine. The advantages also include:
- Convenient location of additional room.
- With optimal construction, excellent air circulation and temperature conditions are always maintained in the basement, which allows food to be stored for a long time.
- If construction standards are observed, the basement becomes an absolutely sealed room, which protects stored products from rodents and pests. This parameter is very relevant for private properties, where, if stored improperly, there is a risk of tularemia infection.
Building a cellar with your own hands is not difficult, especially if the condition of the soil allows it.
Recommendations
In an above-ground cellar, vegetables will remain fresh for a long time.
Any person can master the theory of cellar construction. However, in order to avoid unforeseen difficulties, you should use the advice of the experts:
- when choosing a location, consider the risk of flooding;
- before construction, start drawing up drawings;
- do not deepen the building below half a meter;
- use moisture-resistant building materials;
- do drainage;
- treat wooden elements with antiseptics;
- Perform electrical wiring in accordance with fire safety requirements.
To build an above-ground storage facility for grown crops, follow the technology and the drawn up project. Supplies will remain fresh for a long time if the building is equipped with ventilation and the walls are insulated.