Here you will learn about what is needed to make a barbecue area comfortable. The article contains several options, how to make a grill table with your own hands. Each is functional and attractive, but has its own style. A grill table will help you better organize the process; it is very convenient when everything is at hand, especially if you cook outdoors. Now you can focus on the most important part - food.
From the article you will learn how to make a table with a built-in grill, auxiliary mobile trolley tables, a removable table top for the veranda, as well as how to make useful accessories for a barbecue and other necessary things. I hope this information inspires you to create your own project.
Do-it-yourself stone countertop for an outdoor barbecue area for 1,500 rubles
Now it has become quite popular to create outdoor areas for cooking. Previously, people made do with 4 bricks on a metal sheet, well, sometimes with a barbecue on legs. Now many are trying to create multifunctional complexes with a barbecue, a smokehouse and an area for cutting food with a sink. In principle, it’s convenient to have everything in one place. If you buy a commercial stone countertop for this purpose, it will be quite expensive. Making it wooden is not durable. I went through this at the dacha. Even from larch it becomes unusable after about 3 years. Metal construction - aesthetics, as for me - zero. But I found an excellent option for myself and would like to offer it for discussion. I spotted it from some friends at their dacha. I want to build a bathhouse for myself, combined with an outdoor gazebo, a swimming pool and a barbecue area. That’s exactly where I’ll put a similar tabletop. It is done quite easily, and most importantly - on a budget.
Copycats
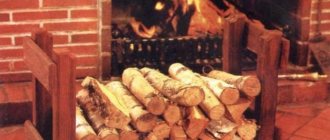
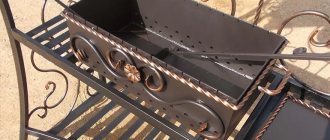
At the end of 2022 - beginning of 2022, the three photographs above became very popular in many communities of artists, where they were posted as an example of successful design. After the unexpected popularity, imitators immediately appeared.
Barbecue loft yusvalvik from January 25, 2022. Photo https://vk.com/wall28758463_386
Brazier-loft stylevm from January 27, 2022. Photo https://vk.com/photo28327558_456241460
Barbecue loft rezka_bakaly from July 9, 2022. Photo https://vk.com/wall-178980916_97
Interesting options for barbecue or barbecue
Let's look at some easy-to-implement examples that you can use in your area:
| Illustration | Description |
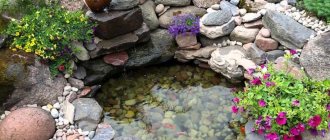
Hearth surrounded by stone mosaics. A very simple option, which is done like this:
| |
| Barbecue from border decor . This option is made up of ready-made segments used when laying borders. Two rings of different shapes are made, the space between them is filled with crushed stone. A barbecue is placed inside - the structure is ready. | |
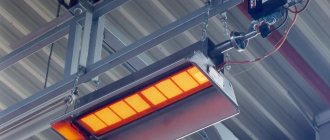
| Table with a gas cylinder inside . A body and tabletop are made with an opening into which a steel or stainless steel box is placed. A small burner comes out from below, to which is attached a cylinder hidden behind an opening door. |
Materials and colors
Most often, countertops for barbecues and grills are made of granites. This natural stone has excellent qualities: it is strong, durable, resistant to temperature changes, can withstand loads well, does not break or crack, has low abrasion and high moisture resistance, and is environmentally friendly. The palette of granites is very extensive both in color and pattern, which can satisfy any demanding customer. Our stone catalog will help you choose the type of granite you need.
By choosing one of the materials presented in our company, you will certainly appreciate its positive properties. Granite will captivate you with its durability and nobility. By choosing the optimal color for yourself, be it grey, black, brown, white or brighter colors such as red, pink, cream, green, you will certainly achieve harmony with the surrounding interior items and the room as a whole.
Operating rules
Any thing requires proper and timely care. To avoid unpleasant consequences, you should follow the operating rules.
All structural parts should be cleaned in a timely manner, namely:
- the grate, doors and subsequent parts of the oven should be cleaned of dirt and soot each time after use, waiting until the oven has completely cooled;
- the stove pipe must be cleaned of soot at least 2 times a year;
- empty the area of burnt coal and food debris after each use;
- you need to check the firebox for accumulated water or snow if there is no cap in the chimney or a canopy over the chimney.
Experts recommend strictly following these safety rules:
- Constant monitoring of flame intensity is required;
- absence of flammable things near the stove.
When using ignition products, it is worth remembering that:
- Only starters are allowed to be used, strictly following their instructions for use;
- the use of gasoline, kerosene and other lubricants is strictly prohibited;
- cover the barbecue with a lid at least 15 minutes after ignition to prevent ignition of accumulated flammable gas;
- Under no circumstances should you soak firewood with such substances, only spray it for ignition.
In the cold season, the barbecue must be dried for 20 minutes over low heat before use. This will prevent premature wear and cracks in the furnace structure from sudden temperature changes.
35f473e3303adac961761186881157e5.jpe c0cc224e88508d542cb6134829a077f1.jpe d6cbe40569440f1117db602691bffc1a.jpe
Setting up a stove: master class
Standard dimensions of the structure: 90x100x90 (width x height x depth). They are laid directly on the ground using solid ceramic bricks.
Solution
The first five rows of masonry are connected with sand-cement mortar (diluted in a ratio of 3 to 1), the subsequent rows are traditionally connected with clay-sand. But it is safer to use heat-resistant oven glue (a dry mixture based on a special mineral binder with additives, diluted with water). Choose inexpensive moisture-resistant glue with a heat resistance rating of 750 degrees.
Firebox "box"
The “box” of the firebox (ignition) itself is laid out in half a brick and held together with stove glue. A steel frame is laid on top, and a steel sheet with a thickness of at least 4 mm is installed in it. The sheet is welded to the frame.
Add-ons
Additionally, you can provide a compartment for an oven or a table on the side, on which it is convenient to cook barbecue.
If the plan provides for the construction of a closed gazebo, a chimney is built. The smoke hood is installed directly on the firebox, secured with screws and anchors. A deflector is placed on the pipe, which avoids smoke and dissipates the smoke. Craftsmen also install smoking devices in the chimney.
For protection from the wind and for fire safety purposes, a brick wall 1.5-3.5 m high is erected along the back of the barbecue.
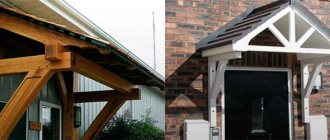
Canopy or roof
If the project includes a canopy, it can be made from simple film or ordered polycarbonate of suitable sizes. You can choose transparent, matte or colored. Yellow, green or blue on a bright sunny day will create a pleasant atmosphere in the interior space, filling it with a soft tint.
Any type will do: cellular and monolithic. The first one is cheaper and easier. Choose a high-quality product so that you can enjoy the new construction on your country house site for many years, so that you don’t have to think about reconstruction and repairs. The sheet thickness should be at least 4 mm (preferably 6-8). Thick ones can withstand harsh weather conditions (hail, strong gusts of wind).
The roof is equipped to protect from rain, bright sun and prying eyes. The classic option for arranging a gable roof is a rafter structure. A permanent roof made of andulin or metal tiles is erected only on reinforced supports (brickwork).
Walls
The walls are sheathed with corrugated sheets, a multi-layer sheet of wood chips. Or they provide window openings and insert glass into them. Glass can be replaced with film (“soft glass” for gazebos sells well) or polycarbonate. But more often in gardens there are still open structures with low partitions around the perimeter.
We arrange approaches (stone, paving slabs)
It is necessary to provide convenient approaches to the landscaped site: with good visibility and sufficiently wide. And organize lighting in the evening.
Decor
Decorating is the final stage. To finish the work and start enjoying the new relaxation area, we will arrange the furniture, add lighting, and decorate with decorative elements. Let’s visually fence off the workspace.
Styles
But before we start decorating, let’s determine the style direction. You can decorate a barbecue area (and this has already been proven in practice) in the following styles:
- Oriental,
- colonial,
- high tech,
- minimalism,
- rural flavor.
How to make a table yourself
I will tell you about the main aspects of manufacturing and the materials used in the work. You need to choose the optimal solution and implement it in accordance with the recommendations below.
Select manufacturing material
The most commonly used solutions are:
| Illustration | Description |
Sheet steel 3 mm thick. Metal is used to make a barbecue or hearth, so you shouldn’t skimp on it. Some people recommend using the 2mm thick option, but this is too thin and will burn through much faster than the recommended solution if used heavily.
| |
| Profiled pipe . From it you can make table supports and its frame. Of course, you can use other options - a corner, a round pipe, a strip or something else, but more neat and attractive designs are obtained from a profile pipe. Dimensions are selected individually, there are no special requirements, the main thing is that the structure can withstand the weight of the tabletop and its contents. | |
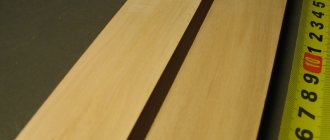
| Board . If the tabletop is wooden, then you will need a board; it is better to choose options with a thickness of 40 mm or more, they are durable and look great on similar products. As for the type of wood, it is best to use oak - it is a durable material that is not afraid of moisture and only becomes stronger over time. | |
| Dry concrete mixture . If you are making a concrete countertop, you will need a special solution. In order not to mix it from different components and not be afraid that you will confuse the proportions, the easiest way is to buy a ready-made version in bags, which you just need to dilute with water and mix thoroughly before use. Such compositions are inexpensive, but they significantly simplify and speed up the work process. | |
| Concrete tiles . This option is often used for laying on the sidewalk or porch, but it can also be used as a reliable and fire-resistant table cover. In this case, the required number of elements is purchased, which are subsequently laid out on a pre-prepared base. |
Collect the necessary tools and determine the dimensions
As for the tools, the set depends on which table option you choose. I'll look at a few basic solutions:
| Illustration | Description |
For working with metal The following kit is required:
| |
For working with wood The most commonly used devices are:
| |
For concrete and brick you will need the following:
|
Making a table on a metal frame is the first option
I’ll tell you about a simple and reliable solution made from profiled pipe:
| Illustration | Description |
The project is being prepared and the frame is being welded. The following is important here:
| |
| The material for the box is being prepared . The box is made of metal with a thickness of at least 3 mm to ensure its durability. It is important to cut the workpieces exactly to size, maintaining ideal geometry so that the structure does not turn out skewed. | |
| The box is welded. It is important to align the elements perfectly evenly and secure them before welding. During the welding process, the main thing is to carefully connect all the parts so that there is not a single hole at the joints. | |
| The box is tried on the frame . It is important to make sure that all elements fit together. Next, all welds are cleaned so that the joints are neat and smooth. | |
| The outer parts are lined with moisture-resistant plywood . Elements that are easiest to glue on special liquid nails are cut out, a box for the barbecue is also built, it should be 10 cm wider and longer in order to lay a 5 cm thick layer of mineral wool from the inside. This will protect the plywood from exposure to high temperatures. | |
| A tabletop is cut from moisture-resistant plywood . It is secured to the frame using furniture bolts; for this purpose, through holes are drilled through a profile pipe. | |
| The structure is covered with varnish or paint . The grill is put in place, a grate is placed on top of it, so that this option can also be used as a grill. It can be used both for a summer house and for a personal plot. To make the table last longer, it is better to place it at least under a canopy, this will provide protection from the sun and precipitation. |
Making a table with a concrete top is the second option
This type of design has its own manufacturing features:
| Illustration | Description |
Material for the wooden base is cut. All elements are carefully sanded and treated with an antiseptic to make them resistant to weather conditions and pests.
| |
| A wooden frame is assembled . There may be different options, the main thing is that the structure is durable and can easily withstand the weight of the tabletop. | |
| Capercaillie screws with a diameter of 8-10 mm and a length of 80-100 mm are screwed into the upper ends of the legs. They are not screwed in completely, but so that the cap sticks out about 3-4 cm. | |
| A form is made for the table top . For this, either plywood 20 mm thick with a smooth surface, as in the example in the photo, or a sanded board is used. The height of the sides is equal to the thickness of the tabletop, since the design will include both a grill and a barbecue, square and round recesses are made. | |
| The mold is filled halfway with the solution . After this, a reinforcing mesh cut to the size of the structure is laid on the surface. | |
| The entire mold is filled to the top with the solution. It is important to distribute the mass evenly and level the entire surface using a trowel or a level lath. | |
| The legs are turned upside down and placed in concrete. The bolts should be immersed in the solution, and the timber should be flush with the surface. In order for the structure to take the correct position to the frame in the right place, slats are screwed in so that the element is immersed exactly as much as necessary. | |
| After 2-3 days, the formwork is removed. To make this easier, connect it with self-tapping screws. The table is turned over into the correct position, after which you can insert metal elements and use the structure for its intended purpose. |
Preparing to assemble all parts
As soon as we have prepared the tabletop, arranged the brazier and made other auxiliary elements of the barbecue table, we can begin the final assembly of the structure. We need to make its fasteners, for which holes are drilled on the front side. The bolt heads must be wide enough.
The legs of the structure are rounded by a milling machine and prepared for further final grinding. After this, they are closed with rubber plugs. The tabletop is now assembled and ready for final finishing and thermal insulation.
Bend the rings
It's time to bend the bottom and top ring.
- We calculate that neither the upper nor the lower parts should be cut out.
- You need to fit 30 vertical pieces (that is, 27 spindles and 3 legs) from the armature shoulder into the bottom ring, if it has sufficient taper.
Once the rings are bent roughly into a circle and welded, it's time to lighten the welding surfaces.
Modules with combustion chambers
Photo 1. Large open-air brick barbecue complex.
It is built of brick in the courtyard of a country house and includes several modules. The furnace complex consists of so-called modules, which have a certain functionality.
It can include no more than three modules with combustion chambers:
- Oven-oven;
- Stove for a cauldron;
- Cooking oven;
- Smokehouse.
This design ensures good draft and does not require a significant increase in the chimney pipe. There may be several modules without combustion chambers.
Barbecue grill is the central part of the complex, as it requires direct-flow smoke draft. This is a small structure with a foundation area of no more than 1 square meter. The height reaches two meters. The pipe for the complex is calculated individually and depends on the number of modules with combustion chambers.
d665010cf2bf6a219214f911d7159390.jpe
9b33ffcb71c94204f064b4150b9ed5b7.jpe 00fa29a9568247df292579f15c905462.jpe 3b5c03a3c379fd72146b904e78574791.jpe
46c3dff5ac2009c4486d533b5e923500.jpe ae6b59ce85e86a32e78808cc73dcccc3.jpe
Oven module - can be with a hob and a baking chamber. The area of such a furnace is no more than one square meter. The height does not exceed the dimensions of the central module.
Module with a smoking cabinet - has a similar design to a baking cabinet. Depending on the required technology, part of the smoke is passed through the smoking chamber.
Modules without combustion chambers. For ease of operation of the oven barbecue complex, a sink and countertop are attached to it. This is a supporting frame made of bricks on which a horizontal surface is installed.
By building a barbecue yourself, you can save a significant amount of money required to hire specialists. But in addition to saving money, you should remember the risks that arise.
For example, about errors in compliance with construction technology and design. To prevent them, you should take a responsible approach to choosing a project and its implementation.
The design should not be complicated, but have the necessary functionality. The simpler the project, the easier it is to implement. Also, when choosing a project, you should take into account the characteristics of the construction site and operating conditions. It is advisable to have a clear example of the implementation of the selected furnace.
Another disadvantage of self-construction is the time costs. In the absence of any practice in this area, building a barbecue will take more time than specialists.
Advice. Construction of this complex should begin at the beginning of the warm season.
Order: how to build a brick grill
Despite the fact that we are dismantling an outdoor brick grill that is easy to build, the order of laying the bricks (diagram) is drawn up in advance, taking into account the selected dimensions and configuration. It is most convenient to do this on a checkered sheet.
How to lay brick? The simplest installation method is to offset each row by half a brick relative to the previous one. The first two rows are laid out solid. The very first row is made up of solid bricks, without halves.
The lower part of the grill is the base. The laying pattern is from the corners to the center along the lines outlined in advance. Every 3 rows it is necessary to check the correct installation level and plumb, and lay out a mesh for reinforcement.
The height of the plinth depends on the project. It may have one or more niches where firewood, coal and other utensils are stored. It is laid out in continuous masonry.
The central part of the structure is the firebox. The base for the brazier is pre-cast from reinforced concrete or laid out in brick. If arches for the firebox and niches are built according to the project, a circle is used. To distribute the bricks evenly, chips are inserted between them.
a9351f757d1a60d65f6e009943947dea.jpe
f7b77be3544f30cea291184abdc0c203.jpe
1680f408d03ee0cb2b692d7196024f74.jpe
76a03ff5d1f2d8f32d67a1f3da93f3d5.jpe
The gaps are the same, approximately 1 cm. Only after the arch has been completely laid out is the space between the bricks wetted and filled with mortar. The laid arch is left to harden with the circle for a day or two.
If the grill will also be used as a barbecue, you should consider in advance the possibility of installing a grate. A small protrusion or several protrusions are left for it so that the grille can be placed at different levels. Install it on reinforcement rods embedded in the walls of the barbecue.
Tip: if you leave small gaps between the bricks when laying the firebox, when using the barbecue in the future, thanks to the air penetrating into the cracks, combustion will be better.
The roasting pan is placed on metal corners, which are attached to the masonry with pins. Keep this in mind when assembling a country brick grill with your own hands (photo of a correctly folded firebox below).
Important! It is unacceptable for precipitation to come into contact with unfinished brickwork. If it starts to rain, it must be carefully covered with polyethylene.
The last stage is the construction of the chimney. Its presence allows you to maintain heat in the grill longer and remove smoke. For the chimney, the masonry continues to be laid, gradually narrowing towards the top. This is done by shifting the bricks in rows. The displacement is made by no more than a third of the brick - otherwise the structure may be unstable.
Feature: the pipe is a heavy part and requires support columns for its installation.
If laying out a brick pipe seems too complicated, you can install a metal one. Upon completion of the masonry, the walls of the firebox must be fired. To do this, light wood in the hearth and increase the heat to the maximum.
The construction of a brazier and the installation of a cauldron or tray are carried out at the final stage. After this, decoration is carried out. If there is a countertop, it can be decorated with a porcelain stoneware slab. The barbecue itself is covered with plaster, decorative stone, facing tiles, etc.
We looked at how to make a brick grill yourself. A separate issue is protecting the structure from leaching of the solution. The problem is solved by processing with special compounds. This can be a heat-resistant varnish, an oil impregnating composition for stoves and fireplace masonry, a silicone water repellent, which in addition protects against the appearance of microorganisms in the masonry.
To ensure fire safety, the barbecue for the dacha is covered with paving slabs. In addition to fire protection, it will create a flat, comfortable platform. There should be no flammable objects in the immediate vicinity of the grill. For decoration, only non-flammable, heat-resistant materials are chosen.
Add spacers
Fold the table so that the legs are flush with the bottom surface of the tabletop. Measure the length required for the spacers, cut them out and attach them to the legs. For a more accurate and accurate result, it is better to focus on the actual distance between the legs. To extend the table, first pull on the pair of legs with more space between them. Then the second pair can be pulled out without touching the spacer of the first pair.
Homemade bed for the cottage. You will definitely need it!
How to polish a homemade concrete countertop.
My neighbors were grinding with discs that they had acquired back in the USSR. I have a friend who has his own small store of various abrasives and machine tools. (I will attach a link to an interview with him about how small tool stores survive). According to him, if you make a tabletop just like a mirror, then you need a set of three discs of different grain sizes. This set costs an average of 2 thousand rubles. But it's polished straight to perfection. If you don’t need a “straight mirror”, then you can do it with one medium-grain disc for an angle grinder. Such discs cost on average 500-700 rubles.
According to the neighbor, sanding is not difficult at all. He did it with a grinder. But quite dusty. After sanding, you can cover the tabletop with liquid glass to add shine and additional waterproofing. This will increase the cost by about 100 rubles.
Turn on the forge
If we can fit all the reinforcement in the forge, then we load 70 and 60 cm rods at once. We try to reduce each step to one melt per forging step. If this is not done, the rods will all get mixed up.
You need to flatten the first 10 centimeters of each rod and return each one to the forge to heat it for the next step.
Drawing of a barbecue with a frame in LOFT style
This brazier is made in the LOFT style, or rather the metal frame of the brazier, and the brazier is the same as in the previous drawing above.
The frame is made of 40x40 mm pipe and the cross member of the bottom shelf is made of 20x20 mm pipe. Table board size 360x360 mm.
Download the drawing. Brazier LOFT
Below is a drawing of just the barbecue frame. The drawing of the brazier is the same as in the previous barbecue here