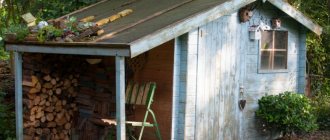
Pergola is a trend of recent seasons in landscape design. It performs an aesthetic function: it is a highlight that attracts attention. At the same time, it is quite multifunctional: you can hide from the scorching summer sun and relax in it, and also serve as support for climbing plants. It is not surprising that many owners of country and garden plots order such an unusual gazebo.
However, its custom production and installation cost a lot of money. Those who want to save money and get a real exclusive, not similar in design to the options from the workshops, can try to make it with their own hands - this is not only a unique author’s art, but also the pride of the owner.
General recommendations
Where to start making a pergola?
Select an option
To master the construction of a pergola with your own hands, first of all you need to look at different design options:
- it can be in the form of a canopy, attached to the house or as a separate structure (like a gazebo);
- the roof can be made in a traditional style (square or rectangular), gabled, arched, sloped or as a promenade structure;
- the pergola itself can be built in the Japanese style or in the form of a rotunda; some people like corner options (one of the easiest to build with your own hands);
- You can also choose different style solutions: country, high-tech, modern, oriental, chalet, half-timbered, etc.
You also need to decide on the material. Everything will depend on your skills and finances. Stone and forged structures are one of the most fashionable, sought-after and beautiful options. However, they are mostly made to order by professionals. If you are not a mason or a blacksmith, it is better not to take on such complex structures. The best option is wood. It is easy to process, looks rich, and allows you to add some of your own flair to the building. Metal is more difficult to work with.
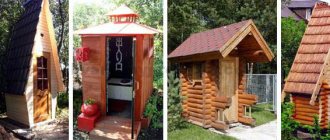
Pergolas:
Related article: Pergolas in landscape design
Preparation
The next step is selecting a scheme. Here a lot depends on your skills and abilities. If you have worked with wood or metal before, if this is not your first experience in construction, assembling a pergola with your own hands will not be difficult. Some people won't even need step-by-step instructions. But beginners should still find a detailed algorithm of actions.
When you finally have what you want in your head, calculate how much material you will need, what tools and fasteners you will need to use. Always take an order of magnitude more. As practice shows, it’s better to have extra left over than to go shopping several times to look for something.
A general list of tools that may be useful for constructing a wooden pergola:
- hand drill;
- drill and wood bit;
- pencil/marker;
- paint brushes;
- hammer;
- fine-grained sandpaper / sander;
- hand saw for wood / jigsaw;
- plumb line;
- roulette;
- chisel;
- clamps;
- square;
- building level;
- screwdriver
Tools for building a metal pergola:
- welding machine;
- Bulgarian;
- building level;
- roulette;
- square;
- pencil/marker;
- shovel;
- galvanized wire.
Selecting a location
Tips from landscape designers for placing a gazebo in the garden:
- a pergola in the middle of the site does not look good - it is better to choose a place on the edge;
- An excellent option for a small garden would be an extension to the house in the form of a canopy;
- those who want to build a full-fledged gazebo with a barbecue and a table with their own hands can choose a corner near a wall or fence, in the shade of large trees;
- it can be an arch to design the transition from one zone of the site to another (along a path or alley);
- if the site already has climbing plants that lack support, it would be logical to erect a supporting structure next to them;
- You may need to create shading over a parking lot or playground - in which case a pergola will also be an excellent solution to the problem.
Try to plan for mostly sunny weather during the work. Always keep in mind the risk of rain in order to protect the material from it (store under a canopy or cover with a water-repellent film).
Pergola in landscape design
An arched canopy, entwined with lush greenery, is a spectacular decoration for a personal plot or summer cottage. In combination with flowering flower beds, stylish gazebos, and openwork swings, it looks very picturesque and attractive.
With the help of a pergola, you can conditionally divide the site into zones, add it to the entrance area, a place of rest, or a gazebo with a barbecue. Under a lattice canopy, the area near the pool or children's playground will become more comfortable and protected.
Garden furniture, textiles, and lighting are used to decorate pergolas. You can arrange a small pond with a waterfall or fountain nearby.
The pergola can be designed in different styles:
- Japanese - laconic form, calm colors;
- eastern - an abundance of details, bright patterns, rich shades of green and red;
- hi-tech - “high technology”, clear geometry, predominance of metal and plastic;
- country - closeness to nature, simplicity, natural materials and colors.
You can support the pergola design concept with the surrounding landscape or, conversely, make it a bright, expressive spot against a calmer background.
A simple solution
The simplest pergola for beginners is a roof in the form of crossbars (on which ivy or vines grow) supported by 4 beams.
Let's take a step-by-step look at how to build it yourself.
What you will need
Pine is good for constructing a pergola, as it is the most inexpensive type of wood. However, it must be well dried, otherwise the structure will then move, and it is extremely difficult to level it. The table shows building materials, sizes and quantities.
Preparatory stage
1. Using a jigsaw, cut the edges of the beams - timber (those indicated in the table in the amount of 9 pieces and with a cross-section of 100x100x3000 mm).
2. On the remaining beam, which will go under the racks, make recesses for the longitudinal floor beams:
- fold 4 beams together;
- align in height;
- fasten with clamps;
- make markings: from the edge - 90 mm;
- recess depth - 25 mm;
- make multiple cuts with a hacksaw from the cutting line to the edge;
- knock down the partitions with a hammer;
- process the recesses with a chisel.
Make notches on both sides of the beams.
Toner treatment
Toner is a paint specially designed for wooden buildings. It has a lot of advantages:
- tints (you can choose any shade);
- preserves the natural texture of wood;
- does not require applying a fixing layer of varnish;
- gives the material such practical properties as hydrophobicity and ultraviolet resistance;
- protects against external negative influences.
Therefore, instead of regular paint, purchase toner and treat the prepared timber with it in 2 layers - this will be enough for a reliable, durable coating. Algorithm of actions:
- Sand the details.
- Protonate them in one layer.
- Wait until completely dry.
- Protonate a second time.
- Wait until it dries completely a second time.
Another undeniable advantage of the toner is that after 2-3 years, when the need for repainting arises, you will not need to peel off the exfoliated pieces. All you need to do is go through the sander and retonate (only 1 time).
Marking on the ground
1. Using pegs and rope, mark the area where the pergola will stand. Dimensions - 2.6 by 3 m.
2. Make holes for the supports (with a shovel or drill). Depth - 1 m.
3. Place the beams in the holes so that the cuts run along the long sides of the markings. Make sure they are at the same height.
4. Fill the holes with cement mortar. Let it harden.
Installation
1. Mount longitudinal beams (those 4 m long) on recesses. Leave the edges to protrude 40 cm beyond the posts.
2. Drill through holes with an electric drill (they are needed for the bolts holding the beams and the rack together).
3. Secure the structural parts with bolts and nuts.
4. Place crossbars evenly along the top of the longitudinal beams, securing them with clamps and securing them with self-tapping screws.
Inside you can put a table with chairs and flower pots. Plant climbing plants along the ceiling and counters - virgin grapes, garden ivy, golden hops or tropical dicentra. This design option can be draped with airy translucent fabrics.
How to make a pergola with your own hands: instructions for a summer resident
You can quickly make a light garden pergola for your favorite climbing flowers yourself. Required:
- block 50x50 mm;
- slats 40x20 and 40x10 mm;
- galvanized perforated corner for fastenings;
- galvanized wood screws.
We assemble a frame for the future pergola from a block and slats in three parts. They are like stairs. We fasten the parts using self-tapping screws and corners.
All parts are treated with impregnation. You can use wood tinting with moisture-resistant compounds. We fix the structures in the form of the letter P.
We install it vertically on the finished platform. We fasten with anchors. We decorate a wooden pergola with hanging baskets or flower pots.
In this way you can decorate paths to the garden, entrance area or porch.
An advanced version of a wooden pergola
Those who know a lot about carpentry can make a more complex structure with their own hands. For example, with a pitched roof. Moreover, it can not be completely covered with material, but left for ivy and vines. If you want more reliable shelter from the same rain, then you should make a full cover.
Blueprints
A drawing is already required here, since you will be building a more complex structure than was described above. The problem is that it is difficult to find a ready-made scheme for your garden and adjust the dimensions of the same building materials to it. The picture may indicate one area, and you have a completely different one. What are the possible options for action in such cases:
- using mathematical calculations, change the dimensions indicated on the finished diagram, taking into account the area of your site and the initial parameters of your building material (you can either do this yourself or order it from a designer);
- draw up a drawing yourself, using an approximate version only as a sample;
- do not look for any other sketches, drawings and diagrams - first draw up your own, reflecting in it your vision of the pergola;
- use very convenient 3D computer programs, specially created for independently drawing up such drawings: you enter the required dimensions, and it produces a ready-made result, which can be adjusted at each stage of construction.
The last option is the most accurate and convenient, although often such programs can only be downloaded for a fee and you need to have at least a little understanding of computer graphics.
Here is one of the drawings of a wooden pergola that can be used for self-construction:
Materials
The following materials are used for pergola roofing:
- roofing felt;
- decorative types of tiles;
- metal sheets;
- slate;
- polymer building materials;
- ondulin;
- profiled sheet.
When purchasing wood for construction, be sure to keep in mind that it must be:
- all from the same batch, otherwise different quality will affect the decorative properties of the structure;
- without damage, deformation, chips, cracks and fungal infections;
- one color.
The quality of building materials will determine the functionality and decorative appearance of the pergola. After purchasing them, the wood must be treated with special solutions if you want the structure to last as long as possible. Fire retardant and antifungal impregnations:
- protect from aggressive weather conditions (rain, frost, heat);
- will prevent wood from being corroded by moisture, fungus, and pests;
- will retain a decorative appearance;
- will reduce the risk of fire.
Such compositions are applied to the wood in 2-3 layers, but each time you need to wait for complete absorption and drying. The final stage will be treatment with stain or special varnish, which will give the material a beautiful shade and preserve its natural structure.
Step-by-step algorithm
Depending on the size of the building, choose what kind of foundation you will build for it. If the construction involves massive building material, it is better to spend time on tape. With a small weight, blocky is enough. If it's just boards, metal screw piles will do.
Algorithm of actions:
- Level the site.
- Remove the turf.
- Dig a hole of the required size depending on the type of foundation chosen.
Frame and straps:
- Place a grillage on top of the foundation to evenly distribute the weight of the structure onto the base. Here you will need logs (minimum diameter 22 cm) or large cross-section beams (20x20).
- Place the lower crown on the grillage.
- Lay a waterproofing layer between it and the base (roofing felt can be an alternative).
- Install pillars (beams) on the constructed lower frame.
- Secure the supports with dowels (alternatively - corners, screw fastenings).
- Connect the pillars at the top and bottom with crossbars (if necessary).
Next, walls or side beams are erected, if the drawing suggests them. According to the scheme that was proposed above, an open pergola will be built, without them.
Floor:
- Lay a rough board on top of the grillage (thickness - at least 20 mm).
- Secure with screws or place on nails.
- Cover the top with wood (thickness - at least 10 mm), which must be pre-treated with special solutions (for example, yacht varnish). The type of installation is better to use tongue and groove.
Helpful advice. This completes the flooring. There is no need to lay plywood, tiles or linoleum on top (supposedly for beauty). Yes, they will give the pergola a homely, decorative feel and make it easier to clean inside. However, in outdoor buildings they become dangerous - especially during rains and autumn, when there is high humidity.
Roof:
- Mount the rafter system (the thickness of the boards directly depends on the weight of the entire roof) on the top frame.
- Lay the sheathing.
- Secure the parts.
- If the roof is of a closed type, lay the selected material (tiles, ondulin, etc.) on the rafters.
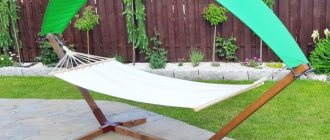
Pergola swing
This option is more difficult to manufacture, and more materials will be required. The frame must be strong to support the weight of the swing. It needs to be well strengthened, since it will have to withstand not only static, but also dynamic loads.
To make a pergola with a swing you will need:
- timber 100x100 mm;
- board 50x150 for load-bearing beams;
- slats for gratings 20x40 mm;
- bolts and screws for wood;
- waterproofing mastic;
- waterproof paint;
- concrete for the foundation.
The work is carried out in several stages:
- We dig or drill holes 70-80 cm deep.
- Add crushed stone to the bottom and compact it.
- We treat the wooden post at the base with liquid mastic and wait for it to dry.
- We level the stand into the well, fix it and pour concrete.
- We cut nests in the floor beams for cross boards.
- We lift the beams and fasten them to the posts with bolts.
- We strengthen the upper belt with braces. To do this, we cut the boards at 45° and fasten one end to the pillars and the other to the floor beams.
- We assemble the grilles from slats and install them in the side openings.
You can make a swing yourself or buy ready-made ones. For fastening, we screw a special hanger for the swing to the supporting beams, not to the cross boards, as they may not hold up. We pass the chains through the fasteners and hang the swing. We put soft pillows on the seat - and a comfortable pergola with a swing is ready. This design is a great place to relax for all those who like to swing. You can install it near a gazebo, swimming pool, barbecue area and enjoy the results of your labor in the lap of nature.
With sheathing
To make a pergola-sheathing with your own hands, you can use any of the above instructions. But before completing the work, install a lattice structure instead of the walls. There are a huge number of variations on how to do this. Firstly, it can completely replace walls. Secondly, reach only to the middle of the structure, and the upper part will remain open. Thirdly, sheathing can even be placed on the roof instead of the usual cross beams that were indicated in the above diagrams. This will not be difficult even for a beginner. It will be much more difficult to make this element itself.
To make the sheathing, hard wood species are taken: oak, ash, larch, pine. Structurally, it consists of 2 parts:
- frame - a wooden structure of a rectangular or square shape as a rigid frame for slats;
- slats are wooden beams that are attached to the frame overlapping each other.
Frame
- Take measurements of the pergola in order to select 4 bars for the frame so that the finished sheathing then fits freely into the desired opening that it will decorate.
- Treat them with an antiseptic solution.
- Wait until completely dry.
- Connect the ends of the bars.
- Secure the seam strips.
There are several ways to connect the ends of the bars in the sheathing:
- beginners can do this using the “comb” method (it is the simplest);
- craftsmen can recommend the “dovetail”;
- You can file down the ends and connect the ends using glue, self-tapping screws, and nails.
The finished frame, while it is without the main element (slats), should be tried to be inserted into the opening of the pergola under construction to make sure that all measurements are made correctly.
Reiki
To fill the frame you will need thin slats. They are attached diagonally at equal intervals. The size of the step can be different: some people like a fine-mesh sheathing, which will almost completely hide those who are in the pergola. Others prefer a wide mesh to allow more fresh air and light inside. This may also depend on what plants will subsequently be allowed to grow along this wall.
The main thing is that the interval is the same everywhere. This is what creates the correct geometric pattern and makes the sheathing so decorative. If there is no hope with your own eyes, you can use a special wooden grid template, which will prevent you from making mistakes and will allow you to do everything as clearly as possible.
The easiest way to attach slats is to place them on nails. Carpenters can use notch mortises.
If you make one sheathing frame with your own hands, which, for example, will be used for the back wall of a pergola, after attaching the slats, it is immediately installed with self-tapping screws to the support beams. If there are several meshes, they should first be fastened together (with glue or fasteners), and then placed in the overall structure.
The pergola-sheathing has excellent decorative properties. In addition, it will serve as a support for climbing plants in the garden. This is one of the best options for beautifully decorating some varieties of roses (excelsa, amestista, flamentanza, santana).
Main nodes
Despite the fact that the design is simple, it is necessary to correctly assess the load that plants can create. For our country, the pressure of snow should not be taken off the scale. Especially after the plants entwine the structure. Therefore, all connections and fastenings are made reliable; it is better to play it safe and install corners than to dismantle a blockage of plants and a collapsed arch. In this regard, the supporting columns and beams of the arch must be strong and reliable.
If you plan to build from wood, support posts for a medium-sized pergola use at least 200*200 mm. Beams are made of boards of at least 40 mm thickness. Be sure to make stops and jibs: they will add rigidity. If you build support pillars from brick or stone, they are placed around a pipe - round or square - your choice, but there must be one.
Dimensions
A little about the sizes of pergolas. They must be proportional to the site. If it is small, then the distance between the posts can be one and a half meters. There is no need to do less: taking into account the foliage, only one person will pass through such a passage. For larger areas, a larger width is required - too narrow will appear short.
The standard height of a garden pergola is 2.2-2.4 meters. Then the whole structure is harmonious, and the foliage and flowers will not crush.
How to connect the parts at the top
When building an arch, special attention should be paid to the joints. See the photo for how to make them.
A simple way to connect posts to main beams
For those who are not very good at carpentry, it can be difficult to cut recesses for installing beams. There is a simple and reliable way to do without this work: connect the posts and main beams using a decorative buttress. This is not only a decoration, but also a way to make the connection more reliable.
A beam is placed on top of the support post (rack) and nailed through with nails or long self-tapping screws. However, with lateral forces they can turn out. To eliminate this, after the auxiliary beams have been laid and secured, a decorative buttress is nailed. It holds together three elements into a single whole. Even greater rigidity of the structure is given by a spacer placed diagonally, which is often called a jib.
In the simplest case, a pergola is four posts connected by main and auxiliary beams.
The simplest pergola design
Beam edge decoration
You can slightly diversify the appearance by different designs of the ends of the auxiliary and main beams. Several ways to wash it down are shown in the photo below. So that they all turn out the same, make a template from a small piece. Then you apply it to the workpiece, trace it with a finely sharpened pencil as close as possible to the template. Cut along this outline.
How to make the edges of beams
Cheaper design
The timber for the columns must be of large cross-section, and this is not cheap. The main beams must be no smaller in size, which further increases the cost of the structure. But you can save money if you nail two thick boards on both sides to the racks at the top. How it looks from above, see the following figure.
To reduce the cost, you can use two boards as the main beams
They can be connected with nails and screws, or with bolts. This is even more reliable: bolted connections can be tightened if necessary. Look at the photo to see what such a structure looks like “live”.
Pergola with double boards instead of main beams
With a bench
An excellent option for a summer cottage is a miniature pergola-gazebo with a bench for those who do not like noisy companies. It is ideal both for supporting climbing plants and for comfortable resting. The arched design allows for a thick ivy curtain to be placed at the top. And rose bushes or clematis growing along the side of the sheathing will make the building romantic and attractive.
Materials
Note: * - with allowance.
In addition to what is listed in the table:
- countersunk screws;
- brass nails for frames (16 and 20 mm);
- clear varnish for exterior use.
Recommended material is cedar.
Blueprints
Step-by-step instruction
Arch:
- Cut out blanks A and B (arch and stand).
- Saw off the ends at A.
- Mill grooves along the upper ends of B and the sawn arches.
- On a workbench, pull the top segments together.
- Glue them together.
- Make markings.
- Make allowances, cut out the upper parts, and clean to the desired contours.
- Glue the pillars and arches.
- Clean the arches and tighten them with clamps.
- Drill holes (4 mm) in the top.
- Round the edges.
What's next:
- Cut out spacers C, D and E.
- Glue E to D.
- Drill holes at the ends D (2.4 mm).
- Use screws to secure spacers C and D between A and B.
Bench:
- Cut out element G for the back.
- Cut out the backs and supports.
- Connect three supports F and G with glue. Tighten with clamps.
- Cut out I and H. Bevel edge I.
- Round the edges.
- Attach the jumpers to the supports with screws.
- Cut out the strips for J.
- Round the leading edge.
- Attach the slats to the seat (6 mm apart).
- Secure the seat between the arches using screws.
Side grilles:
- Make elements K and L.
- Fasten together.
- Secure between the posts.
- Sand all external elements.
- Cover with varnish.
A mini-pergola with a bench only at first glance seems like a simple design, but in fact only an experienced carpenter can make it.
A unique place to watch the skies
The lack of a cozy dacha outside the city is not a reason to give up your homely paradise. It can be installed on the roof of a residential building. In megacities, this type of recreation has been practiced for several decades. Therefore, brave guys set up a pergola on the roof of the house in which they live.
A miniature gazebo made of metal rods against the backdrop of concrete slabs will seem like a real oasis of pleasure. They decorate it with hanging flowers, which exude a delicate aroma and create a light shadow. During the daytime, in such a “tent” you can watch the clouds, and at night contemplate the majestic stars.
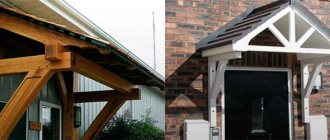
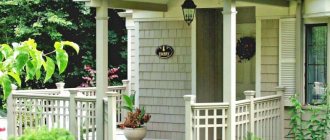
Extension to the house
A convenient extension of a pergola to the house will allow you to spend time with guests in it without going out onto the site. One step and you can already drink tea at a cozy table or grill kebabs. It’s also quite possible to do it yourself.
Specifications
Brief instructions
- Foundation
To install a vertical beam, it is recommended to use metal “sleeves” made of corrugated pipe. Small holes are dug under it and filled with concrete.
- Pillars
The height of the pillars depends on the size of the house. Usually there are 4 of them, but if the pergola is extended, it is better to install a fifth one for strength. It is recommended to install rafters on top of the side ones for reliability, so you need to make recesses in them in advance.
- Roof
The upper Mauerlat is attached with anchor bolts to the wall of the house. The lower one lies on the pillars. Rafters are attached to them using corners. The sheathing is laid on them. Next, the corrugated sheet is secured with classic self-tapping screws and a washer.
If you are adding a pergola to your house yourself, consider different design options. It can be open or closed, with a roof or sheathing instead, made of wood or polycarbonate.
Photos of pergolas attached to the house:
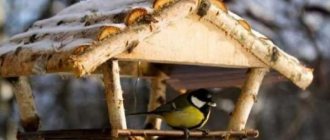
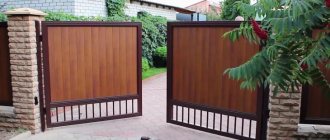
Pergola trellis
Using this simple design, you can zone the area, fence off not very attractive places and create a small vertical flower garden. To work you will need:
- timber 50x50 cm;
- board 25x15 cm;
- self-tapping screws
Instead of timber for racks, you can use a profile pipe.
We spread the boards into 50 mm wide slats.
We cover the entire tree with an antiseptic. For decorative purposes and greater resistance to rotting, lumber can be burned with a blowtorch.
If the slats are going to be painted, it is better to do this in 2 stages - before installation and after. This way we will ensure that water entering the gaps does not cause rapid rotting of the wood.
We assemble a frame of the desired size from a block. Now you need to calculate the distances between the slats of the oblique lattice and mark them with a pencil on the frame.
We first lay the slats in one direction and fasten them to the frame with self-tapping screws. You can nail it, but then the strength of the joints is much worse. There is a risk that when humidity fluctuates, the wood will dry out and the fasteners will become loose.
Now we attach the slats in the other direction. You can install them vertically or at an angle, the main thing is to maintain the angle and equal distances between the elements.
Metal
If you want to install a metal pergola, it is better to make it from profiled pipes with a rectangular cross-section or fittings.
Choice
Metal pergolas are quite varied in their design. So it’s worth starting with a choice:
- hinged, arched, semi-arched, gallery;
- dynamic and static;
- single-row and multi-row;
- decorated with forged elements and as simple as possible in decoration.
You should choose a model not only taking into account its beauty and functionality, but also from the point of view of the ease of its installation, because everything will have to be done with your own hands.
Sketch
The construction of a metal pergola begins with a sketch. It requires much greater precision than when constructing a wooden one. It’s easy to saw the wood, remove the excess, make another notch or fill up the unnecessary one. It's difficult to do all this with metal.
Grace and originality
Looking at photographs of the pergola, one cannot help but admire the simplicity and elegance skillfully combined with a share of the originality of this architectural solution.
A cozy green corner can give you long-awaited coolness on a hot summer day, generously sharing the secrets of unity with nature.
By thinking through the design of a landscape with a pergola, the owner of a personal plot is not just realizing his fantasy, he is a real creator of a small green world.
With proper diligence, this secluded corner will become an excellent relaxation area for family and friends.
Varieties
Depending on the tasks, the following types of pergola are possible:
- An awning is an excellent option for creating coolness and light partial shade in any place where it would be nice to drink tea in the fresh air or just sit with a book or friends. Does not require complex construction operations for installation. It can be presented in the form of a building adjacent to the house (a kind of veranda) or be an independent structure (a light gazebo, a canopy for a playground or transport).
If you use a waterproof material, such as a tarpaulin, for the covering, then this design can even protect you from unexpected precipitation.
- The screen allows you to achieve privacy in any necessary place. It is often installed along the fence, hiding it from the prying eyes of neighbors. Modern designers use it to divide space, because... This type of barrier is well suited for separating zones of different styles, for example, a sports ground and a Victorian garden.
Can also be used as a simple base for climbing plants.
- A canopy is a popular type of pergola in warm southern regions. Installed to shade south-facing windows. Reducing the heat load on the south side of the house, it has become widely used in energy-saving houses, saving on air conditioning.
- An arch or tunnel is a number of arches that have a common direction. Installed above the track. Can serve as a simple decoration or hide behind, for example, a vegetable garden or any outbuildings
As an element of landscape design, the pergola must be combined with the general appearance of the entire site, incl. with the architecture of the house.
Classifications
Unlimited possibilities for imagination
Pergolas for garden space are classified into the following categories:
- view:
- fan-shaped
- rounded
- with kinks
Wooden pergola
- material:
- tree
- plastic
- metal
- stone
- location type:
- adjacent
- free-standing