We decorate the area with wooden figures of birds or animals
Before we look at more practical ideas for using various wood materials, let's show a little imagination and decorate our site with simple, but very cute animals. From the most ordinary materials, at no cost, you can make a beautiful decorative item for a flowerbed and involve your child in the process. Let him figure out exactly what the wooden hero will look like, what size it will be, and where it will live, and all you have to do is assemble it from various fragments. We will make an owl family sitting on a branch.
We
will need:
- First of all, of course, a sketch of the future craft. Visualization is a very useful thing; with its help you can quickly figure out the amount of material needed and its size.
- A wooden branch of medium thickness, about 50 cm long;
- One large cut and one medium size;
- Four small thin cuts:
- Two small twigs or twigs;
- Two small cuts, divided in half;
- Fasteners
- Hacksaw.
Let's start with the big owl. Before tightly connecting the elements together, lay them out and see how it will look. You may want to change or add something. A large cut will serve as the body of the bird. On it you need to place two small saw cuts, which will become the eyes, and a knot, which will be the beak. The craft looks more interesting and voluminous if the elements protrude slightly beyond the overall outline. The wings can be of any shape, perhaps you can come up with a more interesting material for their execution. We took a small saw cut, split it in half with a hacksaw, cleared the edges of the bark and tried to make jagged edges to imitate feathers.
It's time to attach the parts to the body. For this you can use small nails and a hammer, but if you plan to do the craft together with your child, it is better to use “liquid nails”. Using the same technology, a smaller owl is made. If desired, you can add a very small owlet. Then all the birds are attached to a branch or stump. If you want to place them in the middle of the flowerbed, you can attach the branch to a wooden stick so that the structure looks like the letter “T” and rises above the green spaces. Unlike us, don't forget that owls have legs. They can be made in the same way as wings or from ordinary twigs of a suitable shape. In addition to owls, there are also a lot of figurines that are easy to make. Small bunnies with ears sticking up will look very funny.
Furniture made from saw cuts
Using wood slices, you can make original and functional furniture for your garden.
It's easy to make a beautiful table.
- To make a table, you need to knock together the supporting part.
- Additional sides are made on top.
- The sections are properly processed, polished, and placed in a frame.
- The cavities between the tabletop parts are filled with epoxy resin.
- After drying, the product is carefully polished.
In a similar way, you can decorate a stool, a small bench, or decorate a gazebo.
The use of wooden saw cuts in the manufacture and decoration of home and garden interiors is gaining popularity. The material is safe for health. The products are characterized by low cost. And they perfectly complement the interior.
Mosaic crafts for the soul
Surely there is a place in your dacha or garden plot, in the house or on the street, or in a gazebo, that you want to somehow decorate, but at the same time do it in an unusual way. We offer to decorate any surface with crafts in eco-style. The essence of the method is to lay absolutely any pattern or image from wood cuts of different sizes. We will need:
- Plywood sheet;
- Liquid Nails;
- Varnish;
- Jigsaw or hacksaw;
- Many thin cuts of different sizes.
First, come up with a drawing that will delight you and lift your spirits with its appearance. Now you need to transfer the sketch from paper to a sheet of plywood, following the scale. When the drawing is ready, attach it to the attachment point and estimate the size. Perhaps the craft will turn out to be too bulky or, conversely, so small that it will get lost against the background of a long wall. This can be fixed at this stage. After adjustments, you can begin cutting out the plywood base. Now all that remains is to glue the wooden circles with glue and enjoy your creation.
Try to select fragments so that there are minimal gaps between them.
This will have a positive effect on the finished product. To protect the wooden craft, after the glue has dried, open it with clear varnish.
You can experiment a little and make some details multi-colored; in addition to cuts, you can use decorative glass pebbles or sea pebbles. You can make the composition three-dimensional - first glue the main layer, and then glue subsequent parts in a checkerboard pattern, adding smaller and smaller fragments. If you have an old mirror at your dacha, you can use the same principle to frame it in a beautiful frame. The mirror must be glued in the center to a sheet of plywood, leaving the edges free for attaching saw cuts. Usually, if the mirror has a round shape, then the frame follows its contour. And you try to use the opposite method - enclose a round mirror in a square frame and see how unusual it becomes after its transformation.
Required Tools
To make simple wood crafts at home, no special equipment or tools are required. Using a standard set of tools you can make almost any craft from wood. To work, you should prepare the following tool:
- single plane;
- manual cross saw;
- several clamps of different sizes;
- chisels of different knife widths;
- flat rasp, set of sandpaper;
- hand-held electric drill.
- set of screwdrivers, pliers, screws;
- polyvinyl acetate glue, oil paints.
If you want to make a wooden craft with your own hands for a cottage of increased complexity, you should buy the necessary tools or order the necessary part from the nearest carpentry workshop.
When performing work using electric tools, you should strictly follow the rules of safe operation, especially if the craft is performed with children. Painting of craft parts should be done in a well-ventilated area or in the open air.
Useful little things
Everyone, without exception, drinks tea at the dacha, prepares lunches and dinners and gathers with their families. The apartment has all the necessary little things that will make this process as comfortable as possible - various potholders, coasters, etc. At the dacha, one’s hands usually don’t get around to such details, which is why the surface of the table or tablecloth suffers when a hot frying pan or kettle is placed on it. It's time to put an end to this and make a lot of hot pads with your own hands in just a couple of hours. Depending on their application, the shape and size are determined by your needs.
Let's consider a method for making the simplest stand, for which we
will need:
- The basis;
- Glue;
- Wooden circles;
- Hacksaw.
Using the same principle as in the above point, we cut out the base from plywood and glue wooden saw cuts to it. Such simple crafts can easily withstand high temperatures. Small stands on a plywood base are suitable for hot cups or a small kettle. It is much more convenient to place a pot or frying pan on more massive stands, which will also support more weight.
For their base, you can use a large, but not very thick, saw cut.
It is recommended the bark immediately, because during use it will still crumble. The saw cut can be left in its original form only by lightly sanding it with fine sandpaper and opening it with varnish. draw something on it, if you know how, do artistic burning and varnish it. Or you can just cover the entire surface with small circles. The ends of thicker stands can be wrapped with twine or thin twine, having previously coated the surface with glue.
This way, the crafts will look more neat and complete. If you have patience and a little skill with a drill, you can make a flexible stand in a variety of configurations. Bead weaving skills will also come in handy. What we need:
- Thick fishing line or nylon thread;
- Small wooden cuts with a thickness of at least 1 cm;
- Drill and thin drill bit;
- Vise;
We will weave the stand in the same way as bead bracelets are woven. To do this, you need to drill a through hole at the end of each circle. All the parts are small, holding them with your hands is dangerous and inconvenient. Therefore, it is necessary to clamp each circle in a vice. It is enough to use a drill with a thickness of 2 mm. If the process of joining parts causes you difficulties, look for weaving patterns on the Internet and act on their basis. It is not necessary that the entire stand will be woven in one piece. It can consist of interconnected fragments, which makes it much easier to do the craft for the first time. After finishing the work, you need to securely tie the edges of the thread or fishing line. In the latter case, you can carefully burn the ends with a match.
Ideas for decorating a fence at the dacha
The uniqueness of the dacha plot is best emphasized by its fencing. A fence is not only the protection of the territory, but also the so-called calling card of the owners.
A simple wooden or iron fence is trivial. It definitely needs to be decorated. You can decorate the fence with a variety of materials: flower pots, crafts in the form of animals, painted landscapes and anything you can imagine. For example, unnecessary brightly colored rubber boots will look original as pots.
You can decorate the fence with old discs. They reflect sunlight and look interesting in any lighting. You can also apply different patterns to the discs.
A fence made of round timber, painted to look like colored pencils, looks impressive. This fence can also be used to fence off a children’s area in a dacha.
Any fence will look cozier if some climbing plants grow along it. There are various species that grow very quickly. For example, decorative beans or morning glory. You can plant vines. They grow much slower, but also look more expensive. There is no comparison in this case with wild grapes. Grape leaves gradually change their color and retain their beauty until frost. It looks original when the “grape fence” turns into a canopy. This design gives the fence an antique look.
Flowering shrubs planted along it will become beautiful decorations for a low fence. You can combine plants with different colors and flowering times.
In the evening, different lanterns on the fence look beautiful. It’s also possible to make them yourself from scrap materials. Or you can simply place candles in painted glass jars attached to the fence. The main thing is that the flame does not reach the fence.
Lovers of drawing will have a lot of room for imagination. You can draw anything on the surface of the fence: nature, scenes, cartoon characters, ornaments, small patterns in the form of flowers, butterflies, ladybugs. It’s easy to draw on any fence, but it’s easier on a fence made of corrugated board.
Compositions made from lids, shells, stones, and dishes look original. It’s easy to make plastic flowers from the bottoms of bottles and paint them in rich colors - they will look beautiful on a wooden fence.
Taking care of our little brothers - wooden bird feeder
At any time and under any conditions, it is necessary to maintain humanity and love for nature, which will certainly answer you in kind. That is why, when coming to your garden or summer cottage, do not forget about the local residents. You can quickly and easily build an original bird feeder from one single log. In addition to this, we will need:
- Saw;
- Jigsaw;
- Semicircular chisel;
- Hammer;
- Rope;
- Two hairpins with a loop at the end;
- Self-tapping screws.
The log must be at least 30 cm in diameter
- On both sides of the log, using a chainsaw, we saw off circles about 1.5-2 cm thick;
- Along the entire length of the log, it is necessary to cut a wedge whose angle is approximately 45°;
- Remove the wedge and make many transverse and longitudinal cuts in the remaining interior of the log, not reaching the edges along the contour up to 5 cm;
- Using a hammer and chisel, remove the sawn core;
- You should end up hollow log inside with a triangular window;
Try to level the inner surface as much as possible; you can sand it with coarse sandpaper. Now you need to make side walls so that the feeder is not blown by the wind, and the bird food does not spread throughout the area. And thus, much less water will get into the feeder. We will use the two saw cuts that we cut at the very beginning.
- Attach them to a hollow log and, from the inside, use a pencil to transfer its outline onto the cut;
- Cut out the intended part with a jigsaw;
- Insert the plugs and secure them with self-tapping screws;
Now you need to take care of the fasteners. For this purpose, mounting loops are suitable, which are screwed into the top of the feeder on the sides. At this stage, it is important to position the hinges correctly so that the feeder does not lean forward too much and the food does not spill out. Find the optimal position. All that remains is to attach a rope or metal chain to the loops and hang it on a branch. It will be very interesting for you to watch how the birds behave.
Choosing original ideas for a summer residence
Each dacha owner, if desired, can find a lot of different ideas for decorating his site. To make most decorations, only available materials and minimal costs will be enough. And old, unnecessary furniture and interior items will inspire creativity even more. Often seemingly completely useless and forgotten things can come in handy. Country designers use in their work everything that comes to hand: broken old furniture, unnecessary toys, various bottles and dishes, car tires, leftover building materials and much more.
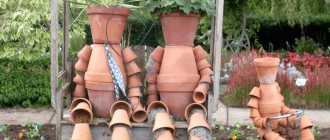
No dacha decoration is complete without intricate, interesting flower beds. You can add uniqueness to flower arrangements by planting them in old containers. These can be barrels, pots, and even carts. Many summer residents build various picket fences for flower beds.
Original paths on a summer cottage will always add coziness. They are made from timber or stone. And leftover materials can always be used to build another composition.
Bottles and plastic jars are especially popular among country designers. From them it is easy and simple to build many interesting sculptures, decorations for flower beds, and borders. There are no limits for imagination here.
You should definitely place a bird feeder in your dacha. Children usually love to watch birds. And with a feeder, birds will be a frequent visitor to your summer cottage. It can be made from a plastic bottle, from an unnecessary block of wood, or from twigs.
Without much difficulty, you can make a variety of figures that will bring comfort and individuality to the countryside atmosphere. To make them, you can use a variety of design solutions and materials. For example, polymer clay, foam residues, gypsum and other building materials. Once you start creative work, it will immediately become clear that nothing is impossible.
Original and simple clothes hanger
There are many ways to make a wooden hanger yourself - from boards, from saw cuts with hooks, or simply from driftwood of a suitable shape and size. But we decided to take a closer look at the simplest, but very unusual method that you will definitely like. We will make a hanger from small logs with knots, which will be enclosed in a frame. We will need:
- Two long and two short wooden boards;
- Whole logs with knots;
- Saw;
- Plane;
- Varnish;
- Self-tapping screws;
- Screwdriver.
The set of tools, of course, is not the simplest, but this is only at first glance. So that the finished product does not seem too bulky and does not take up much space, we recommend sawing logs high . Each of them must have a knot, the thickness of which must be at least 3 cm so that it can withstand the load. Also, you should not choose logs that are too curved, otherwise they will protrude too much beyond the side frames and spoil the overall picture. The thickness of the wooden frame elements depends on the thickness of the logs you find. For example, if the diameter of the log is 5 cm, then the width of the board must be at least 10 cm. After assembly, you will have only 2.5 cm free in front and behind the logs.
Pre- saw the wood into pieces with an allowance for height. The ends of the logs should be even to fit the top and bottom boards with minimal gaps. You can level the ends using a plane. But if you manage to cut it more or less smoothly to the same size, you can immediately coat the surface with varnish. Now you need to enclose the logs in the frame. The easiest and most convenient way to do this is as follows:
- Lay the bottom board end-to-end on a flat surface;
- Place side boards on the sides and make markings for future fasteners. Be careful at this stage. There are two options - when the side boards stand on the bottom plank, or when the bottom plank is enclosed between the side ones. The last option is preferable. Firstly, in this way you will hide the ugly ends of the bottom board, and, secondly, it will be much more convenient to fasten the elements together;
- Pre-drilling should be done in the marked places to make screwing in the self-tapping screw easier;
- At this stage you will need help, as it is very important to keep the edges perpendicular;
- Two mounting holes on each side are sufficient;
- Please note that we are now assembling the structure without the top bar;
After you have screwed the sides into the bottom board, you can start attaching the logs. It is advisable to place them in the center. You can draw a line on the bottom board and try to stick to it.
- Turn the frame over and place it on the side walls. Considering the diameter of the logs, drill the appropriate number of holes along the line. To make the work easier, you can drill holes into the logs, trying to get into their center. It is recommended to do this only on one side. By screwing them to the bottom board, you will still have the opportunity to combine the hole in the plank with the hole in the end of the log. When it comes to the top bar of the frame, all the elements will already be rigidly located on the base.
- Place one log at a time under the frame, secure them with self-tapping screws.
- Turn the future hanger over, cover the structure with the last length of the board and screw it first to the side edges.
- Now use a screwdriver to secure one screw on top of each log. is very important to get into the body of the log together with the top board. Then the structure will be reliable and can withstand heavy loads.
Another important point to consider. Since we are attaching the top and bottom of the frame between the side planks, their length should be equal to the length of the logs + two thicknesses of the long boards. Mounting this shelf is very easy.
- Make several drill holes in the end of the top board with such a diameter that the screw head fits into the hole.
- Screw the appropriate number of screws onto the wall, maintaining the same distance as on the hanger.
Now hang the shelf and enjoy its extraordinary look.
We use bark and branches
Wooden crafts can also decorate a dacha house. Branches or tree bark are more useful here. Craftsmen create with their own hands using branches:
- frames for chandeliers or wall lamps;
- hangers;
- photo frames;
- individual furniture elements (backs, legs)
The craft for the dacha in the form of a hanger is distinguished by its originality. The manufacturing procedure is not difficult:
- For the craft you will need branches of the same size.
- The tree is cleared of bark or left in its original form, but must be treated with impregnation or varnish.
- The frame for the hanger for the dacha is assembled from four boards, its height is equal to the size of the branches.
- In the absence of intense loads, tree branches can be fixed to the base using glue. When placing heavy items, it is better to fasten individual elements with nails. The work on the practical craft is finished, all that remains is to hang it on the wall of the cottage.
Birch bark has been actively used in everyday life since ancient times. Now a craft in the shape of a basket or tee will become an exclusive decoration for a dacha. If they have the necessary skill, craftsmen use their own hands to make mugs, paintings, baskets and other household items for the garden from individual parts of wood.
Monumental creativity
Experienced woodworking craftsmen can make more complex crafts.
Decorative figures
A non-trivial decoration of the dacha will be a figure carved from wood. For a forest monster, it is important to choose a trunk with branches of an original configuration, the rest is the imagination of the craftsman. The fairy-tale hero needs more diligence, but the landscape of the dacha with such a protector will not leave anyone indifferent.
Wood carving is another labor-intensive design process for gardening crafts. Neat figures of birds or animals are the main theme of creativity.
Painting on wood
Wood can serve as a canvas for an artist's creativity. A craft in the form of a painting is another option for decorating a dacha landscape. Basic steps to create decor:
- Part of the trunk is cleared of bark.
- The sanded surface is impregnated with a primer intended for treating wooden surfaces.
- To create your own paintings, use acrylic or oil paints.
- After the drawing has completely dried, the craft is opened with varnish.
Mills and huts
The landscape of the dacha will be exquisitely decorated with a craft in the form of a mill, well or hut. Objects are assembled according to the log house principle. The main stages of the mini mill design process are as follows:
- Planks of the same size are prepared, which serve as the basis for a craft in the form of a mill.
- First, the first two strips are fixed parallel to each other.
- Two more planks of wood are laid perpendicular to them.
- The elements of the craft are fastened together in various ways. You can use glue, nails, or string the parts onto metal pins.
- After the walls are erected, they move on to decorating the roof.
Crafts for the garden can vary significantly in size. It all depends on the area of the site, the availability of material and the skill of the craftsman in handling wood.
Furniture
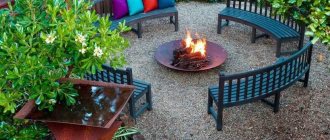
Their garden plot is often decorated with wooden garden furniture. It can be a separate simple bench or a complex composition, complemented by funny figures.
Entire ensembles of furniture consisting of a table with chairs or benches look impressive in a dacha. The function of the legs is usually performed by sawing logs. For bench seats, boards or sawn logs are used.
Comment! The significant weight of furniture made from logs makes it difficult to move around the dacha area, so you should choose in advance the optimal place to install the heavy craft.
Fans of the rustic style will like the idea of garden furniture, where curved tree branches are actively used for decoration. The picturesque picture will not leave the guests of the dacha indifferent.
Making your own garden furniture from wood is represented by various technologies:
- In some cases, the bark is completely removed, while other craftsmen clean only the areas of the craft intended for the seat.
- The tabletop is made of solid logs, saw cuts, boards or decorated with durable glass.
- The function of the legs is performed by logs or branches.
- The color of the wood is left natural or covered with stain to give a specific shade.
Photo examples of interesting furniture crafts are presented below:
Flowerbed for a summer house from a rotten log
rotten sawed into large logs in your yard , or you yourself cut down an old tree in your dacha and discovered that it was almost empty inside. Such material, of course, is not suitable for firewood, but for useful crafts it is just what you need! From such a crumbled stump we will make full-fledged and unusual garden beds.
We will need:
- Decks – number as desired;
- Axe;
- Hammer;
- Soil substrate;
- Low-maintenance flowers or plants.
You will be lucky if almost the entire inside of the trunk has turned to dust, leaving only the outer contour of a small thickness intact. As a rule, this rarely happens, so you will have to remove excess from the internal cavity yourself. This should be done as follows:
- Pre-draw a contour that should be followed to leave the walls about 5 cm thick;
- Now set the ax on the line and hit it hard with a hammer;
- The work is not difficult, but it requires the use of force, so use reliable tools that will not break during the process and will not injure you;
- Be sure to wear glasses to protect your vision from small chips that will fly in different directions;
Do not try to chop off a large piece of wood at once; the work will progress much easier and faster if you chop off small chips, moving from the existing cavity to the outer contour.
When the work is completed, you can give the flowerbed a more
well-groomed appearance - remove the bark, clean the surface a little, soak it with a special solution against insects and moisture, and cover it with varnish. After drying, install the flower beds in the desired location, fill in the soil and plant the plants. If you place the flowerpot on a pre-prepared bed of sand and crushed stone, excess moisture after watering will be quickly removed, preventing premature rotting of the deck.
Such a composition looks much more interesting if it consists of several flower beds of different sizes. And sometimes homemade wooden flower beds can look like this:
Options for wood crafts
The presence of huge forests and the amazing properties of wood make this material one of the most popular for handicrafts. Dried trees damaged by the elements, thick and thin branches, and stumps are used as the starting material for making crafts.
Simple wood crafts can carry a functional load, serve as a hanger for outerwear and hats, a handle for a shovel or a rolling pin. With a little experience, you can make souvenirs and all kinds of children's fun and toys.
Experienced craftsmen, who have the necessary equipment and tools, and the appropriate premises, produce imperishable masterpieces of handicraft. Typically, such work is used when decorating the interior design of country houses of wealthy people.
There are many options for wood crafts. Therefore, when choosing a craft theme, you should be guided by your individual abilities and the presence of an irresistible desire. Other issues are resolved as usual. Inspired impulses in creativity!
Useful craft - Swedish candle
For those who like to cook various delicacies at the dacha or in the garden with friends, such an interesting way to create and maintain a fireplace as a Swedish candle will come in handy. It is very simple to make, and it can bring a lot of benefits, since its burning time is so long that you can not only boil water for tea, but also prepare a full-fledged dish. To make it we need very few items:
- Log;
- Saw;
- Lighter fluid.
The log must be placed on its end and two cross cuts must be made. It is most convenient to work with a chainsaw. The depth of the cut should slightly exceed half the height of the log, otherwise during the burning process it will simply break into four parts. If the log is wide enough, make three cuts so that they look like a snowflake from above. It is necessary to pour flammable liquid into the center of the resulting sectors. After lighting, be careful - a rather high and strong flame will burst out from the center of the deck.
To install the vessel on the end, use damp branches, which will simultaneously provide a flow of oxygen to the fire site. This method of starting a fire is useful in areas that are not equipped with fire pits or where there is no stove for cooking in the house.
Crafts and toys for children
You can make many different crafts from saw cuts for a school exhibition or kindergarten.
Toys made from this material look original: stylized animal figures, play furniture.
Many ideas for New Year's crafts from saw cuts can be found on the Internet: snowmen, snowflakes, flowers, decorations with a pattern applied to them.
From coniferous wood cuts you can make unusual Christmas trees that will not only decorate the room for the holiday, but also fill the house with the aroma of pine needles.
To make a classic triangular-shaped Christmas tree, you will need a frame of thin slats. Round blanks should be placed inside the frame, the voids should be filled with transparent glue or epoxy resin.
For fun leisure – wooden “Tic-tac-toe”
What to do after a hard day at your dacha with family or close friends? There are, of course, a lot of options, but we suggest remembering everyone’s favorite game, which many people symbolize with childhood, tic-tac-toe. It would seem that what’s special about this game is that we ourselves will make not only a field with markings, but also chips for moves! So, we will need:
- One large saw cut;
- 18 small cuts:
- Varnish;
- Burning device or paint;
- Hacksaw;
- Sandpaper.
A large saw cut will serve as a playing field. to mark it in the form of a field of 3 × 3 cells. This can be done using a wood burner, or you can use acrylic paint. After the paint has dried, it is necessary to coat the surface with varnish. Now you need to prepare the chips.
- A branch about 3 cm thick is suitable, which needs to be cut with a hacksaw into circles about 1 cm thick.
- In general, six “crosses” and “toes” are enough for the game, but chips may get lost, one may not work out in the process, etc. Therefore, it is recommended to do it with a reserve.
- The “toes” do not need markings, but on future “crosses” you need to draw the corresponding symbol on both sides.
- First you need to level the surfaces after the hacksaw by rubbing it on sandpaper.
- When you are finished burning or painting icons on the chips, protect the surface with a layer of varnish. You don’t have to do this, but this way the game looks more civilized and is pleasant to pick up.
After the varnish has dried, you can enjoy the unusual stylization of the game everyone is familiar with.
Garden figurines
What besides flowers decorates our yard and garden? Yeah, all sorts of different figures. In this section we will look at new crafts for the garden and dacha in this area.
From plastic bottles
Decorative figurines for the garden and dacha are made from a variety of materials, but most of all crafts are made from plastic bottles. There are a lot of them, in different formats, and this thin plastic material is very flexible. In addition, it can be painted, which further expands the possibilities.
Baby elephant made from a plastic bottle...you also need an old hose from a vacuum cleaner for the trunk
People made from plastic bottles - for those who have artistic skills
Piglets and hares are an eternal theme for the garden
Sweet family
Donkey from a plastic bottle
It's not that difficult...
A snake made from PET bottles is something new
Favorite penguins from Madagascar from ordinary bottles
The frog princess and the little rats
Another version of penguins and wasps...
If fresh flowers have not yet bloomed...
In addition to plastic bottles, garden figurines can be made from wood, old pots, flower pots, bowls, buckets, pine cones, and painted stones. In general, from what ordinary people throw into a landfill. But in vain. All this makes very interesting crafts for the garden and dacha.
Figures made of plaster and cement mortar
Plaster for sculptures is available for sale. It is ideal for making garden figurines. But it is expensive, but it hardens quickly and has a smooth surface. Instead of special plaster, you can use construction plaster or even a mixture of cement and sand. The cement figures will be dark gray in color, so you will have to use dark or rich colors. Under light paints, you will need to apply several layers of light primer. But cement is more durable.
There can be both large garden crafts and small ones
Working with gypsum and cement
Gypsum must be diluted in the proportions indicated on the packaging. Just keep in mind that it sets very quickly. Immediately after mixing, it must be poured into molds, so first prepare all the molds, then only dilute the gypsum mixture. After about 40 minutes, the plaster will have hardened enough that it can be removed from the mold. So making garden figurines from plaster is a quick process.
To lighten the figure and to save plaster, you can insert some kind of vessel inside...
With cement it's different. For 1 part of cement grade M400 or M500 you need to take 4-5 parts of fine, dry sifted sand. When dry, mix the mixture until the sand is evenly colored gray (there is white cement and even pink). Only after this can you add water. Take 0.5-0.8 parts. There are no exact proportions of water, since sand can have different humidity levels, and the composition itself can have different degrees of fluidity. After filling the mold you will have to wait several days. At least 3-4 (at a temperature of about +20°C), and preferably 5-7 days. So to make garden figurines from cement, be patient.
Decor
Once frozen, the figures can be painted with acrylic paints. You have to apply two layers of paint, and then cover it with yacht varnish. In this form, garden figurines retain their bright colors for several years.
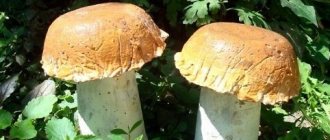
We make a mushroom cap from a bowl of a suitable size, lined with cling film
To work with plaster you need to know one secret. To ensure that the figure comes out easily, the inner walls are lubricated with a mixture of soap, water and vegetable oil before pouring. The soap is grated and filled with water. When the chips soften, mix until smooth and add a little vegetable oil. This mixture is used to lubricate the inside of the mold before pouring the diluted plaster into it.
While the plaster is still wet, you can add details.
Plastic bottles are often used as molds. You don’t have to stand on ceremony with them - cut them with a knife or scissors. If a metal container is used, the walls must be lubricated thoroughly. If the surface does not have to be flat, it is easier to cover the container with cling film or a plastic bag. In this form, the workpiece can be removed without any problems at all. While the plaster is not yet completely dry, you can use something sharp (a needle, an awl, etc.) to form the desired relief on its surface.
If the surface should be smooth, but in fact it has flaws, take sandpaper and get rid of the unevenness. The process is long and dusty, so be patient.
Foam figures
Crafts for the garden and dacha made from polyurethane foam appeared not so long ago. Low expansion foam is used. It produces a denser surface without large bubbles. Work with foam with gloves, as it adheres well to any materials. With skin too.
Foam garden figures are very realistic
Heroes of familiar fairy tales
Iguana on a rock slide...
Dolphin made of polyurethane foam
How and what to make a base from
To create your intended figure, find the base that most closely resembles the object. It could be a plastic bottle, a piece of wood, even a coil of wire or a wad of paper. For handles/paws/sticks or thick wire are suitable if you need to give them a curved shape. A more suitable hose for tails. to give it a stable shape, a fairly stiff wire is threaded inside.
Most often, plastic bottles are used for the body.
Small details - ears, horns, etc. - can be cut from cardboard, plastic, foam rubber. They can simply be inserted into uncured foam, and then, after its polymerization, foamed. Before you start working with foam, all the frame parts must be connected together. The aesthetics of the connection is absolutely unimportant - everything will be covered with foam. Strength is important so that no parts fall off.
Features of assembly and work with foam
If the base is a plastic bottle, pour sand into it so that the figurine does not blow away in the wind. For the rest, you will have to come up with some kind of weighting stands.
Gradual application of foam is the main thing to remember
Foam is applied to the assembled frame. Vertical or horizontal stripes, one close to the other, but leaving room for expansion. The foam is laid in layers. The second layer is applied after the first one has polymerized. The initial polymerization time is indicated on the packaging. We applied the first layer, adjusted it, waited 20-50 minutes for the foam to harden, and applied the second layer. And so on until you get the required form.
The meerkat is almost ready... all that remains is to color it
During operation, the shape of the foam can be adjusted. To do this, you can use a piece of plastic soaked in water, a plastic or silicone brush, whatever is convenient for you. For some figures, a smooth surface is important. If smoothing does not help, the blemishes can be cut off with a sharp stationery knife. The “fur” of hairy animals is also made from foam - it is applied in short strokes. In general, the creative process...
How to paint
The most convenient way to paint garden figurines made of polyurethane foam is with oil paint. It is necessary to cover in two layers. After it dries, it is advisable to coat it with two layers of yacht varnish.
Cover the ball with foam, attach characteristic details - the bun is almost ready
The eyes are small rubber balls covered with paint.
Cut out the missing parts
After painting this is what we get
Just look, it gives all the flowers a yellowish tint. If you are not satisfied with this, look for another composition for external use, but colorless.
Unusual lighting
When making such a tree, every summer resident wants to make something special, non-standard. In this case, there is one more trick that can make your tree stand out. To do this, you will need ordinary garden lights, which are subsequently placed on the branches, creating an extraordinary effect. You can buy them at the store or make them yourself. Also, some people use solar-powered products for this purpose. They accumulate light during the day and illuminate your garden at night.
This landscape design technique will not go unnoticed. Guests will note your creativity, and the familiar area will sparkle with completely new bright colors.
A dry old tree in the garden is always an unpleasant sight.
The first thought that arises when contemplating it is to cut it down, and quickly. But does a tree have to be flowering and fruit-bearing?
Not at all!
It can be an excellent basis for garden crafts and decorative structures. It is enough to show a little imagination, and in your garden, instead of plants disfigured by time and unfavorable factors, there will be real masterpieces, skillfully created with your own hands.
The view of experienced gardeners
According to experienced owners of private estates, trees of all ages must be present in the garden. Only then can it be considered holistic and harmonious - like a patriarchal family in which representatives of many generations live.
The famous English gardener and architect of the eighteenth century, W. Kent, practiced planting dried trees in gardens. He revered them for their unique decorative qualities and believed that they “emanated” a sense of authenticity of being. According to V. Kent, dead branches with unique bends and cracked bark are not ugliness, but genuine beauty.
Another famous gardener of the eighteenth century, S. Switzer, even said that it was better to burn down your own house than to “raise your hand” on a tree of venerable age. The man was firmly convinced that landscape planning should be carried out taking into account the natural state of the area, and not be subject to human fantasies that are not always appropriate.
Second life of an old tree: ideas for a summer house and garden
An outdated plant in the skillful hands of a nature-loving gardener can easily turn into a fantastic decoration for the site. There are many options for how to update an old tree - and we will be happy to share them with you.
Decorative sculpture tree
You can make a decorative sculptural tree from a dried plant using bright paint - one or several colors. True, the “old man” should be thoroughly prepared beforehand:
- cut down unnecessary branches;
- strip the tree bark down to the trunk;
- sand the barrel;
- treat the trunk and “significant” branches with a special impregnation to protect the wood.
After these manipulations, you can safely paint the “craft” with the prepared composition and open it with varnish for exterior use. You can choose absolutely any color for an old tree: just take into account the peculiarities of the surrounding “situation” and the appropriateness of experimenting with shades.
Original flowerbed tree
If desired, an old tree can easily be turned into a flowerbed tree - just place hanging baskets with flowers planted in them on its branches. As in the case of sculptural crafts, the processing of old wood before such an important “transformation” must be done - the same trimming of branches, stripping of bark and applying impregnation are very important for a high-quality final result.
What are the advantages of such a solution for the garden? The baskets can be changed periodically - and with them the appearance of the entire tree will change.
"Seat" for garden figurines
Garden figurines look great on an old tree. By placing the figures higher, you can admire them even from afar. Very often, old trees are decorated with nests with storks, as well as seals and bear cubs. This “new life” of an old tree is a joy for the eyes and soul!
You can also use figurines of garden elves for “composition”. Little elves looking out of a hollow or crevices in a tree trunk are an incredibly fabulous sight. If you have children or grandchildren, they will definitely be delighted with such “decorations”.
Garden lamp
An old tree can be successfully used as a “base” for garden lighting. Just purchase special electric lamps and mount them on a tree - and enjoy the evenings with original and attractive “illuminations”.
In winter, the lamps can be replaced with a garland.
Tree-liana: beauty and exclusivity
You can make a dried tree into an exclusive garden decoration using this method: cut off what you think are the unnecessary branches of the “old man” and plant a climbing plant near it. Choose unpretentious small-flowered clematis - they will stretch up to 15 meters in length and cover the entire surface of the tree with beautiful flowers and foliage. Also a good option would be morning glory, ampelous nasturtium, and Echinocsitis lobe.
Practical benefits of old wood
Not only aesthetic, but also practical benefits can be obtained from old wood. Use it as a natural support for Amur grapes, climbing beans or even pumpkins. Another plant that will definitely “make friends” with a dried tree is the Far Eastern actinidia. The brightly colored leaves of flowering actinidia will give the tree incredible picturesqueness.
Paintings on wood are masterpieces accessible to everyone
If you have artistic abilities (or at least have paint and a desire for creativity), you can create an amazing design on the trunk of an old tree - a real work of art.
How to make a picture on wood: work order
- “Bare” a section of the trunk - strip the bark. It is best to do this after rain, as the bark becomes wet and separates easily. If there has been no precipitation for a long time and it is not “scheduled”, simply water the trunk generously. The most convenient tool for cleaning a trunk is a special metal scraper for wood.
- Brush the surface of the barrel with a wire brush and then sandpaper - this will turn it into a decent canvas.
- Large surface defects must be filled with wood putty. It is best to fill large depressions with polyurethane foam, and remove the excess with a knife after drying.
- Rinse the barrel to remove small particles.
- Leave the surface to dry for some time.
- Prime the trunk.
- Start drawing. You can choose almost any paint for old wood. The classic solution is oil paints.
- After completing the drawing, wait until the paints dry completely.
- Cover the “decorated” surface with varnish for external use - preferably in two layers.
What can you draw on a tree?
Whatever! True, images of natural motifs will probably not be particularly relevant for the garden - they will simply merge with the surrounding environment. But animals, fairy-tale characters and all kinds of abstractions will become a worthy decoration of your possessions.
Still doubt your artistic talent? Don't give up on such a great idea. Patterns are definitely something you can do! For example, national patterns from different countries look very interesting in the garden.
You can always make original garden furniture from old trees - tables, benches, benches, armchairs. The easiest to make benches are logs.
And a dilapidated plant, after a little processing, is a wonderful creative hanger on which you can store various gardening equipment, tools, and work clothes.
Attach eyes, nose, mouth, ears, hands from available materials to the trunk of an old tree - and a mischievous living creature will appear before you, which will delight everyone passing by with its appearance.
As you can see, there are a lot of ideas for decorating an old tree in the garden - choose any one you like. Easy creativity!
If you decide to design your dacha yourself, this means that you have a creative outlook on things and at heart you are an artist. And the artist is able to see beauty in everything around him - in natural colors and shapes, in a beautifully curved branch or crooked tree trunk... This is all a natural garden
, the very state of country house design, when there is no deliberateness.
Natural garden in the forms of dry wood
If you want to make the design of your dacha unusual, photos of beautiful man-made dacha corners should inspire you!
These benches in the photos are made from crooked branches and roots that you can easily find in any forest. Pine branches have especially beautiful “curves” - they can be used to make unusual country furniture.
also use cuts from a dry tree trunk.
, which make very beautiful bases and pedestals for container plants.
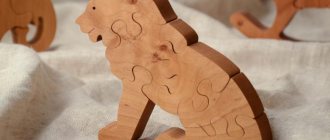
From dry wood chips
you can make different funny figures. Such as this garden horse.
From dry trees or from thick bamboo trunks you can make a swing like this “without a single nail” with rope fasteners.
Natural stones can also be used in garden design
In the photo you can see how the stones were used as a pedestal for a round bench made around a tree. Stones can be used to decorate a flower bed, a flower garden, or an alpine hill.
From large stones you can make the basis for a country bench. Stones must be present in the design of a Japanese garden!
Small stones can be used to decorate a flowerbed
along the contour or limit the edges of the bed - this will give a finished look to the flower garden and garden plantings.
Around a tree trunk
not only make a round bench, but also
create a fluffy flowerbed
of cereals. It will look especially original in contrast with a short-trimmed lawn.
Lovers of natural beauty, try painting nearby buildings terracotta.
! You can also use two-layer painting, when you use two shades of paint, applying them in layers so that one layer is visible under the other.
Shells and other seafood in country house design
You can also use other natural finds in the design of your dacha - not just stones and branches of dry trees. If you go to the sea, you usually bring shells with you - you can also decorate a flowerbed with them.
Another good idea is to use indoor plants in tubs that can be “relocated” to the patio for the summer.
Personally, I like to set up cactus gardens in bowls for the summer. You just need to make sure that they are often not exposed to rain; such gardens are best located under a roof - under a canopy, on a terrace or in a gazebo.
That's all for now! Follow the blog updates, subscribe to newsletters in the form below the article.
Wood is a unique material, so it is widely used in the manufacture of artistic products. Thanks to its natural warmth, it brings warmth and comfort to the home. It is pleasant to look at, it warms and calms, puts you in a calm mood. This review describes how to make simple crafts from wood cuts, provides examples of work and indicates the necessary tools.
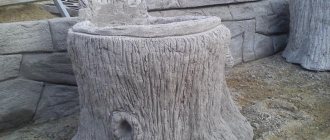
How to decorate a tree stump and make a mini flower garden
There are many ways to decorate a tree stump. One of the simplest and most effective is creating a flower bed on a stump. To decorate old driftwood, you can choose both decorative annuals and climbing greenery. They will not only improve the stump, but also turn it into a creative design element that decorates the garden.
Techniques for making flower beds:
- Level the surface of the stump, then make a hole in the center - it should correspond to the size of the flower pot.
- If the wood is rotten, remove the core using a hammer and chisel.
- The side walls of the stump must be at least 8-9 cm so that the structure does not fall apart.
- If the wood is young and dense, it is most convenient to remove the core using the burning method. Drill a hole in the center of the hemp and fill it with kerosene and seal it with a cork. Repeat 3-5 times, after 7 days light the kerosene.
- Treat the walls of the hole in the stump with an antiseptic.
- Pour a mixture of garden soil and mineral fertilizers into the hole made and plant flower seedlings.
- Plants need to be watered frequently, but in small portions, avoiding stagnation of moisture. Several holes can be made in the walls of the stump for additional drainage.
To make a decorative stump with flowers look even more original, it is decorated with moss or climbing plants. For greater strength and reliability, the structure can be reinforced with metal mesh.
In a similar way, you can make an unusual garden lantern from a stump by placing a solar-powered lamp inside the recess. This option is great for stumps located near a gazebo or recreation area.
We design flower beds and flower beds
Flower beds will help transform your dacha plot and add color to its atmosphere. When choosing plants, you should definitely take into account their individual characteristics. First of all, you should decide on the “soloist” flowers, that is, the main plants in the flowerbed. The choice can be made of three or four types.
Decorating flowers with ornamental grasses and interestingly shaped leaves looks beautiful. With them, the flowerbed will be original, even when the flowers are not blooming. But you shouldn’t try to place many different plants in your garden. The territory of the site should look holistic and harmonious.
Of course, it’s not enough just to plant flowers beautifully. Flowerbeds also look more original if they are decorated around them. The composition must be complete.
Flower beds can be decorated using any unnecessary items. The article already mentioned that it is not difficult to make small flower beds from old tires painted in bright colors. You can use a wheelbarrow, cart, an unwanted beehive, or even an old car. The main thing is that everything is done carefully and aesthetically. If desired, you can add decorations to the flower garden in the form of homemade bees, butterflies, and interesting stuffed animals.
You can make a small fence around the flowerbed. To make it, you can use plastic bottles or cups, fencing made of tyna, and stones. The flower bed looks beautiful and smoothly turns into a lawn.
Wooden mansion
An ordinary old stump can be turned into a fabulous little mansion, which will become a creative design decoration for a garden or backyard. There are many ways to make such castles and towers - the stump most often acts as the main part to which all additional decorative elements are attached.
Before making a wooden tower, it is advisable to make a sketch of the product - this will help to avoid mistakes and make the structure not only beautiful, but also durable. Decorative elements can be made from plywood or a piece of fiberboard.
The elements are attached to the stump using self-tapping screws. Before fixing, they must be treated with special solutions and compounds to protect them from rotting and moisture. The tower can be left in its natural form or painted in any desired color.
If the stump has large shoots of branches or hollows, they can also be used to decorate the stump. Hang curly items on them and decorate them with decorative figures. For example, wooden ladders with small woodcutters or funny gnomes look very impressive.
Removing stumps from old trees is a problem that every owner of a country house faces from time to time. Using the advice of landscape designers, you can get rid of the need for labor-intensive uprooting of a stump and turn it into an original designer garden decoration.