Popular Technologies
Since the main activity at the dacha is caring for the garden, the most in demand are decoration technologies that do not require large financial costs and excessively long and labor-intensive work. Therefore, old, dilapidated, non-functioning things are often used: furniture, household appliances, dishes and kitchen utensils, clothes and shoes. With their help, flower beds are decorated; they can serve as a place for sprouting seedlings, which, if properly decorated, look original and impressive.
Decorating with figures cut out of tires, compositions from plastic bottles, wood crafts, painting stones and barrels has long and firmly occupied its niche in the field of decorating garden and dacha areas.
In recent years, garden designs made from concrete, cement and gypsum mixtures, paperweights and frame sculptures of grass and flowers have become increasingly popular.
The latter, perhaps, refers to aerobatics; it requires skill and the use of not the simplest materials. But there are many dreamers and craftsmen among summer residents, and they certainly don’t lack for patience and perseverance.
Required materials and tools
Regardless of whether you are an experienced gardener or a beginner, you should still have a minimum set of necessary tools to care for the site. What is included in this minimum required set? Let's figure it out.
First of all, you need to remember that any tool must be of good quality and convenient to use. If you forget about these factors, then you will only suffer when working with them.
For the purposes of zoning a summer cottage, the following may be useful:
- Yardstick;
- Twine;
- Stakes of various heights and widths.
No matter why you work with the soil: planting a vegetable garden, making flower beds, sowing a lawn, you will still need some tools. What equipment is included in this group:
- Shovels;
- Pitchfork;
- Rake;
- Hoe;
- Soil loosener.
And if you only have a garden at your summer cottage, do you think you don’t need anything? No matter how it is. Here are the tools needed to work with trees and shrubs:
- Secateurs;
- Lopper;
- Knife;
- Saw;
- Whitewash brush;
- Ladder.
There are also a large number of other necessary tools, the presence of which is not disputed even by the laziest owners:
- Buckets;
- Wheelbarrow;
- Hose;
- Basket;
- And much more.
But having equipment is one thing, but taking care of it properly is quite another. Here are some basic rules for caring for your instrument:
- Wooden handles should fit snugly into the tips of the tools.
- Tools are stored in a dry room under a roof.
- After use, you must remove all soil and plant debris from the equipment.
- Sharp tools should be stored in cases whenever possible and always be sharp.
Buy a good tool and store it properly, and it will serve you for many years.
Suspended structures
Anything that can be hung on a hook, on a nail, on a loop, on a rail, on a crossbar, on a branch can be called a “hanging structure.” Old rubber boots nailed to the fence and serving as flower pots fit perfectly into this category.
This includes a “battery” of plastic bottles, up to half filled with soil, tied by the necks to a strong stick (pole, cornice, bracket), with slots for planting and watering and used for germinating seedlings. They can be painted, or they can be left in their original form - even so they look quite attractive.
A special place among crafts made from improvised materials is occupied by hanging flowerpots made from baskets, mayonnaise buckets decorated in various ways and figuratively carved car tires.
Both the design idea and the artistic design matter here. Such pots, for all their beauty, can be quite heavy, and you need to carefully consider how to secure them to prevent them from falling.
An interesting decorative solution could be a bicycle hanging on a fence, used as a shelf for flower pots. This composition exudes romance and mischief; it is easy to make and pleasing to the eye.
Crafts from plastic bottles
Modern bottles for mineral water and lemonade come in a variety of sizes, colors and shapes. Therefore, they are a convenient “raw material” for garden crafts. From plastic you can get:
- a gorgeous palm tree, a beautiful spruce or pine tree, voluminous flowers;
- an adorable pig, an intricate hedgehog, an elegant butterfly, a ladybug or a dragonfly;
- figurines of various birds and amphibians;
- aesthetic fencing of flower beds and playgrounds;
- garden furniture;
- gazebo;
- greenhouse;
- flowerpots.
Country furniture made from scrap materials
The benefits and aesthetic advantages of such crafts for landscape design are undeniable. A sofa, assembled from many plastic bottles, allows you not only to take a break from righteous labors, but also has a unique massage effect due to the bottom bulges that form the seat.
A table set made from car tires is not only an impressive piece of crafts for landscape design, but also a place for pleasant family tea parties and gatherings with friends. Tin barrels and tanks, complemented by tabletops and seats, also fit well into the picture of country life.
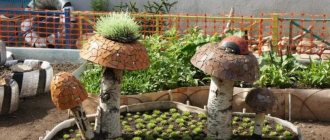
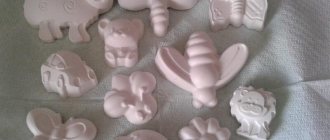
Decorative elements made of cement
An interesting craft made from cement for a summer residence - palms that will never get tired of holding the plants placed in them.
It's quite simple to do. Here's the procedure:
- pour cement into rubber gloves, give them the desired shape;
- after the solution has completely dried, remove the unnecessary rubber;
- carry out the necessary processing - putty, cover with primer and paint;
- Place the finished product near low-growing grasses and bushes, fill your palms with soil and plant pre-selected flowers.
Play space for children
Having arrived at the dacha with their heirs, parents are often faced with the need to keep their offspring occupied with something during the time devoted to chores in the garden. Now, of course, stores offer many forms of entertainment: swimming pools, mini-trampolines, rocking toys, etc. But all this can be done with your own hands.
So, from half a tire, a wooden or plastic seat and a bicycle or scooter handlebar you will get a wonderful rocking chair. From a plastic seat, tires and a car steering wheel, a real race car will emerge, in which your little son can feel like a brave racer.
Using the same tires, you can make swings and sports equipment, sandboxes, obstacle courses and labyrinths - the child will spend the weekend usefully and will not distract adults.
However, it would not be the worst option to involve your child in dacha creativity: handmade crafts for the dacha will not only please, but will also become a contribution to the common cause, show the importance and significance of him as a family member, teach him hard work, patience and perseverance and, of course, will allow the rich childhood imagination to unfold.
Tire decor
It’s easy to turn an old large tire, for example from a truck, into a pond - just cover it with film and fill it with water, and lay pebbles or river sand around the perimeter.
Tires are often used in the construction of sports and playgrounds. They make good obstacle courses, swings, sandboxes, etc.
You can also make stylish garden furniture from tires. Another original idea is an unusual flower bed. To create it you will only need a couple of hours of free time, and you can involve your child in painting.
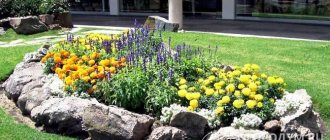
Decoration of flower beds
For amateur flower growers, this question is always relevant. After all, if a rock garden, formed within 1 - 2 months, then only requires maintaining it in proper shape and minimal modifications, then simpler options can be modified at least every year.
Flowerbeds framed with large stones or bricks of natural color or painted with bright colors look aesthetically pleasing. The frame made of wooden saw cuts adds a touch of home comfort. A fence made from buried bicycle wheels looks original. And the tires give the flowerbed a monumental look.
Crafts for a flower bed will allow you to turn an ordinary flower garden into a fairy-tale composition, a symbolic installation, or a flower allegory.
To make them, you can use plastic bottles and mayonnaise jars - figures from them can be either an independent decoration or serve as stands or flower pots; products made from cement and concrete mixtures - openwork “filler” or frame stucco flowerpots - this is a ready-made flowerbed; frame structures, both filled with an earthen mixture for planting flowers and herbs, and serving as a stand for pots with plants.
What material should I use?
When creating decor for your garden plot with your own hands, you can also get rid of many unnecessary things. After all, many of those items that you have not used for a long time will turn into original garden decor.
You can use the following items as a basis for realizing your ideas:
- old tire;
- broken pieces of furniture or vehicles;
- unnecessary dishes, plastic bottles, glass jars;
- household appliances;
- pipes or fittings;
- branches or logs.
- worn shoes or clothes.
Before throwing these things away, look at what crafts for the garden and dacha you can make from them.
Making beds
A beautiful vegetable garden is not a luxury, but a means of obtaining aesthetic pleasure. With the help of plastic bottles, painted in different colors, dug into the ground along the border of the ridges, you can not only divide and fix the sown areas, but also turn your garden into a beautiful tapestry consisting of intricate or strictly geometric patterns.
Crafts for the garden can perform not only a decorative, but also a security function, protecting your crops from birds. These can be small figures made from bottles, cans, plastic bags, CDs, polyurethane foam, flower pots and combinations of various materials (it’s good if the design contains movable rustling elements, for example, characters’ hair, plumage or fur), or and large scarecrows - stationary or movable - towering above the garden bed, usually made from a bag filled with straw and old clothes and shoes.
Design ideas can be suggested by the imagination and sense of humor of a summer resident: someone puts a cheerful Scarecrow on a pole, someone puts a figure in the form of a summer resident busy weeding, and someone uses a terrifying “Scream” mask and a black raincoat with wire threaded through the sleeves , attached to a bicycle handlebar fixed on a pole, leaves a Dementor on guard.
Any option is good. The main thing is that it is to the liking of the owner of the site and fits into the overall picture, pleasing to the eye.
Unnecessary household items
Old kettles and buckets can, of course, be scrapped, or you can make fun flower beds out of them.
To make a “campfire” you will need only three sticks (they can be easily found in the nearest forest). Two of them should have spears, on which a third stick with a hanging pot, kettle, bucket, and mayonnaise bucket is hung. The container is filled with earth and hanging plants are planted there.
The fire itself is surrounded by fairly large stones, logs or cones are placed inside, and small red or orange flowers are planted. Scarlet scraps of fabric can also act as tongues of flame.
Unusual flower beds can be made even from unnecessary women's handbags or suitcases.
Old unused barrels can be painted in the form of nesting dolls or fashionable minions, patterns or colors. Anyone who is comfortable with brushes and paints paints entire pictures on such surfaces. If the Creator did not give such a talent, you can simply paint the barrel with multi-colored stripes horizontally, vertically or at an angle, creating a rainbow.
Such beautiful objects can be used as a warehouse for inventory (everything will be in sight) or trash cans for large garbage. Or take it out into the garden and use it as a high flower bed.
Even old water gutters are used. They can be used as a frame for paths or hanging flower beds on the walls of houses and gazebos or on tree branches, secured with strong ropes or chains.
Old shoes will wonderfully turn into fun flower beds. It is enough to paint it (bright rubber boots can be left without painting), fill it with soil and plant undemanding flowers. Such flower beds decorate garden paths, places along the fence or any free space in the garden.
From several pairs of old shoes you can make a funny dog or a cheerful giraffe that will greet residents and guests coming to the site. Cracked flower or kitchen pots can be laid on the ground and made into a flower river.
Design of fences and fences
What will first of all tell a passerby that this dacha belongs to a creative and extraordinary person? Of course, a fence! Boring gray or neatly painted boards can indicate little about anything other than how diligent the summer resident is.
But a mosaic panel made from bottle caps or bottoms is a completely different matter. The plot may vary. But whether it is a geometric pattern or a folk ornament, a landscape or a picture with a children's cartoon character, it will certainly cause delight and surprise.
The decor of discs sparkling in the sun looks fabulous, and the ornament of vinyl records brings back memories of childhood. A fence or enclosure can also be decorated with flowers made from disposable cups, spoons or forks - this encourages outdoor recreation and creative work.
Of course, in a dacha you can simply grow potatoes, carrots, onions, but in order not to feel like a slave working on a hacienda, you still need to decorate it at least a little. And then you can not only admire pictures from the Internet, but also show off your photos of crafts for your dacha.
Old furniture
Unnecessary or very shabby furniture can serve once again as an unusual flower bed. You can remove the doors of your grandmother’s old dressing table, take out half the drawers and install a flowerpot with flowers there, or arrange a doll’s house inside. Pots can also be placed on the top surface, and the existing mirror can be painted with cute patterns.
The only thing you have to take care of is to protect the tree from rain and other moisture. To do this, cover the piece of furniture with a thick layer of paint, stain or varnish. Or we can do it all together. Such a thing can even be placed on the veranda if it is on the illuminated side.
Such a novelty to the exterior of the site will make the dacha a very attractive and unusual place.
As such a flower bed you can use an old table, chair, ladder, construction pallets leaning against the wall.
Photos of crafts for the garden
Birds or animals figurines
Before moving on to considering more practical ideas for using different wood materials, we suggest using your imagination and decorating the area with simple, but very cute animals.
From the simplest materials, without any expense, you can make beautiful decorations for your flowerbed and involve your own child in the process.
Let him consider exactly what the wood hero will look like, what dimensions it will be, and where it will stand, and all you have to do is assemble it from different fragments. We suggest creating an owl family that sits on a branch.
Here you will need:
- Wood saw.
- Fastening.
- A couple of small cuts, divided into two halves.
- A couple of small branches or twigs.
- Four thin small saw cuts.
- 1 large cut and 1 medium size.
- A wooden branch with an average thickness and a length of 0.5 meters.
- And, of course, a sketch. Visualization is an extremely useful thing, and through it you can quickly navigate the amount of material required and its dimensions.
Let's start with a large owl. Before you tightly connect the parts together, you need to lay them out and see how it will look. You may want to change or add something. A large saw cut will serve as a bird's body. You need to mark a couple of small cuts on it, which will be the eyes, and also a knot, which will play the role of the beak.
The craft will look more interesting and voluminous if the elements extend slightly beyond the main outline.
The wings come in any shape, and you may be able to find a more interesting material to use for them. Take a small cut, divide it in half with a hacksaw, clear the edges of the bark and try to make jagged edges that imitate feathers.
Next you need to secure the parts to the body. To do this, you can use small nails and a hammer, but if you are doing a craft with your child, it is better to use liquid nails. A similar technology is used to make a smaller owl.
If desired, add a very small owlet, and after all the birds need to be attached to a branch or stump.
If you want to place it in the middle of the flowerbed, it is permissible to attach a branch on a stick so that the structure is in the shape of the letter “T” and rises above the plantings.
Don't forget that owls have legs, and they can be made using a similar method as wings or from simple branches of a suitable shape. Besides owls, there are many other figurines that are easy to make.
Small bunnies with ears that stick up will also look great.
Useful craft - Swedish candle
For those who like to cook various delicacies at the dacha or in the garden with friends, such an interesting way to create and maintain a fireplace as a Swedish candle will come in handy. It is very simple to make, and it can bring a lot of benefits, since its burning time is so long that you can not only boil water for tea, but also prepare a full-fledged dish. To make it we need very few items:
- Log;
- Saw;
- Lighter fluid.
The log must be placed on its end and two cross cuts must be made. It is most convenient to work with a chainsaw. The depth of the cut should slightly exceed half the height of the log, otherwise during the burning process it will simply break into four parts. If the log is wide enough, make three cuts so that they look like a snowflake from above. It is necessary to pour flammable liquid into the center of the resulting sectors. After lighting, be careful - a rather high and strong flame will burst out from the center of the deck.
To install the vessel on the end, use damp branches, which will simultaneously provide a flow of oxygen to the fire site. This method of starting a fire is useful in areas that are not equipped with fire pits or where there is no stove for cooking in the house.
Car tires
Durable clothing for wheels tops the list of the most interesting ideas for a DIY garden without holding back the imagination of the craftsman. Tires appear not only as single or multi-tiered flower beds, but also as sofas, armchairs, swings, and hanging flowerpots. Charming birds and animals are cut out of them. Cartoon characters or characters from fairy tales are reproduced by painting and coloring. Rubber, folded in rows, will serve as garbage cans or turn into picturesque cups on saucers. In addition, these products can be used to build a reliable fence for the site.
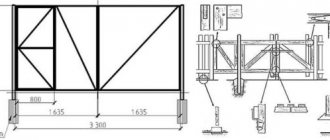
Product made from horseshoes
A horseshoe stand is made as follows. Take two horseshoes, turn them back and weld them together. Another pair of united horseshoes is produced.
At the top of a separate pair, another horseshoe is welded on, with the ends facing up. The two structures are welded into one using the following method:
- installed on the edges with the bottom edge;
- to connect the upper horseshoes, a metal rod is taken and welded to the bottom;
- at the top of the upper horseshoe, a horseshoe is welded perpendicularly, which will look backward with the outgoing edge;
- the second, third, and so on until the end is attached to it, until the topmost one is welded to the side horseshoe on the other side of the structure.
The result will be a product that looks extraordinary and is comfortable for shoes. Welding in a short period of time allows a novice master to consolidate his skills and will be beneficial for the home.
Original and simple clothes hanger
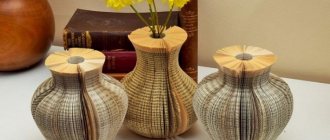
There are many ways to make a wooden hanger yourself - from boards, from saw cuts with hooks, or simply from driftwood of a suitable shape and size. But we decided to take a closer look at the simplest, but very unusual method that you will definitely like. We will make a hanger from small logs with knots, which will be enclosed in a frame. We will need:
- Two long and two short wooden boards;
- Whole logs with knots;
- Saw;
- Plane;
- Varnish;
- Self-tapping screws;
- Screwdriver.
The set of tools, of course, is not the simplest, but this is only at first glance. So that the finished product does not seem too bulky and does not take up much space, we recommend sawing logs high . Each of them must have a knot, the thickness of which must be at least 3 cm so that it can withstand the load. Also, you should not choose logs that are too curved, otherwise they will protrude too much beyond the side frames and spoil the overall picture. The thickness of the wooden frame elements depends on the thickness of the logs you find. For example, if the diameter of the log is 5 cm, then the width of the board must be at least 10 cm. After assembly, you will have only 2.5 cm free in front and behind the logs.
Pre- saw the wood into pieces with an allowance for height. The ends of the logs should be even to fit the top and bottom boards with minimal gaps. You can level the ends using a plane. But if you manage to cut it more or less smoothly to the same size, you can immediately coat the surface with varnish. Now you need to enclose the logs in the frame. The easiest and most convenient way to do this is as follows:
- Lay the bottom board end-to-end on a flat surface;
- Place side boards on the sides and make markings for future fasteners. Be careful at this stage. There are two options - when the side boards stand on the bottom plank, or when the bottom plank is enclosed between the side ones. The last option is preferable. Firstly, in this way you will hide the ugly ends of the bottom board, and, secondly, it will be much more convenient to fasten the elements together;
- Pre-drilling should be done in the marked places to make screwing in the self-tapping screw easier;
- At this stage you will need help, as it is very important to keep the edges perpendicular;
- Two mounting holes on each side are sufficient;
- Please note that we are now assembling the structure without the top bar;
After you have screwed the sides into the bottom board, you can start attaching the logs. It is advisable to place them in the center. You can draw a line on the bottom board and try to stick to it.
- Turn the frame over and place it on the side walls. Considering the diameter of the logs, drill the appropriate number of holes along the line. To make the work easier, you can drill holes into the logs, trying to get into their center. It is recommended to do this only on one side. By screwing them to the bottom board, you will still have the opportunity to combine the hole in the plank with the hole in the end of the log. When it comes to the top bar of the frame, all the elements will already be rigidly located on the base.
- Place one log at a time under the frame, secure them with self-tapping screws.
- Turn the future hanger over, cover the structure with the last length of the board and screw it first to the side edges.
- Now use a screwdriver to secure one screw on top of each log. is very important to get into the body of the log together with the top board. Then the structure will be reliable and can withstand heavy loads.
Another important point to consider. Since we are attaching the top and bottom of the frame between the side planks, their length should be equal to the length of the logs + two thicknesses of the long boards. Mounting this shelf is very easy.
- Make several drill holes in the end of the top board with such a diameter that the screw head fits into the hole.
- Screw the appropriate number of screws onto the wall, maintaining the same distance as on the hanger.
Now hang the shelf and enjoy its extraordinary look.
Willow weaving
Coastal thickets near the site - Klondike. There they obtain willow branches for crafts. The fences are made according to a simple scheme: pegs are hammered in, then rods with the bark removed are passed between them.
- Nice decor - wicker baskets in which flowers are planted.
- You can knit the frame of any animal from strong branches, and then braid it with vines.
But the most interesting creation is the living tree. Chopped willow twigs are intertwined and rooted. All buds on the trunk are blinding, except for the top ones.
How to make figurines, sculptures for the garden and plot
As is already clear from the previous examples, there are 3 areas in landscape design that involve the use of wood as decoration:
- Rutarium is an assembly of decorative elements from several parts. These can be tree trunks and their curved butts, roots, branches.
- Wood carving - a figurine or sculpture is created (in most cases) from one piece. The manufacturing principle is reminiscent of the works of the great sculptors Rodin and Michelangelo: “I take a block of marble and cut off all that is unnecessary.” The only difference is that in our case the material is wood.
- An amateur technique that involves making simple figures.
Sculptures of bears made of wood Source en.worldis.me Wooden elements of landscape design Source pinimg.com
Do-it-yourself log bench Source pinimg.com
In order to make simple (amateur) wooden figures from wood for the garden with your own hands, you will need the following tools:
- Axe.
- Saw, hacksaw, chainsaw.
When making more complex options, you will have to add several chisels of different profiles, a jigsaw, and a knife.
Driftwood collected during a walk Source madeheart.com
Stumps in the garden of a country cottage Source mtdata.ru
Useful little things
Everyone, without exception, drinks tea at the dacha, prepares lunches and dinners and gathers with their families. The apartment has all the necessary little things that will make this process as comfortable as possible - various potholders, coasters, etc. At the dacha, one’s hands usually don’t get around to such details, which is why the surface of the table or tablecloth suffers when a hot frying pan or kettle is placed on it. It's time to put an end to this and make a lot of hot pads with your own hands in just a couple of hours. Depending on their application, the shape and size are determined by your needs.
Let's consider a method for making the simplest stand, for which we
will need:
- The basis;
- Glue;
- Wooden circles;
- Hacksaw.
Using the same principle as in the above point, we cut out the base from plywood and glue wooden saw cuts to it. Such simple crafts can easily withstand high temperatures. Small stands on a plywood base are suitable for hot cups or a small kettle. It is much more convenient to place a pot or frying pan on more massive stands, which will also support more weight.
For their base, you can use a large, but not very thick, saw cut.
It is recommended the bark immediately, because during use it will still crumble. The saw cut can be left in its original form only by lightly sanding it with fine sandpaper and opening it with varnish. draw something on it, if you know how, do artistic burning and varnish it. Or you can just cover the entire surface with small circles. The ends of thicker stands can be wrapped with twine or thin twine, having previously coated the surface with glue.
This way, the crafts will look more neat and complete. If you have patience and a little skill with a drill, you can make a flexible stand in a variety of configurations. Bead weaving skills will also come in handy. What we need:
- Thick fishing line or nylon thread;
- Small wooden cuts with a thickness of at least 1 cm;
- Drill and thin drill bit;
- Vise;
We will weave the stand in the same way as bead bracelets are woven. To do this, you need to drill a through hole at the end of each circle. All the parts are small, holding them with your hands is dangerous and inconvenient. Therefore, it is necessary to clamp each circle in a vice. It is enough to use a drill with a thickness of 2 mm. If the process of joining parts causes you difficulties, look for weaving patterns on the Internet and act on their basis. It is not necessary that the entire stand will be woven in one piece. It can consist of interconnected fragments, which makes it much easier to do the craft for the first time. After finishing the work, you need to securely tie the edges of the thread or fishing line. In the latter case, you can carefully burn the ends with a match.