Useful tips
These flowers can be used to decorate gifts, rooms and/or cards.
.
Not only do they look beautiful, but they will “bloom” forever
.
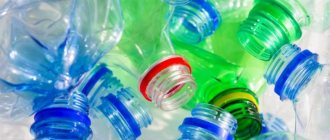
And since plastic bottles are used in production, you are also helping nature - plastic products can take 450 - 1000 years to decompose
.
Today, about 90% of all plastic bottles are not recycled
, and we want to change that.
Making beauty out of trash is beautiful and noble for our planet.
. We offer you several color options made from plastic bottles.
Making a palm tree from bottles
Trees and flowers from this material are made according to a similar pattern, so after understanding the principle of this master class, you can build any plant on your site. For implementation you will need:
- Green bottles are usually beer plastic.
- The vessels are brown.
- Scissors.
- Scotch tape or glue.
- Wire.
There is no point in painting bottles, as many people do. Over time, the paint will begin to crack under the sun.
The foliage is made from the middle part of the bottles; it is cut with ordinary scissors. The barrel can be made from the neck part by placing bottles on top of each other. The amount of material used depends on the height of the finished product.
To keep the structure in place, it is recommended to use thick wire. Using this introductory tutorial, you can understand the basic concept of how to make flowers from plastic bottles.
Care
Watering
Bocarnea needs to be watered when the soil substrate is completely dry (this will be discussed later). The roots should absorb all the moisture that will remain in the trunk. If you water more often, the roots will not cope with their work and will begin to rot. On hot days, you can spray with a spray bottle, since the leaves have jagged edges, it is very difficult to simply wipe them off from accumulated dust. In room conditions, the temperature does not change as sharply as in natural conditions, so plants do not require winter rest.
Lighting
Bokarnia or Nolina love good lighting, but not direct sunlight. In the summer, plants are more likely to prefer a balcony, loggia, or terrace, but even here they need shading from the bright sun. In apartments where there is insufficient lighting, and during periods of low light in winter due to the natural conditions of our country, it is necessary to add artificial lighting.
Also read: Crassula the Hobbit and Gollum an unusual type of money tree
Temperature
The temperature of our city apartments suits Nolina perfectly. But since our houses are heated quite well in the autumn-winter period, Nolina does not fall into the dormant phase characteristic of natural conditions, but continues to grow. Don't let this scare you - in adulthood it grows slowly.
Even if there is a sudden interruption in heating, the plant will survive it without visible damage. Bocarnea can withstand temperatures down to -3-5 degrees.
Humidity
Nolina does not require additional moisture. There is no need to spray it with water unnecessarily or place containers with water nearby. The air humidity that is comfortable for humans is sufficient. If you have taken the plant out into the fresh air, and the weather is rainy and damp outside, then it is better if it spends this period indoors.
The soil
We prepare the soil in the same way as for other succulents:
- 1 part leaf soil;
- 1 part peat;
- 1 part coarse washed river sand;
- It’s good to add fine gravel and a little zeolite. Zeolite absorbs excess moisture and fertilizers and gradually releases them to the roots.
All ingredients must be disinfected by steaming so that all mold spores and various fungi are killed. Then mix well to form a loose, homogeneous mass. Such a substrate allows water to pass through well and contains enough nutrients, so that in the first years the plant does not need to be fertilized with fertilizers until the trunk has acquired the characteristic bottle shape.
Don't forget to put down a drainage layer first. It can be made from small pebbles, medium-fraction sea pebbles, or you can buy ready-made expanded clay at a flower shop.
Transfer
First, select a pot - it should not be much larger than the previous one, flat. And most importantly, there should be holes in the bottom so that excess water after watering can flow freely into the pan.
It is necessary to lay a layer of drainage at the bottom approximately ¼ of the entire height of the pot. Then pour in the soil substrate, lightly pressing it down. Clean the roots from old soil and check for rotten or dead roots. Such damaged roots must be removed. Then we plant Nolina in new soil without deepening the trunk. If the substrate was wet, then for the first few days we do not water it.
Fertilizer
You can use store-bought fertilizer for cacti and succulents, but dilute it at half the recommended rate. Fertilize in spring and summer after evening watering. If the plant feels good, do not overfeed it. Fertilize once every one to two months.
Also read: Pike tail, Mother-in-law’s tongue - Sansevieria: species with photos, care
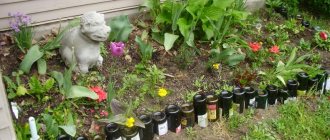
Long-lasting flower beds in the garden
A finished flowerbed can not only become a decoration for the autumn and winter, but also become an ideal refuge for young plants. It's very easy to do:
- The bottles are cut into two parts, only the one with the bottom is used.
- Next they are painted with regular paint.
- Cover the sprouts of real flowers.
If you study ready-made examples of flowers from plastic bottles for the garden, which have already played a role in landscape design, you can find your own option.
Buildings made from plastic containers
Some gardeners build real greenhouses, greenhouses, gazebos and even houses from bottles. For reference: to build a greenhouse you will need 500-1000 bottles. There are several construction technologies. The most common one is this: you need to cut off the bottom of the bottles, then put the bottles on slats. The resulting planks are attached to each other, and then to a pre-prepared frame made of wooden blocks. The greenhouse is light, durable, cheap and easy to repair.
To build a gazebo and a house, of course, additional materials will be required, but such a building also has a right to exist.
It is impossible not to say that by not throwing away waste plastic, but by making interesting, beautiful and useful things from it, people improve the ecology of the planet. And for his family he creates various and unique beautiful things. There would be desire and lazy hands.
colored hedge
Every summer resident has flower beds, even those who grow very little “for the table.” To prevent animals and children from trampling the harvest, you can build a fence in the form of flower vases made from a plastic bottle. There are several arguments in favor:
- Plastic is durable, unlike wooden stakes.
- You can paint it in different colors and design the area to your taste.
Summer residents recommend filling bottles with sand or stones for stability. Then dig the material upside down.
Note!
DIY fruit bouquets - TOP-200 photos with instructions for creating a bouquet of fruits with your own hands. Unconventional ideas with simple diagrams and work overviews
Crocheted flowers: TOP-160 photos and step-by-step knitting pattern, review of finished products with your own hands. Crochet master class for beginners
Paper lily - TOP 100 photos of the best product options. Master class with step-by-step diagrams and drawings for creating an origami lily with your own hands
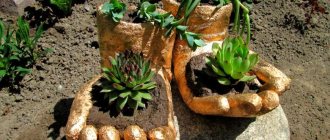
If space is very limited and the housewife wants to decorate everything with fresh flowers. The bottles can be cut into several parts, buried bottom down and a beautiful plant planted in each vessel. Anyone can make flower pots from plastic bottles.
Idea 6. Plastic bottles for plant protection
Bottles can be used to make excellent protection against rodents. To do this, take two bottles, cut off the bottom and tops, and cut the base lengthwise. Wrap plastic around the trunks and secure the structure with tape and rope. For stability, dig in the bottom part a little.
Cut the bottle into several fragments and bury them near the plants. Now slugs and mole crickets are not a threat to the crop!
Plastic bottles can be used to make traps. Cut off the bottom of the bottle and pour beer into it - an excellent bait for slugs is ready. Or make a fly trap. To do this, cut the bottle by a third, as shown in the diagram below, turn the top over and place it in the base, after first removing the cap. Secure the pieces with a stapler, tape, or superglue along the edges. Pour sugar syrup, fermented juice, meat broth, etc. through the neck.
Pots for outdoor flowers
The bottles transform well under high temperatures. Therefore, you can make anything you want from an ordinary bottle. Moreover, after repair work, there are often “bugs” left from under the primer or concrete contact, and you cannot hand them over to any collection point.
You can store both seedlings and ordinary long-flowered flowers in such pots. All you need:
- Free time.
- Several empty bottles.
- Additional material for decoration - it can even be simple covers that were left over from the palm tree.
- Paint - to give the desired shade.
You can transform the bottle using a torch or lighter. For inspiration, it is recommended to study the photo.
Hot flower making technique
Natural flowers have petals that have graceful curves. Similar shapes can be repeated in plastic. To do this, the workpiece must be heated over a candle or alcohol burner. The part must be held above the fire, at a height of 20–25 cm. The heated plastic becomes soft and obedient. You can work on it using thin tweezers or a knitting needle. Nature itself will tell you what shapes to give the petals. Before work, you can look at photos of flowers on the Internet or get inspired by live examples. Don't strive for symmetry!
Making a sunflower from bottles
A sunflower made from plastic bottles will delight the owner even on the stormiest day. To implement the idea you will need:
- 3 empty bottles – it is advisable to choose transparent ones.
- 1 dark.
- Yellow paint – enamel.
- Glue dragon.
- Scissors.
Step-by-step instruction:
- Before creativity, the bottles need to be washed and rid of excess.
- Next, each transparent one is cut into three parts. The neck and bottom are carefully cut off.
- Next, the petals are cut.
Note!
Crochet rose - diagrams and descriptions of how to crochet a rose with your own hands. Crochet technology + interesting craft ideas
DIY edible bouquets - TOP 130 photos with instructions for creating a bouquet with your own hands. Creative ideas with simple diagrams and photos of finished works
Craft primroses - simple instructions for creating crafts from scrap materials. Schemes of beautiful DIY products + photo reviews
From a regular 2 liter bottle you should get 7 pieces. The remaining 2 vessels are cut according to the same pattern. After this, take a brown one, from which only the bottom should be cut. Next, all parts are carefully painted and glued together. You can see the finished version in the photo.
Roses from bottles
Who doesn’t dream of roses that delight you with their beauty for several years? Anyone can make such a gift with their own hands. The color will depend on the bottle chosen. To make such a craft you will need the usual things at hand:
- Scissors.
- Candle.
- Plastic bottles.
How to do:
- Templates are made on a piece of paper. Using a marker or pen, you need to draw a flower consisting of 4 petals. There are 6 of these made in total, they should differ in size.
- Bottles are soaked in soapy water.
- Next, the plastic bottles are cut out according to the selected template.
- The leaves and stem can be made from green plastic.
A small hole is pierced in the middle of the cut flowers. You can secure it using wire or regular glue, and decorate the middle with a bead. To give the desired shape, a candle is lit. Thermal treatment is best done outdoors.
And to give shape, use a spatula or flat stick. These flowers made from plastic bottles for beginners are suitable even for a school exhibition.
Garden Decor Ideas
This is perhaps the most widespread use of plastic bottles. To design a garden plot, you don’t need to be a master; you just need to use your imagination and read useful tips.
Fences for flower beds of various shapes and beds
This option for designing beds is not only beautiful, but also useful: the soil does not crumble from them, is not washed away by rain, and the appearance is bright and attractive. To decorate, you need to collect a lot of plastic containers of the same size, pour sand into them, and then close the lids again.
Then, by digging the bottles into the ground around the garden bed, we create a “fence.” You can make the bed rectangular, oval, or any fancy shape according to the author’s wishes. The finished border can be painted in different colors, you will get a unique vegetable garden that will delight the eye all season long.
Flowers and butterflies for garden decoration
To make flowers, you need to cut off the necks of prepared bottles. By cutting the necks lengthwise, but not all the way, you can get petals (usually 6-8 pieces), rounding them at the edges. Then the edges of the petals need to be scorched on a lit candle, they become even.
Bending the petals, we singe them at the base, at this time bend them back and give them shape. When plastic is heated, it lends itself very well to shaping into various products. The stem for flowers can be made from wire, thinner wire, and beads - stamens. You can fasten all the components with glue and wire, using an awl to pierce the plastic.
To make a butterfly, you must first cut out a template from paper. You need to cut off the bottom and neck of the bottle, leaving only the middle, cutting it lengthwise. By ironing the middle with an iron and placing a sheet of paper, you can get a smooth surface. Having placed the template, you need to draw a butterfly on the blank, cut it out and bend the wings up. You can decorate with varnish and paints as desired.
Zoo in the garden
You can make various animals from bottles. For example, to make a crocodile, you need to cut two 1.5 liter bottles in half, and then so that 7 cm remains to the neck. Then insert the bottles into each other. The edges need to be connected so that the body is slightly bent, so the crocodile will look more natural. The lids will serve as legs. Cut out the paws and teeth on the back from cardboard. Glue all the parts with glue and paint with paints.
Pigs are very easy to make. You need to cut out the ears, bend them, glue the tail and paint it. The pigs are ready. Coca-Cola bottles have a special shape, the bottom looks like the fitted body of an animal, so it’s easy to make penguins out of them, for example.
You need two bottles: from the bottom of the first you will get the body of a penguin, the second will only need the bottom, it will serve as a cap. Now you can take brushes and paint the animal as you please. You can glue a pompom to the hat and tie a scarf around your neck. It will be a lot of fun.
This way you can put together a whole zoo, thanks to which it won’t be boring at the dacha.
Chrysanthemums from plastic bottles
If the housewife did not have time to grow chrysanthemums on her plot, then she can make them from plastic. For sales, it is better to take colored bottles that do not need to be painted. Energy drink containers are especially suitable for this work. How to do it, master class for beginners:
Note!
- Crafting tulips from paper - TOP-100 photos of interesting ideas for creating tulips from paper + simple instructions for beginners
Mimosa craft: TOP-160 photos of simple and complex crafts. Master class for children and adults on making mimosa with your own hands
DIY napkin flowers - a detailed master class with simple diagrams. Non-standard solutions for creating flowers + photos of finished crafts
- Each bottle is cut into noodle shapes. To reduce the labor process, it is recommended to take 0.5 liters.
- Each flower is held together with wire or Dragon glue.
- You can also use plastic instead of a stem. A small strip is cut out, carefully rolled and singed with a candle.
Such chrysanthemums will delight the eye for decades.
Clematis made of plastic
Reproducing the beauty of real flowers is difficult. However, they are ready to please the owners only for a temporary period. To fill the void during the cold period, you can make clematis blanks from plastic in advance. How to make crafts from plastic bottles:
- As in sunflowers, the plastic bottle is cut into 3 parts. In this case, you can use 1.5 liter transparent ones.
- In order for the flowers to turn out identical, a paper blank is made from which the details are cut out.
Clematis are distinguished by a large number of shoots and tendrils. They can be made from green plastic using a lighter. The center is usually decorated with a bead, and the structure is fastened with hot glue.
Crafts for the cottage and garden
Old and unnecessary plastic bottles in the garden and country house are a real find! They can be used to make not only decor, but also quite functional and useful little things. Here are just a few ideas!
Decoration of flower beds
First of all, unnecessary plastic is perfect for fencing your favorite flower beds. If you have accumulated a lot of identical bottles of the same size, their finest hour has come. Just fill them with sand and bury them in the ground around the flowerbed like a picket fence, and then paint them in your favorite bright colors.
Bottles of different sizes and shapes can be used to make beautiful tropical flowers. In addition to them, you will need regular glue, scissors, an awl, thick strong thread, wire, paints, beads and various little things for decoration.
Cut off the neck of the bottle, then cut and form petals. Regular heating will give you an interesting rounded shape: melt the edges of the candle and form flowers by bending and folding. A thick wire is suitable for the stem, and a thin wire is suitable for the stamens. A large bead will make an excellent core, after which it is enough to assemble the flower together.
Photo: texnotoys.ru Photo: dizainlandshafta.ru Photo: culture.ru Photo: svoyabesedka.ru
Garden figurines
Almost any garden figures can be made from plastic bottles: from your favorite gnomes to tall tropical palm trees. Palm trees are the easiest to work with: just take brown and green bottles, cut off the lower parts and string them on top of each other.
It's easy to make cute pigs from large five-liter bottles and several disposable glasses. All you need to do is glue on the ears and tail and draw a face. Peacocks, rabbits, flamingos and other animals look impressive. And the main advantage is that the whole family and children can create such entertaining crafts.
Photo: mir-ogorodnikov.ru
Photo: mirlandshaft.ru Photo: mirstrojka.ru
Photo: cemicvet.mediasole.ru Photo: greenwhite.su Photo: skolkogramm.ru
Photo: skolkogramm.ru
Green wall
You can also make a real living green wall from plastic bottles - in fact, they are used as flowerpots. On one side of the bottle, cut a large rectangular hole, and on the opposite side, punch several holes with an awl for drainage. Fill the soil inside, plant grass or flowers there - and repeat until you have collected the required number of flowerpots.
Connect them together using a strong cord, sisal or other hangers. You will get an impromptu “curtain”, which you just need to attach to the base. And if there are too many bottles, attach them directly to the wall or fence in any random order at your discretion.
Photo: joindiaspora.com Photo: get-loads.ru Photo: whoispro.ru
Photo: pinterest.fr
Photo: vosadu-li-vogorode.ru
Photo: decoratorist.com Photo: thorablog.com
Photo: pinterest.ca
Photo: elena-3-14.livejournal.com
Photo: novamett.ru
Bird feeders
Making a feeder from plastic bottles is as easy as shelling pears, and bottles of any size and shape will work for this. Cut a large hole on one or both sides so that the birds can get to the grain. Finish the edges with a file or emery to avoid sharp corners and burrs.
Attach a stone or other weighting material to the bottom - and the lightweight plastic will not constantly turn over in the wind. Attach the feeder to a wall, fence, or simply hang it from a tree, pour grain inside and wait for the first feathered guests!
Photo: waysi.ru Photo: moy-karapuzik.ru Photo: diycraftsy.com Photo: ogorod.ru Photo: tr.pinterest.com Photo: pol-master.com
Path made from plastic bottle caps
An interesting and unusual option is a path made from bottle caps that have already been used. Laying them couldn’t be easier – in fact, they are simply pressed into pre-leveled soil. Of course, this will take time, because there are many lids and they are small, but the whimsical mosaic will certainly delight you and your household!
Photo: podelunchik.ru
Photo: paper-land.ru
Photo: hammer-shop.ru
Photo: idea-5.ru
DIY crafts from coffee beans: 10 beautiful ideas (photos)
Plastic peacock flowers
Such products can protect crops from running animals and wild birds. Peacocks are very easy to make at home; you can use absolutely any bottle. To make the craft bright, I use enamel paint. How to do:
- One plastic bottle produces 1 flower.
- The neck part is cut off – “up to the shoulders”.
- Next, they begin to cut the bottle into strips, barely reaching the bottom.
- Each feather is sharpened with cuts.
- In the center you can make a “fur center” according to the principle of chrysanthemums.
To make the peacock bigger and more dangerous, you can fasten 2-3 parts of the finished products. For reference, you can use ready-made templates.
Making water lilies
The product is well suited for artificial ponds. It's very easy to do:
- Take large plastic bottles. All they need is the bottom.
- Each is cut into 4 equal parts.
- Using a lighter or candle, they are straightened according to the concept.
One lily will take 3-4 bottoms. Next, the parts are fastened with glue, and a “fur” flower made of green plastic is placed in the middle. Such a lily can even serve as a feeder for the inhabitants of a pond.
Asters for the garden
Usually this craft is made from plastic forks. However, if you can’t find them, then you can safely experiment with bottles. How asters are made:
- You definitely need to take a closer look at the natural flower.
- Next, take one piece for 0.5, 1, 2 liters.
- The neck of each bottle is carefully cut off at the shoulder. This is the part that will be used.
- Each is cut into small strips, not reaching the edge.
- After this, all parts are carefully fastened together. You can place a yellow cork in the middle.
Additionally, you can “break” each strip. Then the variegated flower will turn out curly and beautiful.
Recommendations for painting plastic
Over the years, paint tends to crack and products lose their appearance. To prolong the beauty of the compositions made, it is recommended to pay attention to the following nuances:
- The bottles are washed to remove excess glue and paper.
- For degreasing, it is better to use regular alcohol.
- To ensure that the paint adheres without any problems, the bottles are pre-treated with simple sandpaper.
Although working with plastic is considered a safe hobby, it is still worth adhering to the unspoken rules:
- Do not melt while in the house. The vapors are poisonous and dangerous to humans.
- When working with sharp ends, it is advisable to use construction gloves.
The selected schemes will allow you to equip even the adjacent area of a high-rise building. Photos of flowers from plastic bottles will inspire housewives.
Supplies for creating flowers
To make homemade flowers you will need:
- Plastic bottles;
- Wire for creating stems;
- Spray paint, preferably acrylic or alkyd;
- Fire source for heating plastic (lighter, candle, gas burner, etc.);
- Leaf and petal patterns;
- Buttons and beads for decorating the middle of the buds;
- Marker for marking workpieces;
- An old baking sheet or other container for heating so that the plastic does not drip onto the table;
- Sharp scissors.