DIY garden crafts can bring you great pleasure. Choose the figure that best suits your character and the design of your garden. Let's try to make garden figurines from cement with our own hands. The process, surprisingly, is not as complicated as it seems. But the result is truly surprising!
See what beautiful flower containers you can make from cement mortar and an old rag. This is truly crafts made from scrap materials!
What is cement and how to work with it
Cement does not require professional skills or additional complex tools.
It is one of the main materials used in construction work. When cement interacts with water, the result is a plastic mass, which after a certain time hardens and becomes a stone-like body. Strong and durable.
To work with such raw materials, you need to choose a special place (preferably a larger one). Then lay plastic film everywhere and secure it well with something. This is necessary so that the cement does not spoil other surfaces. After all, everyone knows: once this material thickens, it will be difficult to dispose of it.
What tools and additional materials will be required:
- In order to dilute cement, you need a container with a volume of at least 10 liters. You will need a metal container or utensils made of other durable materials.
- To make the cement mortar homogeneous, you will need a mixer. A drill is also suitable, but only its attachment must be a screw one.
- Water. This is one of the main components, since all tools will need to be constantly washed under high pressure of water.
- For your comfort and safety, you need to purchase small things such as rags, rubber gloves and an apron.
- Forms for figures, which can be found in construction stores, as well as in special shops that sell various goods for creativity.
- Spatulas (preferably of different sizes), they will be very useful in your future work.
- Primer. Will be needed to cover crafts after drying. It acts as the main material for the coloring composition.
- Sand. It should be small and free of unnecessary debris.
- Cement. In this case, we offer brands M-200 or M-300.
Preparing cement mortar
An example of what the mixture should look like
The most important thing is that the mixture should be a homogeneous mass with a consistency reminiscent of thick sour cream. It is this density that will be ideal for pouring cement into molds or using it for necessary crafts.
Procedure:
- Pour sand into a pre-prepared container, followed by cement. These components should be mixed thoroughly.
- Add water.
Proportions per 1 kg of cement:
| Cement brand | Fine sand | Water |
| M-200 1 kg | 2.9 kg | 900 ml |
| M-300 1 kg | 2 kg | 750 ml |
- If you want to make your craft colored, then at this stage add water-dispersion color. Thanks to this component, the products no longer necessarily need to be painted.
- Mix thoroughly and bring to a homogeneous mass.
How to prepare the solution
To prepare the solution you will need:
- cement grade M-200, M-300 or M-400 (the higher the grade, the stronger, more durable the material) – 1 part;
- fine river sand, the volume depends on the brand of cement - for M-400 1 part of sand is required, for M-300 - 2 parts, for M-200 - 2.9 parts;
- clean water (drinking or boiled) - at the rate of 0.25 liters per 1 kg of cement-sand mixture.
Sand is poured into a metal container, then cement is added. The dry mixture is thoroughly mixed with a construction mixer, drill or trowel (depending on the volume of the solution). Gradually pour in water until a homogeneous mass is obtained, reminiscent of thick sour cream in consistency.
Recommendation: to ensure that the material has greater plasticity and that finished garden crafts made from cement do not crack, add 1 part of tile adhesive to the cement-sand mixture before adding water.
Photos of garden crafts made from cement
Please repost
Flowerpot
Working with cement is difficult, but this craft is just for those who have never encountered such a material as concrete. To make a flowerpot you will need the following consistency: cement + sand + water, two buckets and unnecessary towels.
Take a towel and dip it into the solution so that it thoroughly absorbs the mixture. The entire fabric must be covered with concrete mass.
Attention! Use rubber gloves to keep your hands safe.
Prepare a second bucket in advance, select the length of the towel and turn it over. Throw the towel over it.
An example of how to cover a bucket with a cloth
If suddenly the rag is larger than the bucket, then it can be cut, but this must be done at the initial stage, while the concrete is wet. Remember: how you arrange the fabric on the bucket has a huge impact on the final result. So use your imagination and arrange the fabric the way you like.
Let the future product dry, this will take a little more than a day.
Then take out a bucket, fill the concrete pot with soil and plant a flower. Ideas for such cement pots can be seen in the photo below.
Flowerpots can be made of any size and not only from fabric. To do this, prepare any two suitable containers, one larger and the other smaller. Insert one into the other, and fill the space remaining between them with cement mortar. After drying, you will get a suitable, attractive product for planting flowers.
If you wish, paint the craft or varnish it - this will make the pots look more beautiful. We invite you to look at photos of original ideas for such products.
How to turn a soft toy into a hard one
This part of the work must be done when the base and rope basket have hardened. Making a monolithic bear is very simple. You need to prepare a cement mortar in a large container. Then put the bear in there and literally bathe it in this mixture.
It should cover the toy completely. After this, the bear must be removed from the container, lightly squeeze out the excess liquid, and wipe the eyes and nose with a cloth.
The money tree pleases with lush flowering: my secret is in caring for the leaves
Lost weight: what Sofia Tarasova sacrificed for the sake of “VIA Gra” (new photos)
Smooth and fresh skin: dermaplaning, or why a woman needs to shave her face
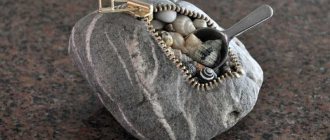
Ring stand
You can make an unusual jewelry stand out of concrete. The process is so simple that even those who have never worked with such material can handle it.
Master Class:
- We print out the cone templates and cut out blanks from contact paper based on it, carefully securing the edges with packaging tape.
- Take a paper plate or strong cardboard, cut out circles with a diameter of 2.5 cm in it and insert cones.
- We mix a solution from concrete and water and fill the cones, first put a little concrete, shake it so that it flattens, then add more. The more often you shake the solution, the fewer air bubbles will remain in it.
- Leave for 12 hours, then cut off the tape and unwind the cones.
Ring stands can be painted any color, you can add gold, paint splashes or polka dots, or stripes on top. Don't be afraid to show your imagination.
How to make swan figures
Beautiful white swans will become a real decoration of the site. An unnecessary plastic basin installed upside down is suitable as a frame base. The neck is made of intertwined metal wires, bent in the shape of the letter S. The wire is attached to the basin by drilling a hole in it.
The basin is coated with cement; rags and pieces of foam plastic are used to form the necessary bends. Form wings and tail. The wire for the neck is wrapped with rags soaked in cement, and cement is gradually applied on top, in thin layers, forming a neck of the required thickness and a head.
Decorative adjustments are made on the wings and tail, imitating plumage using scraping. The eyes and beak are outlined on the head. Leave the swan to dry for at least a week. After this, the product is sanded, primed, and painted.
Openwork balls
As a basis for creating an openwork balloon, a balloon is inflated and tightly tied. Then:
- take a thick rope (twine, yarn), lower it into the solution;
- wrap the ball with moistened rope not too tightly, leaving holes;
- allow the product to harden;
- deflate a balloon or pierce it with a needle;
- The remaining balls are removed through the holes.
If desired, the craft can be decorated: painted, pasted over with decorative details.
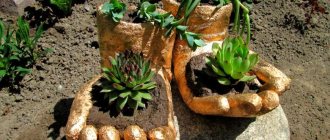
Crafts in the form of palms
The sculptures in the form of crossed palms look original. To create a composition:
- take rubber gloves;
- place the glove in a container;
- pull the edges of the glove over the edges of the container (this will facilitate the process of filling it with cement-sand mortar);
- pour the prepared solution inside;
- to give the fingers rigidity, a metal wire is inserted into them;
- after filling, remove the glove from the container, tie it, place it in a bowl and give it the desired shape;
- carry out similar actions with the 2nd glove;
- to connect the palms, make small cuts on the gloves at the junction and secure with a small amount of cement;
- With another bowl, press your palms on top to form a depression in the center of the composition;
- wait a few days, then cut the gloves with a knife and remove them;
- polish the gloves with sandpaper;
- apply a layer of primer.
Whether or not to paint the resulting sculpture is a matter of taste. You can pour soil extract into the center of your palms and plant succulents, pour water, and turn it into a birdbath.
Cement coasters
Cement stands have good stability. They can have different sizes and purposes. The following options are available:
- Stand for stationery. It is made of several parts. The base is a rectangular plate 2-3 cm thick. The container for pens and pencils is a round or square cup. The base is poured into any box (plastic or metal) with the required wall height. To make the container, plastic cups of 2 sizes are used: one cup is inserted into the other, and the space between them is filled with solution. You can use a piece of plastic pipe with a diameter of at least 6-7 cm, into which a cylinder of a smaller diameter is inserted. After the solution has hardened, the temporary forms are removed and the parts are connected to each other.
- Tablet stand. A popcorn cup is recommended as a mold. The stand is made by pouring the solution into this mold. A shelf (wooden or plastic plate) is fixed in the lower part at the required height for installing the tablet.
One of the simplest crafts is a stand for an unstable container. You can use it to place flowers in a tall glass or beaker. The craft looks like a round, rectangular or original plate with a hole in the center according to the size of the container. It is made by pouring the solution into a box with low sides. Before pouring, a container for flowers is installed vertically.
Monolithic balls
To obtain solid balls, a rubber ball is suitable. A small hole is made in it, into which cement mortar is poured. This can be done using a small spatula. They wait from 1 to 2 days, after which the ball is cut and removed. The surface of the finished product is sanded. You can take several balls of different sizes. The resulting various balls are painted with bright colors. Placed in disarray around the site, such country crafts made from cement will look very stylish.
Useful ideas: to make a monolithic ball, you can use a lampshade instead of a rubber ball. If it consists of 2 separable halves, it becomes possible to reuse such a container. If the lampshade is inseparable, it is carefully broken to remove the ball.
Animal figurines
You can build a whole zoo out of cement in the garden. A few ideas:
- Hippopotamus . The base can be made from large boulders or large basins, or simply pour a pile of gravel and cover it with a mounting mesh. The solution is applied in several layers. This craft looks good near a pond.
- Hedgehog . The figurine is constructed from a boulder or a large piece of foam. In the second case, rounded shapes are formed, and then the mounting grid is laid. The solution is applied in several layers, the latter imitating a needle-like coating. To form the nose, take the neck of a plastic bottle.
A typical example of a frame figure can be considered the “Fish” craft. First, the wire frame is assembled. Thick steel wire outlines the outline of the fish, and then rounded sides are formed. Filler is stuffed inside the frame, and the mounting mesh is laid on top. The solution is applied with a spatula in 3-4 layers.
Cement allows you to create a variety of crafts for the garden and home. A novice master will be able to do simple figures. Complex designs require specific sculptor skills. A creative person is capable of realizing any idea. In the process of work, you need to take into account certain nuances and listen to the advice of experts, and then the summer cottage will become a cozy and favorite corner for family and guests.
Complex figures with a frame
It’s more fun to decorate your country house with sculptures of animals and mythical characters. Such creations involve the preliminary production of a durable frame and layer-by-layer application of cement mortar.
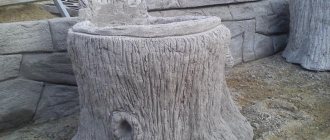
Interesting flowerpots can be made using buckets from construction mixtures. At the first stage, a container of suitable size is wrapped with a plaster mesh and covered with a thick layer of cement. At the second stage, until complete hardening, decorative adjustments are made, making an imitation of an old stump with natural wrinkles on the bark.
A monolithic figure of a hippopotamus would look appropriate near artificial reservoirs. The place for it must be determined immediately and carefully aligned, since in the future the figure will be stationary.
Two elongated plastic basins, which must be fastened with wire, are suitable as a frame. Another option is also possible: a thick cement solution is covered on top of a pile of broken bricks or crushed stone.
The figure itself does not contain complex elements and is easy to perform. After hardening, the product is treated with fixing impregnation and dry pigment for concrete, rubbing the powder with a hard sponge.
More complex sculptures are made in several stages: 1) making a frame from wire and foam plastic or containers; 2) covering the workpiece with a plaster mesh; 3) applying the mixture in several layers; 4) formation of small details (facial features, special texture, folds of clothing, etc.); 5) priming and painting the finished work.
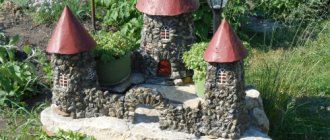
Flowerpots in the shape of swans will become an elegant decoration of the garden. The body frame is an old plastic basin, the neck is woven wire. The head, wings and imitation plumage will have to be made from a cement mixture, showing the skills of a sculptor.
Monolithic figures have a significant weight, so as an alternative there is a way to create lightweight large objects. You can decorate your garden with boulders of different sizes.
To make them, any unnecessary and lightweight material (cuts of polyurethane foam, plastic bottles, polystyrene foam) is tied into a tight lump with wire.
The resulting base is wrapped in a plaster mesh and covered with thick cement mortar. The more irregularities and protrusions there are, the more natural the “stone” will look.
Small garden figurines are made from a mixture of cement with the addition of gypsum or Portland cement.
Here you can use the manufacturing methods described above, as well as any basics: old toys, items of clothing, household utensils.
Tips and recommendations from experienced craftsmen
What do craftsmen and designers advise so that homemade figures decorate and not spoil the territory:
When decorating a site, use one style - do not combine characters from folk tales with classical-style sculptures or angels. Balance the size of the figures with the size of the plot - in small dachas large products look ridiculous. Don't chase quantity
An excess of figures distracts attention from the main thing - greenery, flowers, for which they go to the country. Select figures in the general style of the house, garden, and territory. They will enhance the overall impression. If you lack experience and imagination, start with the simplest figures, master one technique
Install the product and make sure it makes the area better, not worse.
Use common sense and moderation. When making figures from cheap materials (bottles, old tires), carefully process and paint the products with good paint, otherwise they will look cheap and will only spoil the overall impression of the site.
Mushroom craft made from cement
Prepare the following materials: an old rubber ball (for the hat), a plastic bottle (this will make a leg), a steel rod (the fasteners will be made from it).
Cut the ball in half. Place one half in a bucket of sand and pour cement into it. Cut off the bottom and neck of the bottle. Insert the blank into the center of the cement-filled half of the ball. The immersion should be 1-2 cm.
Use a steel rod to connect both parts of the mushroom and pour the cement-sand mixture inside the bottle. Leave the product until completely hardened. Then remove the bottle and ball. After a couple of days, you can paint the mushroom and start decorating it.
Another interesting idea is a light openwork ball. To create it you will need a regular balloon, rope and cement. The ball must be inflated to the desired size and wrapped with a rope soaked in a cement mixture. After the craft has dried, the ball must be removed by bursting it. Next is decoration.
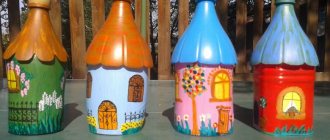
Using the same technology, you can make elegant lanterns for the garden or containers for flowers. In this case, a rope is not needed. You just need to add a little gypsum to the cement.
One of the most popular types of cement crafts for cottage and garden decoration are garden gnomes. It is not difficult to make such objects of landscape architecture. You will need cement mortar, a steel rod, old stockings and rope.
You need to pour the cement mixture into the stocking by inserting a metal rod into it. Use a rope to form a nose, beard and legs. Hang by the cap and leave to dry.
The most original DIY craft is a fountain made of leaves. To make a cement leaf, you will need a fairly large leaf from a plant. With its help, we will form its cement copy. Let it dry. Then we work it out in more detail and paint it. We build a beautiful fountain from sheets of different sizes that will decorate your local area.
If you have difficulties in making cement products yourself, then you can purchase ready-made handmade cement crafts in a specialized store or order them from a workshop.
General tips for making cement crafts
If you have no experience in making decorative figurines, it is advisable to start with some simple forms that do not require great skills and abilities. These can be various balls, mushrooms, flowerpots for plants.
After their production, a long drying period is required, sometimes up to a week. To prevent the product from cracking during this time, it is covered with plastic film.
Completely dried crafts are sanded with sandpaper, larger roughnesses are removed with a file. Dust is removed with a brush, after which the surface is coated with a primer. The product can be left unfinished or decorated in various ways:
- Paint with waterproof paints. Small details are drawn with an artistic brush.
- Cover with pebbles, shells, mosaics, beads, buttons, sparkles, pieces of glass, ceramics. They are attached to cement that has not yet dried, and in the case of pouring into a mold, after drying, they are glued to the craft with waterproof glue.
- Cover with varnish. It must be transparent for outdoor use.
Figures without decoration also look impressive. They are laconic, but still attract attention. If you have no interesting ideas or difficulties in choosing the most optimal decor option for your garden plot, you can watch a video of cement crafts on the Internet, with step-by-step explanations of all the intricacies of the work.
Information: to make complex compositions - sculptures, fairy tale characters, animal figurines, you will need to build a strong frame. In this case, the mixture is applied in layers.
Other ideas
If you have mastered the production of such figures, then you can also expand the range of materials and skills used to create:
- Frame sculptures. Using reinforcement (frame), you can make an angel, a dog or any object. In this case, cement is applied directly to the frame of the composition, and a construction mesh is used to ensure that the finished decorative element remains hollow.
- "Drowning" sculptures. Unusual and sometimes frightening figures, as if crawling out of the ground, are made from gypsum, which is diluted with water until a solution has the consistency of sour cream. The finished composition is poured into a clay mold and left to dry for a day at a temperature of about +15 degrees.
In your garden plot you can create very believable and creative figures from plaster
Mosaic figures. The finished cement turtle or mushroom can be decorated with colored mosaics, which are laid directly on the raw mixture.
In the same way, you can make creative trash cans for your summer cottage, decorate the sidewalk, and much more.
Figures of animals and fairy tale characters
On the Internet you can find a huge number of photos of cement crafts in the form of animal figures and fairy-tale characters. They look great on any garden plot, vegetable garden, making them more magical and fabulous. These can range from the simplest products to manufacture to complex figures on frames made of various materials.
How to create original crafts for the garden with your own hands
To begin with, they determine the type of structures, their sizes and location, as well as the color scheme. Decorative sculptures for a garden or cottage can be of several types: functional (for planting vegetation), aesthetic (figurines for the garden). The first include all kinds of concrete flower pots, in which you can place both tall and tiny plants.
Two main types of garden decor made from concrete
They can have a geometric or abstract shape, torn edges or rounded contours. Do not doubt your own abilities when considering an option with animalistic motifs.
You might be interested in these articles
Necessary equipment for creativity
To get started, you will need a simple set of materials. In addition to the cement and water itself, concrete decor is created in the presence of:
- sand (preferably 1-2 bags) in a ratio of 1 to 1 or 1 to 2 with cement for the appropriate consistency of the solution;
- tile adhesive residues for better adhesion of the material;
- old container for creating a concrete mixture;
- finishing primers;
- sandpaper for polishing;
- plaster mesh for fixation;
- a piece of polyethylene corresponding to the size of the product for drying cover;
- metal rods, inflatable balls, ropes, plastic containers and other auxiliary means for forms (depending on the type of future masterpiece and the author’s imagination).
For the manufacture of simple structures, this list is reduced significantly. Concrete can be used with medium-fraction pebbles or crushed stone to create the base of a figure for a summer residence and monolithic volumetric silhouettes. You will also need a cement dye or a special varnish to give it an aesthetically attractive appearance, although a natural look may suit a certain style of the site.
Concrete planters with succulents
Don’t forget, garden products made with your own hands from concrete need several days to dry. It is also possible to create decor from cement in stages. Therefore, the garden owner needs to allocate about a week for his masterpieces. For many summer residents, this issue is important, since they do not permanently live on their plots.
Craft ideas for beginners
It’s worth starting with the simplest figures and sculptures. These can be mushrooms, gnomes, animals, various characters from fairy tales. Moreover, when it comes to bright figures, it is worth considering not so much the complexity of making the sculpture itself, but rather giving it brightness and compliance with the sketch. So, an ordinary mushroom is a stalk and a semicircle, but the correct coloring gives it a similarity with the idea.
The same applies to animals and characters from fairy tales - the shapes themselves are simple, but not everyone knows how to beautifully paint the figures they make. Below are many options for simple crafts with which you can start creating sculptures and concrete products.
What tools and materials will be needed
To work with cement you will need the following tools and materials:
Metal container. Its volume should not be less than 10 liters. The solution will be diluted in it. You can use a basin, a large bucket, a tank.
- Drill with screw mixer attachment, construction mixer for preparing mortar with a volume of more than 5 liters. Trowel, trowel for preparing a smaller volume of cement mixture.
- Construction plaster spatulas of different sizes, paint scraper, sandpaper. With their help, it will be possible to level the surface of the manufactured craft and remove excess cement.
- Apron, rubber gloves, wet wipes, dry, clean rag. These items will make work more comfortable and protect clothes and hands from contamination.
- Waterproof paint (regular or aerosol) for exterior use, primer (as a base for paint), brush. If desired, you can paint the resulting products (this is not a prerequisite, this is done only to obtain brighter things).
- Molds and frames for making figures. They can be very different - wood, plastic, metal, silicone, rubber. Flower pots, flowerpots, old boots, pieces of fabric, tires, bottles and much more are suitable.
To make your work easier, you can first make a drawing or sample of the planned craft.
Hollow balls
Hollow balls can be used as flower pots, candlesticks, and flowerpots for dried flowers. To create them:
- inflate a balloon and tie it tightly;
- take a few rags or bandages;
- rags are cut into strips;
- moisten rag strips or bandages in cement mortar;
- cover the ball tightly with rags without touching the top part;
- Once hardened (this may take approximately 48 hours), the ball is pierced and removed.
The craft may have some unevenness. They are leveled with cement. The surface of the product is sanded and, if necessary, painted and decorated.
Note: if the hollow ball is intended to be used as a flowerpot for dried flowers or a candlestick, it will look more impressive painted both from the outside and from the inside.
Garden decorations
Cement crafts are very popular in garden landscaping. You can make a fountain from concrete leaves. It is manufactured in the following order:
- A plastic pipe is installed to raise water to a height of 70-100 cm.
- A stencil of a large leaf is made or a natural leaf of a large size plant is selected.
- A hole 4-5 cm deep is cut out in sand or soil using a stencil. The bottom is formed in the form of a concave surface and compacted. A stencil is placed on it.
- A reinforcing frame is made from wire, which simultaneously imitates the veins of a leaf.
- The solution is poured to form a concave surface on top and veins along the wires of the frame.
- At the installation site of the structure, wooden posts of different heights are mounted vertically so that they form a cascade for the water flow.
- Concrete leaves are fixed on wooden posts.
To give the finished look, plants and flowers are planted around the fountain and a stone border is laid.
How and with what to paint a sculpture
Selection of paint, brushes, etc.
To decorate garden figurines, it is better to choose paints intended for outdoor use. To paint the figurine, you can use brushes or a spray gun; be sure to apply the paint in two layers. If the drawing is complex, be sure to draw all the details with a simple pencil.
The varnish will make the figure bright and protect it from harmful influences. It is better to use a silicone or polyurethane based coating. Apply the second layer only after the first layer has completely dried.
How to apply paint correctly
In order for the paint to lay evenly on the surface, it must first be primed. The color is chosen depending on the image and purpose of the figurine. You can make it plain white, bronze, gold or paint it in bright colors. Painting occurs with brushes of different sizes, all elements in turn. The size of the brushes decreases during the painting process.
How to care for a garden sculpture
In order for the garden sculptures created with your own hands, with such difficulty and dedication, to last for more than one season and not fall into disrepair, they require care. After all, when decorating a garden, they are exposed to a full range of weather influences, such as heat and frost, rain and wind. Sudden changes in temperature and exposure to dust can completely destroy them.
Of course, figures made from synthetic materials
, are less exposed. But careful treatment and timely care are required for all garden decorations, without exception: polymer, ceramic, plaster, concrete, wood. First of all, this is the removal of dust and any kind of contaminants.
Resin figures
It is enough to rinse it with water from a hose once a month and let it dry thoroughly. Volumetric garden decor that does not have recesses does not need special protection. Park figures with recesses must be covered for the winter to avoid accumulation of liquid.
Concrete sculptures,
Despite the massiveness and apparent strength, they need care:
- regular cleaning;
- lubricated with a protective composition containing natural wax;
- covering for the winter with non-woven material.
Wooden sculptures
They are afraid of moisture, so caring for them involves gently wiping them with slightly moistened napkins. The main thing is to ensure that the integrity of the coating is maintained: through a small scratch, water can get inside, which can destroy the figurine.
Gypsum specimens
You can clean it with special preparations for cleaning pores, or you can prepare a mask yourself from starch and water. It is necessary to protect from water with compounds containing wax solutions to create a moisture-resistant film. Ceramic decor is recommended to be stored indoors in winter due to its fragility.
Important Tips:
Coating with varnish or any glossy coating to protect against external influences should be done with caution, as this may interfere with their realism. Do not use synthetic detergents for washing. Garden statues can only be weighed down with sand; all other materials, such as plaster, concrete, cement, will tear the figure apart. Treat at the beginning of the season with anti-fungal agents.
Ladybug made of cement
You can make a ladybug out of cement with your own hands. The process is simple and suitable for beginners. Such a figure for the garden will delight both adults and children.
Master Class:
In a container, mix 3 parts sand and 1 part cement. Add water little by little and mix the solution.
On a work surface covered with film, we lay out blanks from the solution that will resemble round loaves of bread.
Using a stick, we squeeze out the outline of the head and wings on the blanks.
We make antennae from thick fishing line and immediately insert them into the solution, and also slightly deepen the contour of the head.
Cover the pieces with film and leave for 2-3 days.
Once the products are completely dry, we begin painting.
We coat the finished figures with varnish.
If, after complete hardening, the figures have roughness, then they need to be cleaned with sandpaper. Also, before painting, it is advisable to coat the product with a primer for better adhesion of the paint to the base.
Production stages
Since any product made from cement must dry well, after making it, cover the craft with polyethylene and “forget” for a week. Then the figure is coated with primer.
And the last step will be coloring. If the surface remains rough after priming, you can go over it with sandpaper or a file.
Step by step process
To begin with, it must be said that this process itself is quite simple, but at its preparatory stage it is necessary to put in a lot of effort and certain skills. Considering this description of how to create figurines for the garden with your own hands from concrete, you need to start from the stage of making a sketch ().
Form
First of all, it is necessary to create a sketch of the future structure. It must fully display all the details of the product and their colors.
It is worth noting that professional craftsmen recommend not using thin elements or areas that are very distant from the main trunk of the structure when designing figures. The fact is that when creating garden figures from concrete with your own hands, it will be very difficult to ensure that they are evenly and even completely filled with the solution, even when using a vibrating table or other available means.
It is worth saying in advance that there are many ways to create a mold for subsequent casting. It can be made from earth, clay, wood, metal and even silicone. At the same time, professionals try to work with materials that can be used several times so that their price is paid off by productivity
It is important to say that the form can be collapsible or consist of two halves. At the same time, to create it, it is best to have artistic skills related to the selected material or have a ready-made model for printing
Considering such difficulties, many craftsmen prefer to purchase ready-made forms for concrete figures, which have recently been very often sold on the building materials markets.
Fill
Typically, the production of concrete figures begins with placing the required amount of reinforcement in the mold ().
It is worth mentioning that some types of such products do not contain metal parts, but this only applies to small structures.
- In order to avoid diamond drilling of holes in concrete later, it is worth thinking in advance about the subsequent fastening of the figurine to the surface and installing it before casting.
- Next, make a solution of cement and sand. At the same time, professional craftsmen recommend creating it in proportions of 3 to 1 with the addition of a plasticizer. You can also use special formulations that are designed specifically for these purposes.
The further pouring process depends only on the design of the mold. In this case, compacting the solution can be done either with your own hands using a stick or on a vibrating table. If the form consists of two halves, which are poured separately, then it is then combined and the joints are rubbed.
Treatment
After the product has hardened, it must be removed from the mold and trimmed off any residue or spills. In this case, on complex figures it may be necessary to cut reinforced concrete with diamond wheels.
- Next, the structure is treated with a large amount of primer, applying it in layers. This is done in order to reduce the absorbency of the material and increase its adhesion.
- At the final stage, the figures are painted and placed in their place, which it is also advisable to prepare in advance.
What to focus on
In stores, prices for plaster figurines sometimes reach several tens of thousands of rubles. However, the cost of material for an entire army of funny gnomes or mushrooms will barely reach several thousand.
To save money on purchasing additional equipment or travel, it is advisable to familiarize yourself with new ideas for garden crafts.
Today the figures can be divided into several components:
- Stands - there can be funny turtles on which small pots of flowers are comfortably placed.
- To decorate a pond, these can be clay frogs or other inhabitants.
- For decorating beds - for example, gnomes, which do a good job of scaring away birds and animals.
- For lighting, in tandem with lighting you can create a fabulous atmosphere.
You can use all options, but experts recommend not to overdo it. To make everything look harmonious, it is advisable to follow the general style.
Toy figures
The easiest way is to make figures in the form of various animals (foxes, bear cubs, dogs), dragons, gnomes, using soft or plastic toys:
- lower the toy into the cement mortar;
- allow to dry for several days;
- paint;
- decorated with decorative elements.
Small cement figures made from toys will look good on garden plots of any size.