Review author: Terrari School of Design
To make crafts from plastic bottles with your own hands, you need to stock up on some materials. This list will depend on the type and purpose of the item being manufactured.
Firstly, it should be remembered that thermoplastic bottles, although convenient to use, are very harmful to the environment. Its long decomposition over more than 2 centuries makes plastic an excellent material for construction or other crafts.
To build a house, barn, greenhouse or any other structure, you will need other building materials. These are pins, metal, nails, ropes, tools, wooden beams, sand, soil, etc.
For furniture, you can also use some of the above list. But you need to add several tools. The list is replenished with fabric, glue, padding (optional).
The next common trend in bottle production is children's crafts. For them you will have to stock up on colored paper, paints, plasticine, glue, beads, etc. The list is limited only by imagination and idea.
Greenhouse made from plastic bottles
You should definitely add a greenhouse to the list of the most useful crafts for the garden. This useful structure can be built from plastic. One will need from 500 to a thousand bottles. Only transparent plastic is used to ensure sufficient light entry.
The next important point is that the bottles must be even in shape, without recesses or curly cuts.
In addition to bottles, pins or rods are prepared. Their diameter should be no wider than the neck of the bottles and fit freely into it.
Wall bases
Pillars are dug into the corners of the designated perimeter. Frames are assembled from beams according to verified dimensions. The process of collecting them takes place on the ground. The ready-made ones are attached to previously dug pillars. Please note that there must be windows and a doorway.
Construction
The bottom of the bottles is cut off, after which they are strung on pins. Two conditions - the necks look in the same direction, and the bottles themselves sit as close to each other as possible. After the row is assembled, it should be attached to the frame. This should be done using clamps, metal strips or nails.
The second finished row must be pressed against the first to obtain deformation, and then secured again. This is how the walls of the greenhouse and its roof are assembled.
Owl: decorating trees
In order for your country house to shine with new colors, it is important to properly decorate the yard space. Another idea for this is to create a figure from PVC bottles in the form of an owl. To do this, you need to prepare 5 brown containers, tin lids, a transparent container, a glue gun, pliers, acrylic paints and threads. Instructions:
- The bottom and throat are cut off, and cuts are made along the edges.
- The cut fringe is pulled together with a thread: the upper part of the bottle will serve as the head, and the lower part will serve as the tail.
- The remaining bottles are useful for making wings: they are cut into rectangles and painted white.
- Using a glue gun, the wings are fixed to the base.
- The eyes are made from tin lids - they can also be tinted and a picture of the pupils can be made.
The night bird will fit perfectly into the design of the site; it can be placed on a tree branch.
Garden decorations
After preparing furniture for furniture, there are a lot of cut off unnecessary bottoms and other parts left. But don’t rush to throw them away.
From plastic it is easy to create various decorations in the form of flowers or butterflies that will look great on the site. This is worth doing in your free time, following simple instructions on how to make crafts from plastic bottles for the garden or home.
You will need:
- bottle necks and bottoms,
- scissors or stationery knife,
- candle or lighter,
- awl,
- glue,
- wire.
The prepared necks are cut lengthwise and not reaching the end to obtain 6-8 petals. Their edges are rounded and scorched over a candle or lighter. This is done for evenness and smoothness.
The shape is given by bending and singeing the petals at the very base. When heated, the plastic is very flexible and allows you to create various interesting shapes.
The stem and, if desired, stamens are twisted from wires of different strengths and thicknesses. Afterwards all the elements are fastened together. Here you may need an awl for punctures, as well as glue to connect the parts of the craft.
A paper template is made in advance for the butterfly. The cut blank is transferred to the base of the bottle, cut along the middle, without a neck or bottom. The plastic is ironed for a flat, even surface.
The template is transferred and cut out from the resulting workpiece. The wings can be heated before folding and given the desired shape.
Acrylic paints, varnish, glitter and other decorations are usually used as decoration.
Using this technique you can make original figures and decorations for your summer cottage.
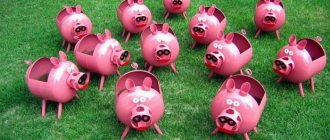
Sheep: how to do it step by step
To create a sheep, elongated bottles are useful. It is necessary to prepare the container:
- 1.5 liters – 4 pcs;
- 2 liters – 11 pcs;
- 1 liter – 3 pcs;
- 2 liters – 20 pcs. with a figured bottom.
You also need some bendable wire and a can of white or gold paint. The top parts with necks are cut off from liter bottles, and one bottle is inserted into another. Process of creation:
- Ears are cut out of a liter container and secured with wire.
- The body and neck are made from two-liter bottles.
- The head is attached to the neck, the legs of the sheep are made from 1.5 and 2 liter containers.
- For curly wool, the sheep are connected with curly bottoms using wire.
At the final stage, the sheep is collected and coated with paint. The eyes and nose are made from corks of a contrasting color.
Furniture for home
Now it’s worth moving on to a furniture set made of soft plastic. The main idea is that the frame is made of plastic containers, rather than the usual wooden base. General step-by-step instructions on how to make crafts in the form of pieces of furniture will help you easily furnish the interior of the room.
The material for “construction” must be the same in height. The caps must be screwed tightly - in this case, blocks of bottles can withstand up to one hundred kilograms.
Blocks of the desired size are assembled from the blanks, secured with tape in the process. The main trick is that the bottles should fit very tightly against each other, without the ability to move. Otherwise, the entire structure will collapse.
After the base is assembled, a cover is made for it. If desired, padding can be added to add softness. Usually this is foam rubber for furniture.
Thanks to this algorithm, you can assemble objects such as a bed, ottomans, sofas or chairs.
Simple airplane models
Bottles can also be used to entertain children. For example, how about keeping them entertained during bath time with airplane toys made from recycled shampoo bottles?
This project can be done in a variety of ways, so it's worth using your existing creativity to draw, cut and glue various elements to the outside of the bottle.
Toys and ideas for children
Plastic is not only an excellent material for construction, but is also good for activities with children. The abundance of children's crafts made from plastic bottles is especially typical for preschool institutions. The ideas are usually simple, but exciting and interesting for kids.
The options are limited only by your imagination and available materials. Below are a couple of ideas for inspiration.
Advantages of working with the material
The material is convenient and easy to work with. It can be cut with ordinary scissors, melts easily over an open fire, and can be shaped for any detail. Bottles can be used for outdoor compositions that cope well with slight temperature changes and precipitation.
If a product or individual element is deformed, it can be easily replaced with a new one. Both small and large containers are suitable, from 0.5 liters to 5 liter kegs.
Hedgehog made of cones
This craft is suitable for any autumn-themed exhibition, especially since there are natural materials.
For production you will need:
- cones,
- neck and bottom of a plastic bottle,
- scissors,
- colored paints,
- wire,
- glue
The edges of the plastic blanks are coated with glue and connected to each other, forming the body of the animal.
The resulting workpiece is completely covered with black paint. Only after complete drying can you proceed to the next stage.
To indicate the muzzle, the area around the neck is painted gray. You should also wait until it dries and then draw the eyes, nose and other elements of the face.
To create antennae, take 2 identical pieces of wire, which are twisted under the lid.
The pine cones are attached to a glue gun or glue. They should fit tightly to each other, creating a dense cover of “thorns” without bald spots.
For strength and durability, the craft is coated with a layer of varnish.
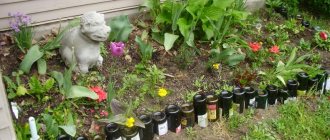
Flowerbed: how to make a basis for growing flowers
The simplest option for making a garden flower bed is to use a tire from a wheel. The result is a large flower bed in which you can plant flowering plants. To work, you will need a large number of small bottles of the same type, glue for plastic, and a tire from a wheel. Paint can also be useful if you want to change the color of the bottles.
The prepared wheel is installed in the desired location of the future flower bed or in the garden. The tire can be painted any color, or left black. Bottles are gradually glued to the top of the wheel, row by row. Toward the top, the throat of the flowerbed will be a little narrow, so you will need to properly pour the soil for future plants. If you don’t want to leave the bottles transparent, you can paint them in the chosen shade before work.
Feeder
This option is suitable for school students in terms of complexity. Younger children will need adult help. In winter, thanks to such feeders, you can save city birds from hunger, while being creative.
You will need:
- bottles,
- stationery knife,
- scissors,
- rope,
- paints (optional)
Square-shaped holes are made on several sides of the prepared container. The resulting “lid” does not need to be cut off – it will serve as protection from snow or precipitation.
Two holes are made under the neck through which the rope is threaded. After filling the feeder with food (seeds, bread, etc.), the product is hung on a tree and secured to it.
For reference and clarity, below are several photos of interesting ideas for crafts made from plastic bottles.
Charging place
It will be a great day when smartphones no longer need to be charged. Until then, people just need to come to terms with waiting for the gadget to replenish its energy supply.
But you can make this wait easy for yourself and your guests by creating a cell phone charging dock. All you need is a lotion bottle, a marker and a utility knife.
Photos of crafts made from plastic bottles
Cute little animals
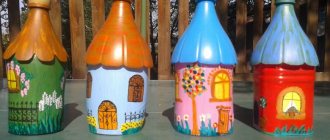
There is nothing simpler - draw a line on the bottle (approximately in the middle), draw ears. Now carefully cut along the lines.
- A DIY mailbox is a beautiful decoration and a useful addition to a suburban area
A house for children is a place where a fairy tale becomes reality, we create it ourselves
Bridges for a dacha - a picturesque element of the landscape in a suburban area
Using a waterproof marker, add eyes and a nose - you get a cute kitten (or a bunny, if you cut out the ears longer).
Now all that remains is to fill the kitten with soil and plant lettuce, parsley or dill - in a few months your “kitten” will have a green “hairstyle”.
Thus, you can decorate the window sills in a children's room or even in a kindergarten - to the delight of the kids.
No. 14. Device for deep watering of plants
Some plants do not like surface watering, so they need to deliver water as close to the root system as possible. An ordinary plastic bottle will come in handy in this case too. It is enough to cut the bottom to make a freely opening lid. The soil around the plant is torn up and a stone trench is laid out to prevent water from eroding the soil. All that remains is to put the bottle upside down and dig it in a little with earth. If necessary, just open the lid and pour in water. You can bury the bottle upside down, but in this case it will be necessary to make a lot of punctures in its lower part so that the water can flow out calmly.
Alcove
If you collect several tens of hundreds of bottles, you can use cement to build a wall or even an entire gazebo out of them.
Experts in this type of bottle construction advise filling the bottles themselves with sand before using them as bricks. However, they can be left empty, and therefore transparent - this is even more interesting.
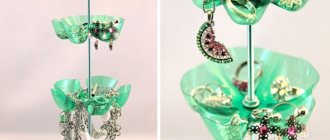
Entertaining curtain
Crafts can be made not only from bottles, but also from their plastic caps. The simplest thing is a kind of curtain.
First, in the center of each cap we make a hole through which we stretch the cord. Thus, we string several cords.
The length of the cord should be slightly less than the doorway. This rustling curtain will not only look funny, but will also protect the house from insects.