Advantages of cement crafts
- One of the most important advantages of this substance is its relative cheapness.
- Durability and strength of finished structures, resistance to weather conditions.
- Concrete can be painted in a variety of colors. Decorating also does not bring any problems.
- Ease of use of concrete. The main difficulty is creating a stencil design for pouring.
How to paint a finished concrete product
- For concrete surfaces, use a special acrylic paint based on organic solvents, such as Aquapol. Thanks to the composition, it has increased adhesion to the surface, which increases wear resistance. The paint can withstand temperature changes and is intended for painting concrete floors.
- Recently, polymer impregnations are increasingly used, for example, “Protexil” or special paint “Texil”. The products penetrate deeply into the concrete surface, which increases strength and prevents cracking. The main condition for optimal application is cleaning the concrete from dust and dirt. It is also necessary to degrease the surface; no preliminary priming is required.
- "Lakotex" is a product for protecting concrete products from the negative effects of environmental factors. The advantage is to protect the surface from dust, dirt and temperature changes. The disadvantage is that the product contains chlorinated resin.
- “Betoxyl” is a polymer-acrylic paint that is resistant to temperature changes from minus 400 to +500, which allows concrete garden products to remain in the garden in winter. To achieve more durable strength, it is better to prime with Betoxyl primer before application.
Important Rules
The concrete mixture is prepared as follows: Part cement and twice as much sand (if increased strength is needed, you can take 1 part sand), part glue. Next, add a little water and you need to achieve a thick consistency. The solution will be ready for use and will not cause any trouble.
All crafts require warm conditions and a lot of time to harden. Hardening time can vary up to two weeks. To prevent cracks from appearing, the figure is covered with bags.
After the hardening time has passed, the figure must be covered with a primer, then varnish or paint. If irregularities appear that interfere aesthetically and create inconvenience, use a file and sandpaper.
Cement can be replaced with plaster; this material allows you to make figures hollow and more decorative.
Preparation of materials and tools
Working with mixing, pouring, drying and decorating concrete requires a well-organized work area. As a rule, a garage, spacious barn or other equipped room is used for such a purpose.
Be sure to take care with a high-quality hood and personal protective equipment (cement dust can cause irritation to the mucous membrane of the eyes and respiratory tract).
The following set will also be useful in your work:
- Containers of sufficient volume for mixing concrete.
- Any auxiliary tool for high-quality mixing of the working mass.
- Forms for pouring, the preparation of which gives the master the most trouble.
- Varnish, primer, paint for decorating finished products, as well as protecting them from high humidity and high temperatures.
Sandpaper and a file will allow you to quickly remove all unevenness and roughness on the surface of the product.
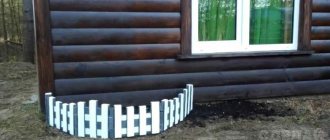
Concrete garden decorations
Sculptures cast by craftsmen are expensive and the simplest rules may not be followed during production. And if you study and cast the figures yourself, you can eliminate all errors and expensive costs. In fact, you don’t need a lot of knowledge or special skills to make concrete.
Everything you need can be found in the garage, and you can easily buy cement at any hardware store.
Here we will describe the basic requirements for making figures with your own hands.
- Buy concrete grade M400 or higher.
- If using gypsum, mix with moisture-resistant additives.
- The water for the solution must be clean, boiled or suitable for drinking. Due to this, the design will be of high quality and durable.
- For particularly complex structures, a mold and frame must be assembled. Heavy figures must have a stand.
- Figures cast from concrete must be covered with paint or varnish. This is done for durability.
- Gypsum can be mixed with cement or glue to give greater strength.
Features of creating a flower vase in the form of a leaf
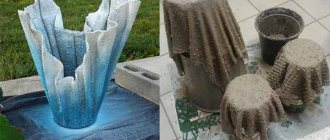
Decorative concrete technology is widely used in interior design. (It is also called liquid or polished.) The principle of implementation is to apply a stencil to give a certain texture. This method began to be used to create garden figures.
- To get a curved stone sheet, you need to give it the desired shape.
- It can be made by pouring a pile of wet sand onto plastic wrap.
Cover the top with film and place a stencil on it, for example, a large burdock leaf.
- The resulting form is covered with cement mortar, a layer of 5 - 10 cm. The top side is the future wrong side.
- The sculpture is kept for 2 - 3 days until completely dry.
- Turn over, remove the sheet, paint and varnish.
Making crafts
One of the original crafts is intended for warm and cozy evenings. We will provide one option for you, and then improvise yourself and create more unique and individual figures.
Craft lamp
- To create such an interesting craft, you will need a ball. We advise you to find several right away.
- The balloons are inflated to different sizes, do not inflate too much, keep in mind that the cement layer will be small and the structure will be fragile.
- Cement is applied to the inflated balloon. It is important to completely cover the ball but leave some space at the top.
- After complete hardening, all the balls burst and are taken out of the finished craft.
- In honor of the last step, candles are lit and placed directly into the craft. These balls look unusual and beautiful.
This method can be used with rope soaked in cement mortar. All steps are completely identical, but rope is used instead of cement. It looks even more unusual and specific. Guests will probably think that this is a purchased decor and will be surprised that you can create this yourself.
There are not only beautiful crafts for the garden. But also extremely useful in everyday life.
For example, for the next craft you will need only two brushes and all the materials from the previous craft.
Pour cement into a plastic basin and place the brushes at an equal distance from each other. After hardening, the main purpose of creating such a useful element immediately becomes clear.
The craft is necessary for cleaning shoes. Moreover, it is easy to do, but has a lot of benefits.
It is worth paying close attention to safety precautions when working with cement. There have been cases of the mixture getting into the eyes. There's nothing wrong with it if you quickly rinse with water and get rid of every bit of it. But the feelings are unpleasant.
When working in creative mode, remember to put in maximum effort and lots of love. We assure you that everyone around you will notice the love put into the craft.
There are such cement masters that it is simply difficult to call their finished figures a craft. They look like works of art and are great for any garden or backyard.
One day, pictures of concrete gargoyles on a fence appeared on the Internet. This is amazing. We believe in your endeavors and hope to see a few more gargoyles on the fence.
Interesting ideas for beginners
Having no experience in using cement for decorative purposes, it is better to start with something simple that does not require modeling skills and obtaining the desired consistency. The first exhibits in your garden can be cute mushrooms, colorful balls or original flower pots.
To make a mushroom you will need an old rubber ball (the size of the cap will depend on its size), a plastic bottle (it will become the basis for the stem, its size should be proportional to the cap), a metal rod to attach the cap to the stem. The ball is cut into two halves, one of which is placed in a bucket of sand and pressed evenly. Next, cement mortar is poured into the resulting form and leveled.
The bottom and neck of a plastic bottle are cut off and inserted into the filled form in the center, immersing it by 1 - 2 cm. Then, using a long iron rod, the future stem and cap of the mushroom are connected and the cavity inside the bottle is filled with the solution. The product should harden for several days, after which you need to remove the piece of the ball and the plastic cylinder.
After a few more days, the product can be coated with paint and decorated with various elements. Mushrooms of different sizes look impressive on the plot in the form of a small clearing. It is also worth noting that your imagination may tell you to use other containers (bowls, jars) and methods for making garden mushrooms.
It’s enough to just make an openwork ball that seems so light and airy. For the base, use a balloon (the size of the future shapes depends on how much you inflate the balloon). Next, any rope is placed in the prepared solution and then the ball is wrapped around it.
Do not wrap the base too tightly; you need to leave enough holes for further removal of pieces of the burst ball. When the product is dry, you can begin decorative coating.
If you cover the balloons with cement mortar with a small amount of gypsum added for faster hardening, you can get original garden lanterns or flower pots.
Using this technique you can also make vases for dried flowers. In this case, not only the outer side, but also the inner side is subjected to decorative painting.
If you pour the solution into a small hole in rubber balls, you can get monolithic balls of different sizes. Painted in different bright colors and randomly scattered around the garden, they will become a laconic and stylish decoration.
Using plastic containers, you can make a flower pot for Crassula and Crassula Ovata cacti. The container is wrapped in a plastic bag, and a bag of clay or sand is placed inside so that the container holds its shape. Next, it is covered with cement mortar. After complete drying, all auxiliary materials are removed, drainage holes are made in the bottom using a drill, the product is primed and painted.
It's very easy to make a flowerpot using a plastic bucket or vase and another suitable container.
One container is inserted into another, and the solution is poured into the space between them. The result is a high-quality product that can be further decorated by showing your imagination to the fullest.
Flowers planted in flowerpots made from crossed palms look attractive. To create such a masterpiece, use ordinary rubber gloves, which are evenly filled with the solution. For rigidity, you need to insert a thick wire rod into each finger. To ensure a high-quality product, air bubbles must not be allowed to form.
When the gloves are filled, they are given the desired shape and fixed. After a few days, the rubber is cut and removed. If you need to connect two palms, then use the same solution. At the final stage, the surface is polished with sandpaper, primed and painted.