Today you can purchase any necessary item in a retail chain of stores. However, if you want to realize your creative potential and explore the threshold of your abilities, you can make many household items yourself from wood.
Having simple carpentry tools, basic skills in using electric hand tools and an irresistible desire, you can begin making simple wood crafts. It will be useful to look at photos of homemade wood products or master classes that are presented on specialized websites.
This will help you understand the extent of your capabilities and decide on the theme of the craft. Any wooden craft carries warmth and conveys the mood and creative intent of the author. Crafts made from wood can be decorative, or they can have a very specific useful function in the house.
How to make a craft from wood
Anyone can make decor for their dacha. When creating wood products, you first need to:
- Draw a drawing.
- Calculate the amount of materials needed.
- Prepare the necessary tools.
- Sand the external parts of the structure with sandpaper.
- Treat all elements with an antiseptic against rotting according to the instructions.
- Assemble the product.
- Decorate: paint or attach additional decor.
Design of fences and fences
What will first of all tell a passerby that this dacha belongs to a creative and extraordinary person? Of course, a fence! Boring gray or neatly painted boards can indicate little about anything other than how diligent the summer resident is.
But a mosaic panel made from bottle caps or bottoms is a completely different matter. The plot may vary. But whether it is a geometric pattern or a folk ornament, a landscape or a picture with a children's cartoon character, it will certainly cause delight and surprise.
The decor of discs sparkling in the sun looks fabulous, and the ornament of vinyl records brings back memories of childhood. A fence or enclosure can also be decorated with flowers made from disposable cups, spoons or forks - this encourages outdoor recreation and creative work.
Of course, in a dacha you can simply grow potatoes, carrots, onions, but in order not to feel like a slave working on a hacienda, you still need to decorate it at least a little. And then you can not only admire pictures from the Internet, but also show off your photos of crafts for your dacha.
Birds or animals figurines
Before moving on to considering more practical ideas for using different wood materials, we suggest using your imagination and decorating the area with simple, but very cute animals.
From the simplest materials, without any expense, you can make beautiful decorations for your flowerbed and involve your own child in the process.
Let him consider exactly what the wood hero will look like, what dimensions it will be, and where it will stand, and all you have to do is assemble it from different fragments. We suggest creating an owl family that sits on a branch.
Here you will need:
- Wood saw.
- Fastening.
- A couple of small cuts, divided into two halves.
- A couple of small branches or twigs.
- Four thin small saw cuts.
- 1 large cut and 1 medium size.
- A wooden branch with an average thickness and a length of 0.5 meters.
- And, of course, a sketch. Visualization is an extremely useful thing, and through it you can quickly navigate the amount of material required and its dimensions.
Let's start with a large owl. Before you tightly connect the parts together, you need to lay them out and see how it will look. You may want to change or add something. A large saw cut will serve as a bird's body. You need to mark a couple of small cuts on it, which will be the eyes, and also a knot, which will play the role of the beak.
The craft will look more interesting and voluminous if the elements extend slightly beyond the main outline.
The wings come in any shape, and you may be able to find a more interesting material to use for them. Take a small cut, divide it in half with a hacksaw, clear the edges of the bark and try to make jagged edges that imitate feathers.
Next you need to secure the parts to the body. To do this, you can use small nails and a hammer, but if you are doing a craft with your child, it is better to use liquid nails. A similar technology is used to make a smaller owl.
If desired, add a very small owlet, and after all the birds need to be attached to a branch or stump.
If you want to place it in the middle of the flowerbed, it is permissible to attach a branch on a stick so that the structure is in the shape of the letter “T” and rises above the plantings.
Don't forget that owls have legs, and they can be made using a similar method as wings or from simple branches of a suitable shape. Besides owls, there are many other figurines that are easy to make.
Small bunnies with ears that stick up will also look great.
Which tree to choose for work
For independent work, you can use a variety of forms of wood:
- Solid wood in the form of timber. Similar material is used for arranging baths and saunas. But for craftsmen, the bars are a valuable basis for creative pursuits.
- Beautiful stumps. A real stump with preserved bark and intact inner pulp is a real boon for DIY work.
- Wood cuts. Crafts made from wood cuts can also be used to decorate children's playgrounds, decorative decoration of a summer cottage, apartment and private property.
- Branches and driftwood. An excellent material that allows you to give your crafts the most realistic shape and decor.
- Veneer. A finishing material used for decorative pasting of a number of surfaces. After repairs, you should not dispose of the remaining parts - they can be successfully used for creative activities.
- Plywood. Pressed sawdust can also be conditionally classified as wood for making crafts at home. In addition, plywood sheets will undoubtedly be found in the household of any zealous owner.
- Crafts made from boards can decorate your home or children's playhouse.
For independent work, you can use small blocks, wooden pallets, slats and many other forms of wood blanks. Crafts made from tree roots in a wide variety of variations have a special style and original decor.
What can you do on your site?
Various structures: gazebos, sandboxes, well. They can be built from improvised means, and they will look impressive. For example, if you find fallen trees in the forest, give them the same length and dig them into the ground, you will get a unique frame for a gazebo or “bungalow.”
All that remains is to cover the roof with willow, and the unusual house is ready.
Track.
Ordinary paths instantly change the impression of your dacha or garden. Neatly designed paths help create the “face” of the site.
And making them is as easy as shelling pears:
- It is enough to prepare tree cuts and collect pebbles from the shore of the nearest body of water. At the same time, the cuts do not have to be the same diameter - it will be even more interesting if they are different, but the thickness should be the same.
- Don't forget to first dig a trench (its depth should not exceed 10 cm) and fill it with sand.
- Cuttings, pebbles, earth are laid on top, and lawn grass seeds are planted.
Fencing.
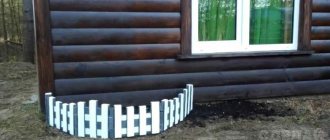
The fence is an important part of any site. And to make it, you don’t have to buy expensive materials; you can use the “gifts of the forest.” A picket fence made from branches collected in the forest will look original.
Fences are needed not only to surround your garden from the outside, but also to divide the space internally.
These can be slatted walls that will appeal to climbing plants, or flower boxes arranged vertically in a checkerboard pattern. This wall looks very beautiful thanks to the flowering plants.
Bridges.
The decorative bridge will delight both children and adults. You can even dig an artificial pond for it, but even without water such an element will look quite natural.
Flowerbed.
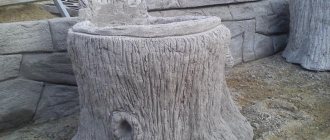
This is the kind of craft that no garden can do without. But a stump left from a cut down tree, a log, or even an ordinary large log can become a flowerbed. But you will have to arm yourself with a chisel and a hammer to hollow out a recess in which the flowers will then grow.
You can make it simpler and decorate a ready-made flowerbed with twigs or neat bars.
Original, unusual flower beds
Planting flowers is the most popular way to decorate a plot of land. There are tulips, peonies, asters, cornflowers and other plants at every dacha, but pay attention to how they are planted.
The original design of a flower garden, beautifully planted plants, decorated with small lanterns or animal figurines is a simple way to make the area even more attractive and interesting.
- Decorative grass - 140 photos of original design. Review of the best varieties of grass for the garden, instructions, reviews, videos + gardener recommendations
- Watering the site - types and types of systems, main differences and features, rules for selection and installation, as well as recommendations for operation
Ornamental plants - 140 photo options. Review of the most popular plants with names and descriptions. Gardener's recommendations + reviews
To create a flower garden, it is not at all necessary to make expensive purchases and purchase high-quality flowers. You just need to sort through the old, unnecessary trash, select suitable plants from the available ones and use your imagination.
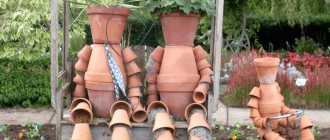
Pour fertile soil into any unnecessary dishes, old chest of drawers, unusable wheelbarrow and these items will immediately turn into beautiful flower beds.
You can decorate your garden plot with a traditional flowerbed, that is, flowers planted directly into the ground, and you can fence it around the perimeter with plastic bottles, logs, branches, bricks and other available materials.
Artificial stones, broken tiles, porcelain cups and much more that at first glance may seem like rubbish will be used.
When creating unique varieties of flower beds, you should take into account the general design style of the site, the facade of the building and, of course, taste preferences.
- Boxwood: planting, care, growing in open ground, propagation. Full description of the plant from A to Z. More than 100 photos of evergreen shrubs
- Living fence - the best ideas on what to make a hedge from at your summer cottage. Many photos of ready-made options with exclusive designs + instructions
- Trimming bushes - the basics of choosing the right plants and forming the right shapes, selecting tools (photo + video)
Useful crafts
Wooden crafts for the garden and cottage can be not only beautiful, but also functional if they are made in the form of furniture. For some, you only need a hammer and nails, while others will require a certain level of professionalism.
When making any wooden furniture, take care of safety and comfort - to do this, sand your products well so as not to pick up splinters.
Be sure to varnish the furniture - after all, it will stand in the open air.
Let's start with simple products:
- Bench. Making a bench or a bench is very simple. You will need two boards (one for the seat, one for the back) and blocks for the legs. You can use either processed logs and boards, or a tree trunk brought from the forest. You can make it even simpler: cut the trunk into two parts lengthwise and use each of them as a separate bench.
The legs for such a bench will be cut off parts of the trunk with recesses where the main part of our bench will lie.
- Chairs. The simplest chairs are made from stumps - just treat the cut area and decorate it. You can use mosaics as decoration.
- Table. Anyone can make a Lego-type table. The most difficult thing in creating it is preparing the boards. The main thing is that they are the same in width, while the length may differ slightly. Build the table as if you were playing Tetris or stacking Lego blocks by securing the tabletop underneath with a couple of longer boards. All that remains is to add the legs and the table is ready.
- Candlesticks. Even a child can handle making them. Prepare a branch of suitable diameter, cut off everything unnecessary and make a recess sufficient for installing a candle.
If you are good at carpentry tools, you will be interested in ideas for professionals:
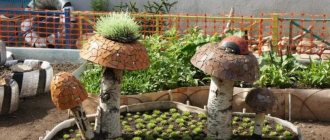
- Playground. A playground for children can be located right in your garden plot. You can build it using a stump from a cut down tree as a basis. A stump easily turns into a house for gnomes if you add a tiled roof, windows and doors. And around this house there will be a small “children’s camp” - with swings, sandboxes and slides. Wooden figurines – a car made from saw cuts, various animals, a rocking horse – won’t hurt either.
A playground can turn into a real training ground if you make ladders out of logs, build a labyrinth, and secure hanging logs low from the ground. Ideas for this can be found on sports grounds.
If you dig saw cuts of different heights into the ground, you will get a path along which you can jump, getting from one end of the “base” to the other.
The playground may include elements such as a wall bars, horizontal bars, hanging rings, a hammock, a gymnastic bar, a rope ladder and a rope.
- The climbing wall will also be a great success. It is very easy to make: you will need two beams dug vertically into the ground and connected by boards. Knots and cuts in boards can be used as hooks.
Be sure to sand all playground elements well and varnish them to protect young athletes from splinters.
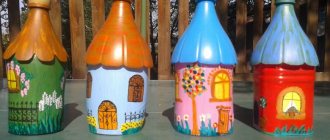
- Decorative mill. It is quite difficult to make a beautiful mill from fairy tales, we will tell you how a simplified version is created, and you can find drawings of more complex mills on the Internet. In order to make a simple mill, you will need wooden planks or planks (for example, clapboard) and two longer slats. Long boards serve as the base, and small ones hold them together. Make a roof and blades on top. Instead, it is enough to arm yourself with two boards of the appropriate size.
- Well. This element looks very beautiful and will attract the attention of anyone who happens to be on your site. The base of the well can be a large wooden barrel. A frame with a roof is placed on top, a crossbar is installed and a bucket is hung. You can make an original well “for a log house” and decorate it with flowers.
- Decorative cart. A small cart decorated with flowers will become a bright element of the interior of any cottage or garden. In order to make wheels, you will need a sheet of plywood or a cut of wood. You can make not only round, but also octagonal wheels - they are easier to manufacture. The cart body is assembled from boards or branches, depending on what effect you want to create.
Tips for beginners on working with wood
- When you decide to assemble the product yourself. Be sure to find a diagram or photo of the assembly on the Internet or in books. Thanks to this, you will not waste extra time and materials for manufacturing. Now it seems to you that it is simple, but in reality everything is more complicated. The main thing is to believe in yourself and not give up. Once you have assembled a birdhouse, you can easily assemble another one. This rule applies to any wood products, the main thing is not to forget the assembly and creation technology.
- Don't be afraid to take on difficult ideas. You will gain a lot of experience, which is very useful.
- To make the task easier, you can buy electric tools. But this will not betray the ambience of physical work
- If you have made a birdhouse, bench, stool and other structures. Find a use for them. Take the birdhouse to the forest and attach it to a tree. Place the bench in the garage or country house.
- Constantly improve your technique in this difficult task. This is important especially for experienced craftsmen. Now it’s easy to learn, find various videos and practice.
- Don't be afraid to show your products to others. There are often people who are ready to order interesting wooden crafts. Put all your strength and love into such products and be sure that your customers' friends turn to you. And friends of friends will order a whole set of furniture for their home.
DIY garden ideas
To create an object that accents attention in the courtyard of a private house, you will have to spend a lot of effort. Various materials, skills, and even tentative drawings will come in handy. In a schematic drawing you can indicate every little detail that needs to be transferred to reality.
You can organize objects of your own imagination, but new ideas from designers will not leave anyone indifferent.
Plant pots made from old shoes
To organize unusual flowerpots and pots, worn-out old shoes or sneakers are often used.
Even children's shoes can be used during the design process. Paired and unpaired numbers of accessories are allowed. Women's shoes and children's lace-up sneakers look very impressive with flowering plants and evergreens. You can also create a temporary summer greenhouse by placing pots of indoor plants in wide men's boots.
Living bouquet in a wheelbarrow
Often unnecessary tools and means for transporting waste are left on the farm. One of them is a three-wheeled wheelbarrow, which can become an original flowerbed in the middle of the lawn. It is not difficult to build such a structure. Climbing perennials, field chamomile and ivy will look good in it.
Cozy sitting area
At your summer cottage, you can’t do without a gazebo for friendly gatherings. You can decorate it in an interesting style, where the main attention is paid to the burning hearth. A small area planted with plants and limited by a fence will always delight you with coolness.
Bench and grill
A rounded wide bench made of wooden slats looks stylish and rich. In the middle of this bench there is a grill in the shape of a wok frying pan, intended for cooking. For safety and to give the object a natural look, crushed stone of the middle fraction is poured in a circle.
Nearby, the landscape design can be supplemented with wide flower beds with perennial flowers and cacti.
Homemade playground
A mini gazebo will bring pleasure to children who regularly visit the dacha with their parents. It is best to equip such a structure from wood: it will be natural and harmless. It is advisable to add a crossbar with a swing and a climbing board to the house.
You will have to buy a factory slide. Alternatively, it can be made from a long piece of tin.
Hammock swing for the garden
Unusual design for a recreation area. You can really make it yourself, it’s just important to choose the right material. The frame is made of wood and varnished. The upper part is covered with tarpaulin or thick reflective fabric.
The swing itself is designed in the form of a bed, having built a durable fabric base.
Crafts made from timber, lining and boards
A lot of interesting things are created from wood. High-quality boards and timber are rare and it is better not to cut them, but to make something large-scale, for example, a bench.
Materials:
- board "twenty" 160 cm long - 7 pcs., 60 cm long - 3 pcs.;
- timber 50x50, length 60 cm - 4 pcs.;
- nails or screws;
- studs for the foundation.
- Tools:
- sandpaper;
- hammer or screwdriver, drill.
Step-by-step instruction:
- Pour the foundation for the legs. Wait for the solution to harden.
- Take 2 pieces of timber, lay them on the foundation and secure them with a pin on the foundation stone, drilling holes in it.
- From the back side of the future bench, nail 2 vertical backrest posts to the ends of the beam.
- Place 2 boards on the edge perpendicularly to the beam and secure.
- Nail 3 short boards across them. Place seat boards on top.
- Assemble the back.
A simplified version of the bench is constructed from timber and hollow building blocks.
Landscape design elements, for example, decorative wells, are constructed from the remains of clapboard, timber, and boards. There are many options for execution, but there is only one correct sequence of work:
- First, a well base box is created, to which the racks are attached.
- A ridge beam is installed between them at the selected height.
- Then rafters are attached on top of the racks, on which the roof is installed: lining or boards.
If you have to buy additional materials for building a well, take a board - the cheapest option.
Stylish flowerpots and tubs are made from scraps.
Flowerbed for a summer house from a rotten log
rotten sawed into large logs in your yard , or you yourself cut down an old tree in your dacha and discovered that it was almost empty inside. Such material, of course, is not suitable for firewood, but for useful crafts it is just what you need! From such a crumbled stump we will make full-fledged and unusual garden beds. We will need:
- Decks – number as desired;
- Axe;
- Hammer;
- Soil substrate;
- Low-maintenance flowers or plants.
You will be lucky if almost the entire inside of the trunk has turned to dust, leaving only the outer contour of a small thickness intact. As a rule, this rarely happens, so you will have to remove excess from the internal cavity yourself. This should be done as follows:
- Pre-draw a contour that should be followed to leave the walls about 5 cm thick;
- Now set the ax on the line and hit it hard with a hammer;
- The work is not difficult, but it requires the use of force, so use reliable tools that will not break during the process and will not injure you;
- Be sure to wear glasses to protect your vision from small chips that will fly in different directions;
Do not try to chop off a large piece of wood at once; the work will progress much easier and faster if you chop off small chips, moving from the existing cavity to the outer contour.
When the work is completed, you can give the flowerbed a more
well-groomed appearance - remove the bark, clean the surface a little, soak it with a special solution against insects and moisture, and cover it with varnish. After drying, install the flower beds in the desired location, fill in the soil and plant the plants. If you place the flowerpot on a pre-prepared bed of sand and crushed stone, excess moisture after watering will be quickly removed, preventing premature rotting of the deck.
Such a composition looks much more interesting if it consists of several flower beds of different sizes. And sometimes homemade wooden flower beds can look like this:
Crafts from logs, logs and logs
The less processed the wood, the more organic it looks in the garden. Massive logs sawn lengthwise are often used to create benches. To ensure stability of the seat on the logs that serve as legs, recesses of the appropriate size are hollowed out or cut out. Then they are fixed with nails.
Pinocchio
To create a man from birch logs, fasten it with nails.
Step-by-step instructions for making Pinocchio:
1. Select a log with a knot that resembles a nose, saw it in half.
2. Find branches that are suitable in shape and size for your legs and arms, cut off the excess.
3. Nail them to the block of wood that will serve as the body.
4. Having attached the limbs, we place Pinocchio on the selected surface.
5. If desired, add details to the figure. On the head we draw or glue eyes from branch cuts.
6. We form a key blank from wire. We measure out the foil.
7. We wrap the wire in foil and get a key.
8. We put shoes made from cheese boxes on our feet, and a cap made from a sleeve from old clothes on our heads.
Making beds
A beautiful vegetable garden is not a luxury, but a means of obtaining aesthetic pleasure. With the help of plastic bottles, painted in different colors, dug into the ground along the border of the ridges, you can not only divide and fix the sown areas, but also turn your garden into a beautiful tapestry consisting of intricate or strictly geometric patterns.
Crafts for the garden can perform not only a decorative, but also a security function, protecting your crops from birds. These can be small figures made from bottles, cans, plastic bags, CDs, polyurethane foam, flower pots and combinations of various materials (it’s good if the design contains movable rustling elements, for example, characters’ hair, plumage or fur), or and large scarecrows - stationary or movable - towering above the garden bed, usually made from a bag filled with straw and old clothes and shoes.
Design ideas can be suggested by the imagination and sense of humor of a summer resident: someone puts a cheerful Scarecrow on a pole, someone puts a figure in the form of a summer resident busy weeding, and someone uses a terrifying “Scream” mask and a black raincoat with wire threaded through the sleeves , attached to a bicycle handlebar fixed on a pole, leaves a Dementor on guard.
Any option is good. The main thing is that it is to the liking of the owner of the site and fits into the overall picture, pleasing to the eye.
Crafts from saw cuts
The wood looks beautiful when cut. The simplest decor from saw cuts is an owl. The parts are connected with nails or glue.
Original flower pots are made from saw cuts glued together in the shape of a vase.
- Another good option is a bookcase. Holes are drilled in the center of each cut with a drill, then they are put on a wooden pin. To prevent the shelves from sliding, a screw is screwed under each one.
- A cute decoration for the door is a wreath. Wooden circles are glued to a plywood ring.
- For the New Year, I decorate the coniferous trees in the garden with toys made from saw cuts.
The hole for the pendants is drilled with a drill.
How to choose the right material
Instructions on how to create crafts from wood.
The appearance of the craft depends on the quality of the harvested branches. What is important is the color, appearance, and the absence of visible defects and damage.
The main thing to pay attention to:
- no resin;
- For some crafts, good flexibility of branches or twigs is important;
- We discard parts of the tree damaged by plant pests; they are not suitable.
To maintain the environmental friendliness of the area and not harm the trees, it is better to collect fallen branches or use branches after pruning trees.
Driftwood and branches in the garden
Any wood is a material for creativity. A board with a greeting is laid out from thin branches.
Thick ones are used to make unique garden furniture.
- Interestingly shaped driftwood will give your garden a picturesque look if you simply place it among the plants.
And with the help of glue and screws, various animal figures are made from pieces of wood. But first, the bark is removed from the branches and they are lightened.
Step-by-step instruction:
- Soak the material in a solution of soda ash: 2 cups per 7 liters of hot water. Place a weight on top.
- After 3 days, remove the bark using a wire brush.
- Then immerse the branches in a bleach solution for 2 days: 1 glass per 7 liters of water.
- Dry in the sun for 3 days.
- Sand with fine-grit sandpaper.
Features of working with the material
Wood, like any other natural material, is susceptible to various damaging factors. Excessive humidity, scorching rays of the sun, pests and fungi can quickly destroy the structure of the wood surface, leading to rot and cracks. As a result, appearance, shape, and size are lost.
Such a craft can no longer fully fulfill its aesthetic or practical functions. To avoid such problems, a number of features should be observed when working with the material:
- Before starting creative work, the prepared material is carefully inspected for cracks, sharp chips, nicks, pest passages and fungus.
- Sharp edges are cut down and sanded with sandpaper.
- Absolutely all wooden surfaces must be subjected to high-quality impregnation with an antiseptic, antipyretic, moisture-resistant and antifungal compounds. This approach allows you to significantly increase the possible service life of a decorative product.
- An additional protective layer can be created by applying stain and then transparent acrylic varnish. In addition, this technique gives the wooden surface a pleasant glossy shine and stylish appearance.
To fasten the prepared parts, both strong glue and self-tapping screws, metal corners, and nails are used. It is important to ensure that when working along the outer contour there are no protruding sharp edges that can lead to injury (especially for children).
Willow weaving
Coastal thickets near the site - Klondike. There they obtain willow branches for crafts. The fences are made according to a simple scheme: pegs are hammered in, then rods with the bark removed are passed between them.
- Nice decor - wicker baskets in which flowers are planted.
- You can knit the frame of any animal from strong branches, and then braid it with vines.
But the most interesting creation is the living tree. Chopped willow twigs are intertwined and rooted. All buds on the trunk are blinding, except for the top ones.
Recommendations for decorating your garden yourself
The number of decorative elements on a site depends on its area, the material capabilities and taste preferences of the owner. When decorating a site, it is important to observe the measure and style of design.
The key to decorating is simplicity, color matching and balance.
The area should not be oversaturated with decorative elements, otherwise it will turn from a place of comfortable relaxation into a cluttered area.
Crafts made from bark and cones
Even fragile wood will serve the cause of beauty. Small crafts are usually made from the bark.
- A birdhouse made of plywood will be transformed if you cover it with bark.
- In order for a hedgehog to appear in the garden, you need to glue the pine cones to a plastic bottle wrapped with twine.
Country furniture made from scrap materials
The benefits and aesthetic advantages of such crafts for landscape design are undeniable. A sofa, assembled from many plastic bottles, allows you not only to take a break from righteous labors, but also has a unique massage effect due to the bottom bulges that form the seat.
A table set made from car tires is not only an impressive piece of crafts for landscape design, but also a place for pleasant family tea parties and gatherings with friends. Tin barrels and tanks, complemented by tabletops and seats, also fit well into the picture of country life.
Wooden masterpieces
Wood crafts look great. Absolutely any breed is suitable. It is enough to find available material. The simplest thing that comes to mind is a table and a bench. No, we are not talking about classics here.
Products made from stumps, saw cuts, and log cabins look unusually creative. In addition, your site can be decorated with various birdhouses, swings, tool storage boxes, a fence, candlesticks, lanterns and much more.
Benefits of working with wood
It is worth mentioning how exactly wood differs from other available materials:
- Wood of various species has a soft, but quite durable structure. The internal base lends itself perfectly to a variety of processing techniques: firing, cutting, sawing.
- For optimal work, no special skills or abilities are required; the master only needs to be able to handle certain sets of tools.
- Wood, even without decorative finishing, gives finished products an excellent natural shade.
- A large collection of ready-made projects and a wide range of products available for work.
Craftsmen today have free access to detailed instructions, video tutorials on how to carry out creative work, diagrams and interesting drawings. You can familiarize yourself with any of them on web resources for practical design, creativity and landscape design.
What crafts can you make?
It is best for a beginner to start with the simplest products and gradually, gaining experience, move on to more complex ones. The crafts themselves can be divided into two categories: those used simply for decoration and those that also have practical benefits.
Let's look at several examples from each group, differing in complexity of execution.
Examples of decorative crafts
Such products are intended simply to please the eyes of the owners and guests of the summer cottage.
- Wooden shoes will serve as an excellent decoration for the hallway of a country house. For their manufacture, square plywood with a side of about twenty centimeters or thin wood of similar dimensions is suitable.
- To begin with, the workpiece should be divided into two equal parts. On one of them, mark a cut line that coincides with the future shape of the shoe. And cut with a saw. This can be done more accurately using a power tool. Next, you have to process the workpiece, removing roughness on the flat surface, as well as smoothing out irregularities on the cut.
- Before further work, you should attach the unfinished product to the second part of the board or plywood and mark its outline. Prepare the second piece using the same principle. As a result, they should turn out to be approximately the same shape.
- The next step is to make holes for the laces. The easiest way is to mark several paired holes on one workpiece, attach it to another, and then drill them. It is advisable to smooth out the resulting holes with sandpaper for smoother shapes.
- Once the craft is almost ready, you can start decorating. For example, paint a shoe some color or simply leave an inscription on it. For greater safety it should be varnished. After the craft has dried, you need to complete the composition by threading the laces. Now the shoes can be placed in a prominent place, surprising your guests with them.
A more complex option for decorative crafts would be a wooden keyboard. To execute it, you will need a piece of wood of the appropriate size, more desire, and also a lot of free time. After all, making such a craft will be extremely labor-intensive.
- It will also require a special tool for creating internal corner cuts and subsequent engraving of the keys. But, as a result, you will receive a high-quality decorative craft that will perfectly complement your desktop or any other place in your country house.
A rather original idea for placing it would be the inside of the fence. Any guest will appreciate such a craft.
Crafts made from wood and plywood for the garden are a reflection of your creativity. Working with products that contain your own ideas and ideas brings special pleasure.
And with a little effort, the result will always delight you and remind you of your own thoughts at the time of creating the craft.
For fun leisure – wooden “Tic-tac-toe”
What to do after a hard day at your dacha with family or close friends? There are, of course, a lot of options, but we suggest remembering everyone’s favorite game, which many people symbolize with childhood, tic-tac-toe. It would seem that what’s special about this game is that we ourselves will make not only a field with markings, but also chips for moves! So, we will need:
- One large saw cut;
- 18 small cuts:
- Varnish;
- Burning device or paint;
- Hacksaw;
- Sandpaper.
A large saw cut will serve as a playing field. to mark it in the form of a field of 3 × 3 cells. This can be done using a wood burner, or you can use acrylic paint. After the paint has dried, it is necessary to coat the surface with varnish. Now you need to prepare the chips.
- A branch about 3 cm thick is suitable, which needs to be cut with a hacksaw into circles about 1 cm thick.
- In general, six “crosses” and “toes” are enough for the game, but chips may get lost, one may not work out in the process, etc. Therefore, it is recommended to do it with a reserve.
- The “toes” do not need markings, but on future “crosses” you need to draw the corresponding symbol on both sides.
- First you need to level the surfaces after the hacksaw by rubbing it on sandpaper.
- When you are finished burning or painting icons on the chips, protect the surface with a layer of varnish. You don’t have to do this, but this way the game looks more civilized and is pleasant to pick up.
After the varnish has dried, you can enjoy the unusual stylization of the game everyone is familiar with.
The advantages of handmade products
From scrap materials you can make amazing things for garden plots. They have the following advantages:
An interesting pastime for the whole family. Involve your household in creating amazing crafts for your garden and cottage. You'll have fun.
Creative thinking develops. This moment is incredibly useful for children.
You don’t have to spend money, because you can make a variety of decorative items from wood, foam plastic, old tires, barrels, plastic bottles, and stones.
The materials may be different, it all depends on your ideas and fantasies. The most important thing is that all crafts made with one’s own hands evoke pride in one’s work. And you won’t be ashamed to brag about your abilities to your friends.
Garden furniture in the form of stools
Small chairs that can be made from wood of the appropriate diameter and height, if you hollow out a large saw cut for seating. For convenience, they can be decorated with soft poufs.
You can also make a table from horizontally sawn boards with uneven edges.
The design will look especially impressive if you combine wood with epoxy resin. The design options in this case are not limited, and the appearance is attractive and stylish.
You can also make a decorative shelf from the saw cuts; just attach them to a thick branch. Moreover, the more uneven the branch, the more interesting the result will be.
You can also make a coffee table for the interior. It can be made from cuts, both longitudinal and transverse.
Kitchenware
There are a large number of crafts that can be made for the kitchen. The most functional of them is the kitchen board.
To create it you will need the following tools and materials:
- board;
- sandpaper;
- electric jigsaw;
- pencil;
- burner.
Next, you need to perform the following algorithm of actions:
- Use an electric jigsaw to give the board the required size. Carefully sand all edges with sandpaper.
- Use a pencil to mark the future drawing. If necessary, you can use a stencil.
- Use a burner to process the drawing.
A stand for various small items will look unusual in the kitchen interior. Such a product will add a touch of eco-style or emphasize it.
Before you start work, you need to prepare a set of tools and materials:
- many small boards that should be approximately the same size;
- bottle;
- hot gun;
- twine;
- lighter;
- big button.
The process of creating an eco-style stand is a sequence of actions:
- Place the bottle on a flat surface. Vertically press small boards against it, treating them together with glue using a hot gun. The result should be a glass made from boards. Dry.
- Wrap the stand with twine. For better adhesion, you can add a small amount of glue. Treat the ends of the rope with a lighter.
- Glue the button to the twine.
In any kitchen there are many tools that need to be hung. To solve this problem, you can make a special organizer.
To do this, you need to prepare the following set of materials and tools:
- board 5*25 cm;
- metal hooks;
- dye;
- pencil;
- brush;
- self-tapping screws;
- screwdriver
The work process can be represented as the following algorithm of actions:
- Paint the board. Dry.
- Make markings with a pencil.
- Screw on the metal hooks with self-tapping screws.
Boards of any size are a universal environmental material. You can use them to make many useful things, from small organizers to furniture. Children should definitely be involved in the process so that from a very early age they learn how to make various fakes with their own hands.
Article design: Natalie Podolskaya