If the site is adjacent to a natural reservoir or there is a man-made pond on it, then sooner or later the question of walkways arises. It can be a simple structure, or a solid home berth. Fish farmers use this structure to feed fish, summer residents use it as a sunbathing deck, and fishermen use it as a small boat dock. In addition, such walkways can become a full-fledged element of landscape design.
In this article we will look at:
- How to make a walkway on stilts
- An alternative way to install walkway supports
- How to make a pontoon on barrels
How to make a walkway on stilts
At first glance, the design of walkways on stilts is simple. All you need is:
- fix the supports in the ground
- install the frame
- make flooring or ceiling.
Read also: How to square a number in Excel? —
The work is complicated by the fact that most reservoirs have muddy banks overgrown with sedge or reeds. When starting work, you need to take into account a number of circumstances:
- features of the soil under water;
- soil features on the shore;
- freezing depth;
- possibility of spring ice drift;
- flow speed.
And driving piles into the muddy bottom is very hard work, especially from a boat. In the vast majority of cases, bridge supports are screwed in manually: equipment, as a rule, cannot drive up to the shore of a reservoir, and not everyone is ready to pay a lot of money for a pair of piles.
There is one well-known life hack: it is best to make bridges in winter, when the reservoir is covered with ice. The edges of the holes are extra points of support, and they help maintain the vertical level. It will be easier to do this from ice.
In winter, it is quite acceptable to twirl your arms. 2 people can easily handle this.
You need at least two people to spin, or preferably three people. Two are spinning, the third is standing with a level. And water will help a little in this case. It's not like wrapping it in dry clay.
A gentle method of arranging support
This method is recommended for constructing walkways in an artificial pond. The main advantage of this method is that it does not violate the waterproofing of the reservoir. In addition, such installation of supports is much easier than conventional screwing in piles.
What this method consists of: at the stage of waterproofing the pond, the piles are installed in a plastic container, which is filled with concrete; The container is installed at the bottom of the pond on top of the film. The load-bearing supports of the structure on the shore must be installed on the foundation. This design will be no less durable than walkways on screw piles, and it will serve regularly for several decades.
To make such a gentle design you will need:
- large plastic containers (according to the number of piles). The diameter of the container must be 8 or more times greater than the width of the pile;
- piles;
- concrete solution;
- protective fabric;
- paving slabs;
- waterproofing film;
- composition for internal waterproofing of concrete or waterproof glue;
- stones to decorate the pond around the pile.
Operating procedure:
- In those places where supports are planned, paving slabs must be placed under the pond film. They must be securely fastened and stable. Lay several layers of non-woven material on the tile to prevent the film from rubbing off.
This is an important stage. A strong foundation that can support the weight of concrete will ensure the reliability of the entire structure.
- Also lay several layers of fabric on the film. In size they should be quite a bit larger than the size of the tiles under the film. This must also be done so that the container with concrete does not rub off the film.
- Place a plastic container on the fabric. It should be exactly in the center of the tile!
- Place the pile and fix it in the middle of the container.
- Fill the container with the pile with concrete, leaving a few centimeters on top for a layer of decorative stones.
- Leave the concrete to harden for several days.
- Perform waterproofing: either treat the concrete around the pile with a waterproofing compound, or glue a pond film.
- Wait until completely dry, add stones.
The difficulty in this process usually arises with measurements. It is necessary to make sure that all supports are the same size, installed at the same level, and that in all containers (usually two are enough) the concrete is poured at the same level.
When the concrete has dried, the load-bearing beams can be secured and the structure of the walkways can be completed.
Frame and platform
A steel corner is best suited for making a frame. It will be able to withstand bulky loads, in addition, the shelf of the corner will serve as an additional limiter when fixing the platform (floor).
As a rule, the platform is made of wooden boards. It would not hurt to treat them with machine oil before installation to prevent rotting, which is difficult to avoid due to the proximity to water.
Also, to cover a homemade bridge, you can use, for example, corrugated sheets or PVL sheets, if suddenly these materials were left over after the construction of the dacha. To make the corrugated sheeting not so slippery, you can drill holes with a drill, and to prevent small parts from falling into the PVL holes, you can put old linoleum. Of course, the terraol decking board would solve the above problems most quickly.
As you can see, not much effort is needed to fully experience the joy of communicating with nature and comfortable fishing conditions.
comments powered by HyperComments
What you need to consider when building a small pier for a boat or boat
The coastal zone of a reservoir, equipped with special equipment for mooring, repair work and maintenance, is called a berth. If until recently hardwood was used to create a pile foundation, today metal driven and screw piles are most often used, differing in structure and installation method:
The diameter of the shaft and the wall thickness of the piles depend on the level of expected load. A concrete solution must be poured into the cavity of the screwed-in piles, which increases the load-bearing capacity of the support. The cost of the material used for construction can be reduced by purchasing modern polymers with high water-repellent characteristics.
The surface structure made of such building material is characterized by the following quality characteristics:
Polymer deck boards used in the installation of decking do not require protection with varnishes and oil, which makes maintenance simple and affordable.
Bridge construction material
In the construction of wooden bridges, coniferous wood, primarily pine, is predominantly used, since it has the most straight and evenly thick trunk, is less knotty, has good physical and mechanical properties and is highly resistant to rotting.
The construction of wooden bridges requires both round and sawn timber of various sections. The wood grade used for this has the following names:
- Log - round wood, cleared of branches and bark, having a natural thickness of the tree trunk in the thin part of at least 12 cm, with a length from 4.0 to 9.0 m;
- Podtovarnik – round timber with a diameter of 8.0 to 12.0 cm at the upper end;
- Poles – thickness from 4.0 to 7.0 cm;
- Plates (cut) are logs cut along the axis into two halves;
- Quarters - a log sawn with two longitudinal cuts into 4 parts;
- Lezhen - a log hewn into two edges;
- Beam - a log hewn into 4 edges;
- Boards – lumber, the width of which is more than 2 times the thickness;
- Lumber - lumber, the width of which is no more than twice its thickness;
- Croaker (obapol) is an incomplete plate obtained as waste when sawing logs into boards and beams.
Decorative bridge in design - how to make it yourself
A pond bridge is a great decoration for your pond, garden or cottage. It not only transforms the area beyond recognition, but also carries out a special functional load. Among the possible uses is a basis for planting plants that bloom wildly or climb. If properly designed, a bridge on a pond with your own hands has every chance of becoming a support for installing lighting and containers with flowers.
- Bridges in landscape design
- Successful accommodation options, basic rules
- Garden bridges: popular design options
- Video review of decorative bridges
- Wooden bridge: construction and materials
- DIY wooden bridge (video)
- Wooden bridge - assembly of the structure and its installation
- Is it easy to make a concrete bridge at the dacha?
Show all content
In a word, the element is useful, functional and very necessary. But how to build a bridge without outside help, is it realistic? Of course - and our article will teach you how to build a beautiful bridge or even a pier yourself.
conclusions
Building good bridges for a pond is not as easy as it seems. But, using life hacks and following technology, you can successfully cope with this task.
The topic about different types of walkways, platforms and decking on our portal will help with this. Learn how to make your own, as well as how to screw screw piles into the ground. Watch our video on how to create a great pond on your property with your own hands.
Subscribe to our Telegram channelExclusive posts every week
How to build a reinforced concrete bridge on a pond
How to make a bridge across a pond with your own hands using reinforced concrete, stones and gravel? This design is more complex, therefore it will take more time, effort and material investments.
Before you make such a bridge for a pond yourself, you need to build a concrete foundation on both sides of the pond. A layer of waterproofing - lining - is laid on it. Next you need to make the bridge elements. They are prepared in forms that are created from wooden blocks and boards. The outline of the form should follow the contours of the future part.
For reinforcement, it is better to use metal rods that will be placed inside the mold with a bend in the desired direction. Next, the concrete solution is poured. The width of the concrete layer should be 10 cm or more. It will take at least 2 days for complete drying. Next, the blanks need to be removed from the mold and installed in the planned location.
Then the reinforced concrete structure is lined. To do this, you can use clinker bricks, paving stones, natural stone, artificial stone, its analogue or mosaic.
The same material can be used to lay a path that will serve as a continuation of the bridge.
It must be taken into account that concrete is capable of expanding when temperature changes, so the supports for the bridge need to be driven in only on one side.
Interesting Facts
Natural bridges made of trees are actively used in India; this is achieved using the peculiarities of the growth of ficus rubber. Roots also grow from the trunk of this plant, which are directed into the palm trunk lying across the river. When the roots reach the opposite bank, they grow into the soil, forming a bridge.
The zigzag bridge is believed to protect household members from evil spirits.
In Xingshan County, China, a bridge was built along the river, not across it, four kilometers long.
The Norwegians built an unusual bridge designed by Leonardo da Vinci, which he designed for the Ottoman Empire. The artist’s idea, a 240-meter long bridge, was not realized at the time.
Not long ago, a bridge was built across one of the tributaries of the Amazon with a length of 3595 meters.
There is a bridge in Scotland from which dogs periodically jump and most often die. The surviving animals come to the bridge and jump off it again.
In South America, monkeys cross bridges made of spider webs.
Style features
Bridges for landscape design should have an unusual shape. The most popular designs are in the Japanese, traditionally Russian or avant-garde style.
Japanese
A Japanese-style bridge will look alien in a garden landscape if the accompanying elements are not recreated. In the Japanese garden landscape, the composition is followed: a bridge and a body of water (pond, waterfall, stream).
Zigzag-shaped, elongated over a pond, the yatsuhashi is a symbol of the path of life.
It can be made curved in the form of two half-arcs over a stream or dry bed. The material for making bridges is wood or stone. The peculiarity of Japanese design is the absence of elaborate details, simplicity and severity of lines, and the predominance of one color scheme.
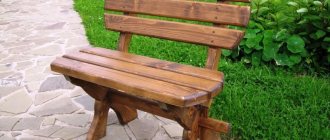
Rustic
A rustic bridge means a straight wood deck with or without rough steps. Dried tree trunks can serve as railings.
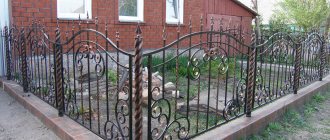
Vanguard
The most decorative forms of bridges.
Several types of materials are used in their manufacture:
- forged metal and wood;
- forged metal and stone;
- concrete, wood, forged metal.
Picturesque arched structures predominate.
Rules for caring for a stream
Dry streams need weeding. If the grass is not removed in a timely manner, everything will become overgrown and the stones will lose their aesthetic appearance. But if you like wildflowers and plants as decoration, then you can leave them, removing only the weeds.
To prevent the vegetation around the stream from blocking the wonderful view, it is trimmed using a lawn mower or garden shears. Stumps, logs or snags can be placed around the “pond”. But then you should make sure that there are no ants under them.
Flowers and herbs planted along the bank of a rocky riverbed must be systematically watered. On hot and dry days, the frequency of watering should be doubled. After all, stones accumulate energy from the sun, thereby drying out the soil around them. If the plants dry out, the beautiful and decorative area will turn into a scorched desert. In the spring, loosen the soil under the plants. To improve their growth, apply mineral or organic fertilizers for feeding.
We recommend reading information about landscape design styles.
Construction principles
When choosing an installation location, it is necessary to maintain proportions and sufficient distance between it and surrounding objects. For example, a bridge may get lost between large trees.
The path from the bridge should lead to garden plants or recreation areas. The bridge itself can be decorated with nearby growing plants, for example, grapes or vines.
Best place for a bridge
If you place the bridge on a flat surface, it will not look organic. When there is no body of water on the site and the terrain is flat, a pond or stream for a bridge can be created artificially, as well as uneven landscapes; a bridge can be placed on one of the paths to be used.
There is an opinion that bridges look great only in large areas; this is a misconception. Made in a small size, appropriately integrated into the landscape, a bridge decorated with flowers will be a wonderful decoration even in a small area.
Under the bridge, you can make a dry stream from a string of green plants or colorful flowers. If the bridge is installed near a gazebo or recreation area, it will add additional picturesqueness to the landscape.
Successful accommodation options, basic rules
The most suitable place to install a bridge on a personal plot is considered to be:
- A small lake or stream, an artificially created pond.
- Natural ravines and ditches.
- "Dry" streams.
- Separately designed flower beds and flower beds
- Paths, paths.
When placing constructed buildings over a body of water, a number of simple rules must be followed. We will introduce you to the most important of them.
The crossing over the pond should be installed in the narrowest place. The smaller the structure, the stronger it will be. Yes, and it looks nicer. Bridges with a dry stream are characterized by such qualities as miniature and compactness. The material used is always combined with the coating and is a continuation of the path.
Bridge over a dry stream
When choosing a place to install a small architectural form, it is worth considering the style of the garden plot. For example, slightly simplified, rough wooden structures are more suitable for country style. Also, without any frills or decorations, they can complement a park area stylized as a forest.
When a garden plot has different differences in ground height, it is recommended to install a forged bridge. Regardless of which material is chosen, the structure must support a minimum weight of 200 kg.
Design safety
It is important that the bridge is not only stable, but also safe, especially if there are children. The best solution would be a bridge with rounded shapes without sharp corners.
Iron handrails will heat up in the sun in summer, so it is better to cover them with wooden material. The bridge must be safe to walk on.
In order for the bridge to be functional for as long as possible, it must be impregnated with special means. This applies to both wooden bridges and metal structures.
A properly treated wooden bridge will last for many years. Periodically care for the decorative structure, maintaining it in proper condition.
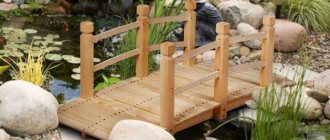
DIY decorative wooden bridge
Before you begin building your bridge, you must understand it, study the structures and the stages in which the work will be carried out. This will help you avoid mistakes that could result in lost materials and save you time. This will also allow you to understand whether you can make a decorative bridge with your own hands in 1 day or whether it will take 2-3 days to construct it. The key elements in the design of this bridge are the arched support beams. The grace of their curvature is emphasized by matching curved handrails.
We choose materials according to our preferences. The most optimal would be to use pine. It has sufficient strength and has a relatively low price. To make a wooden bridge we will need:
- Two wooden beams 100x230 mm and 3 meters long each.
- Wooden planks (we got 25 pieces) measuring 20x150x700 mm.
- Beam for handrails 70x70x700 mm.
- Decorative curved railing strips 8 pcs.
- Long furniture bolts and screws.
To make the bridge we will need a drill/screwdriver, saw or jigsaw. This is the minimum set of tools that every owner should have. Let's go make a decorative bridge for the garden with our own hands.
STEP 1: longitudinal beam . To give an ordinary rectangular beam a curved shape, you need to trim off the excess. We mark the wooden beam (shown in the photo) and start cutting. To properly cut a wooden beam, we use a jigsaw. Protect the edges of the beam with sandpaper. For beauty, you can round all the corners of the wooden beam of the country bridge.
STEP 2: spacers . In order to securely fix two wooden beams together at a certain distance, we make spacers. They are two small strips that are located on the edges of the beam. We take two planks 80 cm long (preferably at least 15 mm thick). We fix them with ordinary wood screws.
STEP 3: wood processing . To protect our decorative bridge from environmental influences (sun, moisture), we need to treat it with special solutions. The most popular and frequently used solution is drying oil. It forms a protective film on the wood and penetrates deeply into the structure of the tree, thereby protecting it from rotting.
STEP 4: fixing the bridge . After we have decided on the location of the decorative bridge for the dacha, we fasten it to the ground. To do this, we will need to drill two holes of suitable diameter in the spacers and secure them with iron pins. We install the pins into the holes made and hammer them into the ground. After this, the bridge will stand securely and steadily in a certain place.
IMPORTANT! Before installing a decorative bridge for a summer house, you need to level and strengthen the site. We remove the top layer of earth cover and fill the desired area with fine gravel. We do everything strictly according to the level, so that in the future there will be no problems with installing the bridge. Since our bridge is small in size, this will be enough
The correct installation of a wooden bridge also depends on its location. If you place such a decorative element in the middle of an empty area, it will not look good under any circumstances, no matter how beautifully you turn it out. For the bridge to look organic, it needs to be located near some greenery. A bridge in the middle of a dense garden, surrounded by greenery, will look very cool.
Operating procedure
The two long boards are guides (in other words, joists). They should be carefully treated, coated with an antiseptic, and painted. If a straight bridge is planned, then the work with them is completed; if it is a humpbacked one, then they need to be bent. To do this, cut off the edges, soak both parts and bend them according to the template until the wood is completely dry.
When building small bridges, PVC pipes, which bend well, are sometimes used as guides. For strength, they are reinforced with thick metal rods - they are simply inserted inside.
Next, the flooring is arranged: transverse boards or bars are nailed to the prepared joists. Walking on unprotected decking is dangerous, especially when it rains when it becomes wet and slippery. The corrugated boards that are nailed on top help out. The bridge is ready.
Scheme of the design of a flat wooden bridge
Two embankments are constructed from stones or gravel, on which the assembled product is mounted. If it is created for decorative purposes, the work can be completed there. If the bridge will be used for crossing, it must be firmly secured. The fixing element will be piles, which should be driven near both ends of each guide - 4 pieces in total. The length of the piles is 80 cm.
- Decorating the finished product
Railings are an optional element, especially when the structure is adjacent to the ground or adorns a “dry” stream. But if the family has small children and the bridge is high enough, railings are simply necessary. They should be strong, high (70-80 cm), with a lattice or frequently spaced slats.
A bridge with railings is much more attractive than one without them. Sometimes wooden parts are decorated with carvings or painted to match the surrounding buildings. They will last longer if you choose coniferous species impregnated with resin for manufacturing: spruce, larch, pine. Applying antiseptic and paint (or varnish) is the finishing touch.
Installation of screw piles on water: walkways and piers
In recent years, modern building materials and the latest technologies have increasingly been used for the construction of structures designed for comfortable and safe access to bodies of water. Now you can choose: to build a seasonal structure (for example, a pontoon) or a permanent bridge on a foundation that will last for many years.
When choosing a construction method and type of structure, take into account:
- soil features on the shore near a river or lake;
- coastal topography;
- loads created by ice in winter and other factors.
The piers are used for swimming and mooring boats. Sometimes gazebos for relaxation are installed directly on the surface of water structures.
Types of engineering structure of above-water structures:
- quay walls - constructed along the shore from reinforced concrete structures;
- pontoons are equipped on platforms made of light pipes, various empty containers, plastic barrels;
- berths on stilts;
- piers are moorings located at right angles to the shore line.
An example of assembling a simple pontoon pier
To build a small pontoon-type berth, they purchase wooden beams, planed boards, nails, screws, metal corners, 200-liter barrels and ropes to secure them. The square frame of the structure is assembled from timber with a section of 100 by 50 mm on the shore. The side length of the square is 2.5 meters. The frame is reinforced at the corners with additional wooden blocks. The corners of the frame structure must be straight (90 degrees).
The structure, assembled from wooden beams and sealed barrels, is an example of the simplest pontoon-type pier providing access to a reservoir
The buoyancy of the berth is provided by four 200-liter barrels, previously used for storing petroleum products. The barrels must be absolutely airtight. To ensure this requirement, sealant or silicone is applied around the plugs to prevent water from getting inside the containers. For better fastening of the barrels to the frame structure, use additional bars (50 by 50 mm), which are attached to the main frame using metal corners. Holes are drilled in these bars through which ropes are pulled to securely fasten the barrels located on both sides of the frame, parallel to each other.
The inverted frame, ready for launching, is transferred to a reservoir without flooring, which will increase its weight several times
Then the rectangular wooden frame is turned over, with the barrels ending up at the bottom of the structure. In this position, the structure is installed in a reservoir near the shore. An anchor system is used to secure it. You can also tie the structure to a pile screwed into the ground on the shore of a reservoir, or to a pole driven into the ground and concreted. At the last stage, the planed board flooring is nailed to the frame. A small bridge is also being built to provide access to the pier from the shore of the reservoir.
Final view of the pontoon pier used in the summer. With the onset of cold weather, the above-water structure is dismantled and stored until the next season
Garden bridge made of stone and concrete by craftsmen
Here is a modern reproduction of an ancient Roman arched stone bridge. A team of several people worked on its construction for about a month, and it took up to
15 tons of stone.
The design principles are obvious: a technological supporting frame is required, the stones should not swing and must intertwine, ensuring a reliable connection. The arch will not collapse only if reliable supports are provided. Probably, with some determination, it is possible to reproduce something similar at your dacha on a noticeably smaller scale.
Note that in modern conditions it is much more convenient to resort to cement and build a decorative bridge made of stone, which is much easier to implement. In this case, the main strength is provided by reinforced concrete, and the stones determine the appearance.
You can come up with and implement your own idea by combining various materials and decoration methods. The main thing is to ensure the reliability of the structure, and then your creation will become a real decoration of the site. The following video has been carefully selected and will certainly help you understand what is presented.
Sticker, stickers, bombing “Stickers-4” 100 pcs HobbiBobbi 2787 ₽ More details
Anti-vibration stands, square 295 ₽ More details
Wallpaper Virtuoso