Types of gates
Currently, there are a large number of all kinds of gates, all kinds of materials for their manufacture and special devices with which they are equipped. The most popular of them:
- Sliding gates.
- Tilt and turn gates.
- Swing gates.
- Rolling gates.
- Folding gates.
Sliding gates
Sliding gates include several varieties, including hanging and sliding structures. Each type of structure requires a large amount of free space.
Hanging gates
Suspended structures are not considered popular, since some types of cars will not be able to drive through them, since their height is limited by the upper bar. Their movement is also carried out along this bar.
Sliding gates
Sliding structures move on rails, but they are not common in northern regions with high rainfall because they will have to be constantly cleared of ice and snow.
Console gates
Cantilever gates are the most successful option among sliding structures.
Tilt and turn doors
Tilt and turn doors are a good option for garage doors. They are not suitable for the yard because they are limited by the upper beam.
Swing gates
Swing gates are well suited for owners of their own homes. The foundation of such structures lies on three pillars: two of them support the structure, and the third holds the gate.
Rolling gates
Rolling gates are a relatively new type of gate. They are folding strips that are rolled up and wound onto a base.
Among the advantages: they do not take up much space, they allow transport to come close.
Folding gates
Folding structures can be opened either upwards or sideways.
Types of structures
We will not consider specific options, but will only talk about the main types of structures from the point of view of engineering solutions.
Table. Types of gate designs
| Gate type | Description of the design, strengths and weaknesses |
| Swing | The simplest and most common design is made of wood or metal. Blind doors are used to fence areas; in public organizations, lattice doors are most often used. The latter allow you to view the enclosed space. Swing gates can be double-leaf or single-leaf. The former are much lighter and require less free space to open. For ease of use, one leaf may have an entrance gate. Design characteristics are improved through the use of special forged or stamped elements. Installation of automatic drive and remote control is possible. The disadvantage is that the width of the driveways or site features does not always make it possible to install gates of this type. |
Sliding | More modern and complex designs are used as an addition to the fencing of prestigious buildings. When opening, the gate slides parallel to the fence, due to this, space is significantly saved; the design can work even when the car has approached the gate closely. The structure is much more complex than swing doors, they require powerful foundations, and have special elements that must be made in specialized mechanical workshops. To manufacture sliding gates, you need to have practical skills in performing various types of work, from structural calculations to welding and construction. Each stage is very important; errors can cause critical consequences. Correcting them requires a lot of time and effort. Sliding gates come in hinged and cantilever types - the former are used to a limited extent and most often in industrial and warehouse facilities. |
It is easier to make swing gates with your own hands; we will consider this option in more detail.
Drawing up a drawing
DIY swing gates (step by step)
Before you start creating a gate, you need to study the diagrams and drawings for the gate with your own hands. Even novice craftsmen can handle making swing gates. There is a lot of information and photos of gates made by yourself on the Internet. They will need:
- Boer.
- Bulgarian.
- Screwdriver.
- Welding.
- Construction tape.
This design implies a large amount of free space.
Installation of gates from corrugated sheets
To begin with, we will tell you about simple swing gates. This design is the most understandable, there are no complex components and it is almost impossible to make a mistake. Ideal choice for beginners!
Gate frame made of corrugated sheets
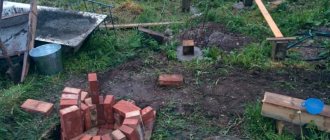
For the frame, take pipes and profiles with a section of 4x4, 6x2, 6x4 or 6x6 cm and a couple of 2x2 cm pipes for internal jumpers. Be sure to prime all profiles with anti-corrosion primer. Pour a crushed stone cushion into the recess about a third of the height of the support and insert the support strictly vertically. Concrete it and cover it with a protective cover from moisture.
Cut the pipes at an angle so that the joints are welded neatly and easily, and then water does not accumulate on them. Clean all elements from rust and dirt, constantly monitor the level, and then clean the welded seams separately. At the end, the frame can be painted with a special anti-corrosion paint for metal.
Strengthening the frame
To strengthen the structure, metal corners are welded for rigidity. For narrow sashes and gates up to one and a half meters, ready-made solid “kerchiefs” are suitable, and for wider ones, a diagonal lintel made of a pipe of a smaller diameter is needed. To prevent windage from the wind, jumpers and stiffeners are installed.
Installation of hinges
For light sashes, two hinges are enough, but for reinforced ones we recommend installing three. They are first welded to the support posts, and only then to the frame. Be sure to take into account how the sash should open in order to understand exactly how to weld the hinges: end-to-end to the support or overlay.
Sheathing with corrugated sheets
The wavy structure of the profiled sheet is convenient for installation: screw the sheets to the frame through the lower waves, and connect them together along the upper ones. Use only the main support and do not screw anything to the reinforcement bars. It’s better to take special rivets - they are neater and less noticeable, but self-tapping screws are also suitable.
Lock installation
For a padlock, weld the hinges to the frame while still plating. The mortise one cuts directly into the pipe, so it is the most inconspicuous. The invoice is mounted on a frame or an additional welded metal sheet.
To secure the canvas more securely and relieve the load from one lock, you need lower clamps that go into the ground. Latches or bolts are installed from the inside.
Automation for gates
For remote control you need an electric drive, with which you can install an alarm and a camera. It is most convenient with sliding and up-and-over gates, because if the gate is sliding, you will have to install two drives and synchronize the operation of the leaves. The most impractical and not particularly applicable in everyday life are automated swing gates.
Specifics of swing gates
To create them, push-button corner connectors are used. They hold the sashes and help them not to sag.
All fastening materials are carefully hidden, which makes them attractive and prevents the penetration of small parts into the fastening areas.
The gate shutters are held on three-section hinges, which helps to increase their service life.
Studying the diagrams on how to do it yourself, it remains to understand that the main thing in swing gates is the frame made of metal profiles. To fasten the sashes you will need electric welding.
The peculiarity of the profiled sheet is that it is not a heavy material, and two reliable loops are enough to secure it. A pipe 70-100 mm in diameter is suitable as a foundation support.
The gate is attached to the fence; if the fence is a brick wall, it is necessary to lay seams into it, to which the supports are subsequently welded.
The dimensions of such gates are: width – 3 meters, height – 2 meters. Metal pins are suitable as constipations. These pins are located at the bottom. To do this, you need to install metal pipes in the ground. The distance from the gate to the surface is 5-7cm.
Installation of piles
To immerse the pile to the maximum depth, which should be at least 1.3 meters, you need to dig a 1 meter hole in advance and hammer the rest. This installation method is called the “hammering method”.
This is the easiest installation method, which can be completed in one day, and the quality of work meets all strength requirements. After driving, you need to weld special hinges to the piles, onto which the gate frames will later be attached.
The next installation method is more radical. It requires preparing a hole at least one and a half meters deep and 30 centimeters in diameter.
At the bottom of this hole you need to pour a few centimeters of sand and then another 10 centimeters of crushed stone. This creates a special cushion that prevents the pile from sinking into the ground. Depending on the massiveness of the gate, the depth and diameter parameters may vary.
To improve strength, a metal mesh is installed in the dug hole. After this, the pile itself is placed, and the entire volume is filled with cement. Afterwards, you need to run a vibrator over the material in order to get rid of air bubbles and voids.
After the cement has hardened, you need to make fastenings for the gate. If you want to make brick pillars, you need to provide a gap for the gate hinges.
Gate dimensions (we make an exact calculation)
Having studied the sketches for the gates with your own hands, you can begin choosing the material. It is better to choose metal with a thickness of 1.5-2 millimeters.
If the gate weighs less than 150 kg, it is better to take a pipe with a cross-section of 80 by 80 mm and a thickness of about 4 millimeters.
If the weight of the gate varies from 150-300 kg, then the pipe is 100 by 100 and 5 millimeters.
With a weight of more than 300 kg - 140 by 140 and a thickness of 5 millimeters.
Gate hinges must support the weight of the structure. The lock can be a mechanical or electromechanical device.
For concrete or tiled surfaces, it is better to increase the distance between the fence and the tiles to 50 mm. If grass grows under the future fence, then it is better to increase this distance to 100 mm.
We fasten the corrugated sheet
Self-tapping screws for corrugated sheets Self-tapping screws for corrugated sheets
The width of the corrugated sheet is usually 110 cm. About 10 cm will go to the floors. Thus, to cover a two-meter wide door you need exactly 2 sheets of material. If desired, the gate can be sheathed on both sides.
We attach the corrugated sheet to the gate. We make cutouts for the hinges
We attach the corrugated sheet to the gate. We make cutouts for the hinges
We fasten the sheets using hex head screws and nuts or special rivets. It is better that the color of the fasteners and the base material be the same.
If necessary, pre-paint the fastening elements. We place bolts or rivets in the inner wave of the sheet (the one that fits tightly to the frame). We fix it in each wave of the profiled sheet. For greater convenience, we can pre-make holes in the frame to accommodate fasteners.
The gate is sheathed similarly to the doors. You just need to pre-cut the sheets to the size of the gate.
Front side View from the yard
Tools and materials
Before creating any gate, be it a sliding gate with your own hands, a roller gate, a swing gate, or a garage door with your own hands, you need to think through the sketch of the future structure in great detail. It will help in the future when purchasing components and selecting tools. A typical list consists of:
- Sheathing.
- Support pipes.
- Fittings.
- Metal square.
- Primers.
- Loop.
- Espagnolette.
- Paints.
Required tools:
- Construction cord.
- Welding.
- Hammer.
- Drill.
- Bulgarian.
- Metal scissors.
Making your own sliding gates
To make a sliding structure with your own hands, you will need a metal corner or a profile pipe. First of all, you need to weld a rectangular frame of the required size. The standard height is from 1.8 m to 2 m, and the width is from 2.5 m to 3 m.
It is necessary to weld brackets with rollers onto the finished frame on top and cover the structure with corrugated sheets or other material from which the gates are made. It is better to sheathe them on both sides, for a harmonious look from the front and back.
When choosing an entrance structure for a private house, you need to be guided not only by the simplicity of the product and low cost, but also by considerations of safety and reliability, since this is protection from prying eyes and the external environment.
Step-by-step work of erecting a gate
The support pillar assembly can be made from a variety of materials. Assembly can be carried out in two ways: driving and concreting with reinforcement.
For concreting it is necessary to make a 1 meter pit. Before pouring, it is necessary to backfill 15-20 cm of sand or crushed stone. Next you need to install the supports and fill the entire structure with concrete. Allow the fill to dry for at least one week.
Learning to make gate leaves
- Prepare a drawing.
- The calculation of materials is based on the width of the structure.
- When forming the components for the frame, you need to cut off part of the pipe and grind it.
Welding work
The main rule when welding is to prevent water from getting into the joints. Otherwise, the structure will be deformed over time.
Welding of the hinges must be done to the posts and base if it is made of metal. If the pillars are brick, you need to use a channel and then electric weld the hinges.
Priming and painting gates
A primer will be needed in any case. It increases the useful life of paint. Welding seams need to be primed in the most detail. Any paint is suitable for painting gates. For a more uniform application, it is better to use a spray gun.
Where to begin
Before choosing a specific type of structure, you need to calculate the entrance arch of the garage. This is necessary for the optimal selection of construction materials.
It is also worth considering the climate, as mentioned above, if it is too humid, sectional garage doors will do. They are lightweight, made of plastic and are not affected by moisture.
After all the calculations have been made and all aspects have been taken into account, you can begin to select a specific type of design.
Photos of homemade gates
Preparatory work
Before building a fence made of corrugated sheets, it is necessary to assess the characteristics of the soil. The accuracy of geodetic tests will subsequently ensure the durability of the entire structure.
The price of such work is justified by the stability of the fence. The main objective of the research is to obtain a detailed description of the soil at the site where the fence will be installed.
Geodetic works include:
- Study of the relief.
- Determination of the composition and type of soil (chemical and physical characteristics).
- Detection of groundwater levels.
The photo shows a corrugated sheet fence in a rural area.
Yard in the village
Carrying out such activities is primarily relevant when constructing heavy fences made of brick, metal or reinforced concrete. However, even when installing a lightweight structure, soil analysis should not be neglected.
Knowledge of soil characteristics allows you to calculate and build a reliable foundation.
It is the base that bears the load, so its arrangement should be treated with special attention.
An example of incorrect calculation of the foundation is the subsequent jamming of a gate or wicket during the off-season. Before future fencing, it is necessary to clear the area of foreign objects.
Mounting unit
Cold Forging Tools
TORSION (Twister) - Twisting tool
With their help, tetrahedral rods or strips of metal are twisted in the longitudinal direction. The result is twisted columns, which are also called torsion bars.
Estimated cost 9000 rub.
SNAIL tool for curls
Device for forming flat curls of different sizes for gates. Market value from 15,000 rubles.
Bending machines or benders.
Bending machines or benders. Allows you to bend rods or reinforcement at the required angle anywhere. Estimated cost 12,000 rubles.
Cold forging machine
With the help of Gnutik, you can roll an arc of almost any radius in several steps. The price for this is low productivity and repeatability of elements. Market value from 6,000 rubles.
Rolling press
Devices for processing the ends of parts - inertial stamping machines or other home-made devices.
A press is needed to form the ends of the rods. This machine works on the principle of a flywheel; first, by rotating the bar with weights, the screw striker is pulled back until it stops. After this, a replacement stamp is inserted into the slot and the workpiece is placed. Next, quickly spin the bar in the opposite direction and leave it to rotate freely. Finally, the striker hits the stamp shank strongly, due to this, a force sufficient for stamping is developed.
Flashlight
On this device, the rod is also twisted in the longitudinal direction, but it is also additionally bent in the transverse direction. It turns out something similar to a flashlight (basket). Hence the name of the device.