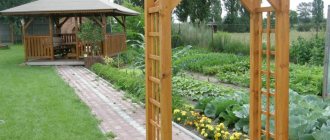
Today landscape design is very popular in the improvement of dachas and country houses. The large abundance of varieties of exotic plants and flowers on the plots requires a special approach, facilities and structures. Pergolas, bridges, gazebos, arches, flowerpots, garden sculptures, trellises help to improve garden areas and create a unified style. One of the most popular objects of garden architecture is a trellis for climbing plants.
Types of trellises and what material is better to choose
The main materials are: plastic, wood, metal alloys. For summer cottages, small wooden slats are usually chosen. About 15mm wide.
Before making a trellis, even at the stage of planning the frame, you need to take into account the dimensions of the future plant and its growth potential. The more voluminous the plant and its leaves are, the more durable and reliable the frame should be.
The appearance and shape can be completely different. Examples of trellises can be seen in the photo. The design is limited only by your imagination and physical capabilities, but you can always hire a designer and craftsman to make the structure.
An important point is that the reliability and stability of the structure directly depends on the scale of the cells. The larger the scale, the less reliable and stable the entire structure will be. And small cells will create a powerful, reliable and safe structure.
It was found that the best option would be cells no larger than 100 mm. The blocks and slats are attached to each other using nails or any similar materials.
As an interesting design solution, you can add several vertical or horizontal rows, with elements of smaller or larger diameter. But, remember that everything should be in moderation and such delights affect the reliability of the design.
- Vertical flower beds - ideas for creating beautiful flower beds with your own hands (80 photos)
- Rose garden at the dacha - layout of different types of flower beds and the best varieties for growing (70 photos)
- A beautiful lawn on your property: how to lay the perfect lawn with your own hands? (100 photos)
If we talk about the types of trellises, then we can distinguish the shape of a square, triangle and rectangle for wooden elements. Plastic and metal are as unlimited in design as wood.
Old interior items
An interesting design find is the use of furniture and household items as supports for flowers and fruit. Beds, bicycles, old carts, bathtubs, musical instruments and even doors are used.
Most supporting structures can be easily made from scrap materials yourself. Show a little imagination, patience and ingenuity, and then unkempt flower beds will turn into bright and stylish accents.
Made of wood
Wood is a traditional and affordable material that is quite easy to work with.
To make a wooden trellis for climbing plants, we will need a frame beam, a picket fence or slats, sandpaper, a level, a screwdriver, self-tapping screws, a brush, varnish or paint.
We make the frame of the future support from timber. The more massive the plant we plan to plant, the thicker the timber we use for the base. The traditional height of such a design is 1.5-2 m, but first of all we take into account the height of the plant. Having fastened the bars into a frame, we attach the rail, arranging it in the form of squares or rhombuses. It is desirable that the cells have sides of approximately 10-15 cm. This is the ideal size that allows you to firmly hold the vines and look quite decorative. When assembling the grate, be sure to use a level, it will help make it as correct as possible. We carefully fasten everything together with self-tapping screws. In order for wooden trellises to be better preserved, we treat them with a special antiseptic, and then open them with varnish or paint them in the desired color.
If the trellis will be installed as a separate screen, then it is necessary to leave 50-60 cm of timber for penetration into the ground, having previously treated it with creosote or wrapped it with waterproofing material. This design also requires additional support to withstand strong winds.
Wooden trellises are great for perennial climbing plants (especially roses), since they will not freeze on the wood in winter (unlike metal).
It will be useful to read:
Choosing support for plants Climbing vines can enhance any corner. In natural conditions, nature itself takes care of them...
How to choose the right material
Before you start creating a trellis, you should decide on the type of plant, location and design of the future structure. Rectangular one- or two-plane structures made of metal or strong wood such as pine, oak, larch, and ash are well suited for grapes.
For agricultural plants, such as cucumbers, some varieties of zucchini, and raspberries, the strength of the material also plays an important role. Arched and lattice types of trellis are suitable for ornamental plants. But light and graceful plants such as thunbergia or morning glory will look good on all types of garden trellises and arches. There is no need for heavy structures to decorate these flowers; they look equally good on iron, wood, bamboo or wire structures.
For a grape trellis, the height of the structure is calculated to be slightly higher than human height, 190-200 cm, so that harvesting is convenient. But often the length of the support pillars reaches 3 meters. The height of the trellis for cucumbers does not exceed 180 cm, for tomatoes - 150 cm, for eggplants - 1.5 - 2 meters.
The dimensions of decorative trellis structures are calculated individually based on design and wishes.
Kinds
Trellis can be divided into types based on several criteria: material of creation, purpose and manufacturing option - ready-made or home-made. Each of them has its own advantages and disadvantages, which you need to know about if you want to get a quality structure.
According to the material of manufacture
In most cases, homemade trellises used near the house or in the country are made of wood and wire, while purchased ones are made of plastic and steel rods.
Important! The greatest demand among consumers is for wooden products made from thin (no more than 1.5 cm) bars or slats.
The shape of the trellis depends on the type of material. Thus, wooden elements are perfect for standard triangular, square or rectangular structures, but wire, plastic and metal will allow you to create structures of more bizarre and unusual shapes: for example, S-shaped or fan-shaped.
By purpose
Trellis are divided into types and depending on their further purpose. The fact is that different climbing plants have different requirements for their cultivation, not to mention different sizes and other individual parameters. Therefore, before you make a trellis, you will have to decide which plant it will be used for: grapes, flowers or vegetables.
Store-bought and homemade
If with home-made options everything is more or less clear: you create a frame taking into account personal requirements and the size of the plant, then purchased options are supplied ready-made and may not take into account the size of your plantings or free space for installation.
Among modern supports there are single-plane (fences, nets, gratings, partitions) and two-plane, represented by balconies, arches, etc.
The first option, which can be easily made at home, is perfect for growing bushes and young plants in small areas. For fast-growing crops, if optimal use of space is necessary, it is better to select two-plane products. In principle, you can also make them yourself, but you will need more material and, perhaps, not only wooden blocks.
In addition to the described species, there are also some other types of trellises. So, depending on its location, you may need a wall support (attached to the wall of any building) or a free-standing one. In the first case, in addition to their direct purpose (supporting plants), such trellises also perform a decorative function, covering the wall.
The functions of support for plants can be performed by pergolas and gazebos, while climbing plants, in addition to their decorative qualities, will also protect from the scorching sun
The advantage of such a support is the absence of a mandatory frame, which would give additional rigidity to the entire structure. To fix the wall trellis, you must first nail wooden blocks with a cross-section of at least 5 cm to the wall. With further growing of the plant, this will improve air circulation between the lattice and the solid support.
Important! From a practical point of view, it is better to secure the trellis with hooks, which will allow you to easily remove it and put it back on as needed.
A trellis, tightly entwined with climbing plants, resembles a sail, which means it is easier to move it. To prevent this from happening, do not forget to use a support post, presented in the form of a rod with a thickness of 1 cm (it is stuck into the ground to a depth of at least half a meter). When using a wooden beam, its lower part should be wrapped in roofing felt or treated with resin, which will prevent the wood from rotting.
Many owners of personal plots prefer to make such structures themselves, which, however, is not surprising. In addition to saving, if you wish, you can get a stronger structure that will serve faithfully for many years.
Advantages of trellis structures
A trellis for climbing plants has a lot of advantages and has an important functional purpose:
- This is a great way to fill and decorate empty space;
- with its help you can hide imperfections and unsightly places: cracks in the wall, old and outbuildings, etc. It’s also a great way to decorate blank walls and windows;
- raising plants above the ground provides good ventilation, prevents rotting and the development of diseases;
- creates much-needed summer shade;
- serves to distribute sunlight evenly for plants;
- shoots of fruiting plants are less damaged during harvesting;
- easy to manufacture and operate;
- a decorative trellis in itself is already a self-sufficient decorative element;
- trellises for climbing flowers for the garden help to delimit space and create special zones;
- support for climbing plants;
- helps save space;
- Great for making hedges.
What types of trellises are there?
According to the design features, trellises can be divided into single-plane and two-plane. The first include flat structures in the form of fences, fences, trellises and decorative walls in the garden. Single-plane trellises can be used to decorate the walls of houses and gazebos, to zone a garden plot, or to tie berry bushes and vegetable plants to them.
For tall tomatoes, single-plane trellises made of poles dug every 2-3 m along the entire row of plants are suitable. Horizontal poles or a block must be nailed to the top or firmly tied to the top. Above each plant in the row, attach a thin wire or strong cord to a block, the lower end of which is attached to a peg driven into the soil next to the plant.
Diagram of an inclined trellis.
Double-plane trellises are three-dimensional structures consisting of 2 rows of flat trellises parallel to each other. Connected at the top by slats or a single-plane trellis located horizontally, they turn into arches, pergolas and light gazebos. This design is more stable than a flat trellis and looks much more decorative. In “green building” it is common to combine both types of plant supports when designing a garden landscape.
Trade organizations offer a wide selection of trellis structures made from different materials. Metal, plastic, and wooden products are available in various sizes and styles. But to save money, you should try to make a trellis yourself. Anyone who has welding skills can easily make a frame from a steel angle with reinforcing bars welded onto it. With some skill, the rod can be bent and assembled into an openwork lattice, similar to a forged product.
Mark on one of the frames the places where the grille strips are attached. The distances between the marks must be the same. For convenience, you can use a template - a piece of bar equal to the size of the grid mesh. Using a hacksaw to cut off the strips of the required length, screw them with self-tapping screws from one mark to another on opposite sides of the frame. When performing this operation, you must ensure that the planks are parallel.
Benefits of using custom plant supports
Many elements are responsible for the vertical structure of the garden, its expressiveness and dynamics - dominants, skeletal plantings, small architecture, and accent plants in each individual composition. But in the vertical game there is no more interesting tool than support structures for garden plants. And we’re not just talking about climbing, twining or climbing stars: both perennials and seasonal stars, whose flowers are too heavy for fragile shoots, need support. Even small supports for peonies or vines can perform a completely unexpected function.
Supports for vines can bring not only grace, airiness, expressiveness and structure to the garden, but also at the same time play the role of a full-fledged decor, style-forming decoration or an element that attracts the eye. Using a variety of supports you can:
- express your character and tastes;
- remind about hobbies and hobbies;
- make a statement about your position or life views;
- bring a feeling of luxury;
- create a special atmosphere.
The supports perform both aesthetic and practical tasks. The former are often ignored, since the main motive for purchasing or creating supports for plants is always purely practical. Supports are needed if you want to support crumbling bushes or fragile flower stalks, reveal the beauty of climbing roses or clematis, create a colorful screen from prying eyes, or drape boring and dull walls, creating living canopies and cascades.
But whatever the task that is solved with the help of a supporting structure, it is not at all necessary to implement it in a boring way. After all, the chance to bring something unique to the garden does not come around very often.
Popular articles How to care for irises in August - September
The original structures that play the role of support for plants are difficult to classify or cover unambiguously. They can be anything - in style, shape, size, materials and aesthetic value. If the support fulfills its main function and at the same time seems to be an original decoration that better reveals the nature of the design of your garden, then it can be included in the ranks of non-standard and acceptable.
Plant supports serve both aesthetic and practical purposes
A little about trellises
First, let's define what a trellis is. A trellis or trellis is the simplest support for climbing and weaving plants, on which the shoots are distributed in the required order.
Such a flower trellis can be made of different materials and, depending on the purpose, be vertical or horizontal, single-plane or two-plane. Several trellises assembled together form a trellis.
A self-made trellis will not only serve as a support for the climbing plant you like, but will help to arrange and decorate the area and emphasize its style.
It can be used to divide the space, as a shading net for a relaxation corner; a horizontal trellis can create an openwork roof for a gazebo.
Beautifully entwined with flowers, the lattice will hide unsightly places on the site, decorate the walls of buildings, fences, and become a wonderful window frame.
Flowers on trellises not only look beautiful and well-groomed, but, being located on an openwork vertical surface, are well ventilated and are less susceptible to disease.
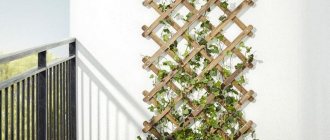
The choice of material when making a trellis with your own hands is determined primarily by its purpose. Thus, a lightweight grille is suitable for mounting on a wall, fence, or between pergola posts. A free-standing screen must have a strong, heavy frame and be thoroughly reinforced.
Trellis can have a wide variety of shapes - rectangular, triangular, zigzag, arched, fan-shaped and others. It depends on your imagination and skill.
The general requirements for creating a trellis for climbing plants with your own hands are as follows:
- Its frame must correspond to the general style of the estate and be in complete harmony with it.
- It needs to have a decorative appearance not only with plants, but also without them (in winter).
- The size of such a support must correspond to the habit of a particular plant, which is designed to look thick and beautiful on the trellis.
- When creating a frame, consider the weight of the overgrown plant. The support must be strong and reliable.
- If the trellis is used as decoration on the wall of a building or fence, then it should not be installed closely; it is necessary to retreat from the wall at least 10 cm, using wooden posts as fasteners. This will ensure the necessary air circulation.
Traditionally, a do-it-yourself trellis for climbing plants can be made of wood, branches (twigs, vines), metal (wire, fittings), plastic (pipes, mesh).
The photos below clearly illustrate all the variety of trellises for climbing plants.
Forged plant supports
Decorative forged supports will decorate the garden area. They are already a work of art in themselves. Individual structures, gazebos or fences, entwined with lush greenery, give the site a special charm.
Types of trellises
By installation method
- Single-plane. Considered a suitable option for small areas. With their help you can grow vegetables, decorate fences and create partitions. They are made of racks about two meters high, between which wire is stretched horizontally at intervals of 0.5 meters. This design provides high-quality natural lighting and ventilation of plants, promotes their intensive growth and high productivity;
- Two-plane. This type of trellis is widely used for growing grapes. A mandatory requirement for their installation is a significant distance between the rows - more than 2 meters. They are made from the same materials as single-plane ones, only they are installed on both sides of the grape bush. There are two options for their construction: vertical and inclined. With the inclined method, two trellises are connected at the bottom and diverge upward at a slight angle of inclination. The supports are placed on both sides of the plant. Their main advantage is improved lighting and an increase in the number of green shoots on large bushes with several branches (sleeves).
Bush holders
Bush holders prevent the plant from coming into contact with the ground, preventing premature rotting. This support is fixed at the base of the bush and promotes its proper growth and flowering. The branches do not break, and harvesting becomes easier.
A standard bush holder consists of several metal hoops of different diameters, fastened with vertical supports. If desired, you can experiment with the form.
From the branches
Trellis made of small branches
In fact, you can make a trellis from a variety of materials, sometimes seemingly unnecessary. These include cut tree branches 1 cm thick. Anyone can assemble such a trellis, and it is also suitable for both plants and cucumbers. So, in addition to branches, you will need:
- flexible wire for fastening rods;
- pliers;
- garden pruner.
Trellis of branches
Actions are performed in this order:
- Available tree branches are sorted depending on their length.
- The main rods should be used first - 2 pieces, which will become indicators of the beginning and end of the trellis. They are stuck into the ground to a depth of 15 cm.
- Near the first rod, at an angle of 60º towards the second, fix the third, and after 14 cm (on average) the next one. The process is repeated until the end of the flight.
- The procedure is repeated only in the opposite direction: from the second to the first rod. The set angle is also maintained.
- The intersections of the rods are fixed with pieces of wire.
- The protruding ends of the branches are trimmed with pruning shears to give the structure the correct shape.
A trellis of branches in action
The result is a trellis with diamond-shaped cells. Naturally, such a design will not last long, but for one season it will be quite enough. If desired, the branches are carefully removed from the ground for the winter and stored in the shed until spring.
As you can see, making a trellis is an absolutely simple matter. In addition, it is worth noting that very little money will be required to create it.
In work and planning, it is important to adhere to just a couple of rules. First, the trellis must be strong, especially when it comes to grapes
The second is stability, since the load from bunches of grapes or cucumbers can be quite large and not every structure can cope with it.
morning glory
In countries with warm winters, morning glory is grown as a perennial plant. In the climatic conditions of Russia, the liana blooms from May until the first cold weather, completing the growing season at temperatures below +10? C. The flowers have a variety of colors: from crimson, purple and blue to variegated varieties.
Necessary growing conditions:
- well-lit area;
- light soil, not overloaded with fertilizers;
- moderate watering (2 - 3 times a week at the root).
Sowing of seeds is carried out at the end of April - beginning of May directly into the ground, immediately installing a support at the site of the first shoots. Morning glory looks great on a fan trellis. A design with a mesh on a metal support is also suitable for it.
Campsis rooting
To form a campsis, choose a strong, high support. It grows well over the summer, forming delicate tubular flowers on young shoots. The liana blooms twice during the warm season: in spring and at the end of summer. For planting, it is preferable to choose lighted and not very shaded places.
If you cover the Kampsis for the first winter, it will become a perennial. In the future, insulation for the winter will not be needed, the woody vine will be able to withstand frosts down to -30? C, and frozen young shoots will quickly recover in the spring.
Growing conditions:
- moderate watering with transition to heavy watering on hotter days;
- minimum fertilizers;
- vertical formation of vines;
- winter insulation directly on the trellis.
Campsis does not like drafts and waterlogging of the soil.
Single-plane trellis
The simplest single-plane trellis
The manufacture of the simplest single-plane trellis begins with marking holes for supports. The distance between the pillars is maintained at 2-3 m, placing them strictly along the line. For the convenience of marking holes, a construction cord is used. Installation of the trellis is carried out in the following order:
- for supports, holes are dug strictly according to the markings, 300 mm wide and 500 mm deep. Half of each hole is filled with crushed stone;
- metal supports are installed by pouring concrete. Wooden posts are treated at the bottom with resin, drying oil or machine oil. The treated area is wrapped with roofing felt and compacted in a hole with crushed stone or soil. During installation, all supports are leveled with a level or plumb line;
Please note: it is not advisable to concrete wooden supports. Columns that have rotted over time need to be replaced and the concrete pouring will have to be destroyed with a hammer drill.
The upper and lower crossbars, depending on the material used, are bolted or welded to the supports. The lower crossbar is mounted 100-150mm higher from the ground;
holes are drilled in the supports for the wire. The first row is placed at a height of 300-400 mm from the ground. All subsequent rows are placed at a distance of 450-500 mm from each other. From the top crossbar, the last row of wire is placed at a distance of 150-200 mm. The wire is pulled like a string, fixed to the posts;
Installation of a two-plane structure is carried out similarly to a single-plane trellis. The only difference is that you need to install two trellises. They are placed opposite each other strictly vertically or in a V-shaped position at an angle. Installation of the V-shaped structure is carried out in the following order: on the site selected for construction, draw a rectangle 3 m long, 800 mm wide; the corners are marked with wooden pegs and an intermediate landmark is measured; In place of the peg, holes are dug and pillars are installed at an angle. The lower distance between the supports is 800 mm, and the upper distance is maintained at 1100-1200 mm. The pits are filled with concrete and crushed stone; After the solution has hardened, attach the horizontal crossbars and tighten the wire. Independent production of an arched structure requires the use of a tool for bending pipes - a pipe bender. It is useful for bending the upper elements of the arch. Installation is carried out in the following order: racks from a profile pipe with a cross-section of 20x20 mm are installed as for a two-plane structure - strictly vertically; The upper elements of the arch are bent using a pipe bender from a profile pipe with a cross-section of 15x15 mm. The finished arched elements are inserted into the supports from above, welded for reliability; for structural rigidity, horizontal jumpers are welded from a profile pipe with a cross-section of 15x15 mm. One lintel is attached to the top of the arch
The sides are welded to the posts at a distance of 500 mm from each other.
Please note: the side jumpers can be welded less often in order to save money, but then you will have to pull additional wire.
To create a small canopy near the house when planting a crop in a single row, you can install a semi-arched trellis. In this case, there is one side of arched elements attached to the posts at the planting site. The second side of the upper structure is welded to a vertical trellis installed near the wall of the house.
Semi-arched canopy near the house
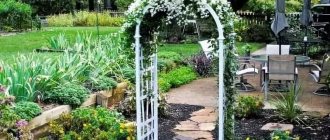
Arches
For zoning and decorating an area in gardens, arches entwined with climbing plants are often used. An arch can become an entrance to a site, a garden, a vegetable garden or a recreation area, or an element of a hedge. Depending on its size, it can accommodate benches, swings or shade-loving plants.
An arch on a site can be built from wood, metal, plastic pipes, or you can purchase a ready-made structure. Regardless of which option you prefer, the arch supports will need to be dug to a depth of at least 60-80 cm and concreted or secured in the ground with stones and bricks, since this structure has a strong windage and can be damaged by the wind.
You can also find arches made of stone; they are more durable than all others, but it is almost impossible to build one without preparation.
Although everyone chooses the size of the arch themselves, it should not be lower than 2.2 m and narrower than 1 m, because otherwise it will be difficult to pass through it after the plants have entwined the support. In order to make a metal arch yourself, you will need: a pipe with a diameter of 30 mm, a rod or fittings with a diameter of 6 mm and 10 mm, a tape measure, a pipe bender, a welding machine, a hacksaw, wire cutters, a hammer and a level. The work is performed in the following order.
- Cut 4 identical pieces of pipe for the supports.
- Bend a 10mm rod into an arc using a pipe bender (you need 2 or more identical parts).
- Weld them together using crossbars made of 6 mm reinforcement (crossbars can be straight, diagonal or bent into a ring).
- Dig the pipe supports into the ground and concrete them.
- Connect the supports to the finished arches.
- Paint the structure and plant climbing plants along the edges.
Popular articles Hydrangea Peppermint: description and features of growing the variety
Tent trellis
Tent trellis
The tent-type structure is made from round or square pipes with a cross-section of 20x20 mm.
Installation is carried out in several steps:
- the pillars of the tent trellis are installed in several rows at a distance of 2-3 m from each other;
- 1300 mm higher from the ground, a horizontal jumper is welded to each support;
- stepping back upward from the jumper, weld a V-shaped canopy from a rod. Each side of the visor is 600 mm long;
- a V-shaped canopy with sides of 1200 mm is welded on top of the post;
- the edges of the lower and upper visors are connected by a vertical jumper.
The tent trellis contributes to the formation of a good grape harvest. In this case, the vine of the crop will hang down in the form of a tent (by the way, you can read about how to plant grapes here).
You can assemble frames of different designs with your own hands. It all depends on the owner’s imagination. The main thing during construction is to take into account the peculiarities of growing the varieties of crops for which the trellis is made.
Watch the video on how to make a trellis for climbing plants with your own hands:
Mesh supports
An inexpensive and very simple way to give direction to a climbing plant is a grid. Entwined with ivy, the structure creates a blank fence, hiding the area from prying eyes.
Choose a regular chain-link fence, a plastic garden trellis, or a trellis net. Two metal poles or a wall are suitable for support.
DIY trellis for climbing plants
Nowadays, it is not difficult to find and buy the product or thing you need. The trellises were no exception. Many companies offer different types of ready-made products from high-quality materials, but since not everyone can afford them, I suggest considering the option of making a trellis with your own hands.
Growing cauliflower: a healthy and tasty vegetable in your garden
How to make a trellis from wood
The size and material for making wooden trellises with your own hands directly depends on the plants for which they are intended. For peas or vines, you can make a simple structure from wire and fruit tree twigs that remain after pruning them. The entire manufacturing process takes place in several stages:
We also recommend reading: How to make a wattle fence from twigs (video) Do-it-yourself trellises for grapes Do-it-yourself support for cucumbers (10 photos)
- Select thin and even branches for the future structure.
- Stick the branch into the ground at an angle. Insert the next rod 15 centimeters from it. In this case, it needs to be tilted towards the first one so that they cross at a certain height from the ground.
- Use a small piece of wire to tie two twigs together.
- We place the third twig immediately next to the second and tilt it parallel to the first. After 15 centimeters, install a fourth twig parallel to the second. Tie with wire where they cross.
- Repeat this process until the end of the future structure.
- Having reached the desired size, cut off all excess ends and give the structure a rectangular shape.
- If your structure is not very stable, then it can be fixed in several places. To do this, we drive small pegs into the ground and tie them to the structure with wire.
- Plants are planted along the support.
Fan trellis
After you have selected the required number of rods, you need to arrange them according to a template prepared in advance and weld them. First, cook the horizontal and vertical, and then mount the remaining rods one by one. If you need to give additional stability to the structure, you can weld additional rods. The finished product is processed and painted, after which it is installed in a pre-designed location.
Aeroponics: gardening without soil
Constructions for the vegetable garden
When choosing the installation location and height, you should take into account their dimensions so that the plants in the garden are not blocked from light by them. Therefore, these structures are placed in the direction from north to south.
As tomatoes grow, they can be tied to a cord. This will ensure access to enough light. In addition, with this arrangement, the trellis will be well blown by the wind, which will save the plants from some diseases.
For cucumbers, you can install the structure in a similar way. This will help you harvest faster in the future. Unlike tomatoes, cucumbers are not tied up, but every few days they entangle the stem with a cord.
This structure can be converted into a two-plane structure. To do this, we install a bar at the tops of each column. We position it perpendicular to the support pillars. We stretch the wire between the slats. Later we attach the cords for the plants to it. These manipulations allow not only to save material, but also time for production.
Forming grapes on a trellis
The fan-sleeve design is considered one of the most comfortable. It is necessary to plant the seedlings correctly so that the upper eye is 7-10 cm deep into the ground. If you use this method, the formation of a trunk is excluded, the vine will easily bend to the soil.
The correct formation of grapes is achieved by several years of periodic work on them.
In the first year, the main goal is to obtain four high-quality shoots from the seedling. Weak shoots must be removed immediately so that the bush does not waste additional energy on them. In autumn, the plants are shortened to 80-100 cm. If no standing shoots have grown, you can remove them all and leave 5-7 buds on the bush, and repeat the steps next year.
The following year in the spring, the shoots are tied to a wire like a fan. On these plants you need to grow 2 new shoots. All eyes break off after swelling, leaving only the top two. All other shoots, which may sprout periodically in the summer, break off. The first harvest may appear, but you should not leave more than half a bunch on the sleeve. The main goal is to form a powerful bush, so all fruit loads should be applied to it gradually. Fruiting links are expected to appear in the fall. On the lower shoot, 2-3 buds are removed, the next one loses 7-10 buds. Before the winter cold, the vine is covered with earth.
In the third year of life of the grape bush, all the resulting shoots are tied horizontally to a wire on a trellis. On the replacement shoot, cut off all the inflorescences except two, one of which should be placed away from the center; it will become the replacement shoot next year. In autumn you can get a harvest of 5 kg or more.
Every year you need to remove the fertilized vine, this will ensure a constant increase in yield.
DIY rockeries. Photos and article about it here.
Here is an article about how to create a discount with your own hands.
And in this section https://ru-house.net/landshaft/ there is a lot of interesting information about the landscape.
Wire for grape trellises should have a high zinc content over the entire surface. Thanks to its spraying, it can last 3 times longer than a regular one. Zinc with a density of about 230 g/m² improves the anti-corrosion properties of the material.
The relative elongation of the wire for trellises is about 5%. This is a good indicator, unlike other options. The negative impact of temperatures does not manifest itself clearly, the wire sags less, so it needs to be tightened less often. The increased carbon content makes the wire stronger, which extends its service life.
Following all the rules for creating trellises for grapes and making the correct formation of the shoots. You can create a wonderful composition with your own hands, which will become a decorative part of the garden path, gazebo, while simultaneously providing a good harvest of fruits every year.
Do-it-yourself trellis for grapes in the country
Copyright "Vsadu.ru" 2010-2017 Copying and modification of site materials is possible only with the written consent of the copyright holders. Articles are protected by the law on copyright and related rights; when quoting materials from the Vsadu.ru project, a direct open link to vsadu.ru is required. All rights reserved.
We can notify you about new articles so that you are always aware of the most interesting things.
Continue No thanks
Arcs
Plastic and metal arcs can be useful not only for covering plants with film or spunbond, but also for creating support. The arches can be made of plastic or metal, the main thing is that they are strong enough, hold their shape and are not afraid of frost. The easiest way is to buy ready-made arcs in a garden store or at the market, since they are inexpensive, but bending them yourself and getting an even result is not so easy.
Due to their small height, arches may not provide support for all plants. It is best to tie short tomatoes, young grape vines, and flowers with thin and tall stems to them.
Clematis
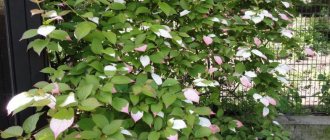
Perennial clematis amaze with the abundance of varieties, colors and shape of buds. They braid trellises, arbors, and any vertical supports with delicate shoots and flowers. Clematis blooms all summer, producing buds on young stems.
An important condition for growing is the formation of the vine:
- in the first two years, the buds are removed from it to form the base of the bush;
- in the third year, leave a minimum number of flowers;
- Abundant flowering begins at 5-6 years.
Clematis responds well to regular watering and fertilizing with mineral fertilizers. It is recommended to cover the perennial for the winter.
How to Use Flower Supports for Strawberries
Structurally, the support is a metal stand in the form of a ring on holders that are immersed in the ground. Leaves, flower rosettes, and berry clusters are placed on the ring so that they do not touch the soil surface. An individual support is installed for each bush in the spring during sanitary measures such as pruning, loosening and fertilizing. After the end of the fruiting season, it is advisable to remove the supports so that the metal does not contribute to freezing of the bush.
Honeysuckle is a magnificent climbing shrub
Most varieties of honeysuckle have shoots up to 8 cm high, which is enough to decorate walls, fences, and a number of garden structures. Honeysuckle foliage is green on top and slightly blue on the underside. The flowers are white, red or yellow. They are relatively small, collected in inflorescences, formed at the end of the shoots. Subsequently, edible fruits are formed here.
Honeysuckle is an unpretentious plant that tolerates partial shade and even shade. However, in sunny areas, flowering is more abundant and the berries are tastier. The plant does not tolerate transplantation well, so it is better to immediately plant it in a permanent place.
Honeysuckle does not have aerial roots and does not form heavy long shoots, so it can be used to decorate the site without restrictions.
Use Cases
Functionally, garden arches can be independent decorative elements and serve an auxiliary function. Among the various options for using architectural structures in the garden, the following are possible:
- installation of a fence next to the load-bearing supports above the gate to the garden for additional decoration with flowers;
- visual separation of garden areas;
- vertical support for climbing roses, ivy, climbing vines;
- base for a children's swing or hammock;
- basis for installing garden lighting elements;
- a shadow barrier for a family recreation area if there are garden chairs or benches nearby.
Highlander - a fragrant liana for the cottage and garden
There are several types of knotweed, including a perennial vine. This plant has fast-growing shoots and long flowering. In central Russia, Baljuan knotweed is planted, which has good winter hardiness.
Baljuan knotweed is distinguished by its extremely fast vine growth. During the season it can grow up to 6 meters. The plant tolerates frosts down to -20 °C. At lower temperatures, the above-ground part of the vine dies, but the roots and part of the plant under the snow remain alive. They will resume rapid growth in the spring.
The climbing knotweed does not have tendrils, suckers or aerial roots, so a trellis is needed to grow it. Without a trellis, the plant weaves horizontally; this quality is used to strengthen crumbling slopes.
Knotweed should not be planted next to trees - it will inhibit their growth and break branches.