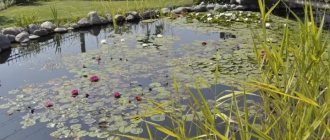
Many dacha owners dream of having an artificial pond on their property. Ideally: with unusual shapes, deep enough and located next to the bathhouse.
Fortunately, this idea is feasible. You can build a pond on your site and decorate it in any style, but before you start designing, you should think about whether you plan to use it as a swimming pool (by the way, this is quite an interesting idea, since after visiting the steam room it would be nice to take a dip in cool water).
But this is not the topic of our article - we are interested in whether it is difficult to build a small pond with your own hands, what is better: plastic or polyethylene, and what points need to be taken into account. Well, let's study this issue in more detail.
A small mini pond made of polyethylene as a way to improve the area
So, you have decided to get your own private pond. Great idea, now everything is in your hands and it’s time to get to work.
A pond can be made in several ways: from polyethylene film, PVC, butyl rubber or plastic. They all differ slightly in assembly (we'll talk about this later). Of course, you also need to plant plants that will decorate your pond.
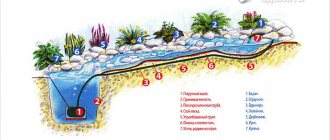
Schematically, the entire process of building a reservoir from polyethylene or PVC film will look like this:
Let's look at each of the stages in more detail.
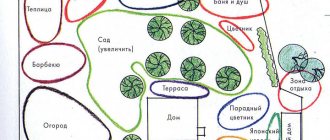
First of all, you need to choose the location of the future reservoir on the site. Please note that even the smallest pond should look decent from anywhere in your yard. Plants that will be located next to it or in it should not spoil its appearance.
When building a reservoir on a site, as when building a house, the first step is marking. A decorative pond should fit perfectly into the overall look - there should be no disharmony.
Then, from a piece of plastic film, you should cut out a figure that will exactly follow the outline of the future pond. That's all, now, having laid the resulting figure on the ground, carefully examine it from all angles.
After laying the film, take a break. Look at its location carefully - is everything in place, is this exactly how you want your pond to look? Don’t be lazy, go into the house and look at your creation from the windows. The view of the future pond should be attractive from everywhere. Carefully weigh the pros and cons to determine the most suitable location for the pond. Because then nothing can be changed.
The location of the mini-pond must be finally marked after the above measures. This is done with a rope and several pegs that are driven into the ground. The rope is stretched between them to replicate the outline of the pond as much as possible.
What tires are needed for a pond?
To understand which tire you should take, you should first decide on the dimensions of the future design. If there is a small pond, then a standard passenger car tire will do. But for a large-scale reservoir you will need something more impressive - from a truck (for example, a tractor or KamAZ).
Choose the tire size depending on the planned dimensions of the pond
If you don’t have used tires in your garage, you can get them at any tire shop. There they sell them at a bargain price or give them away for free. For large tires, it is recommended to contact a car service center. Often car owners offer what you need for a purely symbolic price.
Cut off the top of the tire
How to make a mini pond with your own hands: the initial stage of construction
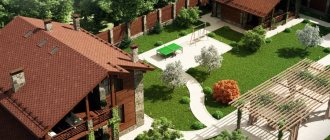
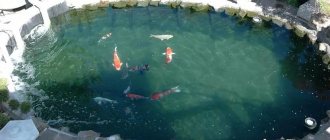
Let's move on to the most important thing - how to do all the work correctly with your own hands? This article is accompanied by photos in which you can see many design options.
As you can see, ponds with a natural look look best, as if they were created by nature. And it will never occur to any of your guests that you could make such beauty with your own hands from seemingly ordinary materials.
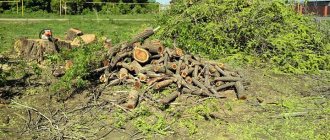
So where to start? To build a mini-pond on a site, you will need to clear the construction site - all the plants that grow in the location of the future pond will have to be removed. After this, along the contour of the mini-pond, remove all the turf (top layer of soil). You should try to get as smooth a surface as possible. To do this, make several control measurements with the level.
Now comes the hardest part. By the way, she is also the most responsible. It will be necessary to dig a pit. Start digging a hole, moving from the edge of the marked area to its middle. Be careful not to cut yourself, as there can often be sharp pieces of brick, glass, metal and other debris in the ground. You do not need the excavated soil; it must be immediately removed from the work site.
Important: at the design stage of the pond, it is better to provide in advance all the terraces, which should be located no closer than 0.3 meters from its boundaries. Try to make sure that all the banks of the reservoir are as flat as possible.
After completing all the excavation work, it is necessary to inspect how the pit turned out: the banks should be at the same level, so they may need to be adjusted a little. The fact is that a piece of shore may be higher than the water surface, and this will affect the appearance of the artificial reservoir. But the most important thing is that the plastic film, which is the basis of a homemade pond, will not be visible.
Stage 1. Decide on the location and size
First, we decide on the place where the decorative pond will be located. To do this, we take into account the following points:
- there should be no trees nearby, as their roots can damage the bottom of the structure, and their leaves can clog the water;
- the place should be open and illuminated by the sun for at least 6 hours a day (this will increase the intensity of algae reproduction without infringing on terrestrial plants);
- if possible, it is advisable to leave space for future expansion of the pond;
- The area of the reservoir should not exceed 3% of the entire site.
Winding pond at the dacha
In a word, the smaller the area, the easier it is to carry out construction work. In terms of depth, we divide the reservoir into three levels:
- for plants near the shore;
- shallow water for winter-hardy water lily;
- a recess in which fish will winter (if we breed them).
Note! It is undesirable to make the reservoir too deep - it is enough to make a depth of 1.6-1.8 meters (that is, below the soil freezing level). The burial area should not exceed a fifth of the entire pond.
Pond
Laying film: how to do it right?
After the water container is ready, you need to compact all the side surfaces as much as possible. Don't forget about compacting the bottom.
That's all, now you need to take an accurate measurement. To do this, use a simple tape measure to measure the length and width of the almost finished pond. It is worth considering that you need to add approximately 0.3 meters on each side. The resulting dimensions are the width and length of a piece of plastic film, which is enough to build a pond.
It is also possible to use butyl rubber, although a reservoir made from it will cost more. The prepared hole must be filled with sand. It is advisable to use river water. The layer thickness should be 3-5 centimeters.
Please note: the thickness of the sand layer directly depends on the type of film used. The thinner the film, the thicker the sand layer. And vice versa. However, provided that perennial plants or trees grow nearby, the possibility of damage to the film by roots should be taken into account. To avoid this, it is necessary to use special bedding that will not allow the roots to break holes in the film.
The film on the bottom of the pond is spread without any problems, but it is most favorable to carry out this procedure on warm days. The fact is that when heated in the sun, polyvinyl chloride becomes as flexible as possible, which makes working with it many times easier. Consequently, you can spread it as tightly as possible along the walls and bottom of the pit.
There is just one minus - small folds will still be present on the film. It will be difficult, and sometimes simply impossible, to get rid of all of them. Then follow the following rule: “a few huge folds will be less noticeable than a hundred smaller ones.” To give a natural look to the bottom and walls of the reservoir, glue the resulting folds, then the plants on the surface will cover all these “defects”.
Please note: the film should not be stretched too much; it should be positioned freely. The main factor for success in this work is sunny weather, since rain can greatly damage the prepared pit.
When the film is laid, check its position - along the entire outline of the coast it is necessary that it protrudes no more than 30 cm. Subsequently, small gravel will be poured onto it, or a layer of soil will be laid on which plants can be planted. They will give the pond an original appearance; take a look at the photo to see what wonderful design options people come up with.
Beginning of work
A pit is first dug into which the tire will be placed. It is possible that it will lie on top of the ground; this option is simpler, but it looks a little unaesthetic, although it all depends on the quality of the design and the idea.
To determine the dimensions of the pit, it is necessary to replace the thickness of the tire and its width. It is worth considering that the dug hole should be slightly wider in order to lay it neatly and without deformation and ensure a strong bond. It is also worth using a level to ensure that the surface is perfectly flat, otherwise the water will be located at an angle.
Important! To prevent the impromptu reservoir from becoming too clogged, it is worth raising it slightly above the surface level
How to decorate a mini pond with your own hands: photo examples
Most of the work has been done, and as it turns out, everything can be done with your own hands, even an artificial pond, and quite quickly. Now we need to decorate this pit with film.
The bottom and edges of the banks can be lined with cobblestones. Just try not to use stones that have sharp corners. Unfortunately, the risk of breaking through the film is very high. The design should be carried out in such a way that the stones are laid as tightly as possible, starting from a depth of 0.3 meters.
It is not necessary to cover the entire surface of the reservoir with stones; it is enough to make steps from this depth when digging a pit, which will help you during installation. It will be easier for you to fill the water to this level. It will be easier to straighten the film, and it will not be possible to deform it.
The landscaping of the reservoir should be such that the first, lowest row consists of large cobblestones. They should be perfectly even underneath. Try to secure them in such a way that they do not move.
It will be much more difficult to decorate a pond if you use a plastic container. In this case, you need to act according to the “inverted pyramid” principle. Each upper tier should rest with a maximum area on the two underlying ones.
When the laying of the cobblestones is completed, you can start filling it with water. Look at the resulting mini-pond from the outside and evaluate it. Make sure that all the banks of the reservoir you made with your own hands are in the same plane. To correct them, you can pour a little sand or earth under the film.
Tips for use
The pond should be cared for constantly: from early spring to late autumn. This prevents water pollution, provides a favorable environment for water flowers and fish, and reduces the likelihood of damage to the waterproofing film. Recommendations:
- garbage entering the pond is immediately removed to prevent clogging of the water and the spread of putrefactive microorganisms;
- Peat, humus or manure should not be poured into the beds near a reservoir (this creates conditions for water to bloom);
- If there are fish in the pool, feed them as needed. The remaining excess food decomposes, which violates the transparency of the pond and the integrity of the film. They must be taken out of the water;
- In winter the pool freezes. To maintain its integrity, several plastic bottles are left in it, partially filled with sand (one per 1 m2). They will take the pressure of the ice.
Don’t put off the idea of creating an artificial pond lined with film, feel free to get down to construction! We are sure that you will be able to realize your ideas and make the pond an excellent addition to the landscape design of your summer cottage.
A pond on the site: how to fill and care for it?
We should start with the fact that filling the reservoir must be carried out according to a certain scheme. Water collection is carried out only using a hose. Pressure - the weaker the better. Do not turn the tap all the way. When filling the pond with water, try to adjust the position of the plastic film.
Unfortunately, no one is immune from the fact that the water in a reservoir may begin to turn green. Fortunately, the problem can be solved by pouring several buckets from a nearby river or lake into your pond, the “natural” water will do its job, and after 1-3 weeks all biological processes will be completed. And the water in the pond will become clear again.
You can see in the photo above various design options for reservoirs. And they have perfectly clean water. Some use tadpoles for cleaning. They eat algae, and the benefit for you is that they purify the water by filtering it through themselves.
Many homeowners are afraid that when constructing a pond, frogs will settle on their property. However, frogs are not the worst thing that can await you. It is much worse if filamentous algae appears. For this reason, you need to get rid of foliage that gets into the mini pond as often as possible. Even a small percentage of it in the water guarantees the appearance of filamentous algae.
Although some plants planted along the edge of the reservoir can get rid of these algae. Plus, you can use them to customize your appearance. One of these “algae fighters” is the common cattail. You can also throw snails onto the shore of the pond.
Plants and algae love water and will try to grow under, above and inside your pond whenever possible. That is why it is important, immediately after filling the hole with water, to carefully secure the edges of the film. Only after this can you plant the plants and make them look beautiful and attractive.
It is also worth mentioning that the edges of the dug pond must be well treated - use geotextiles to prevent weeds from getting out and ruining the excellent appearance of your artificial pond.
Important: how easy it is to keep it clean depends on the size of the decorative pond. The larger the pond, the easier it is to maintain.
This, of course, is somewhat contrary to logic, but, as experts have noted, this is a fact - the smaller the reservoir, the more difficult it is to maintain it in perfect condition. As for plants, they should occupy an area no more than half of the water surface.
Where to dig
Small artificial reservoirs are best viewed from above. Therefore, if there is a corresponding depression on the site, it is best to do it here. There is, however, a negative side to this: you will have to raise the edges of the bowl higher so that rainwater does not get inside. The second option is to come up with a water drainage system (make a drainage system above the reservoir).
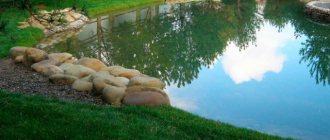
If there is a key somewhere on the site, it is logical to make a natural pond by digging or deepening the existing bowl, lining its borders with cobblestones or stones, and planting plants. The stream, which is sure to exist in this case, can also be improved by lining its edges with cobblestones, drowning them in the soggy soil, you will give greater strength to the bank, and you can plant moisture-loving plants between them.
By covering the bank with stones, you will avoid washing out the soil. Even a small waterfall is a magical sight. How to dam a pond if there is a natural stream on your site - dig a pit, cover it with stones and direct the stream into it. How to make a stream if there is none on your site.
Not everyone has such a luxury on their property as a stream or a spring. We have to make artificial reservoirs. When properly designed, they look no worse than natural ones.
Plastic pond: device and installation method
Now we come to more interesting options for making a reservoir. It would seem that what is so difficult here? There are a great variety of plastic molds in stores now! And square, and rectangular, and with the letter “zyu”. But everything is relative.
When you look closely at a plastic container in a store, it may seem very large to you. But a completely different picture emerges when the full installation is done. Then this container turns out to be incredibly small, almost a puddle. And when the plants cover it, it may completely disappear from view.
Therefore, choose a plastic container for a pond with the largest possible capacity, naturally taking into account the area of the site and your budget.
Let's return to how to use such a plastic container for our business - to build a mini-pond with our own hands:
- First, you need to decide on the shape;
- Secondly, estimate the approximate dimensions of the structure;
- Thirdly, decide on the material.
It’s the latter that we need to talk about in more detail. Fiberglass products will be the most suitable. They are reliable, durable, strong, and quite difficult to damage.
A container made of special reinforced plastic performs a little worse. True, it has one drawback - deformation of the edges is possible. Please note that to achieve a natural look, you need to use black plastic or fiberglass.
Before installing the container in a hole prepared for it, it is necessary to make a small layer of sand. It will prevent the container from warping and deforming after filling with water.
First, pour 5-7 centimeter bags of sand at the bottom of the hole, then place a container and fill it with some water. For sufficient weight, a 15 centimeter layer of water is enough. After this, you begin to pour sand between the edges of the pit and the walls of the tank. Compact slowly if possible. Water the sand with low pressure so that it settles as tightly as possible.
And so, in several passes, adding water to the container and adding sand, you will assemble the main part of your pond. This will give it strength, the container will not deform and will not begin to diverge to the sides. Do not forget that the thickness of the plastic is very small, and the wall area is quite large. Therefore, all work with such a plastic pond should be done very carefully, without deteriorating its appearance.
And finally, the most important thing is to be sure to drain the water from the pond in the winter, otherwise during frost it will expand and destroy the entire plastic container. It is possible that electromechanical cleaning of blockages may be required; for this, contact a specialist. They will clear clogs in your sewer systems in minutes.
A natural reservoir also needs to be cleaned, especially in the autumn, before the onset of cold weather. We have already written about this several times before on our website, so we will not go into details here.
Did you find this article helpful? Please share it on social networks: Don't forget to bookmark the Nedvio website. We talk about construction, renovation, and country real estate in an interesting, useful and understandable way.
Pond in finished plastic form
For beginners, it seems that making a pond in a ready-made plastic form is easier than making a pond using flexible waterproofing. It's an illusion. At first, in the store, the forms seem huge, but after they are installed in the ground, they look about half the size, and when filled with water they seem like very tiny puddles. Such containers are good for raised reservoirs of clear geometric shapes, for installation on slopes, when the lower part is decorated with a retaining wall or rock garden. For rigid containers, simple geometric shapes are good, the edges of which are masked with stone slabs. If a rigid form is intended for a landscape pond, then its edges are often too intricate and difficult to disguise.
The most durable ready-made forms are structures made of fiberglass; they are not inferior in strength to containers made of reinforced plastic, but the edges of the latter can be deformed if the structure is not provided with reliable external support on the ground. These forms are imported and quite expensive. Containers made of ordinary plastic are cheaper, but they are not rigid enough, often have deformed edges, and their sizes are small. Only black forms are suitable for ponds.
Often, reservoirs in ready-made plastic molds become deformed after filling with water; this occurs due to improper filling of the gap between the wall of the pit and the wall of the mold with soil. The correct thing to do is this: pour 5-7 cm of sand onto the horizontal base of the pit, compact it tightly and install a plastic mold. Then pour 10-15 cm of water into it, then pour sand into the gap between the walls of the pool and the pit to a height of about 20 cm, pouring water from a hose over it, or pour a mash of earth, sand and water into the gap and wait until the liquid mass hardens . Then pour another 10-15 cm of water into the pond, and sand with water or mash into the gap, repeating this until the pool is completely filled with water, and the gap is filled with sand or soil. As a result of your actions, the form will stand rigidly in the ground, and its coastline will be in a horizontal plane.
Water from finished structures is never drained for the winter; this is an unnecessary and even harmful operation, because... in the spring the empty bowl will be squeezed out and mangled.
Coastal strengthening
If the soil is weak, then over time it crumbles under its own weight, is washed away by precipitation and can slide into the pond. The slope holds up worst on sandy soil. Loams and clays are more viscous and durable, but sometimes they also need strengthening.
To strengthen the slopes, geosynthetic materials are used:
- geotextiles;
- geogrids;
- geogrids;
- geomats.
Gabions - heavy nets with stones - strengthen the banks well. You can simply lay the rubble along the slope, but the stones must be very large so that the adhesion between them is sufficient to resist a landslide. If the budget is limited, sheet piling walls are installed, mesh impregnated with cement is laid, or concrete is poured over the reinforcement.
Important questions
A pond is not only a rest for the eyes and soul. It creates a favorable microclimate on the site, attracts birds, dragonflies, and makes the garden a special ecosystem where animals, plants and microorganisms interact. In the summer heat, and even with hot drying winds, the air becomes more humid and cooler. This has a good effect on both human well-being and is beneficial for the surrounding plantings.
Every summer resident has at least once thought about his own, albeit small, pond. For some, this is the pleasure of contemplating the surface of the water with plants and fish, a babbling natural stream or a man-made waterfall. Some people want practical benefits, and they use the water supply to water the garden or even breed commercial fish. If the pond is deep enough and clean, it is nice to swim in cool water on a hot day.
Before building a pond, you need to answer important questions for yourself:
- What will be the depth? It depends on whether it is intended to plant deep-sea plants or launch fish. If so, where will they spend the winter? For crucian carp and crucian carp, the wintering pit should be at least 2-2.5 m deep so that an unfrozen zone remains under the ice layer. If the depth is small, about 60-80 cm, then the reservoir will freeze entirely. In this case, fish need to be caught for the winter and moved to an aquarium.
- What volume? The larger the pond, the more excavation work will have to be done and materials purchased. But this is not the only important thing. Even in non-professional fish farming, it is not recommended to overpopulate a reservoir. It is advisable to have no more than 20 fish per 1 cubic meter of water, and the area of the water surface should be 25-50 sq.m.
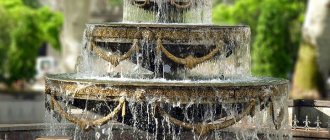
- Will there be a fountain or waterfall? In this case, you need to install equipment in advance - pumps, filters, lay hoses or pipes.
- Where will the water go when the pond overflows? Planned filling occurs from a well, water supply or natural sources - streams, springs. But during rains and melting snow, the level of the pond can rise very much. To prevent the reservoir from overflowing its banks, a drainage system is installed into a drainage pit filled with stones, pumped into a ditch, and other methods are used to get rid of excess water.
- How will the service be carried out? In any case, you will sometimes need to clean the pond and change the water, so you need to provide where the water will drain.
- What materials will it be built from? There are different technologies that vary significantly in price, labor intensity and durability. When choosing, you need to evaluate not only financial, but also physical capabilities, especially if all the work will be carried out on your own.
Soils, their granulometric composition and groundwater level are of great importance. Sandy soils crumble a lot. To form a strong slope, it is necessary to strengthen it. Clay soils are more plastic and hold steepness better. They do not crumble even at an angle of repose of 80-90°.
If the groundwater level is low, there will be no problems with constructing a pond. But if the groundwater level is very close, the task becomes more complicated. You need to make drainage, drain the water, and then form the bottom.