After construction of a house, the garden plot usually looks unkempt, uneven and littered with excess debris. It is too early to carry out its landscaping, lawn seeding and landscaping - before this, an intermediate stage should be completed: clearing the area and preparing the lawn, paths and places for future planting of shrubs and trees.
In this article, we will look at what can and should be done to make your site look well-groomed again, and also in what order you should carry out its improvement.
Stage 1: Site Clearing
Before you start setting up your garden, you need to remove everything that is left after construction, including dirt and debris. You should also remove weeds, remembering that it is not enough to cut off their above-ground parts: new shoots can grow from the roots or rhizomes left behind. In this regard, wheatgrass is especially annoying - it grows even from small pieces of roots.
If the area is large, it is worth considering the option of mechanized processing - using a motor cultivator, excavator or mini-tractor. The choice of equipment depends on the condition of the site after construction.
It is best to dig up the area in the fall to a depth of approximately 15 cm. After this, you need to remove the remaining weeds from the ground with a cultivator or harrow. This procedure must be repeated in the spring, when the plant roots remaining in the ground begin to sprout.
If the area is small, you can use a small tiller, dig up the soil with a shovel, and pull out the weeds with a wide-toothed fork. They are easy to remove roots and rhizomes.
Step-by-step instructions for planting with your own hands step by step
You can sow grass at home only on a fully prepared area. The best time for sowing is spring - from April to June . You can sow by hand or using a seeder.
Regardless of the sowing method, you should walk over the prepared area with a fan rake, fluffing up the top layer of soil, while simultaneously creating grooves on the surface of the soil. The seeds should be mixed well, especially if they are caked. You can also mix them with sand. Each square meter should require from 30 to 60 g of seeds.
When sowing grass by hand, without the use of equipment, the seeds should be scattered in a wide fan, trying to ensure that the seeds fall as evenly as possible. This should be done in calm weather. The section is passed twice: along and across.
It is better to sow large lawns using a seeder . A mixture of lawn grass seeds is poured into the seeder hopper. The seeder needs to go through the area several times: lengthwise, widthwise and diagonally, so as not to miss areas.
After the area is sown, it should be raked over again and lightly compacted with a roller. After this, water the seeded lawn with water from a fine sprayer.
How to sow lawn grass is shown in this video:
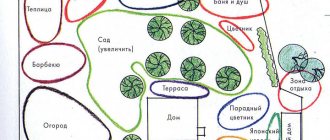
Stage 2: Designing a garden on the site
This is a very important stage in the development of a personal plot. However, unfortunately, it often remains without due attention from landowners.
The point is that before you start gardening work, you should think in advance about what the future garden will look like:
- What elements of small architecture will be present in it?
- How much space should the lawn take up, and how much should the hard surface take up?
- Where will the underground communications be located?
- Where will the greenhouses, utility block, compost pit, etc. be located?
If you do not want to develop a detailed project, it is worth making at least a conceptual sketch of the development of your site and estimating the costs of its development.
Preparatory operations
Before you begin preparing the soil, you need to decide where to plant the lawn.
What should it be like? The site should be sunny, trees, shrubs and buildings should not shade the planting site for more than 4 hours a day. In addition, there should be no stagnation of rain and melt water: excess moisture will help destroy the seedlings.
To calculate the required number of seeds, you should take measurements of the area. To do this, measure the length and width.
Another important step in preparation is the selection of seeds. Currently, there is a huge selection of grass, differing in individual parameters. In addition, you can buy seeds or already sprouted lawn in rolls. In the first case, the lawn will be cheaper, but there is no guarantee that the grass will sprout or grow evenly. With ready-made rolls, the survival rate increases significantly. But this option will cost more.
It is worth considering that the best varieties of grass will cost more than low-grade crops. In addition, cheap seeds may contain weed impurities. So savings are not always justified.
Best at the end of April or beginning of May. At this time, the weather is already quite warm, and the ground is still wet. Therefore, it is easier for the lawn to take root; it grows together and quickly.
To prepare the soil you will need the following tools:
- bayonet shovel for manual digging of the site;
- a motor-cultivator or walk-behind tractor for digging up a large area;
- garden rake for leveling the soil and cutting up clods of earth;
- garden watering can for watering the area;
- a roller weighing 100-150 kg for compacting the soil.
Return to contents
Stage 3: Leveling the terrain of the area
At this stage, the territory of the site is leveled or carried out according to the project: mounds are poured, uneven areas are removed, a foundation pit is dug for a reservoir.
It is worth considering in advance how (from where and where) the soil masses will move so that labor costs are minimal. You can use excess soil for the foundations of a house or fence - this way you can reduce the cost of purchasing and transporting soil.
Be sure to pay attention to the fact that the infertile subsoil layer of soil (the so-called “continent”) is not mixed with the upper fertile layer - humus.
The fertile layer removed during construction or imported must be laid out only in those places where plants are planned to be planted. This makes sense for two reasons:
- Firstly, plants develop better in such soil;
- Secondly, decomposition processes occur in soil containing humus, which leads to a decrease in its volume. Consequently, a covering laid on such a layer or a terrace built on it may fail in the future.
After this, it is necessary to mark the contours of the paths and platforms. And you can already easily imagine: where the elements of small architecture will be located, and where there will be large and small groups of plants, what size the lawn will be and what the view from the window will be.
Thus, when comparing the project with the real picture (the proportions of the house and all the elements of the surrounding landscape), you will be able to see where everything is good and where changes are needed. And, if necessary, change everything.
Common gardening mistakes
When preparing land for planting lawn grass, many summer residents make mistakes that lead to slow growth of the plant crop. Below are the most common ones:
- There is no leveling of the fertile layer. In this case, the lawn grass will take root worse. Sometimes a crop basically doesn’t take root and dries out.
- Planting a lawn near concrete paths. If there are concrete slabs or paths near the site, the grass may grow slowly or dry out due to the influx of cement.
- No watering in the first days after laying the lawn. If the crop does not receive moisture, it can lead to dryness and slow growth. Sometimes the grass does not take root at all without initial watering.
- No fertilizers. In order for the lawn to be bright and lush, it requires proper care. Regular feeding is considered one of the main rules for full growth. In this case, the soil for the lawn should be fertilized with organic compounds. It can be humus, sand, peat.
Summer residents should take into account that an excess of moisture and fertilizers also negatively affects the development of plant crops. In such situations, the grass may have a yellow tint, grow slowly, and dry out quickly. In everything you care for, you need to maintain a balance.
Stage 4: Small architectural forms on the site
After marking the paths and paths, but before laying the covering and starting other work, relief work on the site should be completed.
If there are differences in elevation in the area, it is best to make steps on it. They will also make it easier to move around the garden.
Steps thought out from a landscape point of view not only serve a functional purpose, but will also become an attractive decorative element.
The staircase on the site should have treads 30-40 cm deep and a step height of 12-17 cm. If the staircase is long, it is better to break it into several shorter flights, making platforms between them.
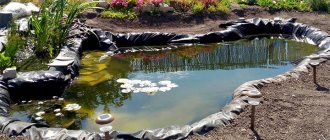
You can also provide space for an artificial pond on the site. A pond in a garden can not only improve its appearance, but also improve its microclimate and diversify the space.
When building a pond on a site, you should remember that the banks of the reservoir should not be steep. The most impressive ponds on the site look not oval or rectangular, but irregular, slightly chaotic in shape.
The earth removed from the pit can also be used to construct artificial hills and elevations, or to correct uneven areas in the area. Retaining walls are used for the same purpose. They allow you to limit the limits of slopes, highlight plants and turn large slopes into comfortable terraces.
Supports can be very different. You can build low walls on dry masonry or plaster walls whose elements are connected with cement mortar. If the retaining structures are too high (over 1.2 m), it is necessary to consult with a specialist who will calculate the load of the restrained earth and carry out a strengthening design.
When installing retaining walls, you should also take into account that if the soil on the site is poorly permeable, you need to make a filter layer between the slope and the wall (from pure gravel or gravel mixed with soil) and put drains at its bottom that drain water into the drainage well. On well-permeable soil there is no need for this and only a filter layer can be laid.
Prices and terms
The cost of performing work to prepare the selected area for a lawn depends on how large its area is. The configuration of the site is also of great importance. If it is a hilly area that needs to be leveled, it will be higher than for a normal flat surface. On average, the price per 1 m2 is 70-80 rubles. This is for light soil - the one that was processed last year. For difficult soils (clayey, swampy, virgin soil), the price increases to 90-100 rubles per square meter.
It matters whether it is necessary to uproot stumps on the site, cut down trees, or remove garbage. Such work has been carried out since May. The weather needs to be dry. The end could be October if it is not rainy. When the work is completed, it is advisable to immediately begin sowing seeds or laying rolls. Otherwise, weeds will begin to appear, because on vacant land this process is inevitable.
Preparing a site for a lawn Source landscape-development.ru
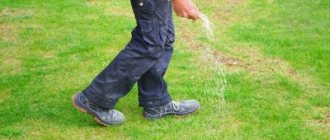
Stage 5: Installation of a site irrigation system
Avid summer residents will not let you lie: when caring for a garden, the most time is usually spent on watering it - in the summer, this generally needs to be done every day.
Watering a plot of 10 acres, with easily drying soil and high sand content, will take at least an hour, if not more. Therefore, for large areas and areas with highly permeable soil, it is better to install an irrigation system in advance - sprinklers and/or drip lines. It is most convenient with automatic control.
If you liked the article, please share it
Previously on the topic:
Share
Stage 6: Laying electrical wiring on site
This stage is recommended to be done in the fall. Then, before spring, the earth will have time to settle, and it will be possible to fill up the formed depressions, and then lay out a lawn or plant plants whose roots do not penetrate too deeply into the soil: perennials and small shrubs.
When laying wires around the site, they are first laid in plastic pipes and placed in pre-dug trenches 60-70 cm deep. The places where they are laid should be marked with signal tape made of film or bricks (15-20 cm above the cable).
In this case, any electrical equipment placed on the site (sockets, lamps, transformers) must have sealed housings protected from dust and moisture (minimum degree of protection IP 55). And home lighting (intended for use inside buildings) cannot be used on the site, even to illuminate canopied terraces and gazebos. Since their parameters and protection do not provide for outdoor use.
Please note that high-voltage equipment (220 V) can only be designed and installed by specialists who have the appropriate permit - permission to perform electrical installation work.
Low-voltage equipment (12 or 24 V) can be installed on the site yourself. Here you will need a step-down transformer. It is best to lay such wires at a depth of at least 30 cm (so as not to cut them with a spade while digging up the ground), or along the surface of the ground.
You should remember about safety precautions. Firstly, the cables should not intersect with gas and water pipes. Secondly, they should be laid as far as possible from already growing trees and shrubs. And although there are no rules regulating this point, it is believed that 50 cm from the edge of the projection of the crown of a tree or bush to the place where the cable is laid is sufficient.
How to make a tamper yourself
A tamper can be made from an empty barrel.
Make a tamper from a barrel:
- Find a container with a volume of about 40-50 liters. Any metal barrel will do, the main thing is that it is not full of holes and that it has a cork .
- Pour in 30-40 liters of water. It is not necessary to fill it completely. You need a weight of about 40 kg for good soil compaction. Place the element on its side, as in the photo.
- Use as a tamper. Just roll the barrel around the area. Large 200 liter options are not suitable, as they are inconvenient to roll.
Video: In a video example, the author talks about how he used a barrel of water for tamping - he simply rolled the soil. He says that within 500-800 rubles you can take a container, pour water into it and roll the soil
Stage 7: Arrangement of paths on the site
Floor tiles are most often used for paths and surfaces in areas. The method of its installation depends on its purpose.
For entrances and other places where heavy traffic is not planned, you can make a base of compacted crushed stone or coarse gravel. Then a layer of sand or a cement-sand mixture (cement-sand in a ratio of 1:9) is laid on it, and then stones, concrete or ceramic elements: slabs, FEM, paving stones, clinker.
For paths that will only be walked on, it is enough to make a base of well-compacted sand or a mixture of sand and cement.
Regardless of the type of covering being laid, you need to remember to form transverse slopes (1-2%), along which water after rain should flow onto lawns or under plants. Thus, you will not only speed up the drying process of paths and areas, but also, by accumulating water in the soil and allowing it to evaporate slowly, you will make a contribution to environmental protection. This solution will also reduce your garden watering costs.
Preliminary work
In order for a beautiful grass covering to appear on the site, you first need to decide how it will be done. There are two options: sowing special seeds and using ready-made rolled lawn. And although preparing the base for a rolled lawn is practically done in the same way as with the seeding option, there are still some nuances. They relate to the composition of the soil that will accept seeds or grown grass rolled into rolls.
In general, the soil for a lawn should be fertile or neutral. The main criterion is at least 50% black soil. If seeds are used, then the remaining 50% should contain 10% sand and humus, as well as 30% peat. For the rolled version, humus is not required, because the base has already been grown. Therefore, 25% sand and peat are added to the chernozem.
But this is done when black soil is present. If the soil on the site is clay, you will have to add fertile soil to it. If there is sandy soil, sand is not used additionally. Only peat and humus are used. Therefore, before you begin preparing a site for rolled lawn or sowing seeds, you need to determine the type of soil available.
The soil for the lawn should be fertile or neutral Source diz-cafe.com
Stage 8: Preparing the soil on the site
In places where you plan to place flower beds, vegetable beds and lawns, trees and shrubs, it is recommended to improve the soil structure, thereby increasing its fertility. For these purposes, you can buy high-quality soil in bags or use the removed fertile soil layer dug out before starting construction.
When purchasing soil, be sure to ask where it came from, so as not to bring soil contaminated with harmful chemicals onto your site. If the soil on the site is infertile or damaged during construction, high-quality soil should be poured in a layer 20-25 cm thick.
After laying the soil, you should measure the pH level - the acidity of the soil. You can do this yourself with a soil pH meter (simple or electronic) or send soil samples for analysis to a laboratory. Most plants are suitable for soil with a pH of 6.0-7.0, that is, slightly acidic or neutral.
What soil is needed for a lawn?
Quite often, after the completion of urban construction, green building residents begin to plant lawns around the new building. Sometimes you can see the following picture: the top layer of soil damaged by construction is completely removed. In its place, a sand cushion is poured, and a new fertile layer of turf is laid on top, which will serve as a substrate for the lawn.
If you decide to landscape your own local area and for some reason want to repeat this technique, you should keep in mind that before performing it you need to take into account a lot of circumstances.
The reasons why there is a need to lay a new fertile layer can be different, for example, the following:
- it is necessary to raise the general level of the nearby territory (in such cases, local soil is usually mixed with imported sand);
- the turf layer has been irreparably damaged by various chemical or construction contaminants and is unsuitable for plant life (the soil is cut off and a new fertile layer is laid in its place);
- Any crops grow very poorly on local soil, for example, on heavy loam or clay (lay a cushion 10 cm or more high, and then mix it well with the mother soil).
If you nevertheless decide to prepare the site by replacing the fertile layer, you need to know what exactly it should be.
Important! The sand used for the drainage cushion and as an integral part of the substrate must be of a coarse fraction
.
It is desirable that the substrate meets the following criteria:
- pH of the salt extract is 6.0–6.5;
- the indicator of moisture retention, porosity and volumetric weight is approximately the same as that of medium or light loam;
- The soil mixture should not float or crack.
If we talk about the specific composition, there are several mixtures on which almost any crop can be planted.
Composition 1
- deoxidized lowland peat - 50%;
- coarse sand - 30–40% (perlite content in this component is acceptable up to 10%);
- sapropel, loam or chernozem - 10–20%.
Composition 2
- lowland or transitional deoxidized peat - 40%;
- turf soil (top layer) - 40%;
- sand - 20%.
Composition 3
- fertile loam - 85–90%;
- sand - 10–15%.
The thickness of the fertile layer should be at least 10 cm. However, it must be taken into account that the soil becomes compacted over time, and to obtain the specified value, it is initially necessary to lay a layer 15–16 cm or more high.
Find out more about the features of vertical gardening.
Step 9: Applying Fertilizer
If the soil is in good condition, it is enough to dig it up, if necessary, lime it, and then add humus.
An excellent fertilizer option is compost. It can be applied in autumn or spring (at the rate of 5 kg/m2) and mixed with the soil. In autumn, you can also use manure (4-10 kg/m2), preferably composted, as it does not have an unpleasant odor.
2-3 weeks before laying the lawn in the ground, it is recommended to apply a multi-component mineral fertilizer or one of the fertilizers intended for grass growth. Then the soil is dug up with a spade or mixed with a soil cutter and carefully leveled.
After all these stages, you can move on to sowing grass and establishing a lawn. But we will talk about this in the next article.
Did you find this article helpful? Please share it on social networks: Don't forget to bookmark the Nedvio website. We talk about construction, renovation, and country real estate in an interesting, useful and understandable way.
Let's keep the land fallow
To obtain a beautiful and attractive lawn, it is recommended to carry out a fallow procedure, that is, the prepared soil is kept fallow for several months. Carrying out such a procedure causes the lawn to naturally shrink, and all its defects become obvious. The positive aspect of this procedure is the opportunity to destroy the remaining weeds in the soil, which will begin to grow in the prepared soil.
Of course, in order to get a beautiful green lawn you will have to spend a lot of effort and energy, but it is worth it. A green lawn will become not only a real decoration of the dacha, but also a place of rest and relaxation.
The lawn near the house gives a special look. However, for the growth of high-quality and green grass, a lot of work needs to be done, since the lawn is a very capricious crop.
For normal growth, not only careful care during growth is necessary, but also good preparation of the land for sowing.
Compacting crushed stone with a vibrating plate
The use of a vibrating plate or vibrating rammer is relevant for global volumes. With the help of technology, it is possible to carry out the process in hard-to-reach places and in areas located near the walls of buildings.
- The equipment is compact, reliable and mobile. Simple operation and high efficiency allow you to complete work with maximum quality in a short time. For domestic needs, vibrating plates weighing from 60 to 120 kg are used.
- The principle of operation is the vibration of the plate produced by rotating eccentrics. Tamping occurs by transferring shock vibrations and energy from the support shoe to the crushed stone.
- The presence of shock absorbers allows you to dampen mechanical vibrations going to the upper part of the equipment, thus providing protection to both the engine and the operator. The equipment is equipped with a speed shift lever, which makes it possible to regulate the travel power.
- Based on the method of movement, there are single-pass and reversible (with reciprocating movements) devices. The latter option is characterized by increased functionality and efficiency. With their help, tamping is carried out without cyclic movement along the surface being treated.
- The engine can run on liquid petroleum products (gasoline or diesel fuel) or by connecting to an electrical network. Units with an electric motor are lightweight (up to 100 kg). They are widely used in jobs where high requirements for material compaction are not required.
- Such equipment can be purchased in specialized stores or second-hand, as they say. The most profitable option is to rent equipment, which will cost much less.
- In any case, it is important to comply with operating conditions that will extend the service life and prevent failure. Before starting, you should carefully study the instructions for use and familiarize yourself with the safety rules.
- Regular lubrication of individual elements, cleaning the air filter, and changing the oil will help maintain all technical parameters of the equipment.
When should it rise?
The main factor that influences the timing of the appearance of the first shoots is the type of grass chosen for the lawn. Different plants have different growth periods. Some varieties grow faster in the spring, others appear closer to summer . The germination time of lawn grass after sowing depends on the composition of the grass mixture.
Grain seeds, which are often used to seed home lawns, take 8 to 12 days to germinate. Since perennial grasses are used to form lawns, a green lawn will acquire a decorative appearance in 1-2 months.