Installation of a stationary pool and its commissioning is not the end of construction, but only the main stages, after which it is important to start improving the reservoir and the area around it. It is important that relaxation in and around the pool is pleasant, comfortable and safe. In addition, an artificial reservoir can become a key element of landscape design, which means it needs to be given maximum attention, competently designing not only the pool, but also the area adjacent to it. How to decorate the area near the pool? More on this later.
Collapsible pool
Available in medium and small sizes. Large structures are difficult to assemble, and they are not cheap.
The structure is installed for the summer season, and with the onset of cold weather it is dismantled and put away until the next use. This type of pool requires water filtration, but does not require professional and expensive cleaners.
Recommendations
In order for the pool to be comfortable and bring joy, you must:
- Cover it from precipitation and debris by purchasing an awning.
- Arrange a comfortable staircase.
- Provide heating of water, which will allow the use of the pool in the autumn.
- Monitor filtration equipment.
- Use lightweight and attractive building materials that meet technical requirements for its installation.
Inflatable pool
Their main advantage is mobility and ease of storage when deflated. Such pools do not require any special equipment, just a pump. They can be installed in a small area and taken somewhere with you.
We recommend reading:
The best options for site planning: modern ideas, the best solutions and beautiful arrangement and design schemes (125 photos + video)- How to make drainage on a site: device, types, design and camouflage (110 photo ideas)
Do-it-yourself sliding gates: projects, designs, drawings, photos and video description of the construction (135 photos)
Stages of construction work
Pool construction includes:
- Determining the type of reservoir, preparing a project, choosing a site
- Carrying out marking and excavation work
- Arrangement of formwork, filling the bowl (or installing a finished one)
- Waterproofing, bowl finishing
- Installation of additional equipment, creation of lighting
Every stage of construction is important. The reliability and durability of the finished structure will depend on compliance with the requirements. The duration of each stage is different; filling a bowl takes much longer than installing a ready-made one.
Excavation
When the location has been chosen and the project is ready, you can begin to make a foundation pit. Markings are created on the site using a stretched rope or pegs. If the pool is large, you will need special equipment to remove the soil.
Make the depth and width of the pit 0.5 m larger than necessary - the space will be required to create the formwork.
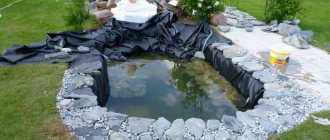
Filling the bowl
Pool formwork
When the pit is ready, you can fill the bowl. Procedure:
- Compact the walls and bottom, pour a sand cushion up to 30 m thick, compact
- Apply a layer of waterproofing along the walls and bottom. Bitumen and roofing felt are the most popular options, but you can choose others. Standard scheme - laying a layer of roofing material to cover the contact surface with the bowl, applying 3 layers of prepared bitumen mass
- Installation of the drainage system - strictly before the start of formwork work. The number and location of holes depends on the shape and size of the bowl
- Installation of formwork - using available materials
- Pouring cement mass with reinforcement
Choose concrete with frost- and water-resistant additives. When the concrete mass has hardened, remove the formwork, treat the bowl with a water-concrete solution, and make iron plating. All that remains is finishing.
Installation of the finished bowl
Construction of a plastic pool
This information will be useful to those summer residents who decide to use a ready-made bowl. The pit is prepared according to the standard scheme. Further:
- Pour a layer of coarse sand about 20 cm, compact it tightly
- Lay a metal mesh around the perimeter of the pit and pour the solution 25 cm thick
- When the mixture dries, lay geotextiles and lay polystyrene foam slabs on top for thermal insulation.
- Lay a durable film over the insulation
- Wrap the outer surface of the bowl in polystyrene foam, then in polyethylene. Insulate the exterior with expanded polystyrene
- Lower the bowl to the bottom of the pit
- Connect the communications, put a protective sleeve on the pipes
- Concrete the voids between the pool walls and the soil. To do this, make spacers to prevent the plastic or composite from bending under the pressure of the concrete mass. Place the formwork, lay the reinforcement, perform layer-by-layer pouring - pour 30 cm of water, raise the concrete, again 30 cm, and so on. Wait until the mass hardens. Repeat the steps until the concrete layer reaches the ground surface
- After a day, remove the formwork, fill the voids in it with sand, spill with water, tamp
All that remains is to mount the pump and filter. If you plan to make a canopy, mount it on supports. Lighting will also be required.
Final works
Ready-made pool from scrap materials. The base is made of pallets, dense polyethylene is laid inside
The second version of a DIY pool
After digging a pit and filling the bowl or installing it ready, all that remains is to complete the finishing and lighting. Before finishing work, a waterproofing layer is applied to the bowl. Inspect the material for cracks - each one will need to be repaired, otherwise there will be a risk of damage to the bowl. Mastic, film, and impregnating building materials are suitable.
There is an assortment of building materials on the market - with any characteristics, cheap and expensive.
When the waterproofing is ready, proceed to finishing. Tiles are usually used to cover the inner surface of the bowl - ceramic material can withstand prolonged contact with water, is easy to clean, and looks attractive . The price is average, you can choose products from different brands.
An alternative to ceramic tiles is PVC film. There are different versions of this material on sale. All of them are durable, strong, and cope with the assigned tasks. The choice of colors is large. This is enough for finishing, but if you wish, you can choose expensive materials and lay out mosaic tiles.
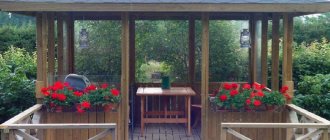
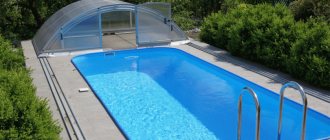
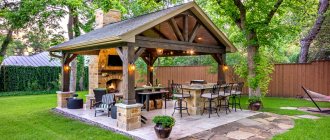
Equipped area around an artificial pond
Additional equipment that also needs to be used:
- Water purification devices - a valve with different strokes, a circulation pump, a filtration tank, and other elements. With this equipment, water changes will have to be carried out several times less often than without it.
- Flow-type heater - allows you to swim in cool weather
- Lighting equipment - lighting solves functional problems and makes the pool attractive
Develop an area around an artificial pond. The approach to the pool is usually decorated using decorative tiles - preferably anti-slip . You can lay out roll coverings, plant a green lawn, or use any other option.
Materials
Having decided to build a pool, you need to choose the right material for its manufacture.
Polypropylene
Tolerates temperature changes well. Tanks made from it can be used outdoors all year round.
The material has an aesthetic appearance, so there is no need to carry out work on tiling its internal surfaces.
Plastic
Does not withstand low temperatures. Most often used for making folding models. Its advantage is low cost.
Composite materials
A tank made of this material is considered the most durable and durable. The service life of such a pool in a country house is about 50 years. It does not require special care, and its surface is not prone to plaque formation.
To develop a high-quality pool design for your dacha, you need to know:
- How deep is the groundwater? To install protection if necessary.
- An indicator of the depth of the foundation of all buildings on the garden plot and the pool itself.
- Direction of the wind. The pool is located along the main air flow. This reduces heat loss and will help concentrate debris settling on the side where the drain is located.
- Soil composition and quality. Information is necessary to establish a reliable foundation
The swimming pool at the dacha can be covered. Then you can swim in it 12 months a year. The tank is located in the main building or in a separate building. The second option will be cheaper.
We recommend reading:
How to make swing gates with your own hands - step-by-step manufacturing instructions. 115 photos of options for building various types of gatesConstruction of a fence from corrugated sheets: the best ideas for a summer cottage, garden or home (130 photos and videos)
- Recreation area in the country: beautiful ideas, application and arrangement in landscape design (125 photos and videos)
The best option is to dig a pit for a pool in the ground. Build walls nearby and lay out the floor.
You can order a turnkey pool online. In a short time, at affordable prices, with a quality guarantee, you will receive an artificial pond for swimming at your summer cottage. This will help save your time, nerves and effort.
Design style in photographs
The photo gallery below shows examples of bathhouse projects in different styles.
High tech
A modern direction in the design of interiors and the surrounding landscape. Such baths are not overloaded with furniture.
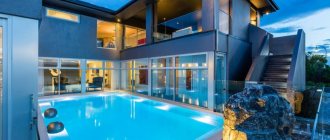
The high-tech style pool has a non-standard curved shape and is equipped with lighting.
The finishing of the bath is made of moisture-resistant materials in contrasting colors. Air temperature, pool water temperature, and humidity are monitored using sensors. Their owners can regulate them remotely through the program.
The photo above is an example of a pool installed directly on a slope. Vacationers have a beautiful view from above.
Provence
The style came from the southern part of France. The decoration is antique, so the furniture and decor are specially aged.
Among other characteristic features of Provence:
- light palette;
- rough plaster, stone trim in places;
- aged wooden furniture with forged elements;
- linen towels, tablecloths;
- forged lamps, chandeliers;
- textiles with small floral and plant patterns;
- stone-trimmed fireplace;
- flowers in pots.
If the bathhouse has a terrace or veranda, then climbing plants are planted around the perimeter, which will entwine the pillars.
Chalet
The chalet is characterized by finishing with natural materials. Stone predominates. They line the walls, pool, floor, and beautifully cover the façade. Wood elements would also be appropriate.
The shape and decorations are as simple as possible without any patterns or carvings.
Country
Country style. Popular in Russian baths. Wood predominates in decoration and in the selection of furniture.
In small-sized bathhouses, a swimming pool and a relaxation area are arranged in one room.
The furniture has a natural wood color. Often these are benches with a table or small chairs. You can put a couple of rocking chairs.
The walls are decorated with carved paintings. The floor is made moisture resistant and laid with ceramic tiles.
Loft
The loft style in the interior imitates the atmosphere in production facilities, workshops, and factories. No decor, exquisite patterns. Only the necessary items that you can’t do without.
The predominant materials are:
- stone;
- metal, rough forging;
- tree;
- porcelain stoneware slabs.
The pool is most often rectangular in shape, with a descending metal staircase.
Modern
The direction overlaps a little with high-tech. In a bathhouse with a swimming pool, finishing with plastic, composite panels, and lining is allowed. The floor is covered with decking and ceramic tiles that imitate wood and stone.
The Art Nouveau furnishings are simple but practical. Panoramic glazing opens up a view of the courtyard and improves the lighting of the rooms.
Half-timbered
A characteristic feature of the half-timbered structure is the protruding ceiling beams made of wood. They are painted dark to place more emphasis on this element.
The photo above is an example of a room with a swimming pool, decorated in half-timbered style. Double-glazed windows, wall columns, and chairs were selected to match the beams. A good contrast is created by light white curtains and light tile flooring.
The pool will be an excellent addition to the Russian bathhouse and will improve and diversify your vacation. It is important to correctly plan its placement, dimensions, shape, and also immediately decide which one is better suited: stationary or portable.
Choosing a shape and location
The more complex the intended shape, the more difficult and expensive the installation will be.
A beautiful pool of an unusual shape can decorate your summer cottage, or it can bring a lot of inconvenience. The choice of shape is influenced by a number of factors: When choosing a stationary tank, its shape and size are limited only by the proximity of other structures. Before installation, you will need a design of the entire structure. Aboveground tanks usually have a fixed shape and dimensions. The most common are:
A round shape is suitable if you are planning a children's pool. It provides stability and has no sharp corners, so the risk of injury is minimized.
The rectangular shape makes it possible to swim or play in the tank. It is considered the most universal.
An oval-shaped pool is often equipped with additional supports for greater stability. The area around the tank can be equipped with additional slides, mini-games or catwalks.
The square shape is less convenient. This is due to the size of the bowl. They resort to it to install SPA baths. Initially, it was designed for comfortable water and massage procedures. But swimming in such small pools is impossible. It is for this reason that they are equipped with heating, lighting, and a number of other functions that promote relaxation.
Decorating a pool is a long process. To reduce your search time and make the task easier, check out the photos of pools of various shapes and types. Consult with companies that help design and equip them.
Installing the bowl
The installation begins with a cushion, which ensures the distribution of the load over the entire area of the pool, the quality of the filling or the subsequent installation of a bowl made of polymer materials.
The first layer of sand 25-30 cm thick is poured. Having compacted it, you need to move on to filling it with crushed stone. The thickness of the second should be at least 20 cm. Then the concrete base is poured, which is 15 cm. For this, ready-made concrete is used. It is delivered on a special concrete mixer, which is equipped with a mixer for mixing concrete. A layer of waterproofing is laid on top. It is widely used as a waterproofing material: The layer thickness should be 20-30 cm.
Next comes the process of reinforcement and arrangement of formwork. A frame of steel rods is laid on top of the waterproofing coating. The recommended thickness of the rod is from 8 to 15 cm. Reinforcement is in two tiers, and the gaps are filled with broken bricks. To construct the frame, the reinforcement is tied with 3 mm wire.
After manufacturing, the frame is treated with polymer paints, and the bottom is again filled with concrete, compacted, and then the reinforcement of the walls begins, which is not much different from the bottom equipment. Before pouring concrete, the walls need formwork. Moisture-resistant or laminated plywood is suitable for this.
To build a polymer structure you need:
After this, a polymer bowl is installed and the embedded parts are mounted. All other additions are recorded at this stage of work. The distance between the bowl and the walls of the pit is covered with sand mixed with crushed stone. Then you can begin to arrange the area around the pool.
Some people think that equipping a pool with your own hands will be cheaper than hiring a crew. But if a person has not previously had experience installing such structures, then it is unlikely that it will be possible to do everything quickly and efficiently the first time.