Most of the territory of the Moscow region is flat terrain, with rare hills, mostly flat landscapes. Therefore, the concept of “geoplastic”, until recently, was practically not used in the vocabulary of most landscape designers.
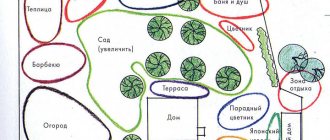
In reality, spatial planning of the area is a real art, allowing the gardener to feel like the architect of his site. Such work can be called “the aerobatics” of landscape design, since linking different spatial objects on one site, such as terraces, grottoes, voluminous flower beds, and doing it harmoniously is not a simple task, but it is feasible.
What is geoplastics? And why is it being done?
Geoplastics is the vertical planning of a territory for the purpose of artistic transformation of the relief. Simply put, this is the creation on the site:
- artificial earthen ramparts;
- hills;
- terraced slopes;
- grottoes and other similar changes to the natural landscape.
Designers and architects usually resort to geoplastics in order to advantageously play off existing unevenness on the site (if the landscape is initially hilly), or to emphasize the most characteristic and picturesque motifs of the natural relief. If the landscape of the site is initially flat, then completely new forms of artificial relief are created.
The goals of such landscape transformations can be either purely utilitarian (hide outbuildings, the wall of someone else’s house or an industrial landscape) or aesthetic (break the feeling of monotony of the relief, create the illusion of privacy, complete immersion in the natural environment).
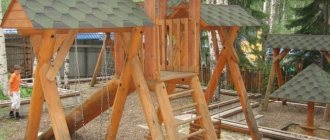
Geoplastics makes it possible to create a landscape of a personal plot with completely unique elements, for example, to design a children's playground in the form of a fairy-tale landscape with rocks, castles, ruins, caves, etc.
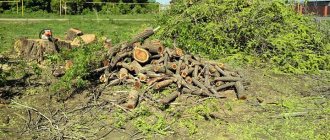
However, the advantages of geoplastics are not limited to this: another attractive aspect of its use is the complete waste-free work. For example, instead of transporting soil removed from a pit when building a house or digging a pond, it can be successfully used to build an artificial hill. Construction waste remaining after the construction of structures can be used in the same way.
By the way, unlike our latitudes, in Europe the culture of transforming the terrain is very developed and is at a high level. Here they not only think about waste disposal, but also use the changed topography to collect rainwater, drain the soil, protect certain parts of the garden from the wind - that is, create an environmentally sustainable environment. And driving through well-groomed European towns, we often have no idea that former landfills are hidden under the picturesque hills with beautiful houses.
So, if you have construction waste left after the construction or renovation of your home, do not rush to take it out - you can use it to make a wonderful mound on your site, with a gazebo on top.
Off-road strike
To make it easier to move between levels of the garden, not only stairs are installed, but also ramps. The latter are built instead of stairs or the structures complement each other. In areas with a slight difference in height, a ramp is more practical than a staircase; it also provides a smooth ascent and descent, for example, of a car into a recessed garage. In a terraced garden, ramps are indispensable for people with limited mobility, as well as for moving strollers, heavy wheeled lawn mowers, and snow removal equipment. The top covering of the ramp should be rough, made of paving stones, clinker, including perforated or mosaic, small-format paving slabs or large relief slabs. The seams between the piece elements prevent slipping, so it is better to lay bricks and rectangular tiles in a herringbone pattern or across the slope.
Popular articles Rules for covering hydrangeas for the winter
Changing the terrain of the site. How to do it right?
Before you start “improving” the site and changing its topography, it is important to take into account three rules:
- Firstly, creating an artificial relief is a rather risky undertaking, because it is not always possible to harmoniously fit hills and depressions into the usual plane so that the effect of an unnatural landscape does not arise. Therefore, before erecting artificial mountains in front of your house, you should think carefully and imagine how harmonious they will look;
- Secondly, the creation of geoplastics can be quite expensive due to its labor intensity - all work is carried out with the filling or cutting of soil, the construction of stairs, ramps, retaining walls and other large-scale “destructions”. All this significantly increases the overall costs of landscaping the site after building a house.
However, despite the complexity of constructing artificial relief, small changes to the landscape (for example, creating a mound, a shaped flower bed, or building a small retaining wall) can be done with your own hands.
The main rule that must be followed in any such work is the so-called “principle of zero balance of earth masses,” which means equal volumes of excavations and embankments. Simply put, there should be one hole for every hill. And this is the third rule of competently changing the terrain of a site.
Let’s look at what work is included in the geoplastics of the site in more detail. Let's start with the simplest object - artificial hills.
Where to begin
Initially, decide what you want to see ultimately on the renovated plot of land. This way, you can estimate the expected amount of work and the likelihood that your ideas can actually be brought to life.
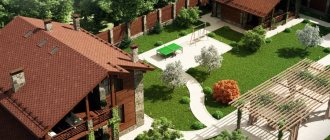
Although the geoplastic process creates artificial terrain, it should still look natural
To achieve such a result, it is important to work through each stage of work, from design to implementation of plans. Working with the ground is not easy, because you have to create harmonious proportions without disturbing the natural contours of the relief
How are artificial hills created on a site?
They can be created from literally anything. As mentioned above, when constructing artificial hills, you can even use construction waste accumulated on the site:
- First, a pile is formed from broken bricks, pieces of concrete and gravel, with a wide base at the bottom and a narrower one at the top. In order for the slide to better hold its shape, it is advisable to reinforce it on top with a metal mesh;
- After this, the hill wakes up with a layer of sand that fills all the voids;
- Then a layer of soil;
- Then it is sown with grass. If you want to give your masterpiece a “marketable appearance” as quickly as possible, you can use a rolled lawn - in this case, in just 1-2 days you will be able to enjoy the beautiful view opening from the top of the hill.
Another important element that geoplastics cannot do without is the construction of retaining walls.
Instructions for action
Here is an approximate list of work required to be performed in order:
- Choosing a location, area occupied and height of the hill.
- Preparing the site for the base of the hill (the fertile layer is removed).
- Constructing the shape of a hill by layer-by-layer filling on the base site with a mixture of crushed stone (or other similar solid material) with wet sand and layer-by-layer compaction of the fill soil.
- Fixing the shape of a hill using geostructures.
- Construction of the surface of a hill by filling a fertile layer.
- Keeping the hill for some time (up to several months) due to its possible shrinkage.
- Planting light-loving and shade-tolerant unpretentious plants with a well-developed root system on the surface of the hill.
If you followed all our instructions and recommendations correctly, then in a very short amount of time you will be able to enjoy the new decorative element in your summer cottage, built with your own hands.
How are retaining walls created?
On a site with a slope or complex terrain, retaining walls are required - they allow you to connect areas of different heights and prevent soil erosion. On a flat area, retaining walls will help diversify the landscape, imitating natural terrain.
Several retaining walls, standing one after the other and forming mini-terraces, look especially impressive. In such three-dimensional flower beds you can plant:
- herbaceous perennials growing in nature among stones: bergenia, dwarf ferns, etc.;
- During repairs and finishing, the uppermost wall can be decorated with abundantly flowering plants, such as Japanese quince or cotoneaster;
- and lovers of minimalism will certainly like laconic, completely identical topiary forms, planted with ground cover plants of the same type or even just grass.
The retaining walls themselves can be constructed from several materials. The most common option among homeowners is concrete and brick supports lined with tiles or natural stone. You can also build a completely stone wall, consisting of large boulders held together with mortar.
And for arid areas, where there is no danger of the support being eroded by rain and melt water, the so-called “dry masonry” method is suitable:
- To do this, carefully selected stones (limestone, sandstone, slate, granite) are placed tightly together without a special solution;
- Regardless of the material chosen, it is necessary to lay a foundation at the base of the building: for a wall up to 60 cm high, a crushed stone cushion 20-30 cm thick is sufficient, and for support above 1 m, the foundation must be at least 70 cm, and for structures more than 2 m high, a special reinforcement.
True, most landscape designers do not recommend building too high or too long walls: instead of one high one, it is better to build 2-3 lower ones, in a cascade, one above the other, and it is advisable to cut through the long wall with architectural elements, such as stairs or niches.
As for the external decor, most often the wall is decorated with brick, natural stone or wooden beams, “antique”.
In order to create the effect of old masonry, during landscaping work you can leave special niches in the wall, which are filled with soil with seeds of hanging plants: nasturtium, petunia, lobelia, sweet pea. Such an artificially “aged” wall will give your garden a resemblance to the abandoned park of a medieval castle.
Where to begin
The main task of geoplastic specialists is to understand the owners’ tasks assigned to them. Based on the information provided, an assessment will be made of the expected scope of work and the likelihood of bringing the idea to life. The fact is that not every human plan regarding the relief of a site can be realized.
The main task of geoplastics is to create natural, beautiful relief contours. And if you make hills on a plot of 10 acres, then the basic postulates of geoplastics will be immediately violated. In such a small area, the embankments will look too artificial. In this matter, a detailed, very clear study of each stage is important - from design to technical implementation.
In the process of geoplastics, a number of measures can be taken to change the topography of the earth:
- Construction of artificial shafts/embankments/dams.
- Terracing the site.
- Construction of slides/hills and other structures.
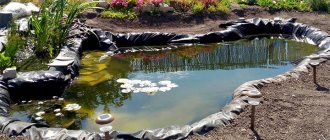
- Construction of artificial reservoirs.
- Construction of grottoes.
Creating steps and stairs on the site
If you have decided to diversify your garden with reliefs with height differences, you cannot do without garden stairs that serve to move from one level to another.
Depending on the style of the house and site, and the wishes of the owner, they can be made from a variety of materials. For example, for a capital regular garden, concrete steps are suitable. The only caveat of such structures is the price: heavy concrete stairs require a reinforced foundation, the construction of which can only be entrusted to specialists.
A more affordable option is stairs made of wood, soil or natural stone. You can even build such steps on the site yourself.
The simplest steps and stairs in the areas are the so-called “bulk” ones. The shape of the steps in such structures is maintained by wooden boards, called risers, pre-attached to two side boards (sidewalls).
In general terms, the process of building a bulk staircase looks like this:
- Niches for steps are knocked out and dug into the slope;
- Then the sidewalls with risers are laid on them;
- Then soil or sand is poured behind each riser, flush with the top of the board. And in order to prevent the board from bending under soil pressure, pegs are driven into the inside of the riser;
- As for the final decor of the future relief staircase, it is best to choose the material used in the design of the retaining wall - this simple technique will emphasize the unity of the design ensemble of your site.
Well, one last point. In order to make it comfortable to walk on the stairs, it is important to maintain certain proportions: the steps must be at least 75 cm wide and 15 cm high, and the tread length must be 33 cm. Most often, developers build stairs so that one flight consists of 8 steps , then it ends with a platform measuring at least 1.5 m2 and, if necessary, continues again.
Did you find this article helpful? Please share it on social networks: Don't forget to bookmark the Nedvio website. We talk about construction, renovation, and country real estate in an interesting, useful and understandable way.
Soaring over the abyss
On flat and terraced areas, rest areas are usually paved or decorated with gravel. In rough and hilly terrain, on a slope and at the water's edge, it is more convenient to arrange a recreation area on a boardwalk (deck). The boards are based on support beams (joists), the beams are based on concrete blocks laid on flat ground, fixed in a slope or at the bottom of a reservoir on piles. iDECT terrace flooring (Bohmans, Denmark) made of hardwood (bankirai, ipe, kumaru, massaranduba, limbali), resistant to dampness and other adverse factors, can be used in any climatic conditions. Wooden structures are usually shaped into a rectangle, circle or semicircle. Terrace flooring is used for constructing sidewalks, stairs, bridges; they harmonize with the natural environment and look good in formal gardens.
Mystery of the mountains
In a high retaining wall, you can leave a “pocket” for a bench, and install a pergola entwined with vines above it. The lattice canopy will only rise slightly above the overlying terrace. A garden fireplace is built near the retaining wall or a barbecue, firewood, washstand, etc. are built into the thickness of the upper terrace. Cabinets for kitchen utensils are placed in stone niches and are usually covered with doors; the working surface of the table is limited on one or more sides by a retaining wall. A secluded corner should be organized in an artificially created lowland or an embankment should be built around the perimeter of the recreation area. If you plant plants with a pleasant smell there, it will be felt even in windy weather. A sloping area facing south, southeast or southwest, as well as a windless area recessed into the slope, is used as a solarium. The entrance to the cellar is also located in the thickness of the embankment or natural elevation, but is oriented to the north and shaded by trees. In a garden with complex terrain, it is easier to hide a bulky pond cleaning system. As a rule, the equipment is installed above the water surface. The bunker can be arranged inside a rocky hill, which is limited on the back side by a retaining wall. On a terraced area, a recessed technical room is installed in the thickness of one of the terraces, with the exception of the lower one. The door is made on the side, the hatch on top, decorated with a plastic cover that imitates a large stone.
7. In an area with a slight difference in levels, a retaining wall can be made using the “dry” masonry method
Non-specialized views
Geoplastics is an art that allows you to influence the transformation of relief. It is possible to say that specialists have control over nature and its reliefs. If the geoplastics were carried out correctly, then new unique reliefs will appear on the plot, which correspond with the entire surrounding natural world. The following natural objects can be subjected to geoplastics:
- Embankments and ramparts.
- Mountains and hillocks.
- Craters.
- Stairs.
- Walls.
- Natural and unnatural canyons.
Relief geoplastics implies:
- construction of unnatural dams, embankments and embankments;
- terracing of a personal plot using retaining walls;
- creation of slides, labyrinths, hills and other structures.
During geoplastics, the natural topography of the site can be restored and new forms with protective functions can be made. These could be gazebos and sculptures of unusual shape. They will be able to imitate natural slides and islands. at the moment we will consider the most popular type of geoplastics - the construction of unnatural hills on a personal plot.
SELECTION OF PLANTS
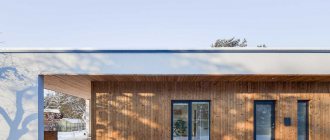
Several species of pine trees were chosen as the main plants. According to Ekaterina Alexandrova, they perfectly emphasize the architectural appearance of the house, and also in winter. and in summer they maintain the structure of the garden.
Rhododendrons were used in the entrance area, as their thick, fleshy leaves go well with the texture of the eco-parking cubes and the “brutal” cladding of the house’s façade.
This area will be especially beautiful in spring thanks to their flowers.
In summer, the main decorative function will be taken on by an arch of oak sage and Japanese spirea 'Crispa'. This arc is a continuation of the red cobblestone path laid out in the parking area. When the spirea blooms, you will get the impression that the red cobblestones of the path have turned into dark pink flowers of spirea and sage, and this living path stretches along a winding path into the hills.