For individual water supply to country private houses and cottages that do not have access to the central water supply main, the main source of water is underground pools, which are easier and cheaper to access using a well. Typically, specialized companies are engaged in drilling deep-water wells with high flow rates (fillability), but you can significantly reduce financial costs by further equipping the water well yourself.
The task is not so simple due to the many factors influencing decision-making on the well construction method; you will mainly have to take into account your financial capabilities, the casing material, the characteristics of the well source and pumping equipment, and the climate in the region where you live. When installing (piping) a well yourself, you should select in advance the type of electric water pump (surface or submersible), draw up a plan for connecting it to auxiliary devices and determine its location.
Station in a caisson
What is needed to supply water from a well?
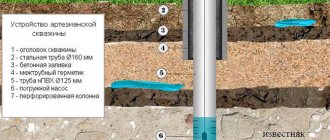
When drilling individual wells using drilling equipment, a column of casing pipes is lowered into the mine, the material of which is polymers (unplasticized polyvinyl chloride UPVC, HDPE) or steel, sometimes plastic pipes are inserted inside metal ones at great depths. At this stage, the well arrangement diagram should be known, for example, if water is supplied to the water supply through an adapter, it is not recommended to attach it to the fragile plastic wall of the pipe; the column or its top should be made of metal.
To understand how to install a water well after drilling, you should consider all the equipment and engineering structures that are needed to deliver water to the internal water supply of the house. To provide housing with well water you need:
Casing string . After passing the borehole channel, a column of pipes 6 m long is immersed into it, which are connected to each other by means of threads. It must have smooth, strong walls that can withstand external soil pressure, and a diameter suitable for immersion of the selected electric pump model.
Recently, individual drilling of Abyssinian wells by private individuals has become popular in cases where the water surface on the site is closer than 9 m from ground level. To do this, use a hydraulic drill to make a narrow hole in the ground and immerse a low-density polyethylene (HDPE) pipe with a homemade filter at the end inside, which is connected to a surface electric pump. The depth of homemade Abyssinians reaches 30 m; the casing and supply pipeline are simultaneously a HDPE pipe section lowered into the channel.
Devices for immersing the pump and suction hose into the source . When lowering a deep-well pump, always use a head or cover with an adapter connection, to which the unit is tied and the supply pipe is attached. When attaching the adapter, the water supply pipeline is passed through its side fitting, fixed to the wall of the column.
Piping diagram for a well with a deep-well pump
Electric pump . There are two groups of electric pumps for supplying water: submersible and surface, the first are lowered into the well to a great depth, so that they plunge without interference, a casing of a suitable diameter from factory well pipes is required. Surface electric pumps for water intake from depths of up to 9 m use a narrow hose or a water pipe of small cross-section, so a wide column is not required for their operation - this is the determining factor when using them to suck water from Abyssinians.
Automation. To turn off the pump after filling the water supply system, a pressure switch is used, a pressure gauge is installed to configure and control it, an expansion tank is used to store water reserves and maintain pressure in the line. The listed devices are the main components of a household water supply main with an electric pump; when using surface types, all of the listed elements and the pump are often assembled into a single unit - a pumping station.
Summer construction of a well without a caisson (option with supply to the house and automation)
You can make a summer well with a pipe supply to the house. To do this, the pipe, which is removed from the head, is buried in the ground and then laid to the house below the freezing depth. A check valve is installed on the pump. Below the pump, a valve is installed on the pipe to drain the water. Regulating automation (hydraulic tank and relay) is located in the house. A watering tap is led out of the house through the wall.
A little trick. You can install a check valve not in the well behind the pump, but in the house. Then, if you remove the top fitting, the water will drain into the well.
Pipe supply to the house from a summer well (our photo)
Removing the watering tap from the house
Winter version of a well with a house
An option if you need to insulate a summer well with automation for the winter. A wooden house (box) is built around the well. The walls of the house are insulated from the inside. In addition, a heating cable is laid. A heater can be installed in the house. It is important to follow safety precautions: do not use incandescent lamps and fire-hazardous insulation materials.
Advantages of the option with a box:
Minuses:
Summer well in an insulated box
The Zagorod company does not use this option in its practice. We make it simpler: we cut the water supply pipe into the casing pipe through a downhole adapter.
Caisson or adapter - in what type of wells is it installed?
To provide water to individual houses, wells are drilled, which are divided into three categories:
Abyssinian . This type of well is installed when aquifers are located at a shallow depth from the surface; hydraulic drilling is carried out by individuals and organizations. The Abyssinian well is drilled within 24 hours; instead of casing pipes, a piece of HDPE pipe with a filter at the end is taken. The depth of the Abyssinian depends on the location of the aquifer and lies in the range of 5 - 30 m. The water surface in the Abyssinian should not fall below 9 m; external centrifugal electric pumps or stations, which are located in close proximity to the source, are used to draw in water.
To protect the external pump from precipitation and frost in winter, an insulated coffered well is installed in the Abyssinian area.
Wells in the sand . This is the main type when the water table from the ground level is below 9 m, the depth of the wells ranges from 20 to 60 m, a submersible pump is used for intake. When installing a deep-well electric pump, it is easier and more cost-effective to connect it through an adapter screwed into the side of the casing wall; the caisson is not mounted.
Artesian . To access water artesian basins, a well with an average depth of 100 m is drilled; in domestic water supply sources it can be larger, but at depths of more than 200 m, already significant costs increase sharply due to the use of industrial technology for drilling such distances.
Due to the pressure of earth layers on a deep water basin, water from artesian wells often rises to a great height and even comes to the surface; a surface electric pump is used for supply and a caisson well is installed accordingly. No one forbids extracting water from an artesian source with a deep-well pump, which has higher efficiency and characteristics; when installing it, it is more economical to use a well adapter to drain water into a house.
Although the use of an adapter is more rational when operating deep-well pumps for water intake, a caisson well has the advantages of convenience when it is necessary to remove and maintain a submersible electric pump, and it also protects the well channel from freezing in winter. Therefore, a caisson is often installed when lifting water with a submersible pump, placing automation in it: a pressure and dry-running switch, a pressure gauge, a hydraulic accumulator.
Surface pumps and pumping stations
Video description
How to make a house for a well with a folding roof and a lock is shown in the video:
Method 3 – caisson
This method is the most common and is suitable for constructing underground sources in any climatic region. It consists of installing a caisson - a sealed well buried in the ground, through the bottom of which the wellhead is brought out.
Advantages of the caisson:
- good thermal insulation - the walls of the well are surrounded on all sides by soil, and its bottom, when buried below the freezing level, is in a zone of constantly positive temperatures;
- uncluttered area - only the upper part of the walls and the hatch are above the surface.
A caisson is the most suitable way to improve a well in a country house, since its upper part can be disguised with a flower bed or a decorative boulder.
Decorative cover for a caisson hatch Source https://gardendecor.ru/
Adapter installation
Installing an adapter for connecting a submersible pump is not a complicated operation, but requires an electromechanical tool (drill, hammer drill) and special components: metal bits with the diameter of the adapter, pipes with a threaded groove about 2 m long for the installation adapter thread.
Although the pump is suspended from a sealed well cap, the adapter experiences the load of the water column in the pressure hose, it can withstand a weight of 500-600 kg, which cannot be said about the walls of the uPVC casing pipe, which experience additional soil pressure - this can cause a change in the geometry of the shell and the appearance of leaks in fitting fastening area. Therefore, the adapter is cut into the metal pipe of the column, installation is carried out as follows:
- Dig a hole around the casing and a ditch below the freezing depth of the soil from the well to the house with a depth of about 1.5 m.
- Use a grinder to cut off the top of the casing pipe. Usually it is buried underground and covered with an airtight lid, but this does not guarantee protection against groundwater entering the canal, so a small section of pipe is often left at the top.
- Prepare the electric pump for immersion by connecting a cable or pressure pipeline to it, which are tied together with the power cable with ties or insulating tape.
- A hole of the required diameter is drilled in the wall of the casing pipe using a metal crown, and one part of the adapter is inserted from inside the pipe. To do this, it is completely assembled, screwed onto the mounting pipe and lowered into the well, illuminated with a flashlight.
Downhole adapter
- After inserting part of the adapter through the side hole of the casing pipe, it is clamped with an outer nut through the rubber gasket with an adjustable wrench, and the mating part together with the mounting pipe is removed from the well.
- Cut the HDPE pressure pipe from the electric pump to the required length, and install the second part of the adapter with a dovetail connection on the free end.
- Screw the mounting pipe to the mating part of the adapter and lower it together with the pressure pipelines and the electric pump into the well, fixing the dovetail connection with the part fixed to the casing.
- A sealed cap is installed over the well, a cable is tied to its inside, and the power cable of the electric pump is connected to the terminals of the junction box located in the side of the cap body.
- Through the adapter coupling, the HDPE water line entering the house is connected to the side of the adapter; upon completion of the work, the trench and hole are filled with raised soil.
Basic steps for connecting the adapter
Well protection from atmospheric influences
To protect the source and equipment from atmospheric influences and precipitation, a protected room is erected around the wellhead, placing it above ground level or below the ground surface:
Option #1 - above-ground “house”-pavilion
At first glance, the easiest way is to install a small “house”-pavilion over the water intake structure. It can be deepened a little, like the entrance to a free-standing cellar, sprinkled on the sides with soil, making a kind of heap. This will reduce heat loss.
Similar pavilions are built over industrial wells. But you rarely see them in a private yard. The “house” takes up space on the site and clutters it up, which is also questionable from an aesthetic point of view. In addition, it is not easy to effectively insulate an above-ground pavilion.
A standard ready-made container-type pavilion, specially designed for installation above wells. A similar house can be made and well insulated on your own.
Option #2 - placing the source inside the building
An infrequently used, but quite rational technical solution for arranging a water well is to place the water source in the basement of a residential building or inside an insulated utility building, winter greenhouse, or greenhouse. By the way, this was a very popular technique in the old days for the construction of stone buildings.
The well and equipment under the roof are reliably protected from all atmospheric influences, thieves and vandals. Installation and maintenance work are simplified as much as possible. The equipment does not create vibrations; the noise consists of soft clicks when the relay is activated. But they are practically inaudible outside the technical room when the door is closed.
However, placing a well in a house or an insulated outbuilding is rare. This is explained by the fact that to implement this option, you must first drill a well and then build a house over it. In our country, the vast majority of developers do the opposite.
The well was drilled and installed directly in the basement of a private residential building
Option #3 - underground caisson well
The most popular option for a protective room over a private well is a well. It would be correct to call it a caisson; this is an adequate technical term. The caisson installed in the ground is good because it does not clutter up the area; on the surface we will only see a small hatch located flush with the ground.
It is much easier to insulate an underground room than an above-ground one; moreover, its lower part, located below the freezing depth, is in the positive temperature zone in winter, receiving a certain amount of heat from the ground. The only problem is waterproofing. The caisson can be purchased ready for installation or built independently.
The factory caisson is completely ready for installation. All you need to do is dig a pit and lower the tank to the desired level. The caisson already has the necessary technological holes; all that remains is to insert communications into them through sealed cuffs: a water pipe and an electrical cable.
An example of a design solution for a factory caisson. The finished product already has a hatch, a ladder, the necessary technological holes, equipped with seals
Finished caissons are made of steel or polymer materials. Metal containers are stronger, are not afraid of frost heaving, shock, and can be installed in problematic soils prone to displacement.
Installation of a steel caisson on a concrete base. Metal structures freeze, they need to be insulated especially carefully
Plastic caissons are not subject to corrosion and almost do not form condensation on the inner surface. Unfortunately, factory caissons are not cheap. But they can be installed in a few hours, and waterproofing issues are reliably resolved.
Some manufacturers, equipping their well caissons with shelves, offer to use them “in combination” for storing seams. If the house does not have a basement or cellar, this is very convenient
It’s possible to build a caisson yourself. Most likely, it will cost significantly less than the factory one. Perhaps it will be stronger. However, you will have to spend a lot of time and effort. The simplest option is to bury a couple of reinforced concrete well rings in the ground, covering them with a lid and a hatch with a neck.
The bottom will have to be concreted. It is quite difficult to make reliable waterproofing of a reinforced concrete caisson. If you do it outside, it is better to use rolled bitumen material or high-quality mastic. However, you will have to dig a pit that is too large to have access to the walls of the well.
You can make insulation from the inside by carefully caulking the seams and coating the internal walls, bottom and “ceiling” of the caisson with a polymer-cement composition.
Concrete caisson-well made of rings with a diameter of 1.5 m with equipment already installed inside: a 100-liter membrane tank, a filter, automation
You can build a caisson on your own not only from factory rings. The structure can be monolithic, brick (you need well-burnt red brick), or you can use small-sized concrete blocks. A discontinued steel barrel will also work.
Caisson device
When using a well source for water intake only in the summer, an external shed or pit with dimensions suitable for placing a pump and equipment, providing free access for maintenance and control, is built on a dacha plot for protection from precipitation. The walls of a dug pit of small depth are usually lined with brickwork, crushed stone is poured onto the bottom or a screed is made, and the structure is covered with an airtight lid on top.
With a constant individual water supply to the house, the summer equipment is replaced with a capital engineering structure - a caisson well, which, in addition to protecting the equipment from precipitation, provides its safety and thermal insulation during the cold season. Let's consider the main options for constructing caisson wells.
Concrete rings
Construction of a water well, where low price is the determining factor, is carried out using concrete rings. A caisson well is easy to assemble from standard factory parts: a bottom, two well rings with locks with a standard internal diameter of 1 m and a height of 0.9 m, a cover with a hatch, the average cost of the entire set will be about 5,000 rubles.
Tip: Purchasing concrete rings with a finished bottom and lid will further simplify installation and improve its quality.
Types and sizes of products for concrete wells
To install a well, you will need a building level, a mixture of sand and cement in a ratio of 4:1; before installation, all concrete parts are coated on the outside with bitumen waterproofing (mastic) and dried well. The well is installed in the following order:
- Dig a hole of the required dimensions in depth and width, pour sand onto the bottom and level it horizontally.
- They make a hole in the bottom for the column; to do this, draw a circle of the required diameter and drill through holes around its perimeter with a hammer drill, then knock out the middle.
- Lower the bottom onto the cut casing (30 - 50 cm from the ground), nail it with a massive rubber hammer for horizontal installation.
- A small layer of cement mortar is laid around the perimeter, the first ring is placed on top, a layer of mortar is applied to its upper edge and the second ring is lowered.
Installation of a well made of concrete rings - A cover with a manhole is lowered onto the cement mortar, to which a plastic hatch is then screwed onto anchor bolts. Using a crown, drill the necessary holes in the walls of the well and bring the pipes out.
- Coat the junction of the bottom with the casing, the cracks near the exited pipes with cement-sand mortar, and additionally remove all joints and remove excess mortar.
- For hydraulic insulation, buy a dry mixture in bags, dilute it with water and coat all joints from the inside using a spatula or brush. It would not be a mistake to carry out a similar procedure for waterproofing the inner surface of the entire concrete chamber to prevent it from becoming saturated with moisture.
- After installing the rings, insulation is carried out - their surface is covered from the outside with sheets or narrow strips of foam plastic with further fixation, then sprinkled with earth.
Note: It is difficult to insulate a round-shaped well with straight sheets of polystyrene foam; for these purposes, you can purchase a foam plastic shell from some manufacturers, which is made of several segments and assembled on the surface of the rings by inserting fragments into each other.
Metal and plastic caissons - design
Metal
Caissons made of sheet steel 3-6 mm thick are manufactured by many enterprises and commercial firms; the welded structure of the working chamber has a round or square shape, with a square or cylindrical manhole welded on top. Due to problems with corrosion, steel is always covered with waterproofing on the outside; installation of a steel caisson is carried out according to the following scheme:
- A pit is dug for a caisson and a trench for laying HDPE water pipes, the bottom of the hole is filled with a screed 10 - 15 cm along the horizon.
- Holes for pipes are cut in the bottom and walls of the metal caisson, fittings are inserted to connect the internal and external pipelines, and the caisson is lowered onto a pre-cut casing.
- The bottom of the caisson is welded to the metal casing; if the pipe is made of plastic, a rubber cuff designed for its outer diameter is used for sealing.
- Insulate the side and top walls of the caisson from the outside with foam sheets (if it is square, this is quite easy to do) and sprinkle it with earth.
The standard height of a metal caisson is about 2 meters, the width is 1 m or more, the price depends on the size, thickness of the steel sheet and the manufacturer, the minimum cost of a standard design is 20,000 rubles, the average price of a quality product is 30,000 rubles.
Strapping scheme with a metal caisson
Plastic
Chambers made of concrete and sheet steel have high thermal conductivity, so in cold weather they have to be additionally insulated, which is not always effective and leads to additional financial costs. The best winter option is plastic caissons, which are currently gradually ousting cold-weather competitors from the market; their main drawback is their high price of about 40,000 rubles. for standard quality products. Almost all plastic caissons have a cylindrical working chamber and manhole with a height of about 2 m and a different internal diameter; they are installed in the following order:
- Dig a hole in such a way that there is a gap of 20 cm between its walls and the caisson shell, level the bottom with a cement-sand screed 15 cm thick. If the area is swampy and the bottom of the hole is flooded with groundwater, lay a concrete slab with a pre-cut hole for the pipe.
- Make the necessary holes in the caisson and place it on the top of the column using a transition rubber coupling.
- Cement-sand mortar is diluted in a ratio of 1:5 and poured along the edges of the pit, filling the space between its walls and the caisson shell; 10-15 cm of mortar is not poured on top, leaving room for soil for landscaping the area.
Installation diagram of a plastic caisson
Choosing a place to drill a well
Before choosing a site, they inspect the entire territory, collect and study initial data about the well, and consider different options. You need to take into account the likelihood that, for example, neighbors will soon move in nearby or you will want to plant trees, flowers, and vegetables. They calculate everything in advance, make a diagram and only then start working.
Criteria for choosing a location:
- The drilling site must be equidistant from the main objects: house, kitchen, garage, other buildings at a distance of at least 3 m. This is necessary so that the water source is closer to outbuildings. If the well is located far away, additional costs will be required for the number of pipes.
- There should be no trees or bushes within a radius of 5-10 m from the drilling point. Roots, falling branches, foliage will interfere with work.
- The well is drilled at a distance of 100 m from landfills and garbage dumps, at least 25 m from the septic tank.
- If the well is located close to the house, the foundation of the building may collapse, plus this will complicate the drilling process.
- If there are hills on the territory, the location is chosen at the highest point of the site. In the lowlands, the system will constantly flood after rains and melting snow. With standing water and high humidity, bacteria and fungi will appear. They can enter the device and contaminate the water.
Before starting work, provide equipment access to the site. Drilling machines are quite large; you will need a platform measuring 4x12 m with a width of 3 m. The height of the drilling mast is 10 m. This should be taken into account so as not to damage trees and wires.
Advice!
It is better to drill in winter: the plantings will not be damaged, and the cost of installation will be lower.
Pump selection and installation
In order to properly equip a water well after drilling, select the type of electric pump with the necessary characteristics; the choice of a caisson well or adapter when arranging a water supply source depends on its parameters. All electric pumps, based on their location relative to the well, are divided into two large groups, differing from each other in their parameters.
Superficial
Surface centrifugal pumps with an efficiency of about 50% are used more often than other types to supply water; for most models, the suction depth does not exceed 8 m, so they are placed next to the well or at a short distance from it.
With a large distance between the pump and the source, each vertical meter of water column is converted into 7 m horizontally with a pipe diameter of 1 inch, taking into account hydraulic losses in fittings, bends, and tees. Thus, a surface pump can be placed not only in a caisson, but also in a house if the water level is close to the soil surface, for example, with a mirror (static level) of 5 m, the electric pump can be installed in the basement of a cottage 20 m from the well.
Free-standing external pumps are very rarely used in domestic water supply; they are usually operated as part of stations where an electric pump, a hydraulic accumulator, a pressure relay and a pressure gauge are placed on one frame, connecting them through fittings and flexible hoses.
Surface household pumping stations are capable of pumping water up to 5 m3/h with a maximum pressure of about 50 m, which makes them suitable for supplying water to a house with a family of five people.
Centrifugal surface pump - internal structure
Submersible
A large group of deep-well pumps operate using a centrifugal design; such units have the highest efficiency among all types, reaching up to 65% for high-tech expensive Grundfos models. In terms of parameters, submersible pumps are significantly superior to external ones; the volume of pumped liquid in household models reaches 20 m3/h, the maximum pressure reaches 300 m thanks to the use of a number of stages with impellers that successively increase the pressure.
On the pumping equipment market there are other types of submersible electric pumps with a different operating principle; their list consists of the following types:
Vibrating
Popular household models of the electromagnetic principle of operation, sucking up water due to the reverse and forward movement of the built-in piston connected to the armature of the electromagnetic coil. The maximum supply volume of vibration pumps does not exceed 1.5 m3/h, the pressure reaches 80 m with an efficiency of about 35%.
The average price of vibration pumps is around 1,400 rubles; in everyday life they are not used for constant water supply due to low technical characteristics, they are used mainly for irrigation, drainage work, pumping wells, filling pools and reservoirs with water, and other economic purposes. Vibrating pumps can pump out very turbid and dirty water without damaging the electrical part and housing (that’s why they are used for pumping wells), but the rubber piston and return valve are worn out by sand particles and may require replacement after a while.
Centrifugal and vibration submersible electric pumps - internal structure
Screw
Units of this operating principle are often called screw units; their operating principle is reminiscent of a household meat grinder, in which the liquid moves due to the rotation of a spiral screw. Screw models are not so popular on the market; their advantage is the ability to work with viscous and turbid media. The efficiency of screw units does not exceed 50%, the flow is up to 15 m3/h, the pressure reaches 100 m.
Vortex
In this type of electric pump, water is sucked in by the blades of the impeller through an opening on the side of the housing and pushed out by the impeller through the side pipe in the same plane. The distance between the blades and the walls of the working chamber is minimal to reduce hydraulic losses, so vortex models only work with clean water from artesian wells. The efficiency of such devices is also low (about 50%), household units have average technical parameters with the highest flow of 5 m3/h and pressure of 100 m.
Screw and vortex pumps - design
Why do you need to build a well?
After the well is drilled and before the water supply in the house is supplied from it, the source is arranged, the water supply equipment is selected and installed.
What problems does the installation of a water intake well solve:
- Ensuring the purity of the source. Do not allow contamination from the surface to enter the well: dust, rain or melt water.
- Protecting the water supply source, equipment and pipelines from freezing.
- Formation of conditions for connecting and servicing equipment.
Water supply equipment (except for a submersible pump) can be installed both in the house and next to the well. In the latter case, it is necessary to have a technical room of sufficient area at the wellhead where this equipment will be installed.
But even when installing it in a house, having a small room at the outlet of the pipeline from the well is very convenient; this greatly simplifies the installation of the pump and its maintenance. The insertion of a water pipe into the well, as well as the supply of power to the submersible pump, is also carried out at the construction stage.
The purpose of constructing a well is to protect the source of water supply from atmospheric influences, ensure the entry of communications, convenient installation and maintenance of equipment
Head installation
A typical head has a simple structure; its body consists of two parts, which are connected to each other through studs with nuts, and between them there is a donut-shaped rubber ring. The top cover has holes for entering the power cable and pressure pipe (the latter is located in the center), a carabiner is welded at the bottom to secure the electric pump cable, and two eye bolts are screwed on top to facilitate landing on the well.
Installation of the head is carried out in the following order:
- Place the bottom cover and rubber donut over the column, pass the power cable through the head through the rubber seal and the HDPE pipe, and thread the loop of the cable tied to the pump into the carabiner.
- A pump with a head is lowered into the well channel using a cable tied to its eye bolts, after the top cover rests on the top of the column, 4 threaded rods are inserted into its holes.
- The nuts are tightened with a wrench, connecting the upper and lower halves of the head, while the ring in the middle is compressed, tightly fixing the structure to the surface of the pipe.
- Cut the HDPE pressure pipe, put a feed-through and compression fitting on it, and clamp the pipeline in the head.
Head installation
How to seal a casing pipe
When researching the question of what is needed for a water well, it is important not to forget about sealing the well casing. This communication is responsible for supplying water from the depths to the surface, so there should be no dust, dirt, condensation or atmospheric water inside it. Otherwise, microorganisms hazardous to health will get inside the underground source. After this, the well will be considered contaminated.
Casing protection elements:
- Header. We are talking about a reliable steel hatch with technological holes. Through them, communications and a cable with a hook for hanging the pump are fed into the shaft. The diameter of the head should slightly exceed the cross-section of the casing pipe. To ensure a tight fit, it has a rubber crimp collar.
- Rubber seals for entering the supply pipe and electrical cable.
It is prohibited to cut the pipe in the immediate vicinity of the caisson bottom. The optimal distance between the end of the pipe and the bottom is 25-40 cm. This will simplify the installation of a pump with a head, and if water penetrates into the structure, the well will be protected from contamination.
Connecting a hydraulic accumulator, automation
To fully equip a water well, it is necessary to install a pump, equipment and automation, which include a hydraulic accumulator, relay and pressure gauge, in the prepared caisson pit. If you use a station, all the components necessary for water intake are collected in one module, all that remains is to connect its input to the pressure pipe through a compression fitting and in a similar way connect it to the water supply supply to the residential building.
When connecting a pumping station, the help of a specialist and the use of special tools are optional - the HDPE pipeline is connected with straight or angled threaded compression fittings manually, or using a wrench on metal parts.
How to choose water supply equipment
Autonomous water supply is equipped with the following set of equipment:
- Pump
. Submersible or surface models are used to supply water from a well. - Automation
. Designed to control the pump, which protects the engine from overloads. - Hydraulic accumulator
. It can be open or closed. Closed membrane tanks are considered more convenient, thanks to which the operating pressure is maintained at the same level. To install an open-type container, select the highest section of the water supply. Most often this is the attic or the ceiling of the top floor. Closed drives have no restrictions on the installation location.
The procedure for how to equip a water well with your own hands is directly influenced by the specific location of the equipment and the specific modules that will be used for this.
Expert advice
To properly equip a well with your own hands, you will need to make many decisions, in which any additional information will only be useful, especially if it comes from professionals in their field. The tips below will help prevent some common mistakes many homeowners make due to lack of knowledge:
- When choosing a borehole caisson, it is better to give preference to modern technologies - models made of polymers with high tightness and low thermal conductivity - this will prevent the well from freezing in the cold season. Too high a cost should not discourage you from purchasing: the production of plastic caissons is well developed, manufacturing companies often organize promotions with significant discounts, and in winter and late autumn the product can be purchased at a price 2 times lower.
- It is also not necessary to carry out drilling work only in the summer in dry weather; drilling is a year-round process, and carrying it out in winter will cost much less, and all other work can be postponed to the warm spring-summer season.
- When choosing an electric pump, they look at its technical characteristics, and you should know that the given maximum values are one and a half times higher than the nominal values at which the pump effectively sucks water.
Pumping equipment in a plastic caisson - examples of placement - If you use an Abyssinian or a well on sand, before supplying water to the hydraulic accumulator or automation elements, be sure to install a coarse sand filter; it would be useful to install another additional mechanical filter with a polypropylene cartridge.
- To avoid draining water from the system, a check valve must be installed at the outlet of the submersible electric pump and at the inlet of the surface pump.
- With limited financial resources, an Abyssinian well is drilled manually; private owners carry out this work within one day (unless they come across a large cobblestone or stone slab during excavation, after which the drilling ends). The cost of the work is approximately 100 USD; manually it is possible to reach depths of up to 35 m; for example, the depth of wells in the Moscow region starts from 5 m.
- The idea of using a well adapter should be approached with caution - the dovetail connection on two adjacent rubber rings can leak under high pressure. The purchased parts must fit very tightly into each other.
Connection diagram of the pumping station to the water supply system
Internal placement
This method of improving a water well is rare. To do this, the house must have a permanent basement. An insulated shed, greenhouse or greenhouse is also suitable for these purposes. Internal placement of water supply equipment was widely practiced in ancient times: most often stone buildings were equipped in this way.
Advantages of the solution:
- Reliable protection of equipment from any atmospheric, mechanical and vandal influences. You don't need to spend additional money for this.
- Easy to install and maintain. All you need to do is go down to the basement.
- No noise during operation. Despite concerns, modern modules do not produce loud sounds during operation. As for the quiet clicks from the triggered relay, good doors to the technical room can solve this problem.
Despite the listed advantages, the internal arrangement of instruments is rarely used to equip a well with your own hands. The reason is simple: to implement such a scheme, the first step is to drill a well, and only then build a house. In practice, the opposite happens.
Construction of a water well from A to Z: video
Below are examples of videos that clearly display many stages of well piping:
- Borehole drilling, independent arrangement of a well caisson under water, installation of a deep-well pump in a well, installation and connection of a hydraulic accumulator, automation in the caisson:
- Drilling, constructing a caisson well with your own hands, assembling a pumping station for a submersible electric pump:
- Installation of a steel coffer chamber, installation of a hydraulic accumulator and automation for a submersible electric pump:
- Installation and connection of the pumping station to the well in a caisson chamber made of concrete rings:
When piping a well, they focus on the physical parameters of the source: depth, flow rate, static level, water quality. Based on the listed factors, choose the type of pump (surface or submersible), and then the placement option (caisson, house) and connection (via a head or adapter). The complexity of the filtration system depends on the quality of the water; usually artesian sources require the use of expensive purification systems for removing metal oxides and hydrogen sulfide.
Dimensions of the well protection structure
The dimensions of the protective structure must be such that the installer can easily carry out his work.
Dimensions depend on the installation location of the equipment. If it is not located above the wellhead, 0.8 x 0.8 m is enough for a person to lower the pump. If a pressure accumulator or station is supposed to be installed in the caisson, add at least 0.5 m in front and behind.
If reinforced concrete rings are used to construct a protective structure, the minimum acceptable size is 90 cm, provided that the equipment will be located in the house. Inside the ring with a diameter of 150 cm, medium-sized equipment is placed, leaving space for the installer to work. A circle with a diameter of 200 cm allows you to place a tank with a volume of 200 liters inside.
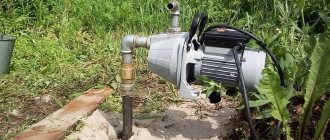
Surface pump for a well.
This type of pump is used if the well is shallow.
The pump type costs less than a submersible installation and is easier to install and maintain.
The most rational and profitable solution would be to purchase a complex pumping station, which is equipped with a surface-type pump, a membrane tank with a volume of up to sixty liters, and automatic control.
A hose is dipped into the source to suck up the water. The size of the hose inside is small; it is actively used for Abyssinian wells; it is impossible to install another type of pump in them.
The disadvantage of the system is the small depth with which the device is capable of operating, a maximum of ten meters.
Attention! The scope of application of pumps is limited to small wells or wells.
The low lifting height dictates the rules for installing the station: it is located at a close distance from the borehole so that the system does not experience hydraulic resistance, which must be overcome on the way to the building where the equipment is located.
Classification of soils by drillability
An important criterion for determining drilling technology, especially if the work is planned to be carried out manually, is the physical and mechanical parameters of the soil. Based on these properties, they are divided into the following classes:
- Bulk. They consist of medium and fine-grained sedimentary rocks that do not retain their shape when excavated. These include sand of any size fraction, gravel, pebble and crushed stone soils. Typically, these types of rocks are easily traversed, but when extracted to the surface they can crumble and make excavation difficult.
- Plastic. These include rocks with a high content of clayey sediments: loams, sandy loams and clays themselves. These soils are more difficult to destroy due to their high density, but are easier to remove to the surface due to sticking to the drilling devices.
- Solid. These are rocky and semi-rocky rocks, the passage of which requires high physical effort. In addition to the fact that they are difficult to destroy, bringing the debris to the surface is also accompanied by technical difficulties.
Rice. 4 Classification of soils
Preparatory work
At the preparation stage, you need to purchase all the necessary equipment:
- a pumping station with a hydraulic accumulator, or a deep-well pump for wells over 20 meters;
- pipes for laying water supply;
- sealant - bitumen mastic or roofing felt;
- cement, sand and fine crushed stone;
- all adapters, fittings, stopcocks - they are calculated according to the previously drawn up water supply diagram.
Also at the preparatory stage you should prepare the necessary tools:
- concrete mixer;
- bayonet and shovel shovels;
- tape measure, building level;
- tamper;
- Master OK;
- formwork boards.
The preparatory stage also includes carrying out earthworks. It is necessary to dig a pit with the required parameters around the casing. A square chamber of 1.5x1.5 m will be sufficient. The depth of the caisson should slightly exceed the soil freezing level. When digging a hole, it is important to take a margin of 20-30 cm to the sides and depth.